


يُعد استبدال العدسة العاكسة من أهم مهام الصيانة لمسدس اللحام بالليزر لضمان الأداء الأمثل وطول العمر الافتراضي. صيانة معداتك أمر بالغ الأهمية، وتقدم هذه المقالة دليلاً شاملاً لإتمام عملية استبدال العدسة العاكسة لرأس اللحام بكفاءة. باتباع الخطوات الموضحة، يمكنك إجراء الصيانة اللازمة بثقة والحفاظ على تشغيل معداتك بسلاسة.
مقدمة
عملية استبدال العدسة العاكسة يُعدّ تلف العدسة أمرًا بالغ الأهمية للحفاظ على الكفاءة والدقة العامة لمعدات اللحام بالليزر. فمع مرور الوقت، قد تتراكم الأوساخ والغبار والحطام على العدسة، مما يؤدي إلى تآكلها وتلفها بشكل كبير. لا يؤثر هذا التدهور على قدرة العدسة على نقل أشعة الليزر وعكسها بفعالية فحسب، بل يؤثر أيضًا على الجودة العامة لمشاريع اللحام. قد تؤدي العدسة التالفة إلى لحامات معيبة، وأداء دون المستوى الأمثل، وحتى إلى زيادة تكاليف الإصلاح. من خلال معالجة هذه المشكلات بشكل استباقي من خلال استبدال العدسة في الوقت المناسب، يمكنك منع انخفاض الإنتاجية وضمان تحقيق معداتك لنتائج دقيقة ومتسقة، مع الحفاظ على المعايير العالية المطلوبة لعمليات اللحام الناجحة.
يُمكّنك هذا الدليل الشامل خطوة بخطوة من استبدال العدسات العاكسة بكفاءة وفعالية دون الحاجة إلى مساعدة متخصصة. سواءً كنتَ محترفًا خبيرًا أو من هواة الأعمال اليدوية، يُقدم هذا الدليل تعليمات واضحة ورؤىً ثاقبة حول كل مرحلة من مراحل عملية الاستبدال. إن التنفيذ الصحيح لهذه الخطوات لا يُعيد معداتك إلى أدائها الأمثل فحسب، بل يُطيل عمرها التشغيلي أيضًا. من خلال الحفاظ على عدساتك خالية من التلوث والتآكل، يُمكنك تجنب فترات التوقف المُكلفة، وتعزيز السلامة، وضمان دقة اللحامات. في نهاية المطاف، يُعد فهم وتطبيق ممارسات الصيانة هذه استثمارًا قيّمًا في موثوقية معداتك ونجاح مشاريعك.
الأدوات والمواد اللازمة
قبل أن تبدأ، ستحتاج إلى جمع الأدوات والمواد التالية:
- مجموعة مفكات البراغي
- شريط لاصق
- عدسة عاكسة بديلة
- قطعة قماش ناعمة أو منديل تنظيف العدسات
إن وجود هذه الأدوات في متناول اليد سيساعدك على تبسيط عملية استبدال العدسات العاكسة ويضمن عدم تفويت أي خطوات مهمة.
خطوات التشغيل التفصيلية
في هذا القسم، سوف نتعمق في الخطوات الدقيقة المطلوبة لنجاح عملية إعادة التدوير.استبدال العدسة العاكسةتم تصميم كل خطوة لتكون سهلة الفهم والمتابعة، مما يسمح لك بصيانة رأس اللحام وإصلاحه بثقة في المنزل أو في ورشة العمل.
الخطوة 1: فك مسامير التثبيت وإزالة الغطاء الخلفي للمحرك
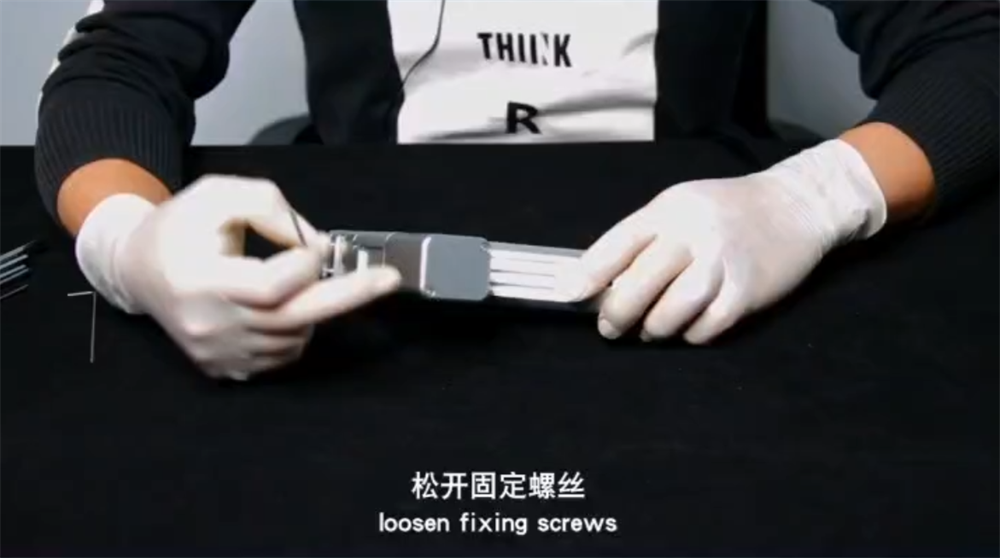
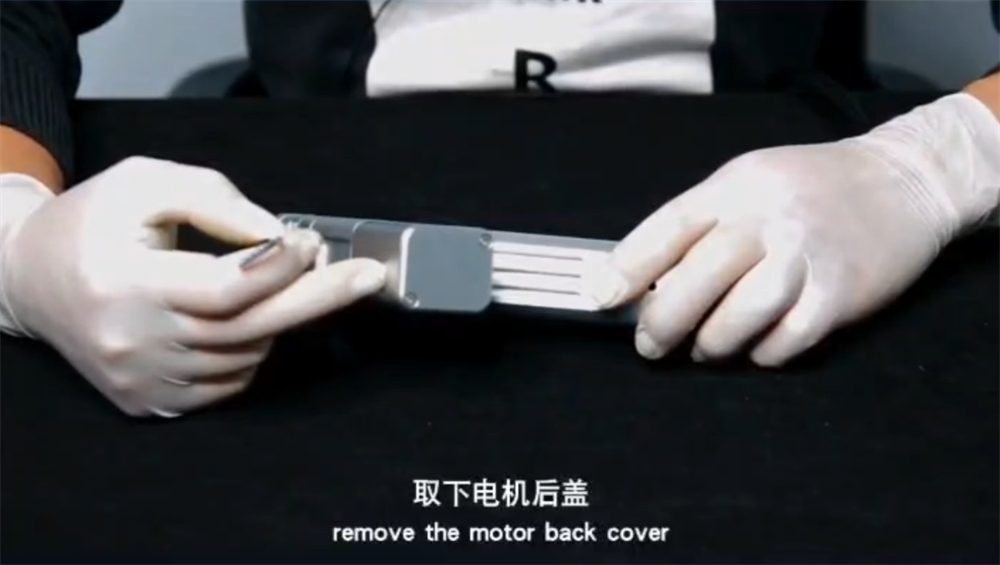

ابدأ عملية استبدال العدسة العاكسة بفك براغي التثبيت على رأس اللحام. انزع الغطاء الخلفي للمحرك بحرص. تتيح لك هذه الخطوة الوصول إلى المكونات الداخلية لرأس اللحام، مما يُمهّد الطريق لاستبدال ناجح للعدسة العاكسة.
الخطوة 2: اسحب الكابل ببطء
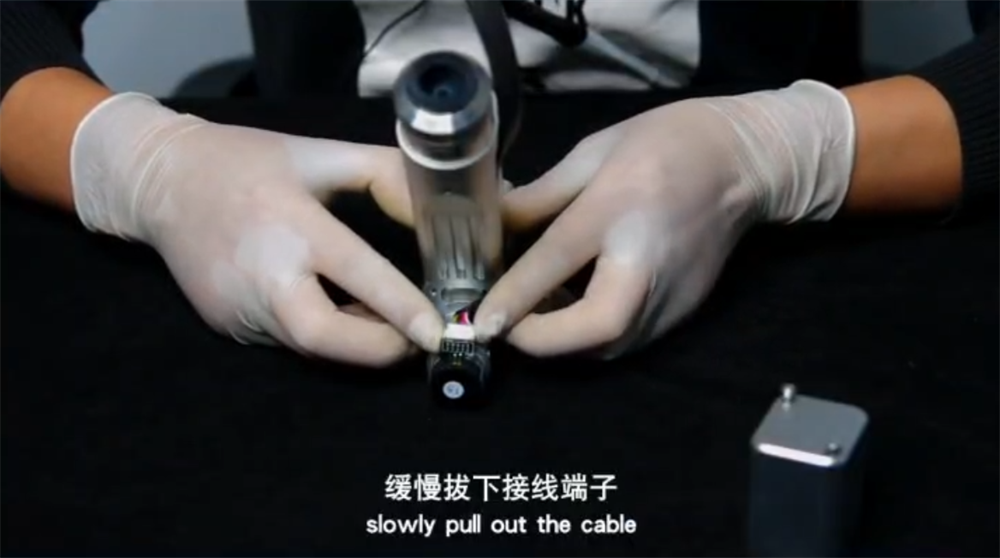
اسحب الكابل برفق لضمان وجود مساحة كافية للعمل أثناء استبدال العدسة العاكسة. احرص على عدم إتلاف الأسلاك أو تشابكها، فقد يُعقّد ذلك إعادة التركيب لاحقًا.
الخطوة 3: فك برغي الضبط العلوي

بعد ذلك، حدد مكان برغي التثبيت العلوي وفكّه. سيسمح لك هذا بسحب وحدة المحرك، وهي خطوة أساسية في عملية استبدال العدسة العاكسة.
الخطوة 4: اسحب وحدة المحرك


اسحب وحدة المحرك بحرص. هذه الخطوة بالغة الأهمية لأنها تتيح لك الوصول إلى الحامل العاكس، حيث سيتم استبدال العدسة العاكسة.
الخطوة 5: التغطية بشريط لاصق لمنع دخول الرماد

لمنع تلوث المكونات الداخلية بالحطام أثناء استبدال العدسة العاكسة، استخدم شريطًا لاصقًا لتغطية المناطق المكشوفة. هذا الإجراء الاحترازي يضمن نظافة ودقة العملية.
الخطوة 6: قم بفك مسامير تثبيت الدعامة العاكسة لاستبدال العدسة العاكسة
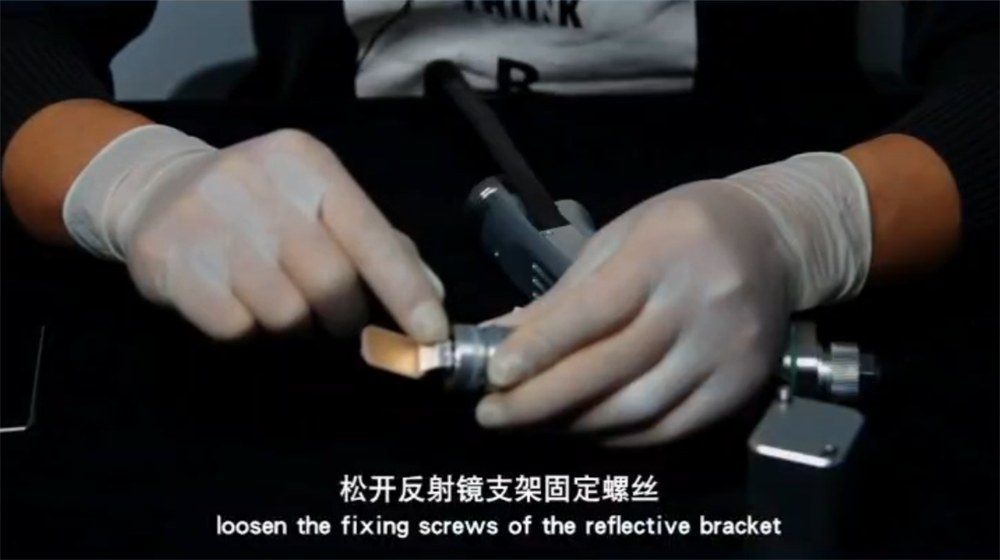
الآن، ركّز على فك براغي التثبيت على حامل العاكس. أزل العدسة القديمة برفق، ثم ابدأ باستبدالها بتركيب العدسة الجديدة. تأكد من التعامل مع العدسة الجديدة بحرص، لأن أي تلف قد يؤثر على أدائها.
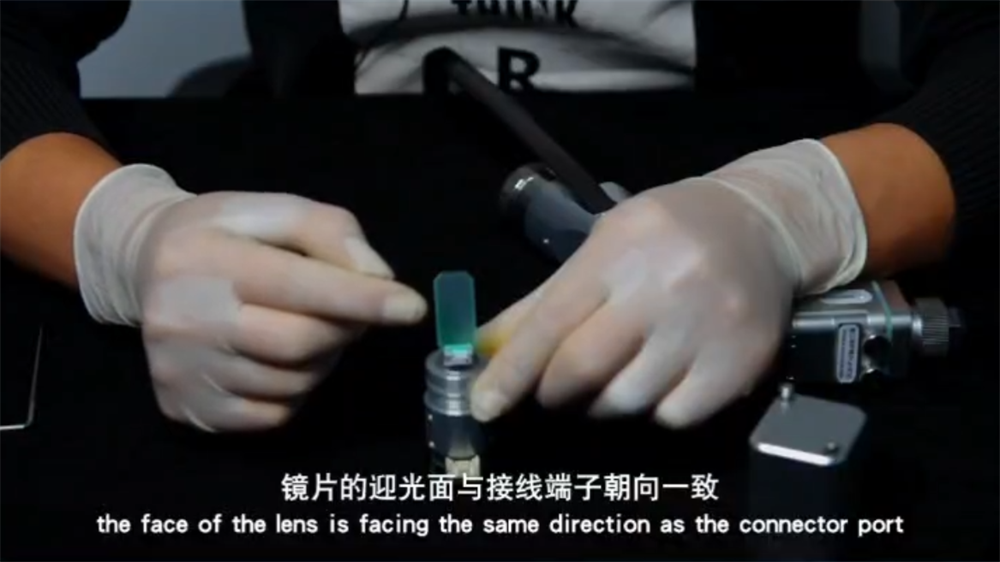
الخطوة 7: كن حذرًا عند تركيب عدسة عاكسة
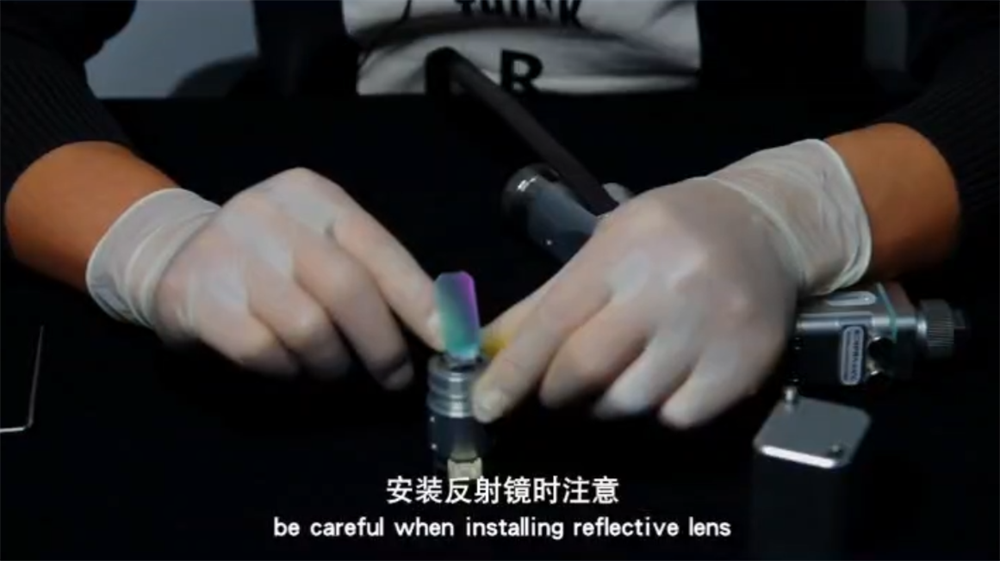
أثناء استبدال العدسة العاكسة، من الضروري تركيب العدسة الجديدة في نفس اتجاه موصل المنفذ. هذا يضمن محاذاة مثالية ووظائف مثالية.
الخطوة 8: ضبط زاوية العدسة العاكسة


لإكمال عملية استبدال العدسة العاكسة الأساسية، اضبط زاوية العدسة. تأكد من تأرجحها من جانب إلى آخر بنفس السعة، مما يضمن محاذاة خصائص الانعكاس بشكل صحيح.
الخطوة 9: قم بتجميع وحدة المحرك مرة أخرى في رأس اللحام

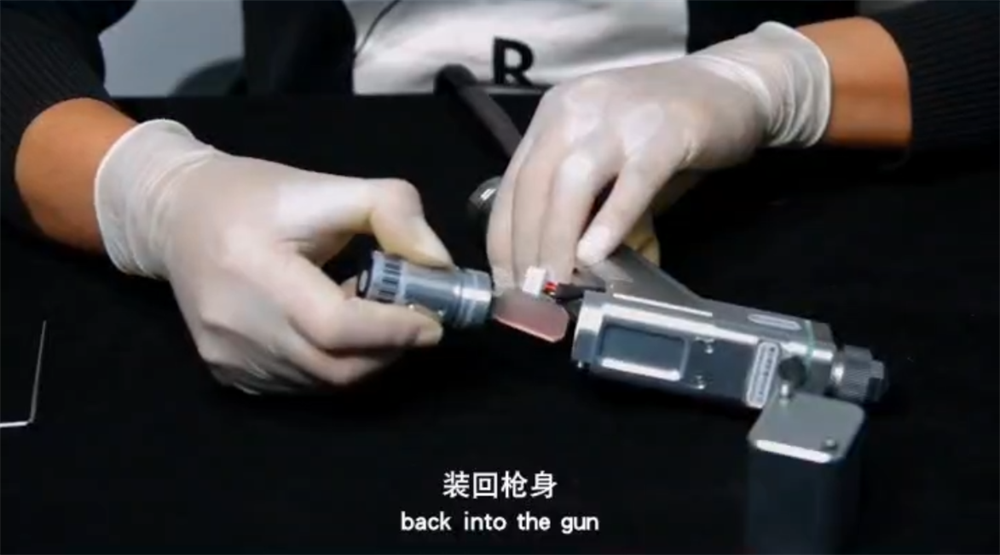
بعد اكتمال استبدال العدسة، أعد تركيب وحدة المحرك بعناية في رأس اللحام. تُعد هذه خطوةً حاسمةً بعد استبدال العدسة العاكسة، لضمان تثبيت جميع المكونات.
الخطوة 10: شد البراغي وأعد توصيل الكابل

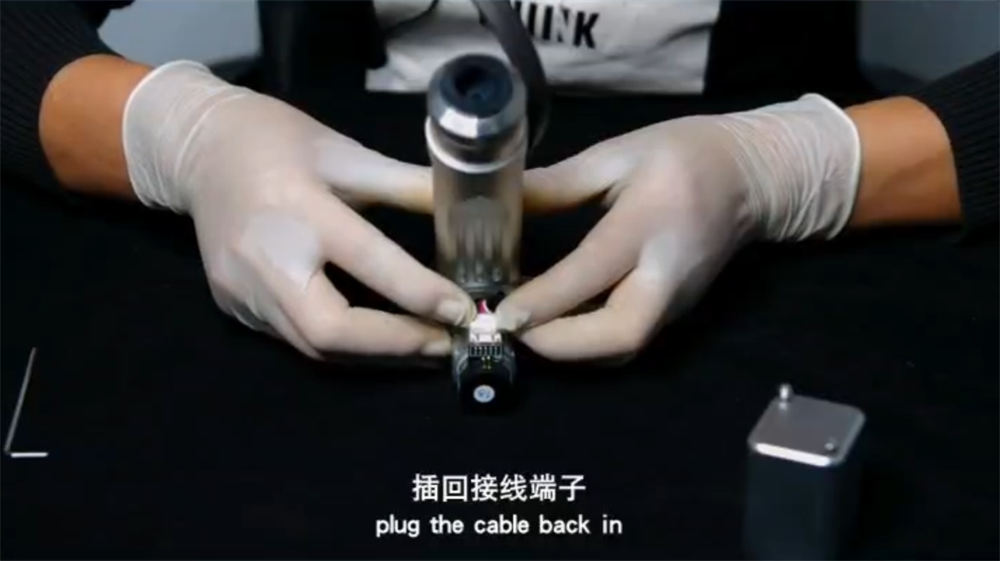
قم بتأمين جميع البراغي ثم قم بتوصيل الكابل مرة أخرى. تنهي هذه الخطوة عملية استبدال العدسة العاكسة من خلال التأكد من أن رأس اللحام جاهز للتشغيل.
الخطوة 11: هل تحتاج إلى تركيز الضوء الأحمر قبل الخطوة التالية؟


بعد استبدال العدسة العاكسة، من الضروري ضبط مركز الضوء الأحمر لضمان دقة وكفاءة التشغيل. المحاذاة أساسية لدقة مسدس اللحام بالليزر.
الخطوة 12: أعد تركيب الغطاء الخلفي للمحرك وشد البراغي
أخيرًا، أعد تركيب الغطاء الخلفي للمحرك وشدّ البراغي، معلنًا انتهاء عملية استبدال العدسة العاكسة. هذا يضمن ثبات كل شيء في مكانه لتحقيق الأداء الأمثل.
خاتمة
استبدال العدسة العاكسة لرأس اللحام بالليزر عملية سهلة وبسيطة، إذا ما تم تقسيمها إلى خطوات سهلة. الصيانة الدورية والاستبدال الفوري للعدسات العاكسة يضمنان بقاء معداتك في أفضل حالاتها، مع تقديم نتائج موثوقة ودقيقة في كل مرة. سيساعدك هذا الدليل على إجراء مهام الصيانة اللازمة بشكل مستقل، مما يوفر لك الوقت والتكاليف المرتبطة بالصيانة الاحترافية.
باتباع هذه الخطوات، ستبقى معداتك في حالة مثالية، مما يوفر لك الأداء الموثوق الذي تتوقعه. تذكر أن استبدال العدسات العاكسة بانتظام هو مفتاح تحقيق أفضل النتائج في جميع مشاريع اللحام.


