


When it comes to mastering CYBELEC CybTouch 12 Programming, understanding how to create an efficient part program is crucial. If you’re seeking guidance on effectively using the CYBELEC CybTouch 12 for your press brake operations, you’re in the right place.
In this article, I’ll walk you through the essentials of creating a part program with the CybTouch 12, ensuring you optimize your metalworking process. Whether you’re a beginner or an experienced user looking to enhance your programming skills, this guide will provide you with valuable insights to boost your efficiency and precision.
Introducción
In the realm of CYBELEC CybTouch 12 Programming, there are three primary ways to create a part program: using TouchProfile Mode, Numerical Mode, and L-Alpha Mode. For effective programming, it is essential that the machine is fully operational with all parameters, tools, and materials already configured. This ensures a seamless process in creating part programs, enhancing both efficiency and accuracy in your metalworking tasks.
TouchProfile Mode

In this mode, the operator can very intuitively draw a profile directly on the screen.
SETTING INSTRUCTIONS:
1. Touch the program number, select Nuevo programa in the list, and touch Gráfico.
2. First select the material, the Material thickness and the tools to be used for the part by touching their respective icons.
3. Draw the profile by touching the screen where you want to add a segment.

Touching this icon

allows erasing the last segment added.
4. Touch on the middle of a segment to modify its value.
5. Touch on an angle to modify its value.
Touching the

icon will open a yellow pop-up, in which it possible to:
- Activate (and deactivate) a special tool by touching its icon, and select it from a list by pressing.
- Change the value of the radius (see also Step bending) and define how many steps the NC will make to execute it.
6. Should it prove difficult to select a particular segment or angle, it is possible to zoom on an area by touching this button and then on the desired zone.

One can also choose to enter the length and angle values in the L-Alpha Mode page by pressing this

botón.
7. Once all the segments and angles are adjusted, press this button

to access Secuenciación de curvas.
Secuenciación de curvas
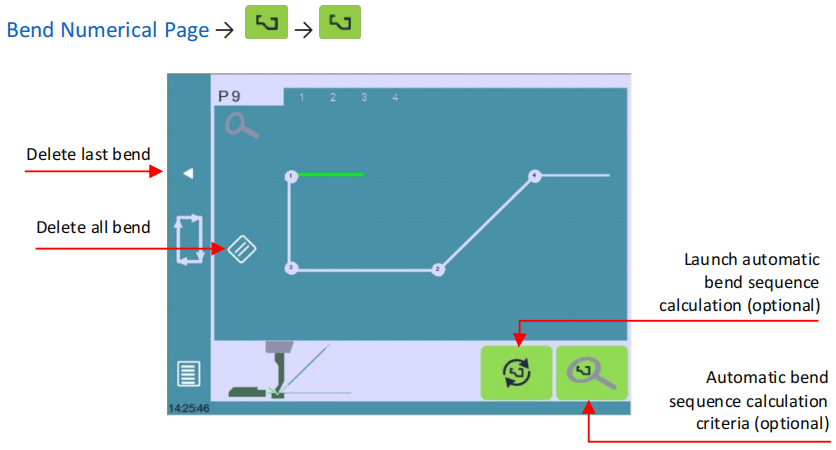
Once the shape of the part has been defined, the bending sequence for the part can be determined.
SETTING INSTRUCTIONS:
- Start by touching the bend sequence calculation button, if available, to access the Bend 2D screen.
2. For manual sequencing, touch each bend in the preferred order. A number will indicate its position.
Use the back button to remove the last bend, f you wish to delete all bends, simply touch the
botón.
3. The Bend 2D screen will appear after selecting the last bend.

4. Set the back gauge and part position for each bend, adjusting Extra Bending Parameters if needed.
5. Navigate back to the Página numérica de curvatura.
6. Activate the hydraulic pump motor by pressing the button

, turning it red.
7. Position the machine using the COMENZAR botón.
8. A DE ACUERDO button will display when the machine is ready to bend.
9. Switch to Modo semiautomático to make corrections.
10. Execute the bend using the foot switch.
These steps will guide you in mastering CYBELEC CybTouch 12 Programming efficiently.
Numerical Mode
It is also possible to simply create a part program directly on the Bend Numerical Page.
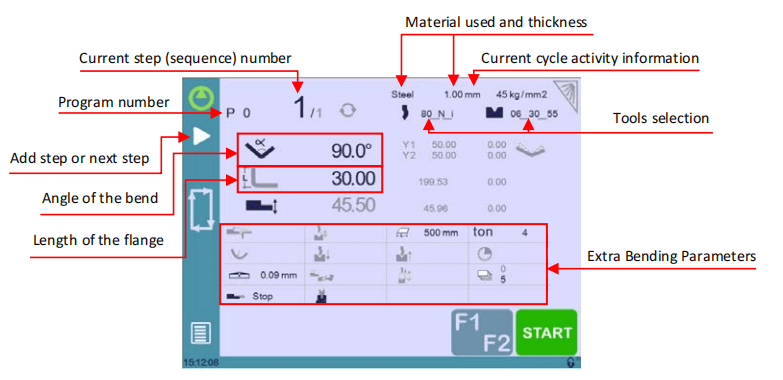
SETTING INSTRUCTIONS:
- Seleccionar Nuevo programa under Numerical.
2. Choose your tools by tapping their icons(see Tools Management).
3. Select the material (e.g., Steel) and enter its thickness.
4. In Parámetros de flexión adicionales, set Bending length and sequence details like Opening (TDC).
5. Enter the angle for the first bend (e.g., 90°).
6. Input the first segment length (e.g., 30.00 mm).
7. Add subsequent bends as needed.
8. Start the hydraulic pump motor. (by pressing this button
if available.
9. Press the START button to position the machine using your data.
10. Ready the machine for bending and adjust in Modo semiautomático Si es necesario.
11. Execute the bend with the foot switch.
Modo L-Alfa
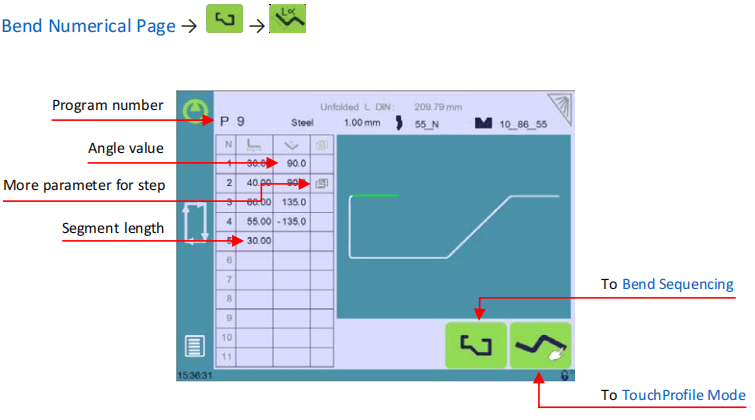
For effective CYBELEC CybTouch 12 Programming, enable the “Show page L-alpha” setting. This allows you to define each profile step, whether length or angle, directly on a table for precise customization.
SETTING INSTRUCTIONS:
- Create a New Program: Touch the program number, select “Nuevo programa“, and choose “Gráfico“.
2. Enter L-Alpha Mode: Press the button
to enter L-alpha mode.
3. Select Material and Tools: Choose the material, thickness, and required tools by tapping their icons.
4. Input Segment Lengths: Tap the first table value, enter the segment length, and add steps. Click OK to confirm.
5. Repeat for All Steps: Input all profile steps and angles similarly.
6. Manage Special Bends: For special parameters (large radius, unique tools), use the “More” field and follow the yellow pop-up instructions.
7. Activate Special Tools: Choose special tools from a list in the yellow pop-up, adjust radius values, and set execution steps.
8. Finalize and Sequence: Once all are set, press the button
para Secuenciación de curvas.
Doblado y correcciones
In CYBELEC CybTouch 12 Programming, program corrections are handled in the Página numérica de curvatura. Operators can choose to apply corrections step-by-step or use the Modo semiautomático to adjust a step before proceeding. Key areas for correction include the angle (Y1 + Y2, with options for angle correction and crowning) and the back-gauge position (X and R axes).
Modo semiautomático
In CYBELEC CybTouch 12 Programming, the semi-automatic mode lets you repeat a sequence until perfect. Operators can make bend corrections step-by-step, repeating until satisfied.

Activate or deactivate by holding the button for over a second, ensuring precision and efficiency.
Angle Correction (Y axis)
In CYBELEC CybTouch 12 Programming, always apply corrections on the designated page after measuring angles, not directly in the program step, to ensure accuracy.
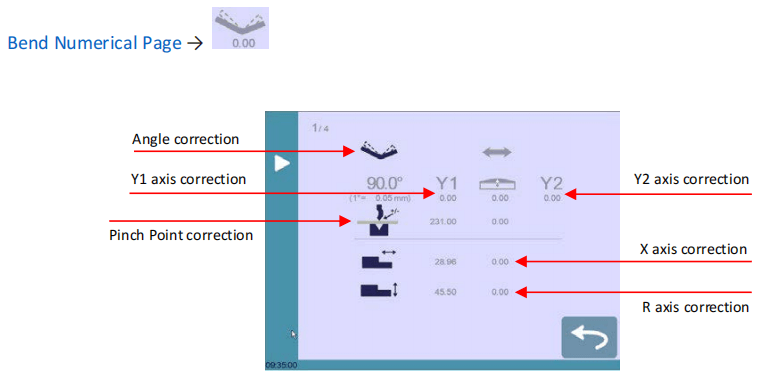
INSTRUCCIONES DE AJUSTE:
- Adjust Angle: Input measured angles via the angle correction icon to let CYBELEC CybTouch 12 adjust Y1 and Y2 axes automatically. Reset all corrections with a button.

2. Beam Fine-Tuning: Correct beam position based on sheet metal placement using the Y1/Y2 axis correction icon.
3. Crowning Correction: Tap the icon

to modify the crowning value.
4. Pinch Point Adjustment: Correct the Pinch Point height as needed by selecting the Pinch Point correction icono.
5. Back-Gauge X Axis:Utilice el X axis correction icon to adjust the back-gauge X axis position.
6. Back-Gauge R Axis: Make R axis corrections by tapping the R axis correction icono.
The greyed values next to the back-gauge correction icons are the value calculated by the numerical control, and thus the values onto which the corrections will be applied. The back-gauge positions corrections can also directly be made on the Página numérica de curvatura.

Función de siguiente parte
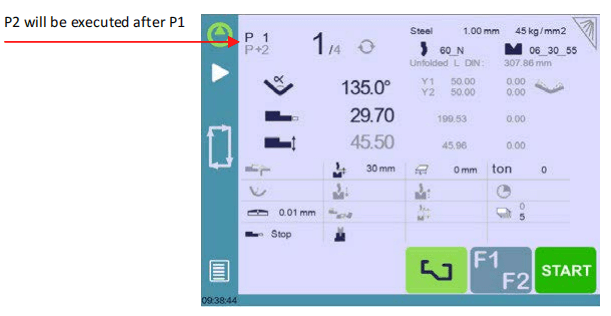
One of the most valuable features of CYBELEC CybTouch 12 Programming is the ability to run multiple part programs consecutively. This is particularly useful when creating complex three-dimensional parts, such as a box, or assembling a final product from several parts.
With CYBELEC CybTouch 12, the current program is executed, and upon reaching the last sequence, it automatically switches to the next designated program (P+nn), ensuring seamless continuity in your production process. This functionality streamlines operations and enhances the efficiency of creating multi-part components.
INSTRUCCIONES DE AJUSTE:
1. To activate the Next-Part function, touch the Program name and keep it pressed until the following list is displayed.

2. Select from the list the name of the program that must be executed at the end of the current one.
3. Guarde el programa.
4. To delete the P+ program, select the same program from the P+ list. (or delete the P+ program).
Cycles and Quantities
CYBELEC CybTouch 12 Programming allows seamless cycling of programs, looping back to the start. For example, in a three-program assembly, program 1 leads to program 2, then program 3, which cycles back to program 1. This setup ensures the part counter increments by one from program 3 to 1, optimizing your programming flow.

Exporting a Program from VisiTouch Offline Software to CybTouch
Once a part have been created with Visitouch offline, it is possible to save it for a next use on a CybTouch. Please proceeds as follow.
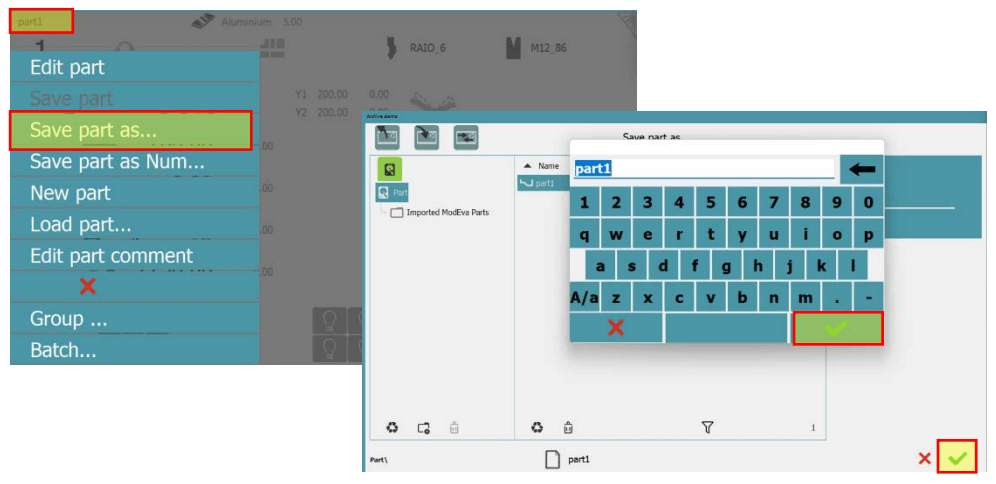
1. Create a part and save it.
2. Export your part by clicking on part / Load part.
3. Select the program and tick the box CybTouch to convert the file.
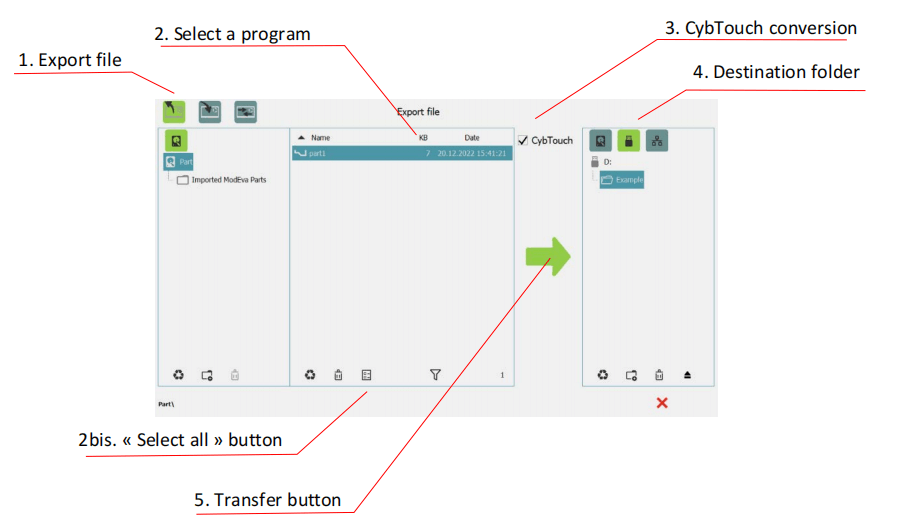
Tips: Create a folder “DataCybT” on your USB memory stick and save your part – tools program in this folder. Doing this, the program list will appear directly when the USB key is plugged in the controller.
Preguntas frecuentes (FAQ)
What is the most efficient way to start programming on the CYBELEC CybTouch 12?
Begin by familiarizing yourself with the interface and exploring sample programs. Input precise measurements and utilize on-screen prompts to guide you through each step. Using these features will enhance your programming efficiency.
How can I ensure my CYBELEC CybTouch 12 is calibrated for accurate programming?
Regular calibration is key. First, ensure the machine is level, then use a digital gauge to measure and adjust the angle of the bending die as needed. Consistent calibration supports precise CYBELEC CybTouch 12 programming.
Can CYBELEC CybTouch 12 Programming handle complex bends?
Yes, CYBELEC CybTouch 12 is equipped to handle complex bends. It’s important to accurately input the bending sequences and use the simulation feature to verify the design.
Conclusión
Dominando el CYBELEC CybTouch 12 Programming requires understanding the key steps involved in creating a part program. By following the outlined process, you can efficiently design and execute precise bending operations. Key steps include setting up the parameters, entering the required dimensions, and simulating the process to ensure accuracy.
To take your programming skills to the next level, consider exploring additional resources or contacting our team for personalized support. For further details, don’t hesitate to reach out to us or browse other related documentation to enhance your expertise with CYBELEC CybTouch 12.


