https://www.youtube.com/watch?v=c3lX3gjhngALuchando contra la ineficiencia o los malos resultados en el corte por láser ¿Proceso? Descubra técnicas probadas para dominar la precisión y la eficiencia sin esfuerzo en sus operaciones.
Para dominar el corte por láser En el proceso, se centran en tres factores clave: seleccionar la configuración láser correcta, asegurar la preparación adecuada del material y realizar el mantenimiento regular de la máquina. Optimizar estos aspectos mejora la precisión, reduce errores y optimiza la eficiencia, garantizando así proyectos de corte láser impecables.
¿Listo para profundizar más? Exploremos cada paso a detalle para perfeccionar tus habilidades de corte láser.
Proceso de corte por láser
Corte por láser Proceso que utiliza un rayo láser para cortar materiales con alta precisión. El rayo láser se dirige al material a cortar, lo que provoca que este se funda, se queme, se vaporice o sea expulsado por un chorro de gas, según el tipo de láser y el material a cortar.
El haz láser se genera típicamente mediante un resonador láser y se enfoca mediante una serie de espejos y lentes antes de dirigirse al material. El haz láser enfocado tiene una alta densidad de potencia, lo que le permite fundir o vaporizar el material en el punto de contacto, creando un corte estrecho con gran precisión.
El corte por láser permite cortar una amplia gama de materiales, como metales, plásticos, madera, papel y telas. Se utiliza comúnmente en la fabricación para cortar y dar forma a piezas y componentes para diversas aplicaciones, como la aeroespacial, la automoción, la electrónica y los dispositivos médicos.
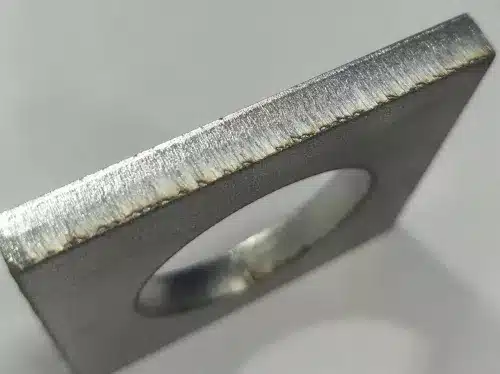
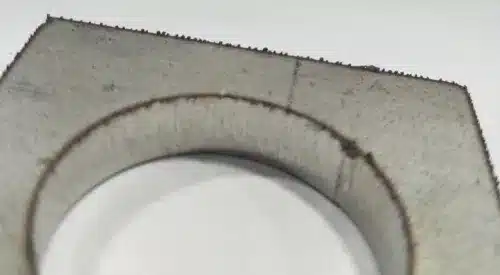
El corte por láser es un proceso versátil y eficiente que ofrece varias ventajas sobre los métodos de corte tradicionales, como alta precisión, velocidad y repetibilidad. Además, produce un corte limpio y preciso sin necesidad de procesos secundarios como lijado o pulido.
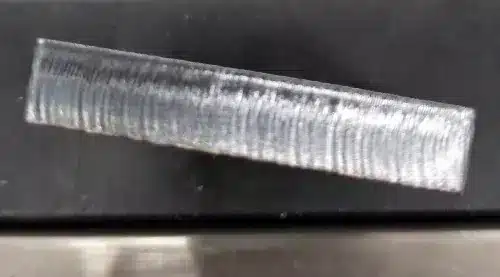
Acero carbono
| Problema | Razón | Solución |
 | 1. Presión atmosférica | 1. Reducir la presión del aire |
 | 2. Enfoque bajo. 3. La boquilla es demasiado grande. | 2. Mejorar el enfoque. 3. Usar una boquilla pequeña. |
| En la parte inferior aparecen arrugas en capas. | ||
 | 1. Presión de aire excesiva. 2. La velocidad de corte es demasiado lenta. | 1. Reducir la presión del aire. 2. Acelerar el corte. |
| Aparecen pequeñas rayas en la sección. | ||
 | 1. Presión de aire baja. 2. Enfoque demasiado bajo. 3. Boquilla pequeña. 4. Velocidad de corte rápida. | 1. Aumentar la presión del aire. 2. Mejorar el enfoque. 3. Cambiar la boquilla grande. 4. Reducir la velocidad de corte. |
| Hay escoria de soldadura y puntos de soldadura en la parte inferior. | ||
 | 1. Demasiada energía. 2. Presión de aire excesiva. 3. Velocidad de corte demasiado lenta. | 1. Reducir la potencia máxima. 2. Reducir la presión del aire. 3. Acelerar el corte. |
| Quemado en la parte inferior | ||
 | 1. Luz polarizada. 2. Proteja la lente de la suciedad. 3. La velocidad de corte es demasiado rápida. 4. La boquilla no es redonda o está obstruida. | 1. El centro de atenuación 2. Limpie la lente protectora o reemplácela 3. Reduzca la velocidad de corte 4. Reemplace la boquilla |
| Mal corte al costado | ||
 | 1. La velocidad de corte es demasiado lenta | 1. Acelerar la velocidad de corte |
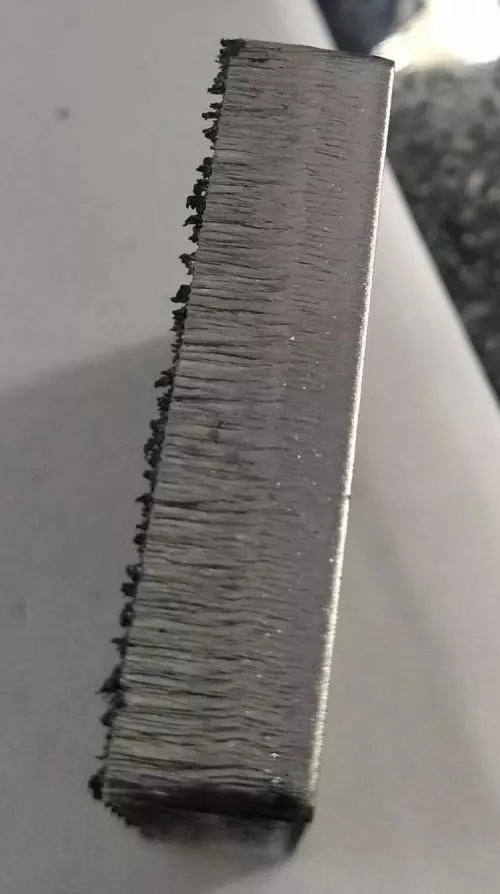
| Pequeñas líneas finas en la sección con hierro fundido en la parte inferior. | ||
 | 1. La velocidad de corte es demasiado rápida. 2. La presión del aire es demasiado baja. 3. Enfoque incorrecto. | 1. Reduzca la velocidad de corte. 2. Aumente la presión del aire. 3. Ajuste el enfoque. |
| Metal caliente en la superficie | ||
 | 1. La velocidad de corte es demasiado rápida | 1. Reducir la velocidad de corte |
| Sarga seccional | ||
 | 1. El enfoque es demasiado alto. 2. Presión de aire excesiva. | 1. Reducir el enfoque 2. Reducir la presión del aire |
| Hay rayas finas en la sección superior del corte. | ||
 | 1. El calor de giro es demasiado alto | 1. Redondea las esquinas afiladas. 2. Usa puntos de enfriamiento. 3. Usa la curva de potencia. |
| Quemadura de cuerno |
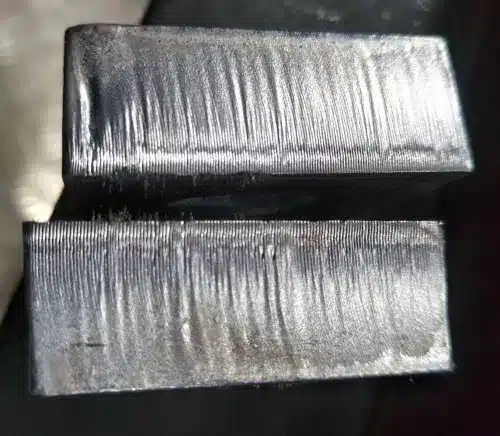
Artesanía en acero inoxidable
| Problema | Razón | Solución |
 | 1. El enfoque es demasiado alto. 2. La presión del aire es demasiado baja. | 1. Reducir el enfoque |
| Escoria dura rayada colgando en el fondo | ||
 | 1. Enfoque excesivo. 2. La altura de la boquilla de corte es demasiado baja. 3. Presión de aire excesiva. | 1. Reducir el enfoque. 2. Aumentar la altura de la boquilla. 3. Reducir la presión del aire. |
| La parte inferior de la sección es blanquecina. | ||
 | 1. El enfoque es demasiado alto | 1. Reducir el enfoque |
| Amarillamiento en la parte inferior de la sección | ||
 | 1. Demasiado rápido. 2. Enfoque bajo. | 3. Reducir la velocidad de corte. 4. Mejorar el enfoque. |
| Pequeñas rebabas en forma de gotas en la parte inferior | ||
 | 1. Alto enfoque | 1. Reducir el enfoque |
| Restos de esquina | ||
 | 1. Proteja la lente de la suciedad. | 1. Reemplace la lente protectora |
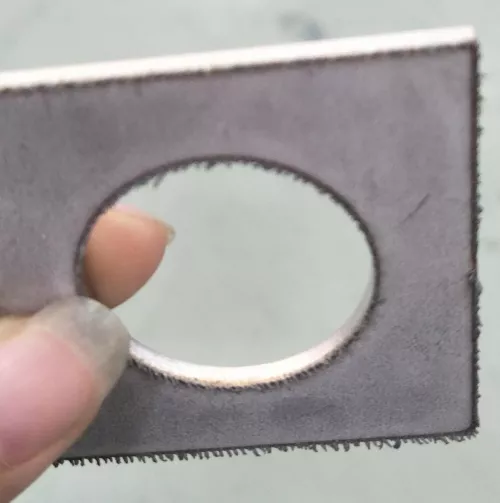
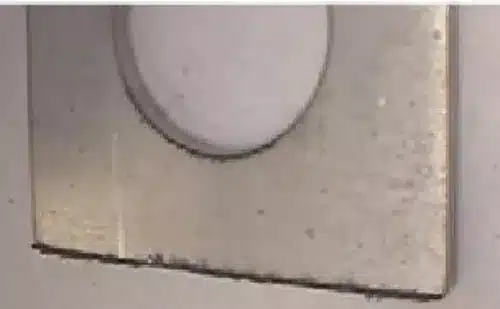
| La ranura se hace más ancha | ||
 | 1. El enfoque es demasiado bajo. 2. La velocidad de corte es demasiado rápida. 3. La cuchilla no está ajustada. | 1. Mejore el enfoque. 2. Reduzca la velocidad de corte. 3. Use un punto de inicio lento para iniciar el cuchillo o use un orificio redondo en el punto de inicio de la mina para introducirlo. |
| Sección rugosa, aparece luz azul en la costura durante el corte. | ||
 | 1. Luz polarizada. 2. Proteger la lente de la suciedad. 3. El cable coaxial no es bueno. 4. La boquilla no es redonda. | 1. Verifique el centro de la luz. 2. Limpie o reemplace la lente protectora. 3. Verifique el cable coaxial. 4. Reemplace la boquilla. |
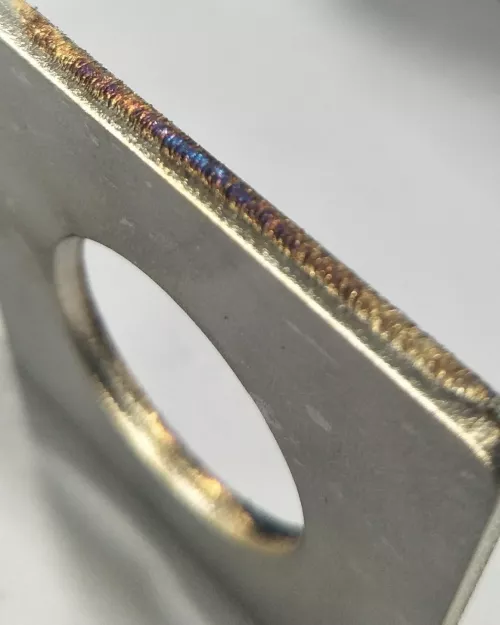
| Un lado o ambos lados no están bien cortados, el otro lado está bien cortado | ||
| 1. El gas es impuro. 2. Aire u oxígeno en la tráquea. | 1. Requisito de pureza de nitrógeno: 99.99%2. Verificar la ruta del gas. 3. Verificar el retardo. |
| Sección amarilla |
Proceso de perforación de acero al carbono
| Problema | Razón | Solución |
 | 1. Frecuencia de perforación demasiado alta. 2. Fuerza de perforación excesiva. 3. Presión de aire excesiva. | 1. Reduzca la frecuencia en 10% cada vez. 2. Reduzca el ciclo de trabajo en 1%-2% cada vez. 3. Reduzca la presión de aire en 0,1 bar cada vez. |
| Pozo ligero | ||
 | 1. Frecuencia de perforación demasiado alta. 2. Fuerza de perforación excesiva. 3. Presión de aire excesiva. | 1. Reduzca la frecuencia en 10% cada vez. 2. Reduzca el ciclo de trabajo en 1%-2% cada vez. 3. Reduzca la presión de aire en 0,1 bar cada vez. |
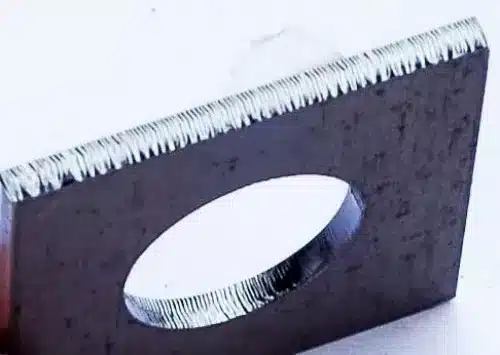
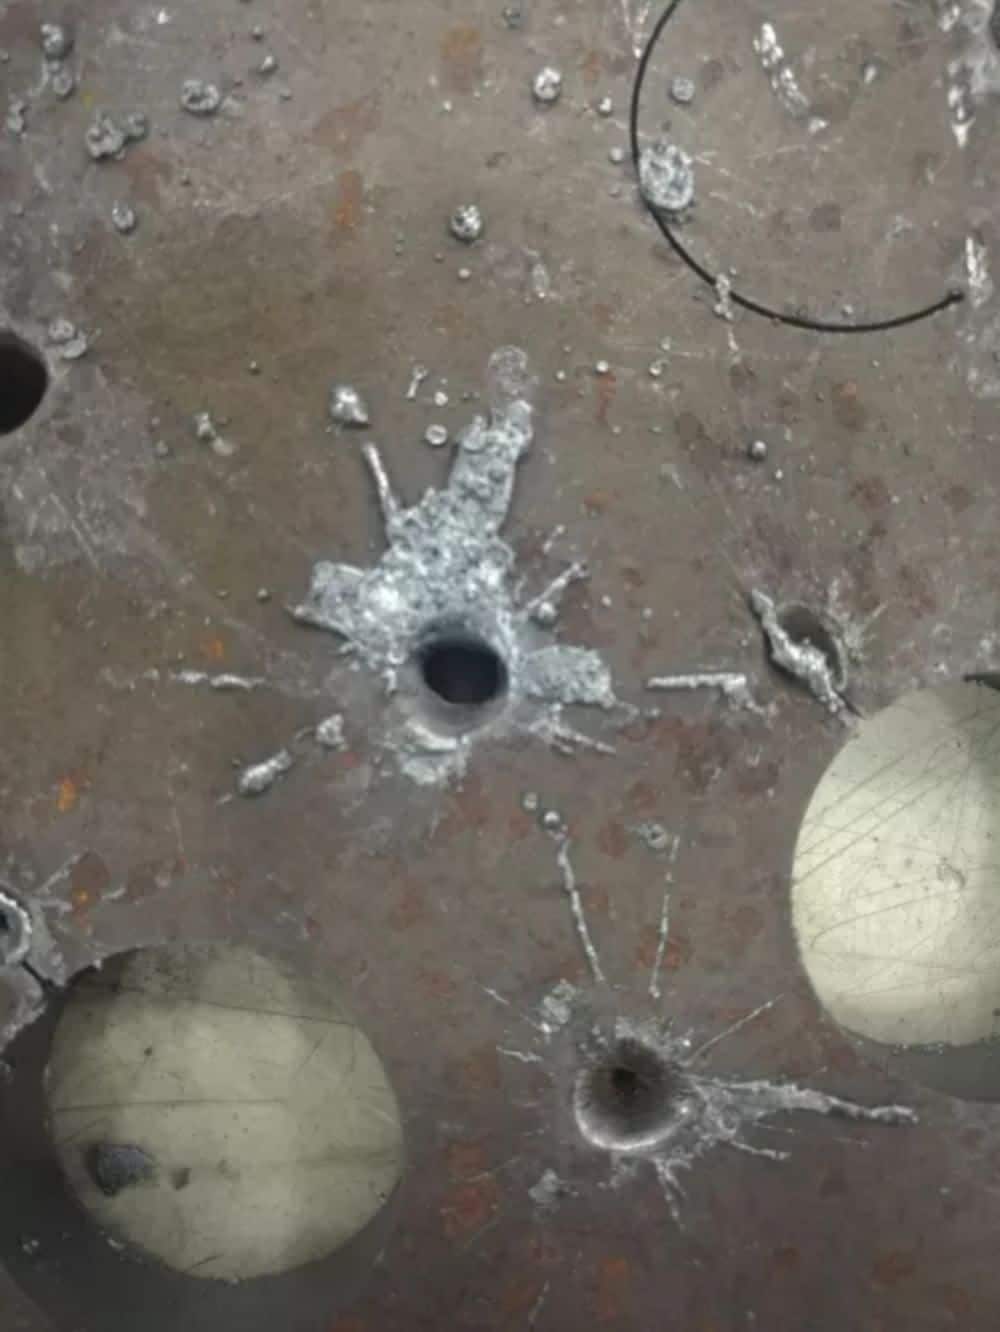
| Agujero de explosión durante la perforación | ||
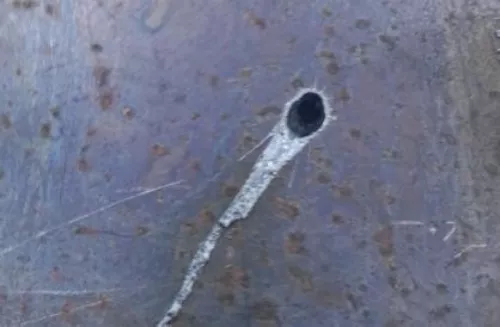 | 1. Tiempo de perforación insuficiente. 2. La potencia de perforación es baja. | 1. Aumente el tiempo de punzonado en 0,5 segundos cada vez. 2. Aumente la potencia de punzonado en 51 TP3T cada vez. 3. Aumente el ciclo de trabajo cada vez. |
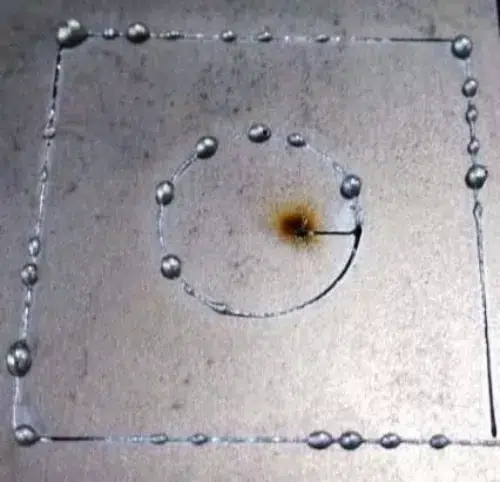
| Fin de la perforación y comienzo del corte del barreno. |
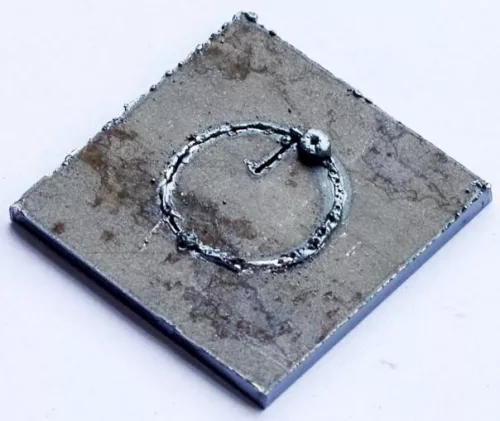
1. La voladura inicial común se divide en tres etapas. El orden de perforación es de tres niveles, dos niveles y un nivel posterior al corte. Por ejemplo, en el primer segmento de la voladura inicial, es necesario ajustar los parámetros de perforación de tres niveles.

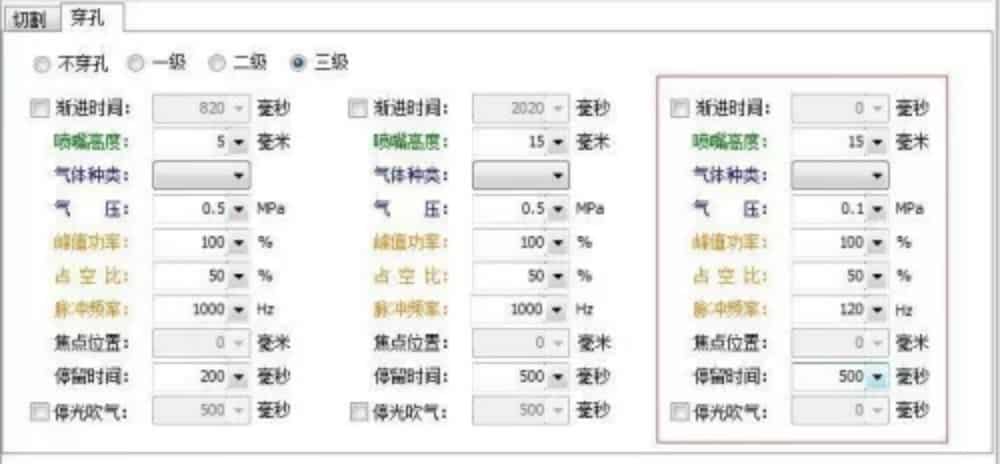
Como se muestra en la imagen superior, el agujero se perfora al inicio de la perforación de tres niveles. Primero se selecciona la placa gruesa Hongshan. El método de procesamiento es el siguiente.
1. Verifique si la presión del aire de perforación excede el estándar, generalmente la presión del aire de perforación está entre 0,04 mpa y 0,15 mpa.

2. Verifique la altura de la boquilla, la altura de chorro generalmente está entre 12 mm y 20 mm.
3. Alargar el tiempo de progresión y el tiempo de residencia de la perforación es la forma más directa de reducir la velocidad de la perforación.
4. Reducir la frecuencia de perforación o el ciclo de trabajo de perforación puede abordar la voladura, la frecuencia promedio es de 50 HZ a 1000 HZ, ciclo de trabajo 30% a 70%.
5. Se debe verificar el cese del soplado de aire para ayudar a eliminar la escoria generada durante la perforación.
6. El óxido u otras etiquetas adheridas a la placa también afectarán la calidad de la perforación.
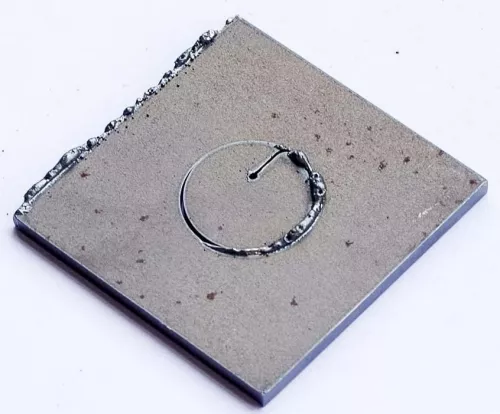
Como se muestra en la figura a continuación, al perforar el segundo y tercer polo, la voladura es la misma. El enlace específico se dinamita, por lo que debe modificarse.
Como se muestra en la imagen de la izquierda, la voladura se produce cuando la perforación alcanza la segunda etapa. Es necesario verificar varios factores importantes que afectan la perforación en esta segunda etapa.
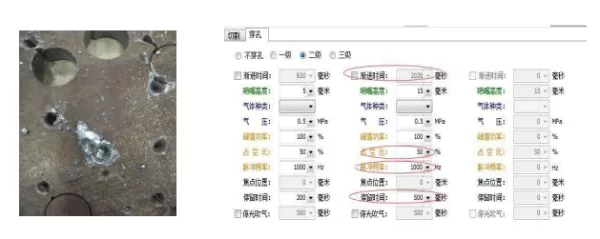
Nota: En general, alargar el tiempo de perforación y el tiempo gradual, reduciendo el ciclo de trabajo y la frecuencia es una forma directa de ralentizar la voladura de plomo.
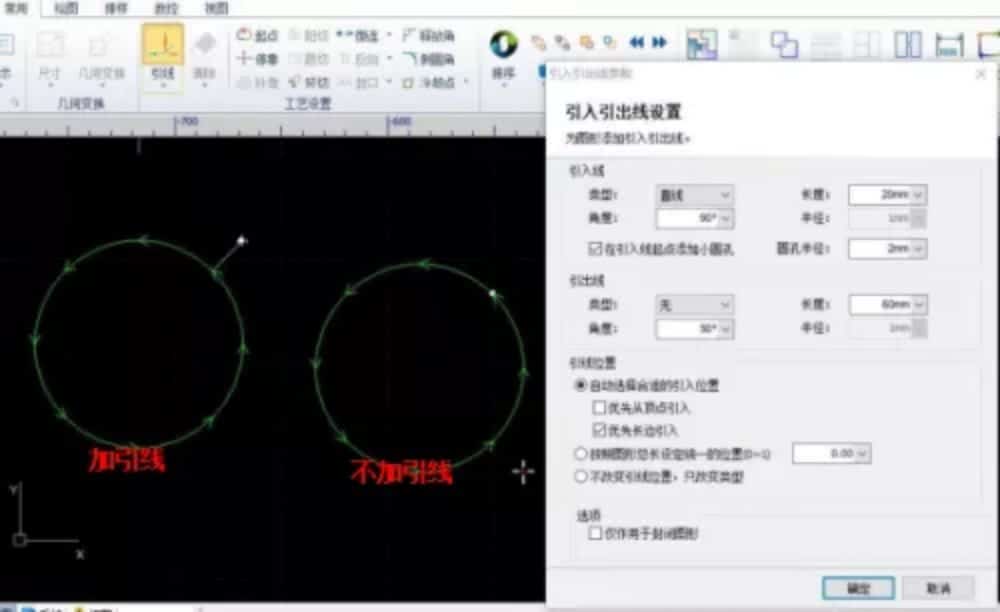
Línea de entrada: línea que conecta la posición de punzonado y el contorno de la pieza de trabajo, llamada línea de entrada o línea de entrada.