


If you’re just starting with ESTUN E300 Programming, you’re in the right place. Many beginners are eager to unlock the potential of this versatile control system, and my goal is to provide you with essential beginner tips to get you started. In this article, I’ll guide you through the initial steps and share key insights that can streamline your programming journey. ESTUN E300 Programming is known for its efficiency and flexibility, and by the end of this guide, you’ll have the foundational knowledge to make the most out of your programming efforts. Whether you’re looking to improve precision or simply understand the basics, this guide is tailored to meet your needs.
Page Structure
When working with ESTUN E300 Programming, understanding the page structure is essential for efficient navigation. Power up the device and wait for a while; the screen will automatically display the initial page (Single-Step), as shown in Figure 2-1.
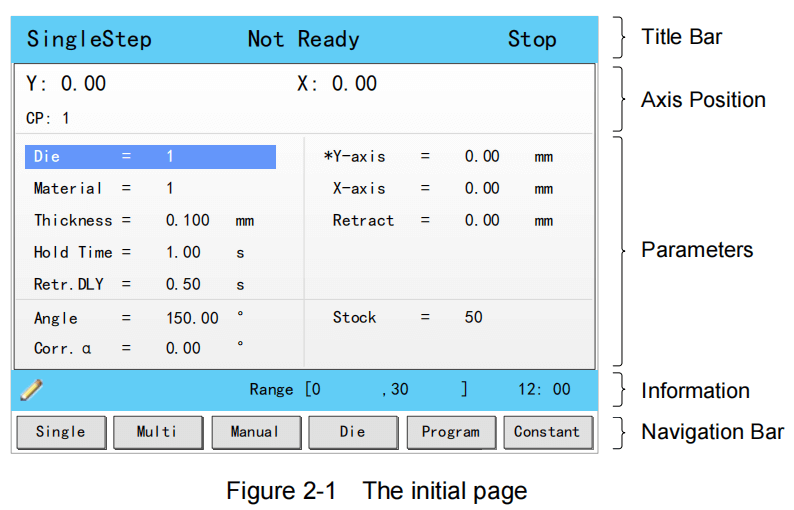
Title Bar
This area is displayed on every page, and from left to right are Page Name, System Status, et Operation Mode in turn.
- Page Name: displayed the current page’s name, e.g. SIngleStep, Multi, Program.
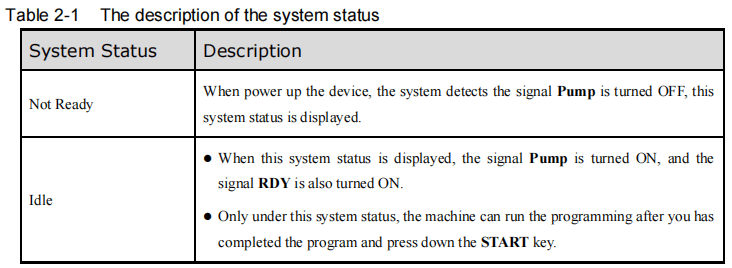
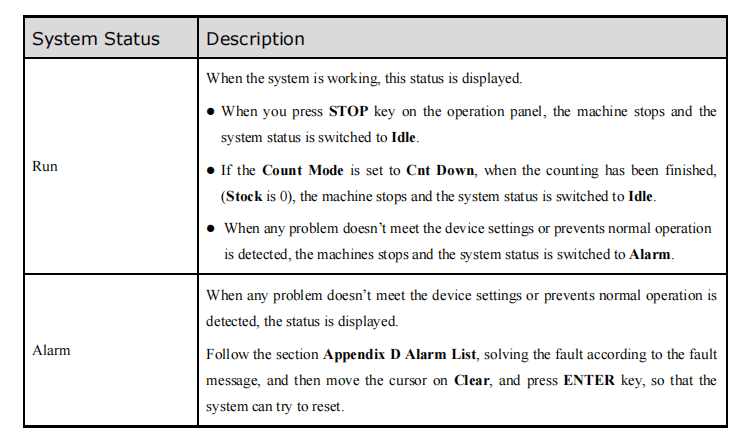
- System Status: displayed the current system status. There are six system statuses, as shown in Table 2-1.
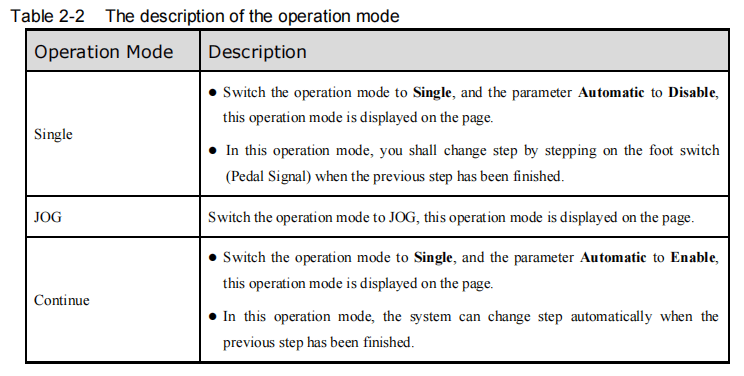
Operation Mode: displayed the current operation mode. There are three operation modes, as shown in Table 2-2.
Axis Position
When delving into ESTUN E300 Programming, understanding the Axis Position is crucial. This display shows the current position values of the axes, crucial for precise control. Typically, the default E300 device supports standard X-axis and Y-axis control. For more advanced features, contacting ESTUN is recommended.
Paramètres
This area displays the parameters information. Each page has corresponding parameters.
Information
In the ESTUN E300 Programming interface, this section shows the details of each parameter, such as editing values and ranges. On the right side, you’ll also find the system time for easy reference.
Navigation Bar
When starting with ESTUN E300 Programming, it’s important to familiarize yourself with the basics, such as the Navigation Bar. This section corresponds to the F1 à F6 keys on the operation panel and allows you to switch between main pages easily. For a quick understanding, refer to the descriptions provided in Table 2-3 of your user manual. These foundational elements will support your journey in mastering ESTUN E300 Programming.
Table 2-3 lists the descriptions of each main page.

By familiarizing yourself with this page structure, you’ll gain a better understanding of how to maneuver through the various functions and settings in ESTUN E300 Programming, ensuring a smoother programming experience.
Single-Step
When beginning with ESTUN E300 Programming, you can program the bending steps for the same settings on the initial page, commonly used for quick bending. This page appears right when you power up the device. Simply press the F1 key to enter the Single-Step page, as shown in Figure 2-3.
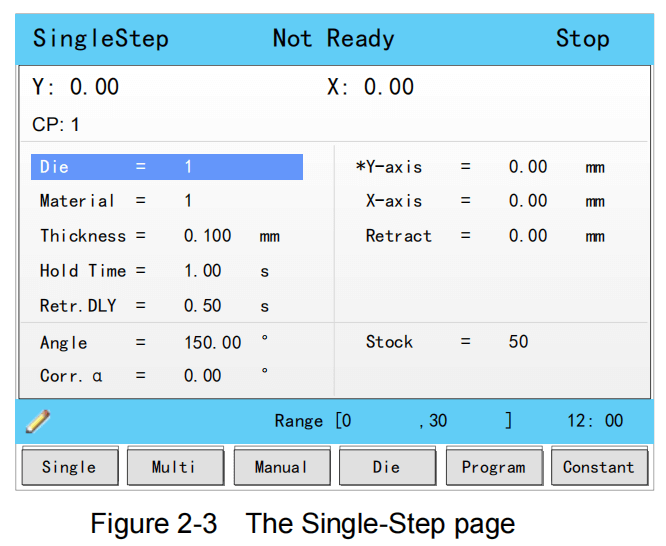
For ease of use, Table 2-4 provides a description of the parameters on this page, serving as a handy reference when editing these parameters.


Exemple
In the context of ESTUN E300 Programming, let’s use a simple example to illustrate the process.
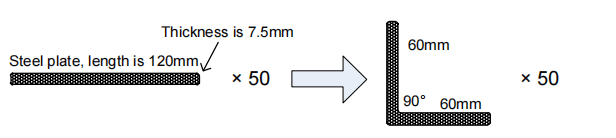
Consider programming a steel plate with a length of 120mm. We’ll break it down as follows: X-axis at 60mm, a bending angle of 90°, and a thickness of 7.5mm. The stock is set at 50. We choose to program by the specified angle, assuming the die ID is 1.
Based on experience, we’ll include additional parameters like a holding time of 3, a retracting delay of 2, and a retract distance of 5. Follow these concise steps to execute the ESTUN E300 program:
- Navigate to Die and input 1.
- Navigate to Matériel and enter 1.
- Navigate to Épaisseur and input 7.5.
- Navigate to Hold Time and enter 3.
- Navigate to Retr. DLY and input 2.
- Navigate to X-axis and type 60.
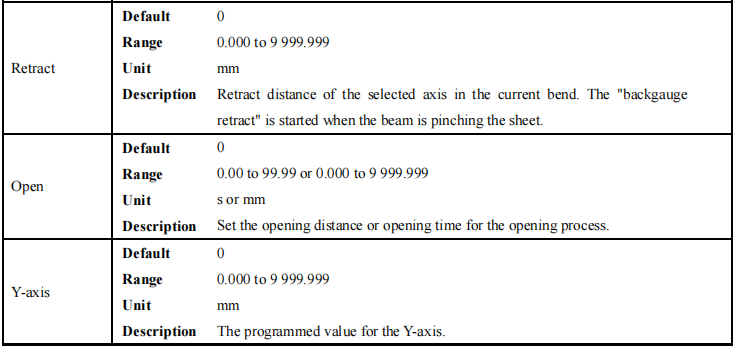
- Navigate to Rétracter and enter 5.
- Navigate to Angle and type 90.
- Navigate to Stock and enter 50.
Ensure the Count Mode is set to Cnt Down on the Constant page beforehand. Finally, press the START key on the operation panel. The servo-axis will then begin positioning, allowing you to start production when the machine is ready.
Multi-Step
You can use ESTUN E300 Programming to set up the bending steps for various settings on this page. For complex bending operations that involve multiple steps, multi-step programming is often used. To access the Multi-Step page, simply press the F2 key, as shown in Figure 2-4.
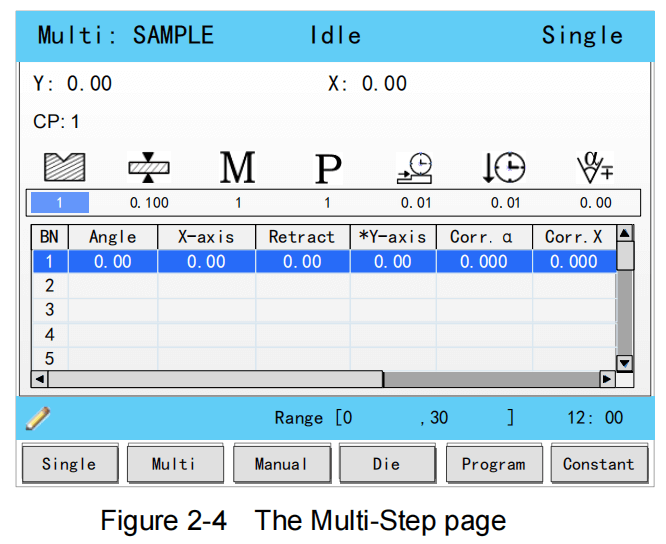
Table 2-5 lists the description of the parameter on this page. You can refer to this table when you edit the parameters on this page.


Exemple
We take the following process as an example to describe the programming.

Suppose you’re working with a steel plate of 180mm in length, segmented into 120mm and 30mm angles at 90°, and a thickness of 7.5mm. The process involves two bending steps, using material set to steel, one X-axis position at 30 and another at 120, a consistent bending angle of 90°, and a thickness of 7.5mm, with a stock of 50mm.
We decide to program the process by the given angle, and supposing the die IDENTIFIANT is 1.
Additional parameters can be adjusted, such as setting the holding time to 3 seconds, retracting delay to 2 seconds, and retract distance to 5mm.
Here’s a streamlined process to set up your program:
- Move the cursor to Die, and type 1.
- Pour Épaisseur, input 7.5.
- Under Matériel, input 1.
- Set Stock to 5.
- Input 2 for Retr. DLY.
- Use 3 for Hold Time.
- Dans le Angle section where BN is 1, input 90.
- Pour X-axis where BN is 1, type 30.
- Under Retract where BN is 1, type 5.
- Confirm by pressing the ENTRER clé.
- A dialog box will prompt you to create a new bending step; press D'ACCORD.
- Pour BN 2, input 120 on the X-axis.
- Set Rétracter pour BN 2 to 5.
- Initiate the process by pressing the COMMENCER key on the operation panel.
With this basic overview in ESTUN E300 Programming, the servo-axis will position itself, and once ready, production can commence.
Manual Movement
When starting with ESTUN E300 Programming, understanding manual movement is crucial. The servo axes, managed by a servo motor, can be manually moved using the arrow keys on the Manuel page. This operation doesn’t require starting the device, making it perfect for adjustments or commissioning.
Pour accéder au Manuel page, simply power up the device and allow it to display the default screen, then press the F3 key, as shown in Figure 2-5.

- Press the arrow keys UP et DOWN to select the desired servo-axis.
- Press the arrow keys LEFT et RIGHT to select proper movement direction.
This foundational knowledge in ESTUN E300 Programming helps ensure precise adjustments right from the start.
Die Settings
To program the process by the given angle, it is necessary to set parameters of the die. Press F4 key to enter the Mourir page, as shown in Figure 2-6.
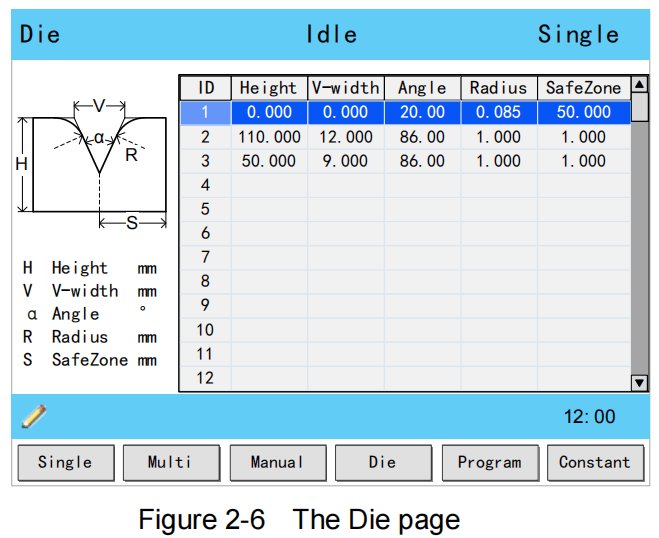
- Press arrow keys UP et DOWN to select the desired die IDENTIFIANT.
- Press arrow keys LEFT et RIGHT to select the desired parameter of the die.
- Presse NUMERIC keys to type the proper value.
The technical parameters diagram of the die are as shown in Figure 2-7.

- H: The height of the die, which is used in the bend depth calculation.
- V: The length of V-opening, which is the distance between the touching lines crossing.
- α: The angle of the die.
- R: The radius of the edges of the V-opening.
- S: Safety distance, which will be used in the case an R-axis, is mounted. This to prevent finger to die collision. The indicated minimum value is computed automatically from the die dimensions as follows: S = FS + V/2, in which: FS = flat section on the back side of the V-grove V = opening value
Bend Correction
In ESTUN E300 Programming, mastering bend correction is crucial for achieving accurate bending results. Before you begin your actual processing, it’s essential to commission the machine correctly. By programming a bending process on the Single-Step page and executing one cycle, you can measure the actual bending angle, bending depth, and back gauge distance. This will help you determine if the bending results align with your requirements.
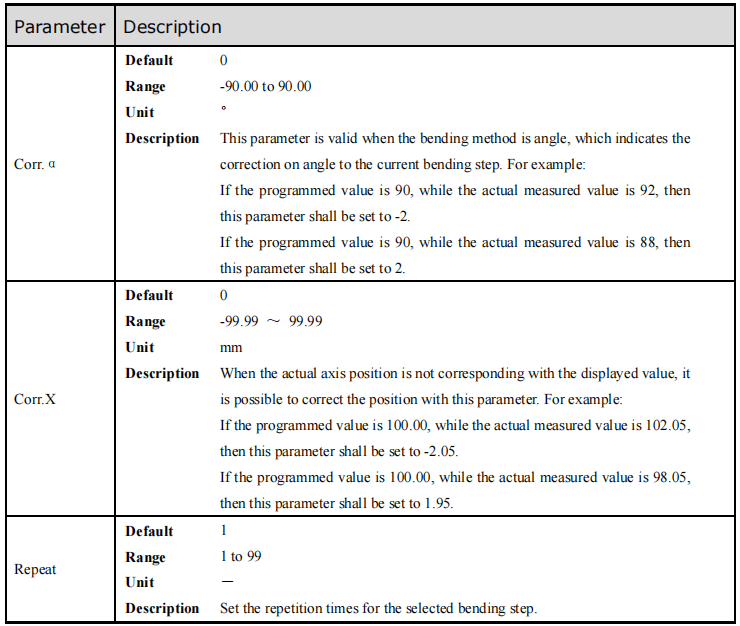
Angle correction
For angle correction within ESTUN E300 Programming, parameters range from -90 to 90. If the actual axis position doesn’t match the displayed value, corrections can be applied. For instance, if the programmed and displayed value is 90 but the actual position is 92, set the Corr. α to -2. Conversely, with a position of 88, set the Corr. α to 2 to make adjustments.
Y-axis correction
Y-axis correction in ESTUN E300 Programming also involves fine-tuning, with parameter ranges from -99.999 to 99.999. Through repeated settings of Corr. Y, gaining experience, and measuring depth per degree, you can program by depth and adjust Corr. Y as needed. This iterative process ensures the bending result meets your requirements.
X-axis correction
Similarly, X-axis correction aligns closely with angle correction. With a range from -99.999 to 99.999 in ESTUN E300 Programming, adjustments are straightforward. For example, if a programmed value of 100.00 results in an actual position of 102.05, set Corr. X to -2.05. Alternatively, an actual position of 98.05 requires Corr. X to be set at 1.95. Following these steps will ensure precision in your programming efforts.
The machine can stop any time in Single-Step bending, and then you can modify the programmed value of X-axis, so Corr. X is not necessary in Single-Step programming. However, there are a number of bending steps in Multi-Step programming, and Corr. X is assigned to each step.
Foire aux questions (FAQ)
How can I troubleshoot common errors in ESTUN E300 Programming?
To troubleshoot errors in ESTUN E300 Programming, refer to the error codes and descriptions provided in the manual. Ensure all connections are secure and settings are configured correctly. Consulting the troubleshooting section of the manual can also offer solutions to frequent issues.
How can I improve the precision of my ESTUN E300 Programming outputs?
Improving precision in ESTUN E300 Programming can be achieved by regularly calibrating your equipment. Ensure all parameters are set correctly and adjust them based on your specific requirements. Consistent maintenance and software updates will also help maintain accuracy.
Conclusion
Mastering the basics of ESTUN E300 Programming can greatly enhance your efficiency and precision in using this control system. We’ve covered essential beginner tips including understanding the interface, simplifying complex tasks, and troubleshooting common issues. By focusing on these key areas, you’ll set a solid foundation for more advanced programming techniques.
To further expand your skills or tackle specific challenges, I recommend consulting our comprehensive resources or reaching out to our expert team. For more in-depth guidance or personalized assistance, feel free to contact us or explore our additional documentation for continued learning.


