


Si vous souhaitez exécuter efficacement un programme avec ESA S860, vous êtes au bon endroit. Dans ce guide, je vous présente les étapes essentielles pour saisir et exécuter des programmes avec ESA S860, un outil essentiel pour la précision de la fabrication métallique. Comprendre comment gérer efficacement les programmes numériques et graphiques, ainsi que maîtriser la séquence de pliage, qu'elle soit automatisée ou manuelle, peut considérablement améliorer votre flux de travail.
Avec des instructions claires et des meilleures pratiques, cet article vous fournira les connaissances nécessaires pour rationaliser les opérations et maximiser la productivité avec l'ESA S860.
Liste des programmes
Pour accéder à la liste des programmes dans le programme ESA S860, il faut suivre les étapes ci-dessous :
– presse

– la fenêtre suivante apparaîtra :
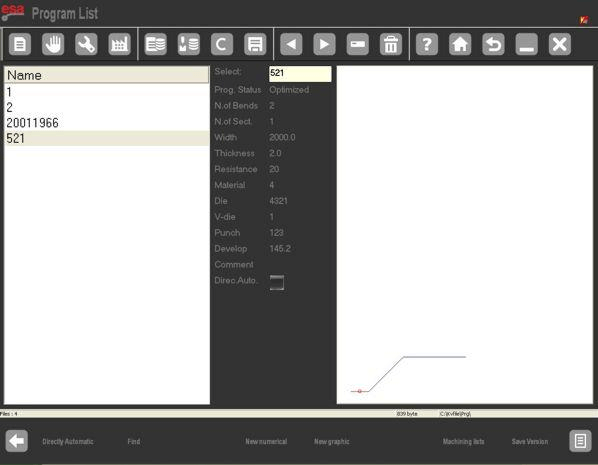
Dans le programme ESA S860, la fenêtre de gauche est la fenêtre de liste, avec des cases centrales affichant les données du programme mises en évidence par le curseur. La fenêtre de droite offre un aperçu du poinçon correspondant à la position du curseur. Utilisez votre doigt pour parcourir les programmes disponibles, ce qui simplifie la recherche et l'exécution.
- Présentation des touches de fonction :
- [Directement en automatique]: Activez cette option pour exécuter un programme directement dans ESA S860 sans modification. Un carré rouge à côté de DirectAuto indique la sélection.
- [Recherche]: Trouvez rapidement un programme spécifique à exécuter en utilisant cette fonction.
- [Nouveau numérique]: Créez un nouveau programme numérique pour une exécution immédiate.
- [Nouveau graphique]: Configurer un nouveau programme graphique pour une exécution ultérieure.
- [Enregistrer la version]: Enregistrez vos programmes dans une version précédente pour une récupération et une exécution faciles.
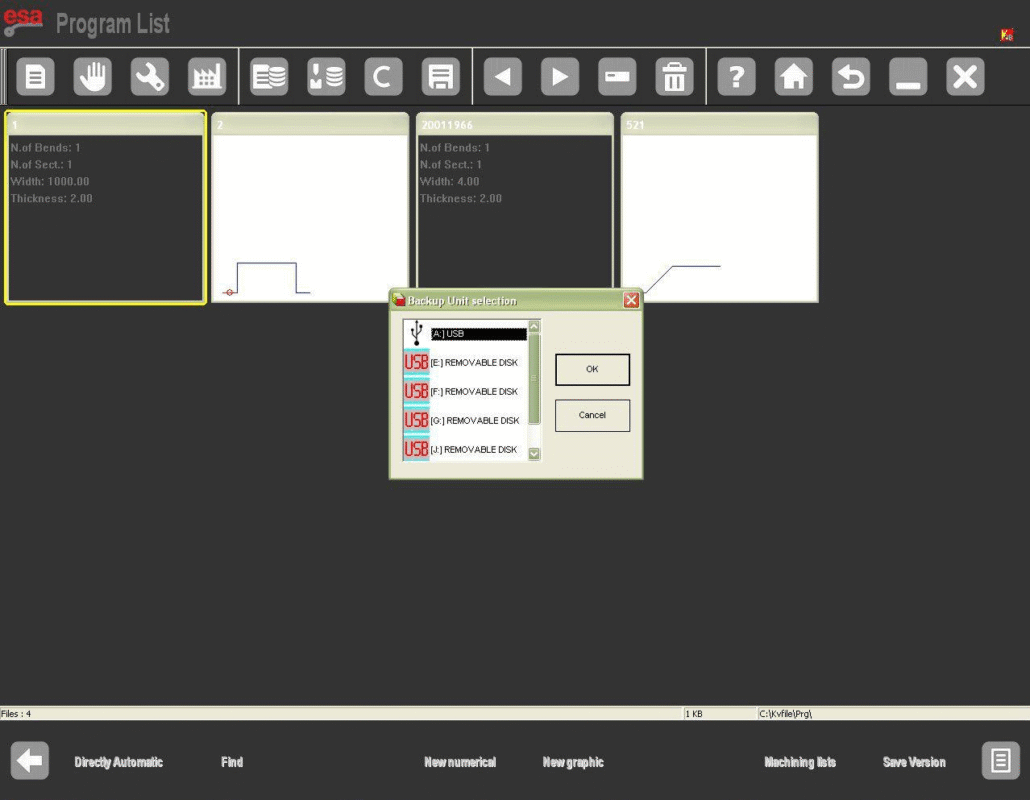
Afficher la liste des programmes sur USB
- Insérez la clé USB contenant les programmes dans le port.
- Appuyez sur la touche désignée pour afficher la liste des programmes.
- Vous pouvez copier, renommer ou supprimer des programmes comme vous le faites avec la liste d'outils.
Changer l'unité de travail
- Ouvrez la liste des programmes en appuyant sur la touche .
- Appuyez sur une autre touche pour accéder au menu.
- Sélectionnez « 7 » Unité de sauvegarde » pour modifier l’unité de travail.
Saisie des programmes dans l'ESA S860
La saisie précise des programmes dans le système ESA S860 garantit des résultats finaux conformes aux spécifications souhaitées. Voici comment exécuter efficacement un programme dans ESA S860.
Saisie d'un programme numérique
Étape 1 : Accédez au mode de saisie du programme
Pour entrer un nouveau programme numérique il faut :
– presse

Le masque d'accueil s'ouvrira :

Sur le masque c'est choisi [Nouveau prog. de bend] pressage

Étape 2 : Saisir les données avec précision
Une fenêtre s'ouvrira pour saisir les données du programme. Veuillez noter que le mode tactile permet de faire défiler les informations :

- Choisissez le Punch:Cliquez pour ouvrir la liste des poinçons et sélectionnez votre poinçon pré-dessiné avec un double-clic ou un double-toucher.
- Sélectionnez le dé: Dans l'éditeur de programme, choisissez votre dé pré-dessiné. Les deux sélections apparaîtront dans le programme.
- Entrez dans la cavité de la matrice: Saisissez le numéro de cavité de la matrice ; saisissez « 1 » s'il n'y a qu'une seule cavité.
- Spécifier les dimensions de la tôle: Entrez la largeur et l'épaisseur de la feuille.
- Sélectionner le matériau:Utilisez le tableau des matériaux pour choisir rapidement le matériau et sa résistance.
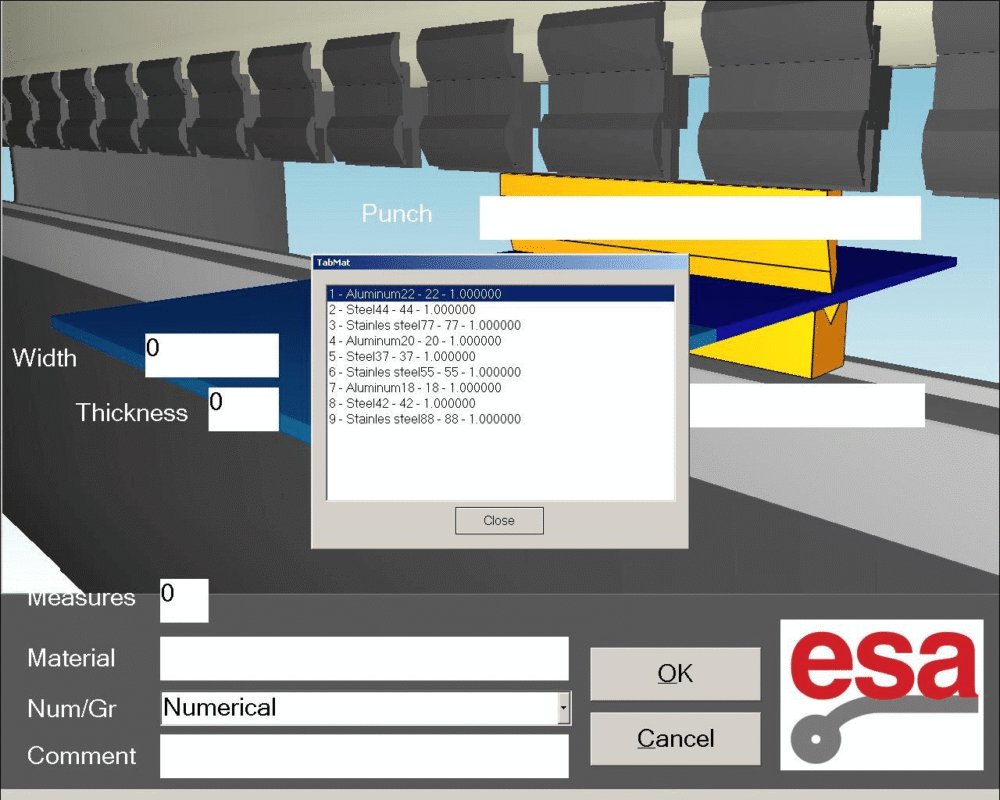
Après avoir sélectionné le matériau, ce qui est décrit dans le champ NOM du tableau des matériaux apparaît.
Ensemble spécifiant que le programme est numérique dans le champ Num / Gr.
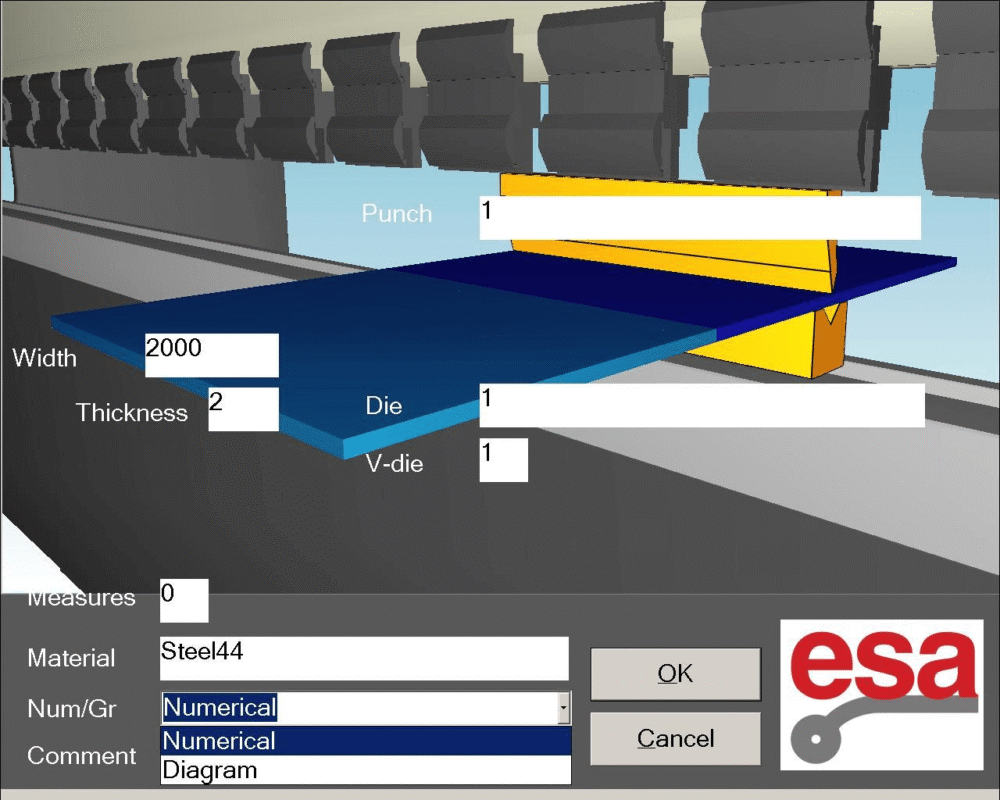
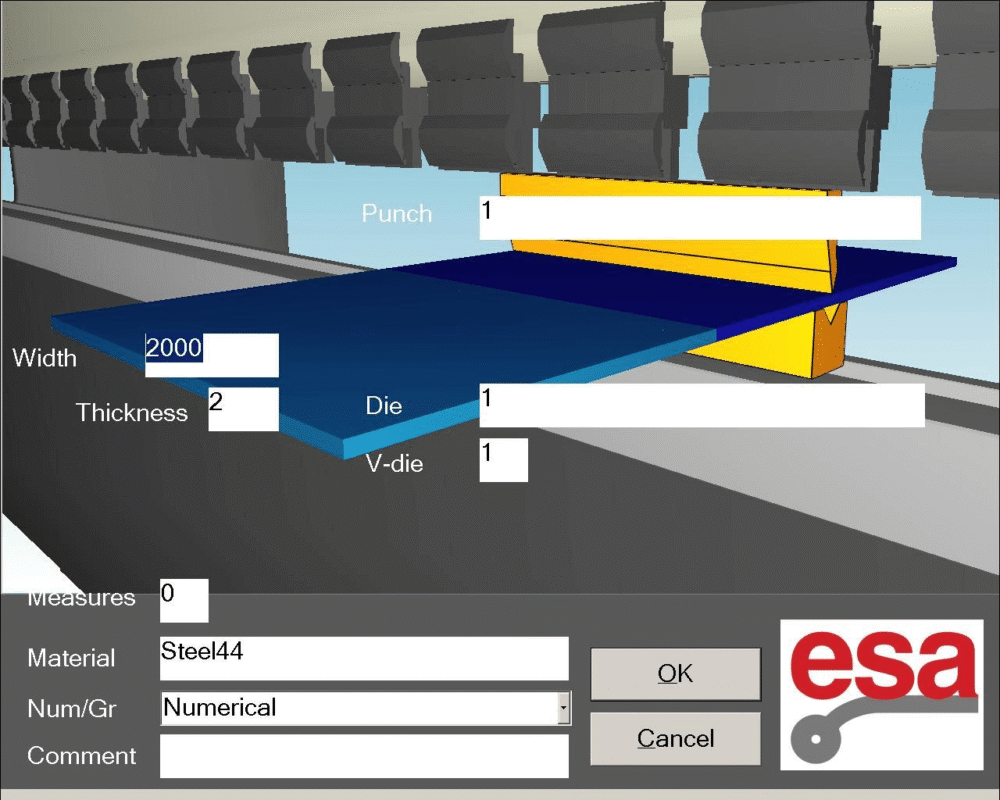
Pour accepter les données, appuyez sur [Confirmer], permettant l'accès direct au masque Paramètres.

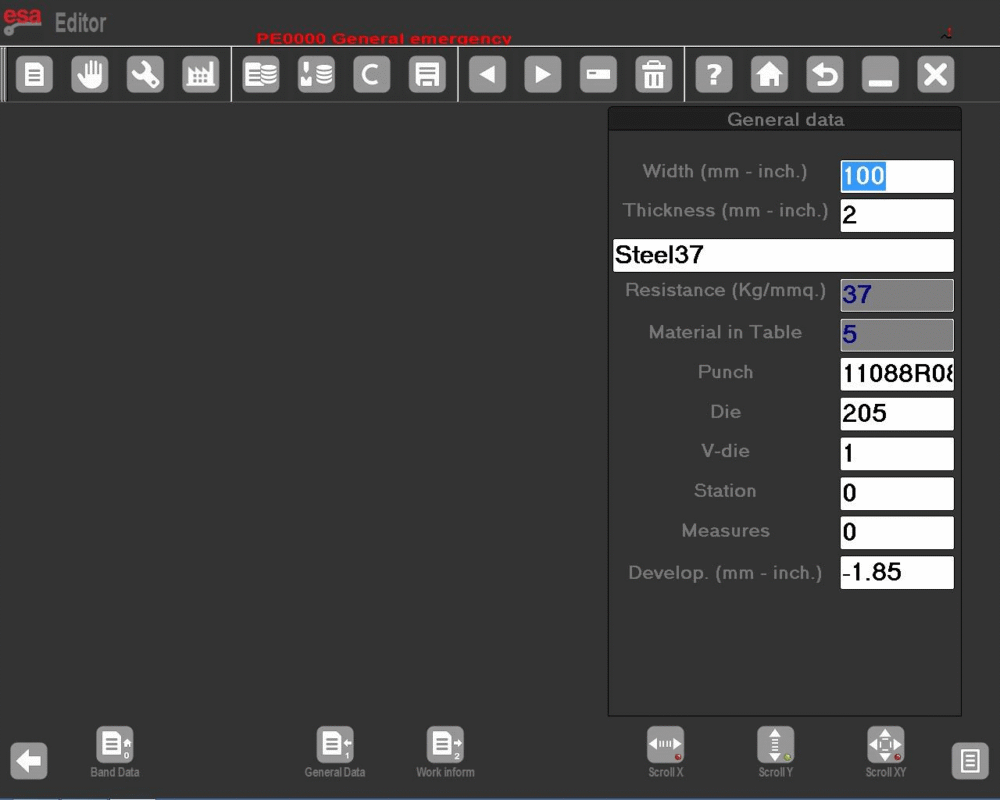
À partir du masque de configuration, en appuyant sur cette touche de fonction, vous accédez au masque de données générales.

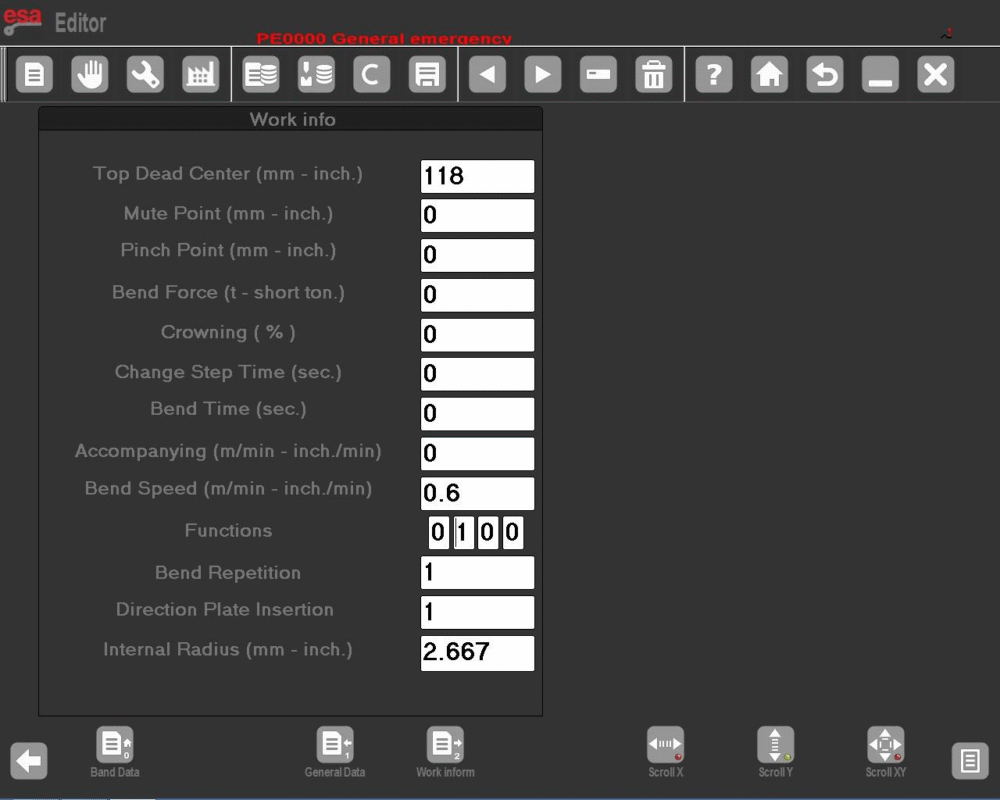
Également à partir du masque Paramètres, en appuyant sur cette touche de fonction, vous accédez au masque Données de travail :
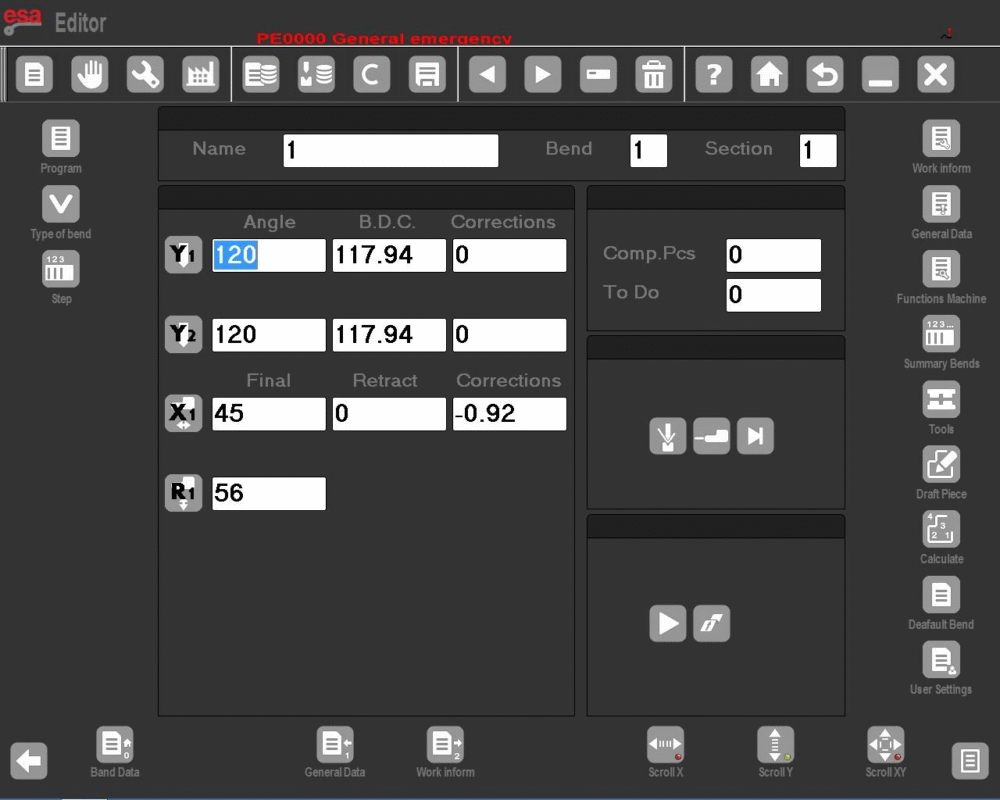
Réglage des virages
- Définir les angles de courbure: Déplacez le curseur vers le Angle Y1 champ et entrez l'angle de courbure souhaité.
- Définir les longueurs de courbure: Entrez la longueur de courbure requise dans le champ Finali X1.
- Calculs automatiques:D'autres données relatives aux courbures seront calculées automatiquement, mais vous pouvez les modifier selon vos besoins.
Affichage des données de travail
-Appuyez sur cette touche.

Une fenêtre affichera des données essentielles telles que syndrome prémenstruel, PCV, et PCL pour le virage.
Gestion des virages
- Copier un coude: Accédez au virage souhaité, ouvrez le menu et sélectionnez Étape de copie pour reproduire le virage à la fin de la section.
- Entrer dans un virage: Déplacez-vous vers la position après le point d'insertion souhaité, ouvrez le menu et sélectionnez Entrez l'étape.
- Entrer un coude copié: Similaire à l'entrée dans un virage mais après la copie, utilisez Étape de copie encore une fois pour un placement et une duplication précis.
Définition du calandrage
- Activer le calendrier: Ouvrez le menu, sélectionnez le [Calendrier] fonction.
- Données d'entrée: Entrez l'angle, le rayon, la longueur du pas et la position d'arrêt initiale.
Définition du clinching (flexion et écrasement)
Saisissez 0,0 dans le champ d'angle Y1 ; la valeur d'arrivée du vérin tiendra compte de la profondeur et de l'épaisseur de la cavité. Pour accélérer la programmation, un clinchage peut être défini directement dans le masque de réglage.
– Appuyez sur cette touche pour ouvrir le menu

– Appuyez sur la touche de fonction Clinching

Correction du clinching
-Entrez le Corrections masquer en appuyant

- Augmentez la valeur si la courbure est trop comprimée. Ajustez ensuite la hauteur Y2.
-Modifier le PMI en utilisant [Coefficient de correction]. Annuler avec [Ignorer la correction].
Opérations de frappe ou de moulage
Pour assurer une plus grande rapidité de programmation du travail, il est possible de réaliser une opération de frappe ou de moulage simplement :
-Appuyez sur cette touche pour ouvrir le menu
-Sélectionnez la touche Fonction de frappe

Correction de frappe
Ajuster le point mort inférieur: Réduire si peu profond, augmenter si profond. Utiliser [Coefficient de correction] si nécessaire.
Définition de coude conique
-Assurez-vous que l'axe X2 est configuré pour un fonctionnement conique et monté correctement, soit de manière incrémentale sur la barre X1, soit en tant qu'axes indépendants.
-Entrez la position d'arrêt initiale dans X1. Utilisez la touche de fonction conique.

, saisissez l'angle souhaité (-45 à 45 degrés) et confirmez.
- Les angles positifs ajustent X2, Z1, Z2 ; les angles négatifs affectent X1, Z1, Z2. Répétez les nouveaux coudes si des ajustements sont effectués.
Courbes hors cavité
- Saisie directe : Entrez les valeurs de courbure d'extrémité dans PMI Y1 et PMI Y2.
- Ajustements du programme : Assurer PCL et PCV les champs reflètent des valeurs dépassant les hauteurs finales théoriques.
- Validation de la hauteur : Maintenir l’ordre de hauteur approprié pour l’exécution automatique du programme.
Entrer dans un programme graphique
Étape 1 : Sélectionner l'option de saisie graphique
Dans l’écran des données du programme, choisissez « Graphique » sous Num/Gr.

Pour exécuter un programme dans ESA S860, commencez par saisir la largeur et l'épaisseur de la feuille, sélectionnez le matériau dans le tableau des matériaux, puis spécifiez le poste de travail, les détails de la matrice, l'orientation de la cavité et les détails du poinçon, ainsi que tous les commentaires facultatifs.
Étape 2 : Utiliser les outils de conception
Avec le clavier souple, vous pouvez :

- Ajuster la longueur du segment : Modifiez la longueur du premier segment en saisissant une nouvelle hauteur, confirmez et sélectionnez une flèche BLEUE pour afficher automatiquement les angles de courbure suivants.
- Définir l'angle du segment : Utilisez les sept flèches (45, 90, 135, 180, -135, -90, -45) pour définir rapidement les angles.
- Saisie manuelle de l'angle : Si « coussin à épingles » est désactivé, appuyez sur le champ ALPHA pour saisir les angles manuellement.
- Longueur et angle d'entrée : Appuyez sur le centre de la ligne pour saisir la longueur ou appuyez sur les intersections.
- Réglages du zoom et de la vue : Utilisez la barre ZOOM pour mettre à l'échelle et déplacer la vue pour une meilleure visualisation
- Naviguer avec CALCULER : Appuyez sur CALCULER et faites glisser le dessin de la machine pour ajuster sa position, améliorant ainsi la planification dans les modes SEMI-AUTOMATIQUE et AUTOMATIQUE de l'ESA S860.
Comment réaliser le dessin d'une pièce
Supposons que nous devions dessiner la pièce illustrée dans la figure ci-dessous :

- Démarrer le mode dessin : Placez le curseur dans Champ l pour le réglage polaire.
- Première section :
- Entrez la longueur (20,0) en Champ l.
- Entrez l'angle (120,0°) dans Champ α.
- Deuxième section :
- Entrez la longueur (45,0) en Champ l.
- Entrez l'angle (-120,0°) dans Champ α.
- Troisième section :
- Entrez la longueur (70,0) en Champ l.
- Entrez l'angle (-90,0°) dans Champ α.
- Quatrième section :
- Entrez la longueur (20,0) en Champ l.
- Entrez l'angle (90,0°) dans Champ α.
- Cinquième section : Entrez la longueur (30,0) en Champ l, presse [ENTRER] à compléter.
Calcul de la séquence de pliage
Pour des résultats optimaux, le calcul de la séquence de pliage dans le programme ESA S860 est crucial.
Calcul automatique de la séquence de pliage
Un programme ESA S860 peut calculer automatiquement la séquence de pliage, optimisant ainsi l'ordre de pliage pour une efficacité accrue. Activez simplement le « Calcul automatique du pliage » dans les paramètres pour permettre au système de calculer la séquence optimale pour vos pliages.
Calcul manuel de la séquence de pliage
Lors de l'utilisation d'un programme ESA S860, une intervention manuelle peut parfois être nécessaire. Calculez manuellement la séquence de pliage à l'aide du guide, puis saisissez-la dans le système pour garantir des ajustements précis. Cette approche améliore la flexibilité et la précision de votre programme ESA S860.
Comment plier une boîte
- Créer deux sections:Courbes horizontales et courbes verticales, en mode graphique ou numérique.
- Exécuter séquentiellement:Commencez par la section avec la plus petite largeur de feuille pour garantir la précision.
- Ajout/suppression de sections:
- Pour ajouter, appuyez sur [Changer de section].
- Pour supprimer, ouvrez le menu et sélectionnez « Supprimer la section ». Cela réinitialisera le virage 1 de la section 1.
Exécuter un programme dans ESA S860
Exécution en mode automatique

Démarrer en appuyant sur cette touche après avoir défini un programme numérique ou graphique dans ESA S860.
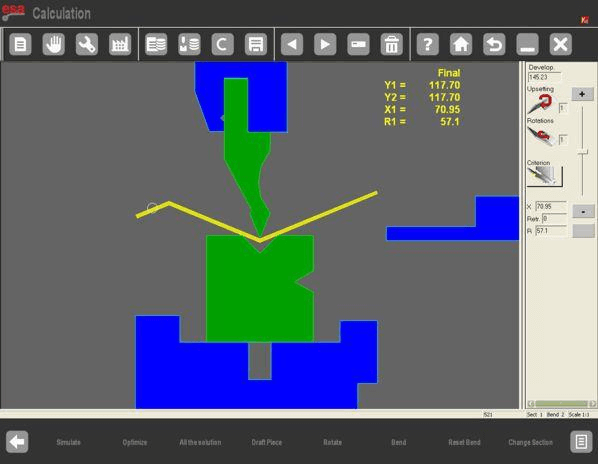
Masque graphique automatique
Presse [Graphique] pour visualiser le masque d'un programme graphique calculé.
- Fenêtre principale : Affiche les pièces de la machine, le poinçon, la matrice et la pièce avant/après le pliage.
- Orientation : Fournit des instructions sur le clinchage ou la rotation des tôles lors des pliages.
- Affichage des données : Détails de pliage et compteur de pièces, avec les hauteurs des axes indiquées en jaune.

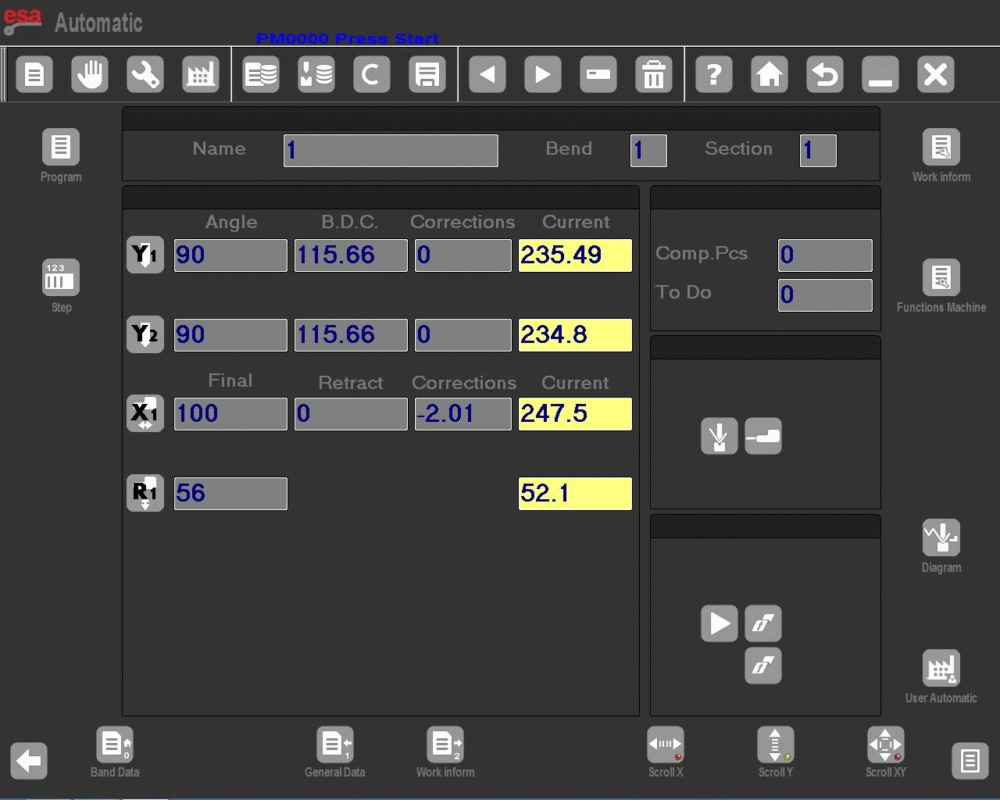
Masque numérique automatique
- Affichage des hauteurs des axes : Affiche les hauteurs d'axe actuelles ; les modifications ne sont pas autorisées en mode automatique.
- Orientation de la pièce : Fournit des conseils pour chaque pliage, comme le clinchage ou la rotation.
- Basculement de la taille d'affichage :
- Appuyez pour doubler la taille, similaire à Kvara S 860 PC et S 660W.
- Appuyez à nouveau pour une taille unique.

Foire aux questions (FAQ)
Puis-je modifier un programme en cours d'exécution dans ESA S860 ?
En mode automatique, vous ne pouvez pas modifier les données du programme actuel. Il est essentiel de vérifier que tous les paramètres sont corrects avant de lancer le processus dans le système ESA S860.
Est-il possible de basculer entre les tailles d'affichage dans ESA S860 ?
Oui, vous pouvez basculer entre les caractères de taille simple et double à l'aide du bouton de réglage de l'affichage, similaire à ceux trouvés dans les modèles Kvara S 860 PC et S 660W.
Conclusion
En résumé, l'exécution d'un programme selon la norme ESA S860 implique la compréhension et l'utilisation de plusieurs fonctionnalités clés. Parmi celles-ci figurent l'affichage précis des hauteurs d'axe actuelles en mode numérique automatique et le suivi précis des instructions d'orientation des pièces lors des pliages. Il est également important de savoir basculer entre les tailles d'affichage pour plus de confort d'utilisation.
Pour une assistance plus détaillée ou pour toute question, n'hésitez pas à contacter notre équipe. Consultez également notre documentation pour en savoir plus sur l'optimisation des fonctionnalités de votre ESA S860.


