


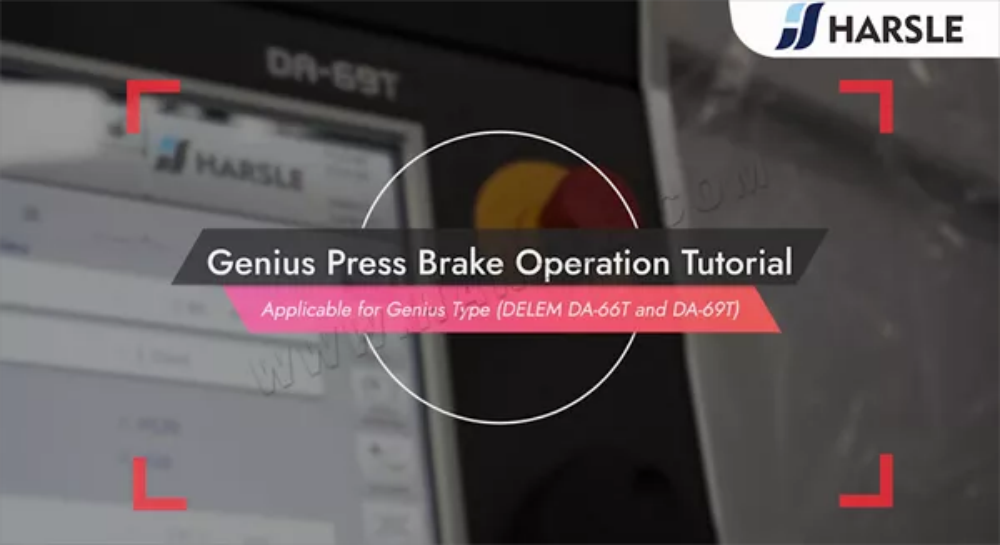
Genio Pressa piegatrice Il funzionamento può essere impegnativo, ma questo tutorial ti guiderà nell'utilizzo dei modelli DA-66T e DA-69T per ottenere prestazioni e precisione ottimali.
Scopri come utilizzare il Genius Pressa piegatrice (DA-66T e DA-69T) con questa guida completa. Segui le nostre istruzioni passo passo per migliorare il tuo processo di piegatura e ottenere risultati perfetti.
Pronti a iniziare? Esploriamo il processo di funzionamento dei modelli DA-66T e DA-69T per garantire operazioni di piegatura fluide ed efficienti.
I nuovi clienti incontreranno solitamente diversi problemi quando utilizzeranno per la prima volta la nostra pressa piegatrice Genius. Gli ingegneri HARSLE hanno registrato un tutorial completo sul funzionamento della Genius. Pressa piegatrice DA-66T e DA-69T per garantire ai clienti un utilizzo più rapido ed efficiente delle macchine. Questo tutorial illustra il processo di iniezione dell'olio fino alla programmazione della piegatura, con contenuti completi e dettagli chiari. Ci auguriamo che il seguente video vi sia utile:
Parte 1: Riempire l'olio e collegare i cavi
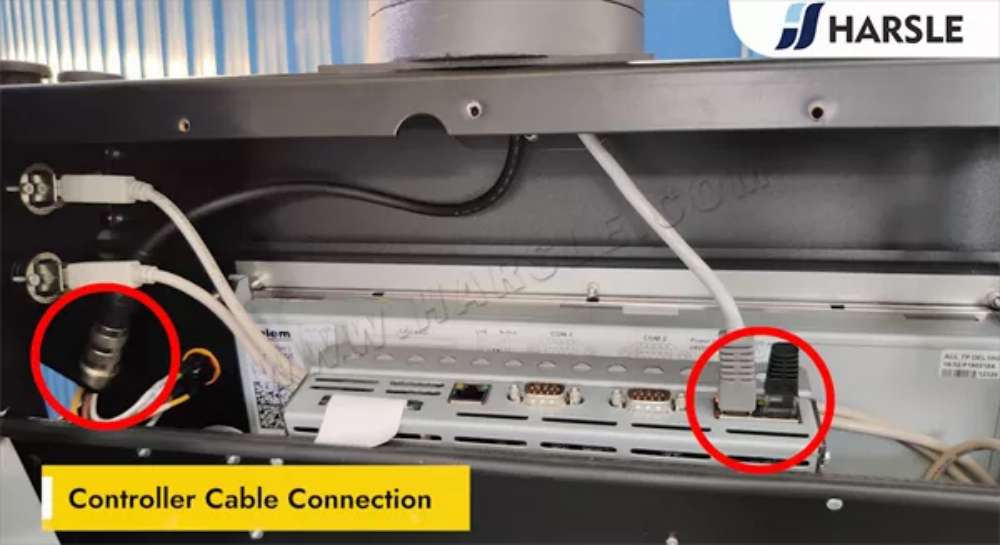
Collegamento del cavo del controller
Un corretto collegamento dei cavi del controller è essenziale per garantire una comunicazione stabile tra la pressa piegatrice Genius e il controller CNC DA-66T o DA-69T. Iniziare verificando il tipo di cavo e abbinandolo alle porte di ingresso corrispondenti sia sul controller che sulla pressa piegatrice. Fissare saldamente tutti i collegamenti per evitare perdite di segnale o errori della macchina. Utilizzare cavi schermati per ridurre al minimo le interferenze elettromagnetiche. Dopo il collegamento, eseguire un test di sistema per confermare la corretta trasmissione dei dati. Ispezionare e manutenere regolarmente i cavi per prevenirne l'usura, garantendo prestazioni e affidabilità a lungo termine. Un cablaggio corretto garantisce un funzionamento impeccabile della pressa piegatrice e risultati di piegatura precisi.
Riempimento del serbatoio dell'olio con olio idraulico antiusura
Riempimento del serbatoio dell'olio con olio idraulico antiusura è un passaggio cruciale per garantire il buon funzionamento e la longevità del tuo Pressa piegatrice GeniusPrima del riempimento, assicurarsi che il serbatoio sia pulito e privo di contaminanti. Utilizzare solo olio di alta qualità. olio idraulico antiusura raccomandato dal produttore. Versare lentamente l'olio nel serbatoio, assicurandosi che raggiunga il livello richiesto senza eccedere. Dopo il riempimento, verificare eventuali perdite e lasciare in funzione il sistema per alcuni minuti per garantire una corretta circolazione. Controlli e sostituzioni regolari dell'olio contribuiscono a mantenere prestazioni ottimali e a prevenire l'usura prematura dei componenti idraulici.

Riempi l'olio da questa porta
Per garantire prestazioni ottimali e longevità della pressa piegatrice, è fondamentale riempire correttamente l'olio idraulico. Utilizzare l'apposito foro per aggiungere olio idraulico, assicurandosi che raggiunga il livello 2/3 del livello del volume totale dell'olioUn riempimento eccessivo o insufficiente può causare inefficienze del sistema, surriscaldamento o riduzione della durata della macchina. Utilizzare sempre olio idraulico di alta qualità raccomandato dal produttore. Dopo il riempimento, controllare l'indicatore del livello dell'olio e assicurarsi che non vi siano perdite. Una manutenzione regolare e una corretta gestione dell'olio contribuiranno a mantenere il vostro Pressa piegatrice Genius funzionare in modo fluido ed efficiente per gli anni a venire.

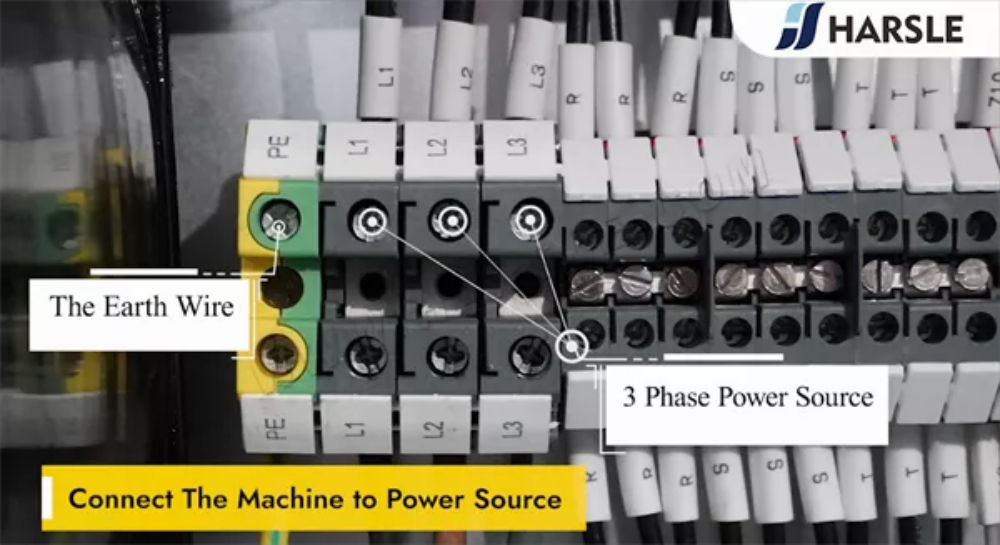
Collegare la macchina alla fonte di alimentazione
Prima di azionare il Pressa piegatrice Genius, assicurarsi che il collegamento elettrico sia sicuro e corretto. Iniziare verificando che le specifiche di alimentazione della macchina corrispondano alla rete elettrica della propria struttura. Rivolgersi a un elettricista certificato per collegare la macchina a una presa elettrica stabile. fonte di alimentazione trifase, seguendo le normative di sicurezza locali. Assicurarsi che il il filo di messa a terra è collegato saldamente per prevenire rischi elettrici. Dopo l'accensione, verificare la presenza di eventuali messaggi di errore sul Controllore DA-66T o DA-69TSe tutto funziona normalmente, sei pronto per procedere con la calibrazione e la configurazione. Segui sempre le linee guida del produttore per garantire un sicuro ed efficiente operazione.
Collegare il cavo alla scatola elettrica
Collegare il cavo alla scatola elettrica è un passaggio fondamentale per garantire un funzionamento sicuro ed efficiente della pressa piegatrice. Iniziare spegnendo l'alimentazione principale per prevenire qualsiasi rischio elettrico. Spellare con cura le estremità del cavo e inserirle negli appositi terminali all'interno della scatola elettrica. Fissare i collegamenti serrando le viti e assicurandosi che la messa a terra sia adeguata. Verificare attentamente che tutti i cavi siano posizionati correttamente secondo lo schema elettrico. Una volta fissato tutto, chiudere il coperchio della scatola elettrica e ripristinare l'alimentazione per testare il collegamento. Un'installazione corretta garantisce sicurezza e stabilità della macchina.
Collegare il filo di terra
Il collegamento del cavo di terra è un passaggio fondamentale per garantire la sicurezza elettrica di qualsiasi macchina, comprese le presse piegatrici. Il cavo di terra fornisce un percorso diretto per le correnti elettriche vaganti che possono fluire in sicurezza verso terra, prevenendo scosse elettriche, cortocircuiti e potenziali rischi di incendio. Senza un'adeguata messa a terra, le perdite elettriche possono causare gravi lesioni agli operatori e danneggiare i componenti della macchina. Utilizzare sempre un cavo di terra di alta qualità e di dimensioni adeguate e collegarlo a un punto di messa a terra affidabile. Controllare regolarmente il collegamento per assicurarsi che rimanga sicuro ed efficace. Un cavo di terra ben collegato migliora la sicurezza sul posto di lavoro e prolunga la durata della macchina.
Collegare alla fonte di alimentazione trifase
Collegare correttamente il tuo Pressa piegatrice Genius a un fonte di alimentazione trifase è essenziale per garantire un funzionamento stabile e prevenire problemi elettrici. Prima di iniziare, verificare le specifiche di alimentazione sulla targhetta della macchina e assicurarsi che corrispondano alla tensione e alla frequenza della propria struttura. Utilizzare cavi di potenza adeguata e garantire una connessione di terra sicura per la sicurezza. Collegare correttamente i cavi trifase ai terminali designati, seguendo lo schema elettrico fornito nel manuale. Dopo l'installazione, verificare la corretta rotazione delle fasi; un cablaggio errato può causare il funzionamento inverso della macchina. Avere sempre a disposizione un elettricista qualificato gestire la connessione per garantire la conformità alle normative locali.

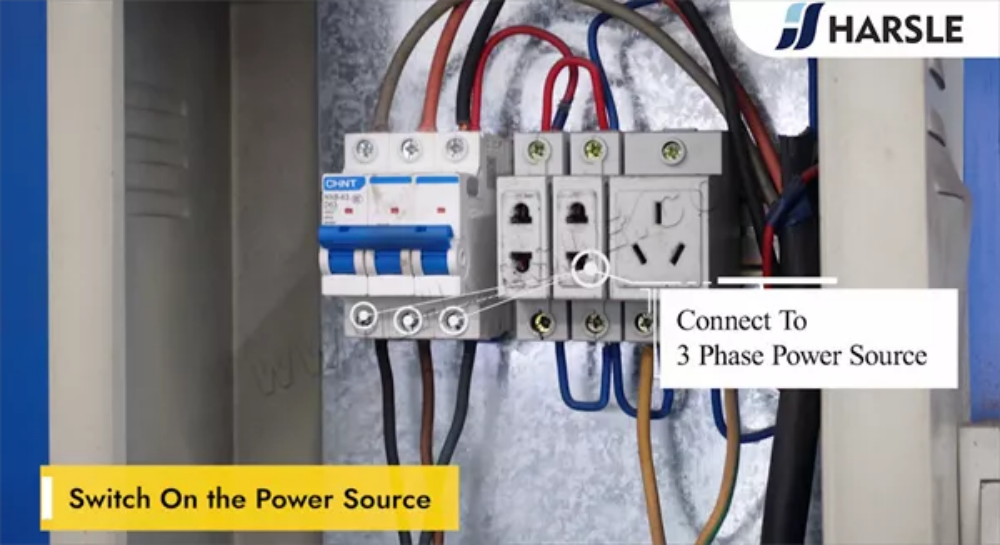
Accendere la fonte di alimentazione
Prima di azionare il Pressa piegatrice Genius, garantire un'alimentazione stabile. Innanzitutto, verificare che l'interruttore di alimentazione principale sia in posizione SPENTO posizione prima di collegare la macchina alla fonte di alimentazione. Verificare che la tensione corrisponda ai requisiti della macchina per evitare problemi elettrici. Una volta confermato, accendere la interruttore di alimentazione principale acceso e attendere l'inizializzazione del sistema. Il display del controller si illuminerà, indicando che la macchina è pronta per l'uso. Ispezionare sempre il pulsante di arresto di emergenza e i circuiti di sicurezza prima di procedere per garantire un funzionamento regolare e sicuro. Un avvio corretto garantisce l'efficienza e prolunga la durata della macchina.
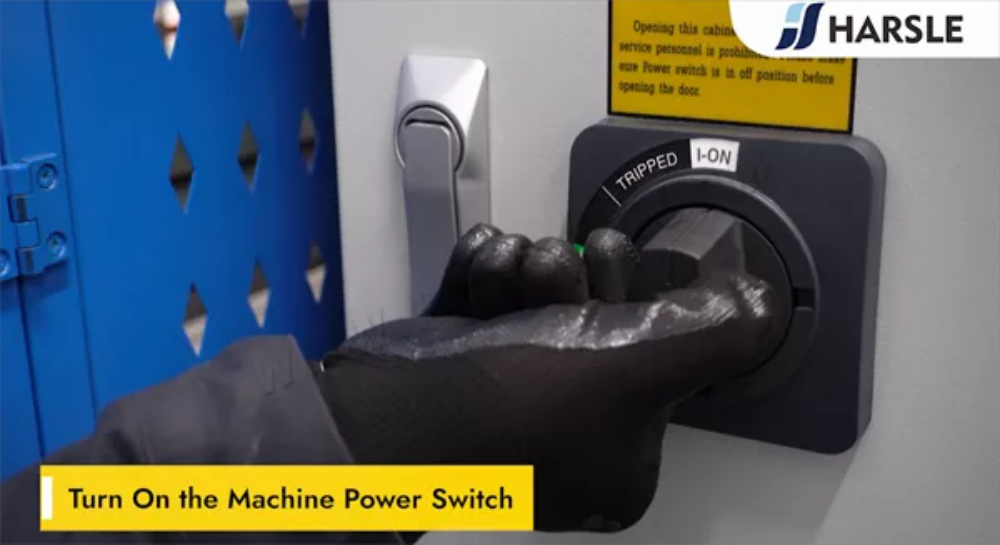
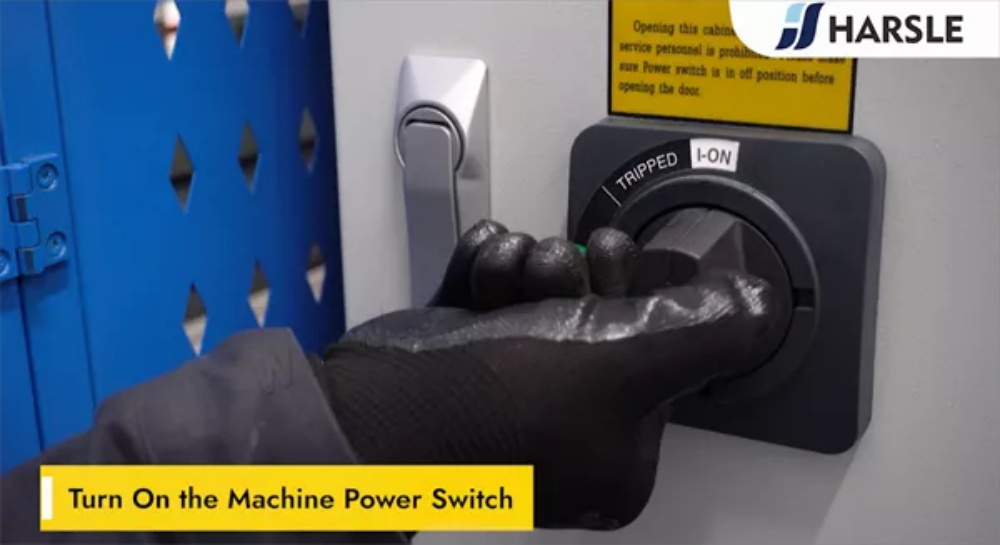
Accendere l'interruttore di alimentazione della macchina
Per iniziare a operare il Pressa piegatrice Genius, il primo passo è accendere il interruttore di alimentazione della macchina. Individuare il interruttore di alimentazione principale sul pannello laterale o posteriore della macchina. Assicurarsi che l'alimentazione sia stabile e che il pulsante di arresto di emergenza non sia premuto. Ruotare l'interruttore di alimentazione su SU posizione e attendere l'inizializzazione del sistema. Il pannello di controllo visualizzerà le informazioni di avvio, indicando che la macchina è pronta per l'uso. Seguire sempre protocolli di sicurezza prima di accendere la macchina per evitare problemi elettrici o movimenti accidentali della pressa piegatrice.
In attesa del caricamento del sistema
Quando si utilizza una pressa piegatrice CNC, il messaggio "In attesa del caricamento del sistema" appare durante il processo di avvio. Ciò indica che il controller sta inizializzando le funzioni essenziali, caricando le configurazioni di sistema e preparandosi per il funzionamento. A seconda del DA-66T o DA-69T sistema, questo processo potrebbe richiedere da pochi secondi a un paio di minuti. Evitare di interrompere l'avvio per prevenire errori di sistema. Se il caricamento richiede più tempo del solito, verificare la presenza di eventuali aggiornamenti software o malfunzionamenti del sistema. Garantire un'alimentazione stabile e una corretta manutenzione può contribuire a ridurre al minimo i ritardi durante il caricamento del sistema, mantenendo le operazioni di piegatura fluide ed efficienti.

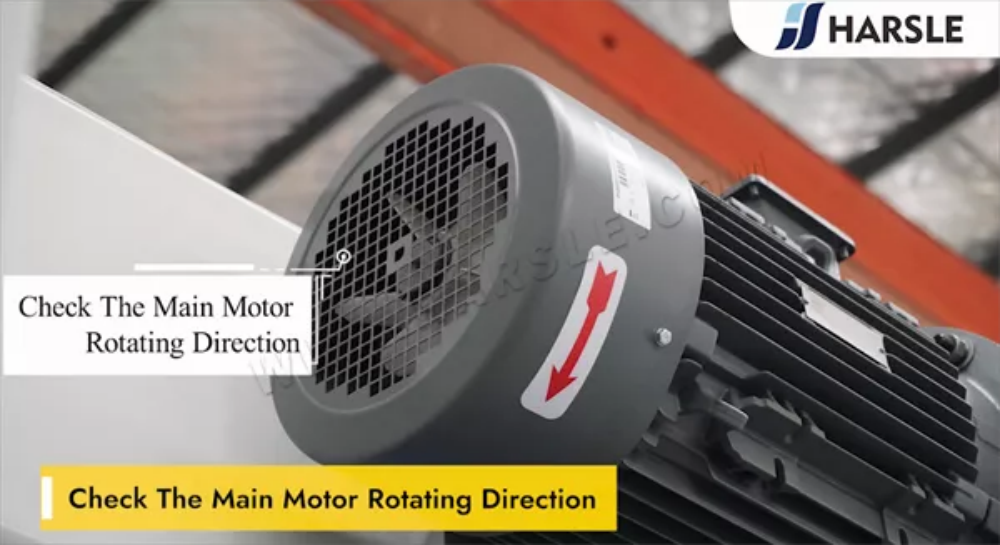
Controllare la direzione di rotazione del motore principale
Garantire la corretta direzione di rotazione del motore principale è fondamentale per il corretto funzionamento del tuo Pressa piegatrice GeniusUna rotazione errata del motore può causare malfunzionamenti della macchina o persino danni ai componenti interni. Per controllare la rotazione:
- Accendere la macchina – Assicurarsi che tutte le misure di sicurezza siano in atto.
- Osservare la rotazione del motore – Controllare la freccia direzionale del motore e confrontarla con il movimento effettivo.
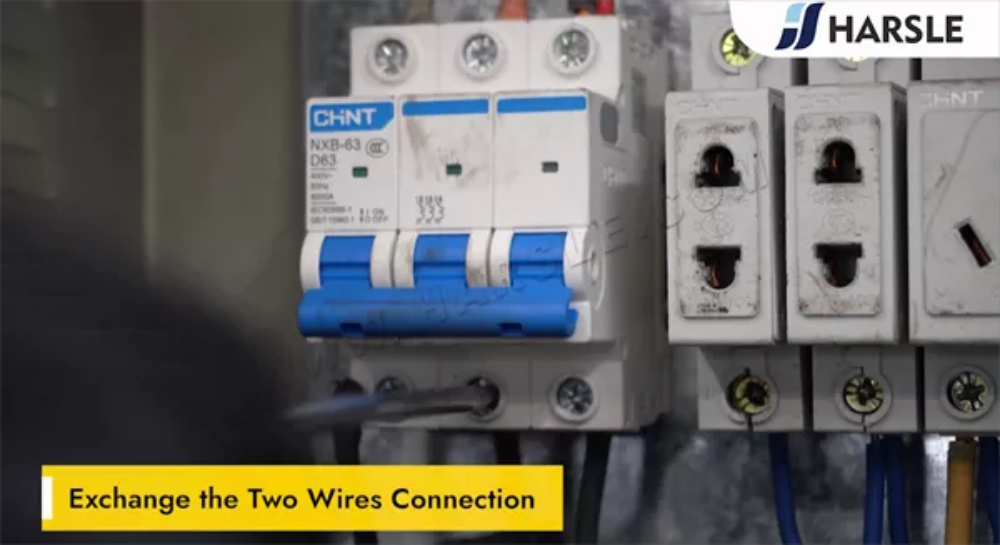
- Regolare il cablaggio se necessario – Se la rotazione non è corretta, scambiare due fasi dell’alimentazione.
- Prova di nuovo – Riavviare e confermare la direzione corretta.
Tirare giù i pulsanti soft
IL “Tirare giù i pulsanti soft” funzione sul DA-66T e DA-69T i controller consentono agli operatori di accedere a opzioni di interfaccia aggiuntive per una migliore controllo della pressa piegatriceToccando lo schermo e trascinando i pulsanti soft verso il basso, gli utenti possono rivelare funzioni nascoste come correzioni di piegatura, impostazioni degli assi e regolazioni degli utensiliQuesta funzione migliora l'efficienza del flusso di lavoro, consentendo modifiche rapide senza dover navigare tra più menu. Padroneggiare questa funzione garantisce un funzionamento più fluido e cicli di produzione più rapidi, rendendolo essenziale per i professionisti che mirano a piegatura di precisioneCapire come usare questa scorciatoia migliorerà notevolmente il tuo Pressa piegatrice Genius operazione.
Premere brevemente il pulsante di avvio della pompa
Per avviare il sistema idraulico del tuo Pressa piegatrice Genius, devi premere brevemente il pulsante Pump-StartQuesta azione attiva la pompa idraulica, garantendo il regolare funzionamento della macchina. Evitare tenere premuto il pulsante troppo a lungo, poiché è progettato per una breve pressione per avviare il sistema. Una volta premuto, si dovrebbe sentire la pompa attivarsi, indicando che la macchina è pronta per l'uso. Se la pompa non si avvia, controllare l'alimentazione e lo stato di arresto di emergenza. Il corretto funzionamento del pulsante di avvio pompa è essenziale per mantenere l'efficienza e la longevità della pressa piegatrice.

Controllare la direzione di rotazione del motore principale
Prima di azionare il Pressa piegatrice Genius, è essenziale verificare il direzione di rotazione del motore principale per garantire prestazioni della macchina fluide e sicure. Una rotazione errata del motore può causare malfunzionamenti del sistema, efficienza ridotta o potenziali danni all'impianto idraulico. Per verificare la rotazione, avviare la macchina e osservare indicatore di direzione del motore o ascoltare suoni insoliti. Se la rotazione non è corretta, spegnere l'alimentazione e regolare la cablaggio di fase di potenzaSegui sempre protocolli di sicurezza e consultare il manuale utente prima di apportare modifiche. Il corretto orientamento del motore garantisce prestazioni ottimali e maggiore durata della macchina.
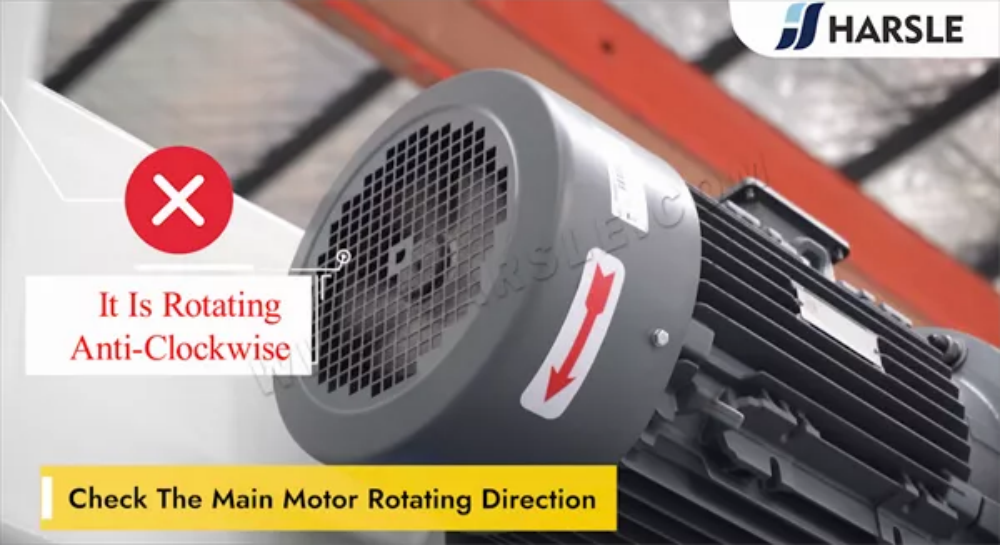
Se ruota in senso orario, allora è corretto
Quando si opera un Pressa piegatrice Genius con DA-66T o DA-69T, è fondamentale garantire la corretta direzione di rotazione. "Se ruota in senso orario, allora è corretto" Serve come linea guida semplice ma essenziale. Una rotazione in senso orario indica in genere un corretto allineamento del motore, garantendo il corretto funzionamento del sistema idraulico e del registro posteriore. Una rotazione errata può causare malfunzionamenti del sistema, una riduzione della precisione di piegatura o persino danni ai componenti della macchina. Prima di iniziare le operazioni, verificare sempre il senso di rotazione del motore. Se necessario, regolare il cablaggio per correggerlo. Il rispetto di questa regola garantisce prestazioni ottimali, risultati di piegatura precisi e maggiore durata della macchina.

Sta ruotando in senso antiorario
Quando un componente della macchina è ruotando in senso antiorario, si muove nella direzione opposta alle lancette di un orologio tradizionale. Questo tipo di rotazione è comunemente visto in presse piegatrici, macchine CNC e motori industriali, dove garantisce la corretta funzionalità in base alla progettazione meccanica. La rotazione in senso antiorario viene spesso utilizzata per migliorare efficienza di coppia, migliorare movimentazione dei materialio soddisfare i requisiti operativi di utensili specifici. Comprendere la direzione di rotazione è fondamentale per sicurezza, precisione e prevenzione dei guasti meccanici. Fare sempre riferimento al manuale operativo prima di regolare o invertire le impostazioni di rotazione per evitare danni o disallineamenti nel sistema.
Scambiare la connessione a due fili
La sostituzione dei due fili è un passaggio semplice ma cruciale nelle regolazioni elettriche, soprattutto quando si tratta di presse piegatrici CNC e altri macchinari industriali. Questa procedura è spesso necessaria per correggere il senso di rotazione del motore, risolvere problemi di sequenza di fase o garantire il corretto funzionamento della macchina. Prima di iniziare, verificare sempre spegnere l'alimentazione e indossare guanti isolanti per sicurezza. Identificare i due fili da scambiare, allentare le viti dei terminali e scambiarne attentamente le posizioni. Una volta ricollegati, fissare saldamente i terminali e testare il sistema. Una corretta sostituzione dei fili garantisce prestazioni stabili e previene guasti alla macchina, rendendola un'abilità essenziale per gli operatori.
Parte 2: Avviamento della macchina
Accendere l'interruttore di alimentazione della macchina
Prima di azionare il Pressa piegatrice Genius, assicurarsi che la macchina sia correttamente collegata a una fonte di alimentazione stabile. Individuare il interruttore di alimentazione principale sul lato della macchina o dell'armadio elettrico. Ruotare l'interruttore su "SU" posizione e attendere l'inizializzazione del sistema. Il controller CNC (DA-66T o DA-69T) si avvierà, visualizzando la schermata di avvio. Verificare eventuali avvisi di sistema o messaggi di errore prima di procedere. Assicurarsi che il pulsante di arresto di emergenza sia rilasciato per consentire il pieno funzionamento. Una volta accesa, la pressa piegatrice è pronta per l'impostazione dei parametri e le operazioni di piegatura.
In attesa del caricamento del sistema
Quando si accende il Pressa piegatrice Genius dotato di Controllore DA-66T o DA-69T, il sistema richiede alcuni istanti per l'inizializzazione. Durante questo periodo, i componenti critici, tra cui il software CNC, i parametri di piegatura e le funzioni di sicurezza, vengono caricati per garantire il corretto funzionamento. È essenziale attendere pazientemente che l'interfaccia sia completamente pronta prima di procedere. L'interruzione del processo potrebbe causare errori di sistema o impostazioni incomplete. Una volta completato il caricamento, è possibile iniziare a configurare i parametri di piegatura e avviare le attività di fabbricazione dei metalli in modo efficiente. Attendere che il sistema completi il caricamento prima di procedere.

Rilasciare l'interruttore di arresto di emergenza
IL Interruttore di arresto di emergenza è una caratteristica di sicurezza critica sul Pressa piegatrice Genius dotato di DA-66T e DA-69T controller. Se la macchina si arresta inaspettatamente a causa di un'attivazione di emergenza, seguire questi passaggi per sbloccarla:
- Girare il pulsante di arresto di emergenza – Ruotare il pulsante in senso orario finché non fuoriesce.
- Controlla i messaggi di errore – Controllare lo schermo del controller per eventuali avvisi di sistema.
- Ripristina la macchina – Premere il pulsante di reset o seguire le istruzioni del pannello di controllo.
- Riavvia operazione – Assicurarsi che tutte le misure di sicurezza siano in atto prima di riprendere il lavoro.

Accendi la luce
Accendere la luce è più che premere un interruttore: significa portare chiarezza, calore e direzione in uno spazio. Che si tratti del bagliore di una lampada da comodino, della brillantezza di un lampione che ci guida o dello splendore del sole mattutino, la luce trasforma l'ambiente circostante e il nostro umore. Dissipa l'oscurità, rivela dettagli nascosti e crea un senso di sicurezza. Nella vita, "accendere la luce" può anche simboleggiare l'acquisizione di conoscenza, la ricerca di ispirazione o l'accettazione di nuove opportunità. Quindi, letteralmente o metaforicamente, non esitate mai ad accendere la luce e a illuminare il vostro mondo.

Tirare giù i pulsanti soft
IL “Tirare giù i pulsanti soft” funzione sul Controllori DA-66T e DA-69T consente agli operatori di accedere comodamente a opzioni di comando aggiuntive. I pulsanti soft sono pulsanti virtuali visualizzati sull'interfaccia touchscreen, che cambiano dinamicamente in base alla funzione selezionata. Trascinandoli verso il basso, gli utenti possono visualizzare funzioni nascoste, scorciatoie o impostazioni avanzate senza uscire dall'interfaccia principale. Questa funzionalità migliora efficienza del flusso di lavoro, consentendo rapide regolazioni dei parametri e riducendo i tempi di funzionamento. Padroneggiare le funzioni dei pulsanti software è essenziale per ottenere risultati di piegatura precisi e ottimizzando le prestazioni della macchina. L'uso regolare aiuta a semplificare la programmazione e migliora l'esperienza dell'utente con Pressa piegatrice Genius.
Premere il pulsante di avvio della pompa
IL Pulsante di avvio della pompa è un controllo cruciale nel Pressa piegatrice Genius (DA-66T e DA-69T), avviando il sistema idraulico per alimentare la macchina. Prima di premerlo, assicurarsi che la macchina sia correttamente collegata a una fonte di alimentazione stabile e che tutti i controlli di sicurezza siano stati completati. Una volta confermato, premere il pulsante Pulsante di avvio della pompa saldamente, consentendo l'innesto del sistema idraulico. Si dovrebbe sentire la pompa attivarsi, segnalando che la macchina è pronta per l'uso. Se la pompa non si avvia, verificare l'attivazione dell'arresto di emergenza o errori di sistema. Seguire sempre le istruzioni linee guida del produttore per un funzionamento sicuro.

Premi il pulsante Start e trova i punti di riferimento
Prima di iniziare qualsiasi operazione di piegatura sul Pressa piegatrice Genius, è essenziale inizializzare correttamente la macchina. Iniziare da premendo il pulsante di avvio, che attiva il sistema e lo prepara al funzionamento. Una volta acceso, il passo successivo è trovare i punti di riferimentoQuesti punti di riferimento aiutano la macchina a calibrare la sua posizione, garantendo angoli di piegatura precisi e un posizionamento preciso del registro posteriore. Controllori DA-66T e DA-69T Rileva e regola automaticamente i punti di riferimento, migliorando l'efficienza e la ripetibilità. La corretta impostazione di questi punti garantisce un funzionamento fluido, riduce gli errori e ottimizza le prestazioni di piegatura complessive della pressa piegatrice CNC.

Trovare i punti di riferimento è fatto
In Pressa piegatrice Genius operazione con DA-66T E DA-69T controllori, il messaggio “Trovare i punti di riferimento è fatto” indica che la macchina ha completato con successo la calibrazione del punto di riferimento. Questo processo garantisce che il registro posteriore, ariete e assi siano allineati correttamente, consentendo risultati di piegatura accuratiLa calibrazione del punto di riferimento è essenziale prima di iniziare qualsiasi attività di piegatura, in quanto consente Sistema CNC per mantenere precisione e ripetibilità. Se questo messaggio non viene visualizzato, gli operatori devono verificare allineamento del sensore, problemi di alimentazione o ostruzioni meccanicheLa calibrazione regolare migliora efficienza della macchina e previene errori di piegatura.

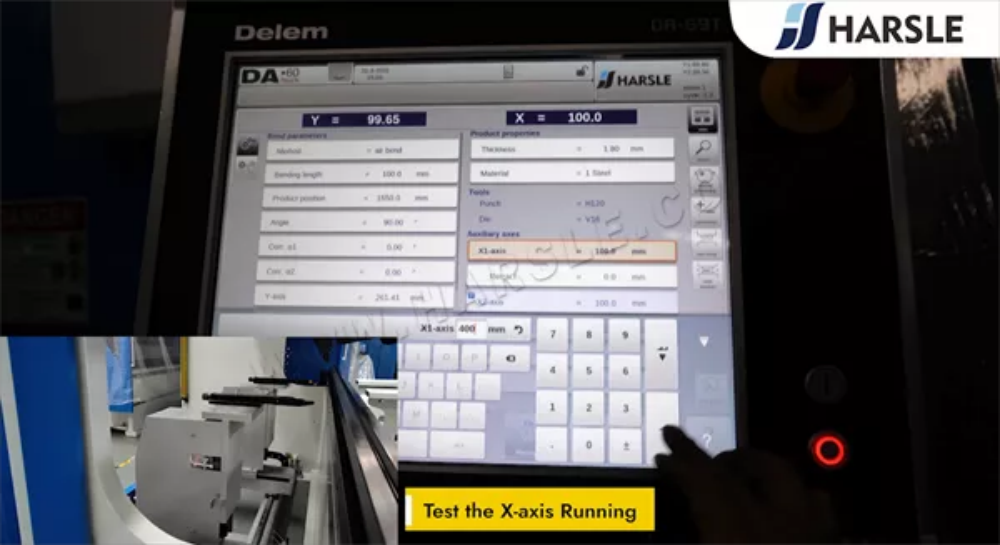
Prova l'asse X in esecuzione
Per garantire una precisione di piegatura precisa, è essenziale testare il Corsa sull'asse X sul tuo Pressa piegatrice Genius. Inizia accedendo al Controllore DA-66T o DA-69T e navigando verso il impostazioni del registro posterioreImpostare un punto di riferimento e comandare l'asse X di muoversi avanti e indietro, osservandone la fluidità e la precisione. Verificare eventuali disallineamenti, rumori insoliti o ritardi nella risposta. In caso di incongruenze, calibrare l'asse tramite le impostazioni del controller. Test regolari aiutano a mantenere prestazioni ottimali della macchina e garantiscono un posizionamento accurato per risultati di piegatura di alta qualità.
Prova il sistema di incoronazione in esecuzione
Testare il sistema di coronamento su un pressa piegatrice è essenziale garantire una precisione di piegatura costante su tutto il pezzo. Iniziare selezionando una lamiera standard e impostando la macchina con un appropriato forza di piegatura e apertura della matrice a VAttivare il sistema di bombatura ed eseguire una piega di prova, verificando eventuali deformazioni o incongruenze. Utilizzare un righello o calibro per misurare la flessione lungo la curva. Se necessario, regolare le impostazioni di bombatura per ottenere una distribuzione uniforme della pressione. Test regolari aiutano a prevenire difetti di piegatura, migliorano la qualità dei pezzi e prolungano la durata dei componenti della macchina.

Controllare i parametri degli utensili
Le impostazioni corrette dei parametri degli utensili sono fondamentali per ottenere pieghe precise e coerenti su un Pressa piegatrice GeniusPrima di iniziare qualsiasi operazione, controllare attentamente le impostazioni del punzone, della matrice e dello spessore del materiale nel Controllore DA-66T o DA-69TAssicurarsi che l'apertura a V, il raggio del punzone e la tolleranza di piegatura siano configurati correttamente per soddisfare i requisiti di piegatura. Parametri errati possono portare a angoli imprecisi, usura eccessiva degli utensili o difetti dei materialiControllare regolarmente l'usura degli utensili e ricalibrare le impostazioni secondo necessità. Mantenendo parametri ottimali degli utensili, è possibile migliorare la precisione di piegatura, prolungare la durata dell'utensile e aumentare l'efficienza complessiva nelle operazioni di pressatura.

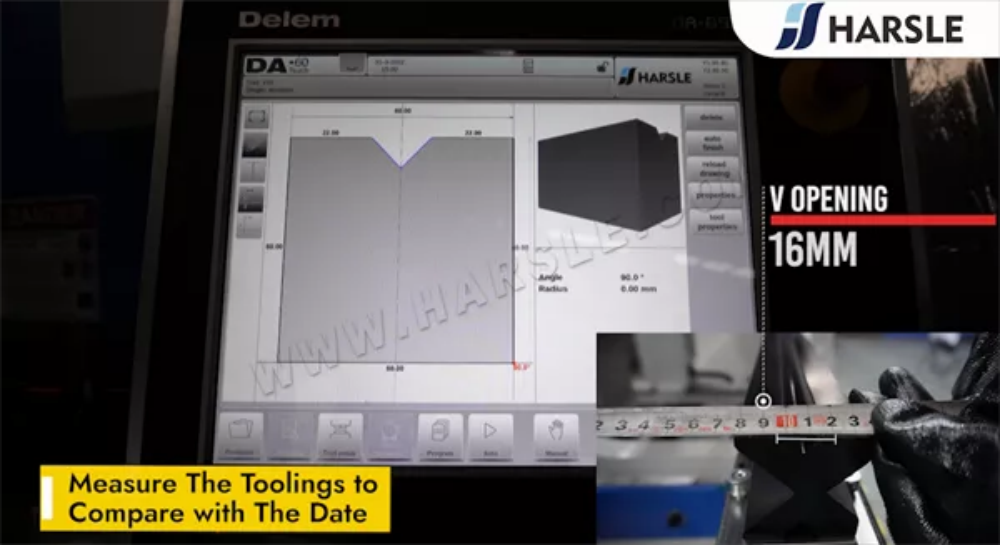
Misurare gli utensili per confrontarli con la data
Misurare accuratamente gli utensili della pressa piegatrice è essenziale per garantire la compatibilità con le impostazioni della macchina e la precisione di piegatura. Utilizzare calibri o micrometri per misurare le dimensioni di punzone e matrice, inclusi altezza, larghezza e angolo. Confrontare queste misurazioni con dati originali forniti dal produttore per verificarne la precisione. Anche lievi deviazioni possono influire sui risultati di piegatura, causando disallineamenti o deformazioni del materiale. Controlli di misurazione regolari aiutano a mantenere la coerenza e a prolungare la durata dell'utensile. In caso di discrepanze, ricalibrare l'utensile o consultare il fornitore per eventuali regolazioni. Una misurazione corretta garantisce precisione, riduce gli errori e ottimizza le prestazioni della pressa piegatrice.

Parte 3: Programmazione di piegatura
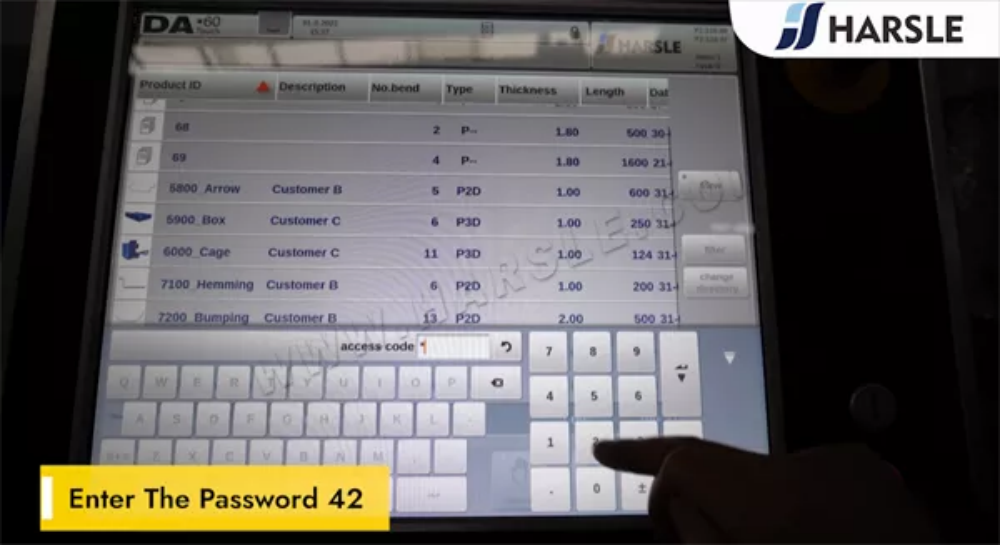
Inserisci la password 42
Uno schermo scarsamente illuminato tremolava nell'oscurità, suggerendo: "Inserisci la password." Le mani esitavano sulla tastiera prima di digitare “42”—un numero apparentemente ordinario, eppure carico di un mistero infinito. Il sistema ronzava, concedendo l'accesso con un leggero segnale acustico. Improvvisamente, una cascata di file crittografati e messaggi nascosti invase il display. Cosa sbloccava questa password? Una verità dimenticata, un esperimento segreto o la porta d'accesso a una dimensione sconosciuta? Il numero 42, a lungo acclamato come la risposta alla più grande domanda della vita, aveva appena rivelato qualcosa di molto più profondo. Ma era conoscenza o una sfida in attesa di essere svelata?
Inserisci il nome del programma
Durante il funzionamento del Pressa piegatrice Genius con DA-66T o DA-69T, il primo passo è inserire il nome del programma. Questo nome aiuta a identificare la sequenza di piegatura e i parametri per riferimento futuro. Per fare ciò, andare su interfaccia di programmazione, seleziona “Nuovo programma”e inserisci un nome univoco che descriva il lavoro. Utilizzando nomi chiari e strutturati, come il tipo di materiale o l'ID del progetto, garantisce un facile recupero. Dopo aver confermato l'inserimento, procedere con l'impostazione delle fasi di piegatura. L'organizzazione sistematica dei programmi migliora efficienza del flusso di lavoro e riduce al minimo gli errori in Operazioni di pressatura CNC.

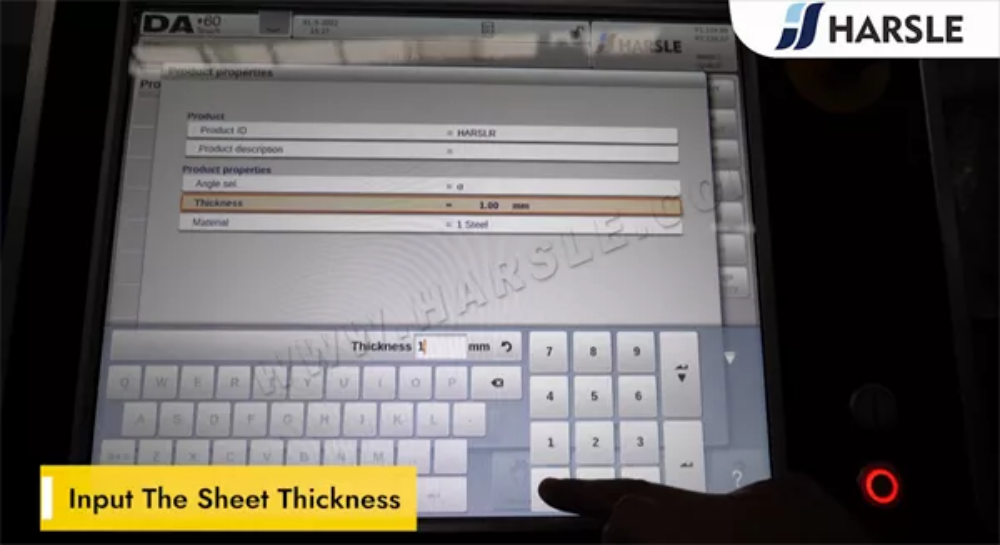
Inserisci lo spessore del foglio
Durante il funzionamento del Pressa piegatrice Genius con il Controllore DA-66T o DA-69T, inserendo con precisione il spessore del foglio è fondamentale per ottenere risultati di piegatura precisi. Per fare ciò, accedere alle impostazioni del materiale nel controller CNC e immettere spessore esatto della lamiera. L'input corretto garantisce calcolo corretto della forza di flessione, previene il sovraccarico e mantiene elevata precisione di piegaturaVerificare sempre lo spessore con un calibro prima dell'inserimento. Impostazioni di spessore errate possono portare a angoli imprecisi e potenziale sollecitazione della macchina. Questo passaggio è essenziale per garantire curve costanti e di alta qualità nel tuo processo di fabbricazione.
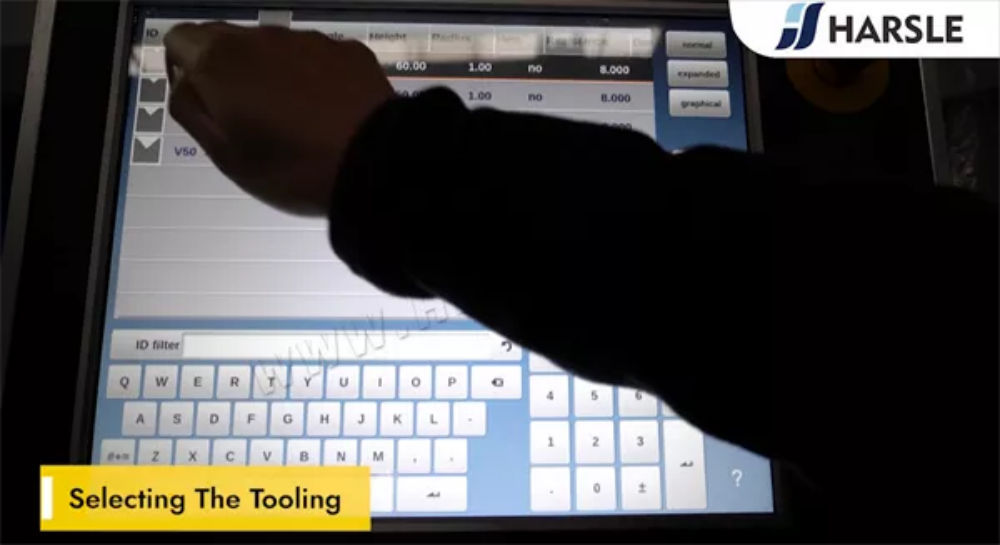
Selezione degli utensili
Scegliere il corretto utensili per presse piegatrici è essenziale per ottenere curve precise e coerenti. Il Pressa piegatrice Genius, dotato di Controllori DA-66T e DA-69T, richiede punzoni e matrici di alta qualità che corrispondono al tipo di materiale, allo spessore e all'angolo di piegatura. Fattori come durezza dell'utensile, apertura della matrice a V e raggio del punzone influiscono in modo significativo sulla precisione della piegatura. Inoltre, la selezione utensili a cambio rapido può migliorare l'efficienza nella produzione. Per piegature complesse, gli utensili segmentati consentono una maggiore flessibilità. Assicurarsi sempre la compatibilità con Parametri di programmazione CNC per ottimizzare le prestazioni. Investire negli utensili giusti non solo migliora la precisione di piegatura, ma prolunga anche la durata della macchina.
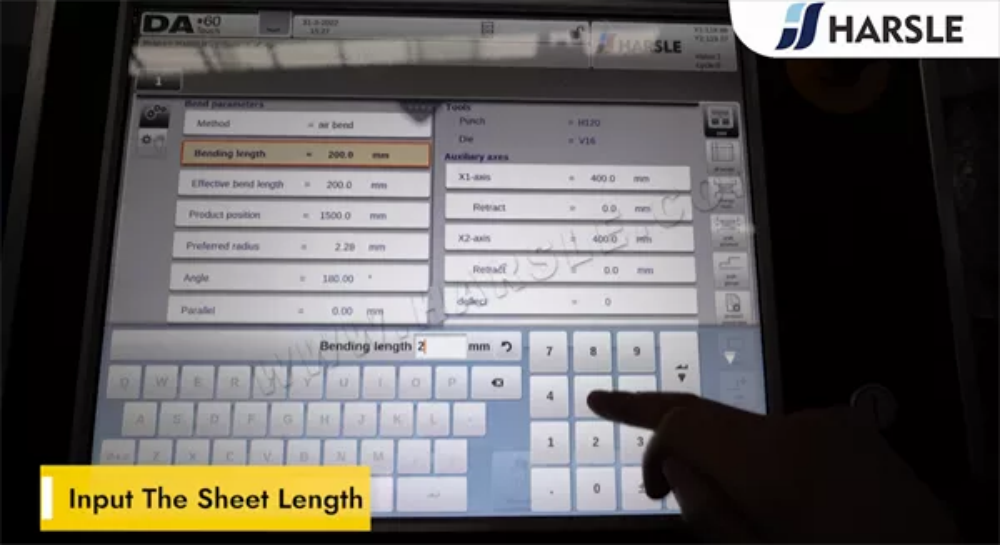
Inserisci la lunghezza del foglio
Inserendo il corretto lunghezza del foglio è fondamentale per operazioni di piegatura precise sul Pressa piegatrice Genius dotato di Controllori DA-66T o DA-69TPer immettere la lunghezza del foglio, andare su interfaccia di programmazione, individuare il impostazioni del materialee inserisci l'esatto lunghezza del foglio in base alle specifiche del pezzo. Questo passaggio garantisce un posizionamento preciso del registro posteriore e previene disallineamenti durante la piegatura. Verificare sempre che il valore inserito corrisponda alle dimensioni effettive del foglio. L'inserimento corretto della lunghezza del foglio migliora precisione di piegatura, ripetibilità ed efficienza, riducendo al minimo gli sprechi di materiale e garantendo curve di alta qualità in Operazioni di pressatura CNC.
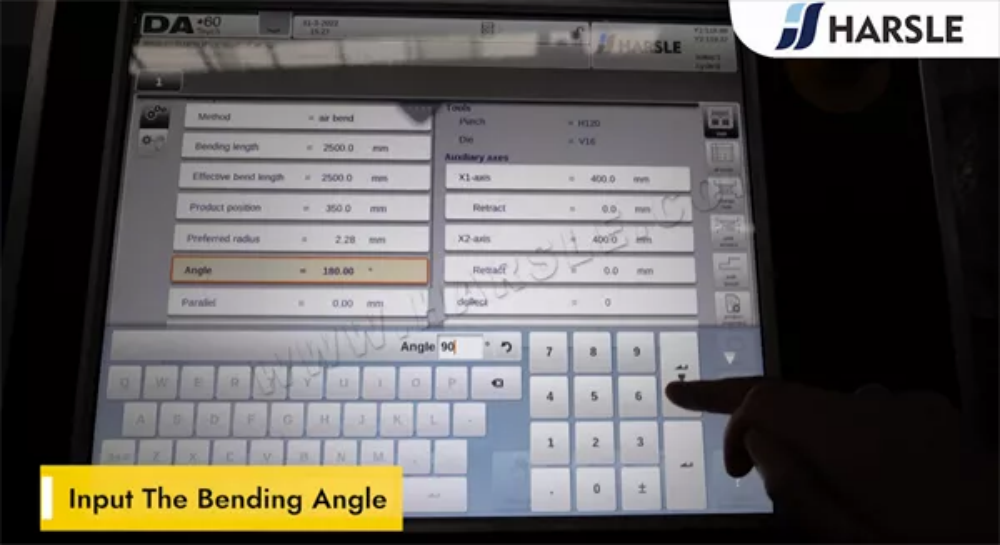
Inserisci l'angolo di piegatura
L'inserimento accurato dell'angolo di piegatura è fondamentale per ottenere piegature precise della lamiera con la pressa piegatrice Genius. Utilizzando il Controllori CNC DA-66T e DA-69T, gli operatori possono facilmente impostare l'angolo desiderato tramite l'interfaccia intuitiva. Il sistema calcola automaticamente l'angolo richiesto profondità del punzone in base allo spessore del materiale e ai parametri di piegatura, garantendo la coerenza in ogni piega. È possibile apportare regolazioni precise per compensare ritorno elastico, garantendo un'elevata precisione. La padronanza di questa funzione migliora efficienza, riduce gli sprechi di materialee migliora la qualità complessiva della piegatura. Le impostazioni angolari corrette portano a un processo di produzione senza interruzioni con meno errori e una maggiore produttività.
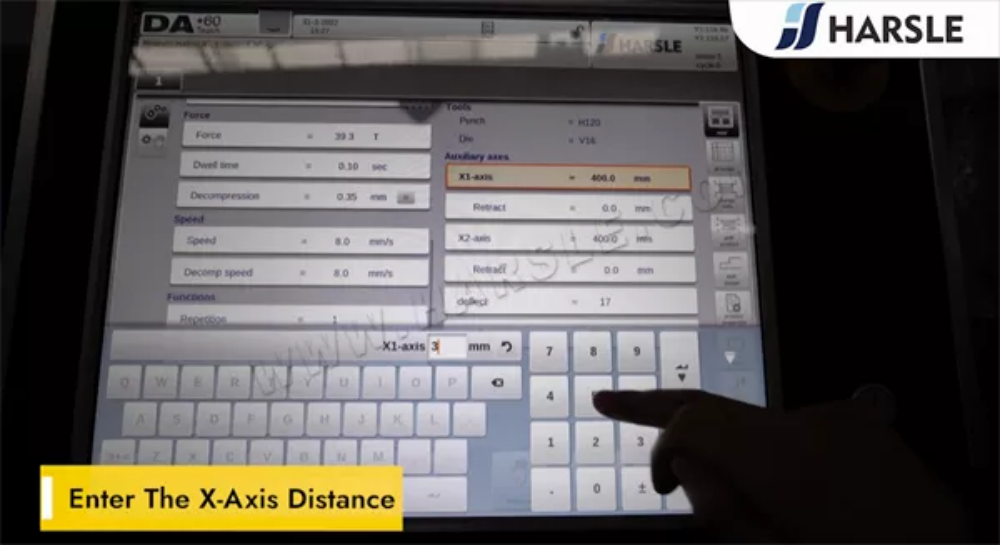
Inserisci la distanza dell'asse X
IL Distanza dell'asse X su un Pressa piegatrice Genius si riferisce alla posizione del registro posteriore, che determina dove posizionare la lamiera per la piegatura. Impostare con precisione questa distanza è fondamentale per ottenere angoli di piega precisi e risultati costanti.
Per entrare nel Distanza dell'asse X sul Controllore DA-66T o DA-69T, vai al impostazioni del registro posteriore, inserisci la distanza richiesta in base alle tue esigenze di piegatura e conferma il valore. Il sistema regolerà automaticamente la posizione del registro posteriore. Una corretta calibrazione garantisce precisione ripetibile, riduce gli errori e aumenta la produttività. Controllare sempre il posizionamento prima di iniziare il processo di piegatura.
Aggiungi un altro passaggio di piegatura
Aggiunta di un altro passaggio di piegatura nel Pressa piegatrice Genius con DA-66T o DA-69T Il controller consente sequenze di piegatura più complesse e una formatura precisa dei metalli. Per fare ciò, accedere all'interfaccia del controller CNC e passare al programma di piegatura. Inserire una nuova fase di piegatura regolando angolo, posizione del calibro posteriore e impostazioni della pressione come richiesto. Assicurarsi che ogni passaggio segua la sequenza corretta per evitare errori. Ricontrollare la simulazione prima dell'esecuzione per confermarne l'accuratezza. Questa funzionalità migliora la produttività e la flessibilità, semplificando la gestione di processi complessi. piegatura della lamiera compiti in modo efficiente.

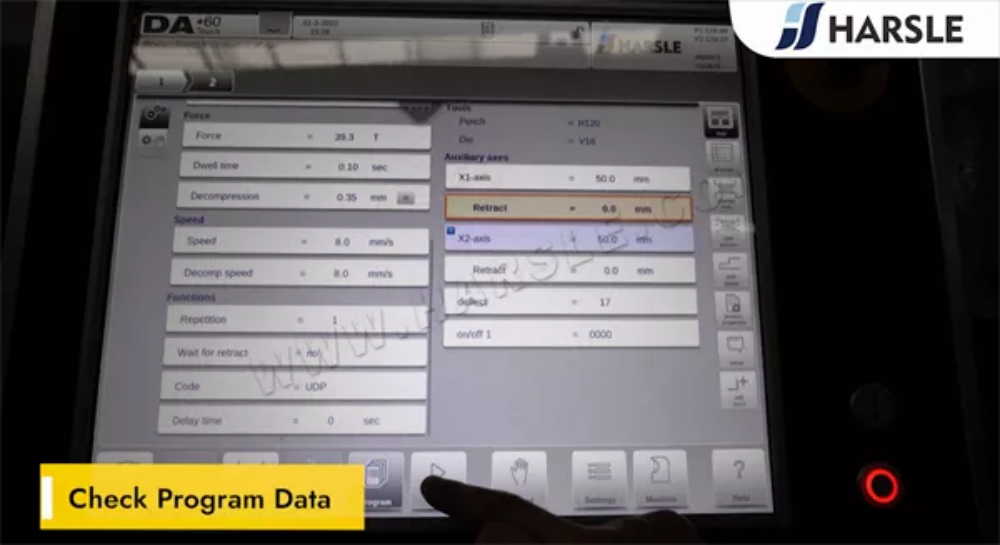
Controlla i dati del programma
Controllo dati del programma sul Pressa piegatrice Genius con DA-66T o DA-69T garantisce operazioni di piegatura accurate e riduce al minimo gli errori. Prima di eseguire un programma, gli operatori devono verificare i parametri chiave, tra cui angoli di piegatura, spessore del materiale, selezione degli utensili e sequenza dei passaggiUtilizzare l'interfaccia del controller per rivedere e regolare i dati, se necessario. Assicurarsi che i dati siano corretti posizionamento del registro posteriore e impostazioni di bombatura per ottenere risultati precisi. Il controllo regolare dei dati di programma aumenta l'efficienza, riduce le rilavorazioni e migliora le prestazioni complessive della macchina. Padroneggiare questo processo garantisce pieghe costanti e di alta qualità, massimizzando al contempo le capacità della pressa piegatrice.
Pronto per iniziare
Pronti per iniziare il vostro viaggio con il Pressa piegatrice Genius? Che tu sia un principiante o un operatore esperto, padroneggiare il DA-66T e DA-69T I controllori sono essenziali per ottenere risultati di piegatura precisi ed efficienti. Questi sistemi CNC avanzati offrono programmazione intuitiva, elevata precisione e automazione senza interruzioni, aiutandoti a semplificare il tuo processo produttivo. In questa guida, ti guideremo attraverso i passaggi chiave per ottimizzare il funzionamento della tua pressa piegatrice, dalla configurazione alle funzioni avanzate. Preparati a sfruttare appieno il potenziale della tua macchina e a migliorare l'efficienza della piegatura dei metalli come mai prima d'ora! Immergiamoci nell'argomento.

Parte 4: Prodotti piegati
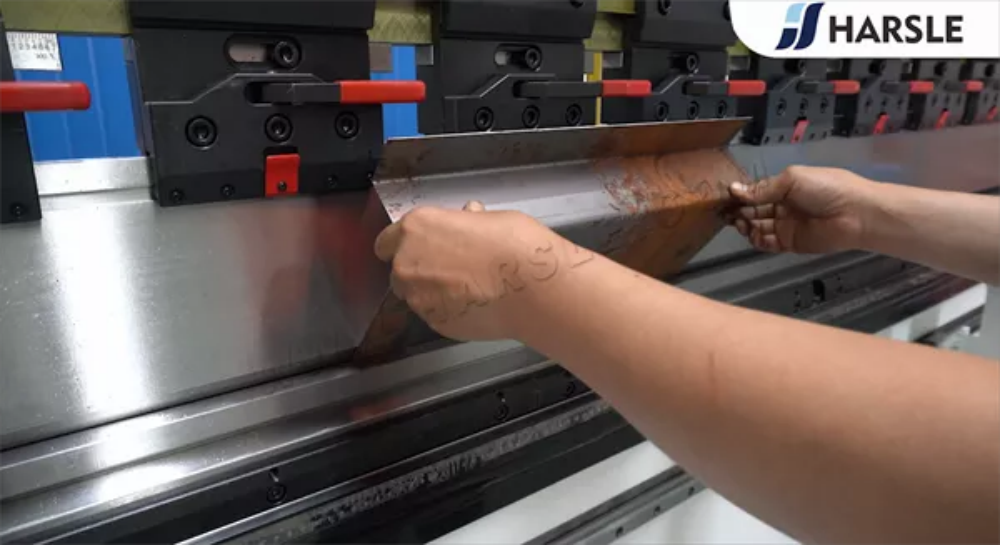
Posizionamento della lamiera
Posizionamento corretto della lamiera sul Pressa piegatrice Genius è essenziale per ottenere pieghe precise e uniformi. Iniziare assicurandosi che il tavolo di lavoro sia pulito e privo di detriti per evitare disallineamenti. Posizionare la lamiera contro il registro posteriore, allineandola con le dimensioni di piegatura richieste. Utilizzare impostazioni automatiche del registro posteriore nel DA-66T o DA-69T controller per regolare con precisione la posizione di arresto. Per fogli grandi o pesanti, prendere in considerazione l'utilizzo seguaci di fogli o un supporto aggiuntivo per mantenere la stabilità. Il corretto posizionamento non solo migliora precisione di piegatura ma assicura anche sicurezza dell'operatore e prolunga la durata dell'utensile.
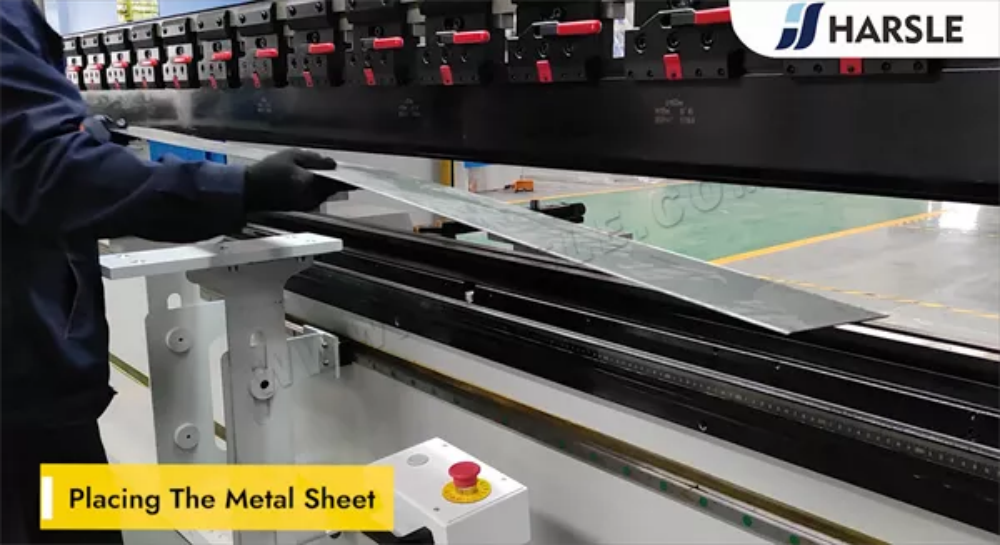
Il foglio toccherà le dita di arresto
Quando si opera un Pressa piegatrice Genius, garantendo la il foglio tocca le dita di arresto è fondamentale per una piegatura precisa. Il dita di arresto del registro posteriore fungere da punto di riferimento, posizionando correttamente la lamiera prima di iniziare la piegatura. Se la lamiera non è completamente a contatto, si potrebbero ottenere angoli di piega imprecisi o risultati incoerenti. Gli operatori devono regolare posizione del registro posteriore secondo il programma di piegatura e verificare l'allineamento prima di premere il pedale. Il corretto contatto con le dita di arresto garantisce ripetibilità precisa, riduzione degli errori e miglioramento dell'efficienza nelle operazioni di piegatura CNC. Anche la manutenzione regolare del sistema di registro posteriore è essenziale per la precisione a lungo termine.

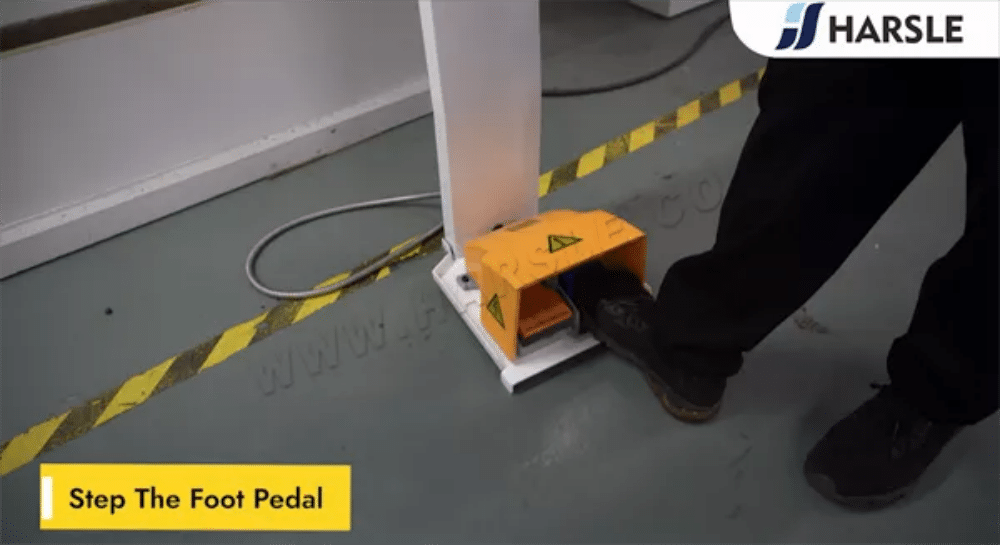
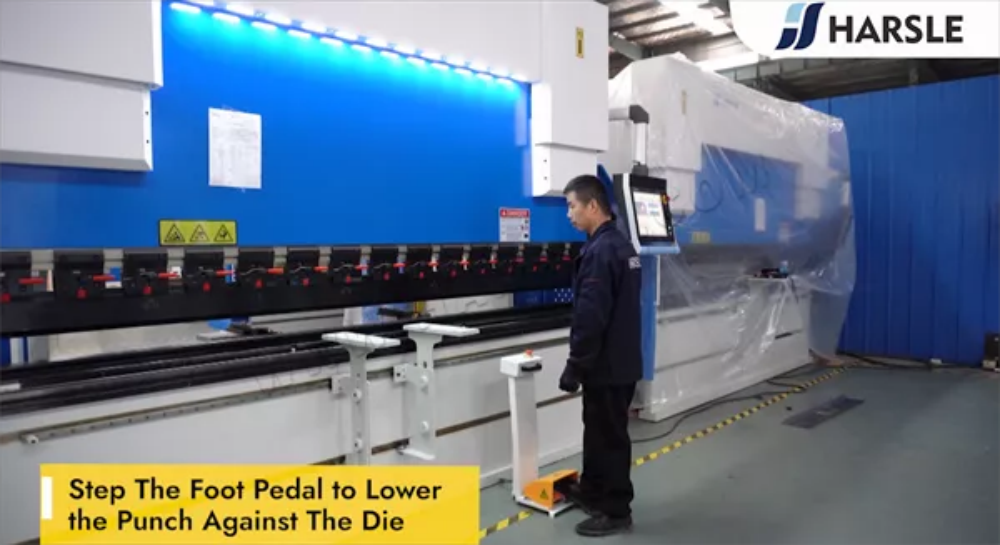
Premi il pedale
IL pedale è un meccanismo di controllo cruciale in Pressa piegatrice Genius funzionamento, consentendo agli operatori di eseguire le attività di piegatura in modo efficiente. Premendo il pedale, gli utenti possono attivare, tenere premuto o rilasciare il processo di piegatura con precisione. Il Controllori DA-66T e DA-69T sincronizzare con il pedale per garantire un funzionamento fluido, riducendo lo sforzo manuale e aumentando la produttività. Gli operatori devono mantenere un movimento costante del piede per evitare arresti improvvisi o disallineamenti durante la piegatura. Controllare regolarmente il pedale per risposta adeguata e conformità alla sicurezzaPadroneggiare l'uso del pedale garantisce controllo senza soluzione di continuità, migliorando la precisione e l'efficienza della piegatura nella fabbricazione della lamiera.
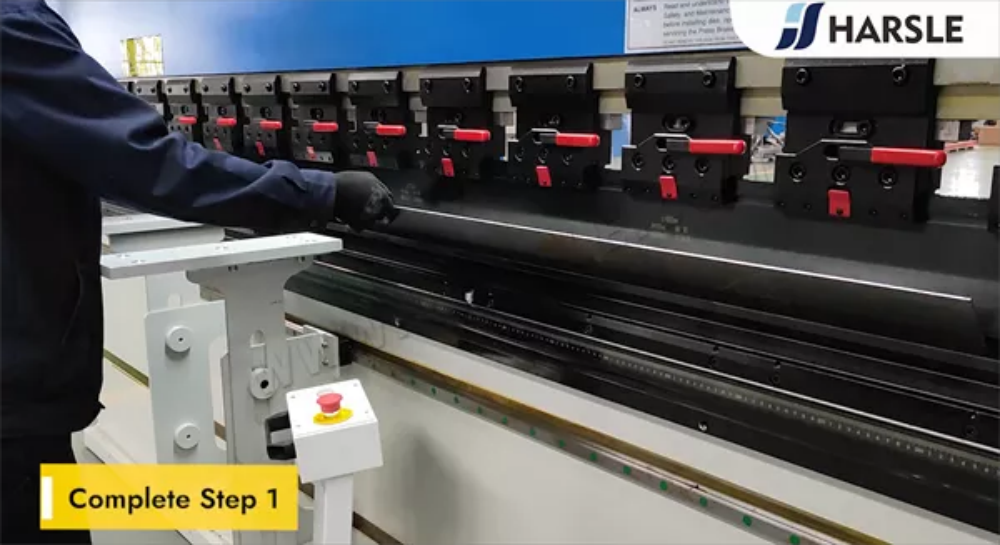
Completa il passaggio 1
Prima di azionare il Pressa piegatrice Genius, è fondamentale familiarizzare con il Controllori CNC DA-66T e DA-69TQuesti sistemi Delem avanzati offrono interfacce touch-screen intuitive, simulazioni di piegatura in tempo reale e un controllo preciso sui parametri di piegatura. Inizia esplorando il menu principale, da cui puoi accedere alle impostazioni della macchina, alla selezione dei materiali e alla configurazione degli utensili. Scopri come navigare tra le modalità di programmazione e regolare gli assi per garantire piegatura precisa ed efficienteLa comprensione di questi controllori sarà massimizzare la produttività, ridurre i tempi di configurazione e migliorare la precisione di piegatura, consentendo di sfruttare appieno le capacità della macchina.
Premi il pedale
Premere il pedale è un passaggio cruciale nel funzionamento del Pressa piegatrice Genius dotato di DA-66T o DA-69T Controller. Il pedale funge da controllo principale per l'esecuzione del processo di piegatura, consentendo agli operatori di gestire con precisione il movimento della macchina. Grazie al design reattivo ed ergonomico, garantisce un funzionamento fluido, migliorando sia l'efficienza che la sicurezza. Una leggera pressione attiva il ciclo di piegatura, mentre il rilascio del pedale arresta immediatamente il movimento, prevenendo errori. Gli operatori devono assicurarsi che i piedi siano posizionati correttamente per mantenere la stabilità ed evitare attivazioni involontarie. Padroneggiare il controllo del pedale porta a un flusso di lavoro migliore e a una maggiore precisione nelle attività di piegatura dei metalli.

Completa il passaggio 2
Una volta che il Pressa piegatrice Genius è acceso, il prossimo passo cruciale è l'impostazione del Controllore CNC DA-66T o DA-69TInizia selezionando il programma di piegatura appropriato o creandone uno nuovo. Inserisci parametri chiave come tipo di materiale, spessore, angolo di piegatura e selezione punzone/matriceUtilizzare l'interfaccia touchscreen per regolare posizionamento del registro posteriore e impostazioni di bombatura per la precisione. Ricontrollare tutti i valori per garantire l'accuratezza prima di procedere. Una corretta configurazione garantisce curve fluide e uniformi e riduce al minimo gli errori. Padroneggiare questo passaggio migliora l'efficienza e prolunga la durata del tuo utensili per presse piegatrici.

Parte 5: Misurazione e calibrazione
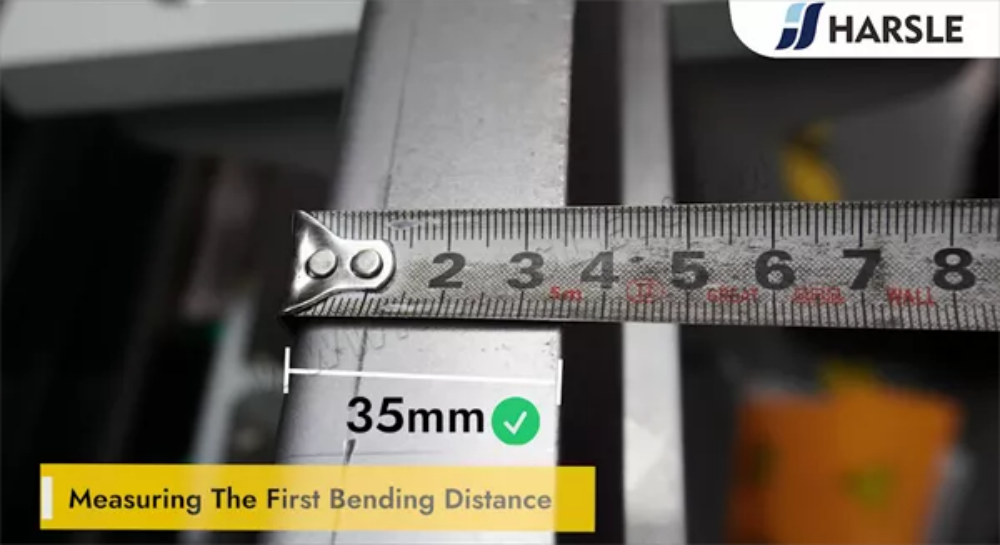
Misurazione della prima distanza di piegatura
IL prima distanza di piegatura è un fattore critico per ottenere una piegatura precisa della lamiera. Si riferisce allo spazio iniziale tra l'utensile di piegatura e il pezzo, che influisce direttamente sulla precisione dell'angolo di piega e sulle dimensioni finali. Per misurarlo correttamente, gli operatori devono considerare fattori come spessore del materiale, tolleranza di piegatura e tipo di utensileUtilizzando un Pressa piegatrice CNC con DA-66T o DA-69T, è possibile immettere misurazioni precise per garantire la coerenza. Una corretta calibrazione e una piegatura di prova aiutano a eliminare gli errori, con conseguente curve impeccabili e ridotto spreco di materialePadroneggiare questo passaggio garantisce efficienza e produzione di alta qualità.
Misurazione della seconda distanza di piegatura
La misurazione della seconda distanza di piegatura è fondamentale per ottenere risultati accurati e coerenti in operazioni di pressaturaQuesto passaggio garantisce che il materiale si allinei correttamente per la piega successiva, prevenendo errori e mantenendo la precisione. Per una misurazione efficace, gli operatori devono considerare fattori quali spessore del materiale, angolo di piegatura ed effetto di ritorno elasticoUtilizzando un sistema di registro posteriore e verificando i valori programmati sul Controllore DA-66T o DA-69T può aiutare a mantenere la precisione. Inoltre, l'esecuzione di un prova di piegatura Prima di avviare la produzione su larga scala, è possibile prevenire errori di calcolo. Tecniche di misurazione appropriate riducono le rilavorazioni, migliorano la produttività e garantiscono risultati di piegatura dei metalli di alta qualità.

Utilizzo del righello angolare
IL righello angolare è uno strumento essenziale per garantire una piegatura precisa in Pressa piegatrice Genius operazioni. Aiuta gli operatori a misurare e verificare l'angolo di piegatura della lamiera, riducendo gli errori e migliorando la precisione. Quando si utilizza il Controllori DA-66T o DA-69TIl righello angolare consente regolazioni in tempo reale, garantendo che ogni piegatura soddisfi le specifiche di progettazione. Per utilizzarlo in modo efficace, posizionare il righello sulla piegatura, confrontare l'angolo misurato con il valore programmato e apportare le correzioni necessarie. La calibrazione regolare del righello angolare migliora la precisione. Padroneggiare questo strumento garantisce piegature costanti e di alta qualità, ottimizzando l'efficienza in pressa piegatrice CNC operazioni.
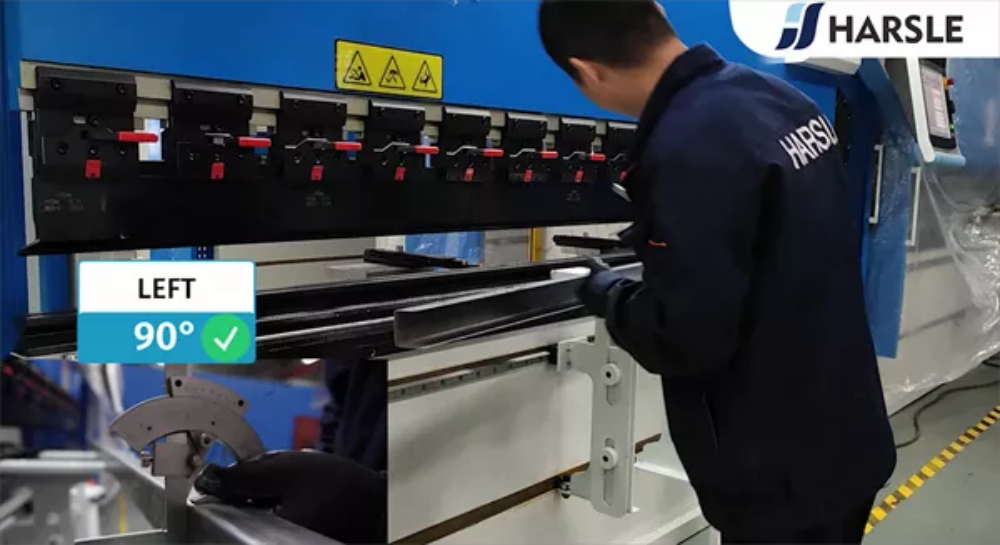
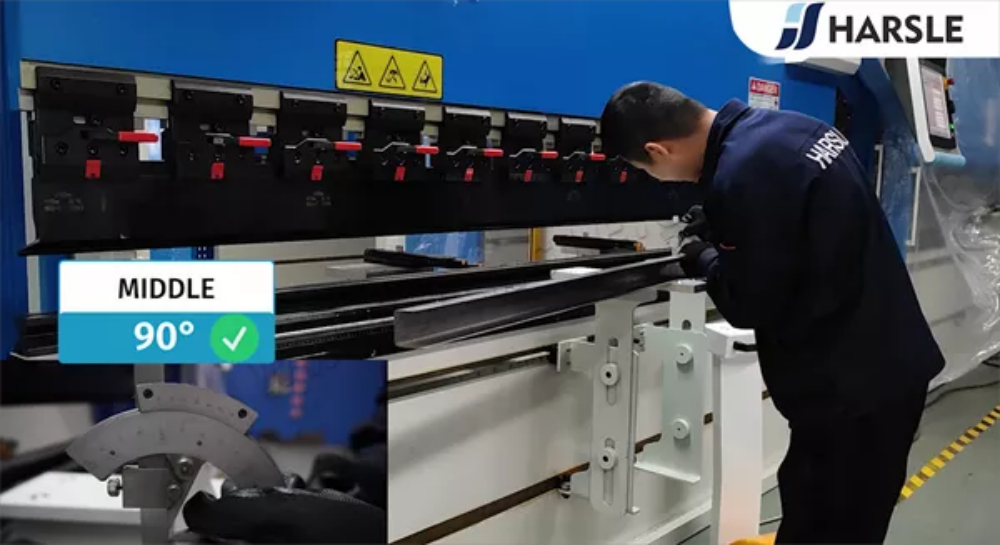
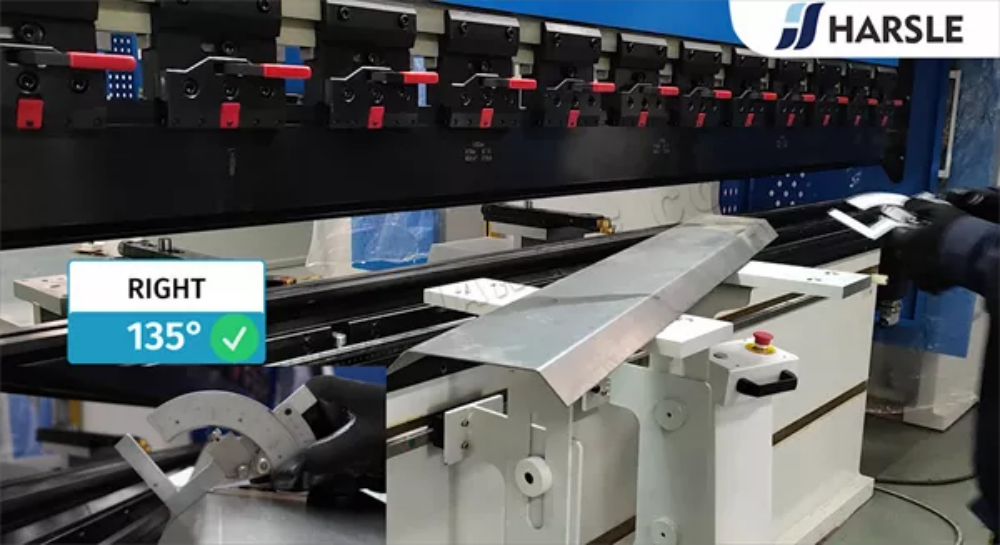
Misurare gli angoli di piegatura in tre posizioni: sinistra, centro e destra
Per garantire la precisione nella piegatura dei metalli, è fondamentale misurare gli angoli di piegatura in tre posizioni chiave: sinistra, centro e destraQuesto metodo aiuta a identificare eventuali incongruenze causate dalle proprietà dei materiali, dall'usura degli utensili o dalla calibrazione della macchina. Utilizzare un goniometro digitale o goniometro digitale per controllare ogni sezione dopo la piegatura. Se si verificano deviazioni, apportare modifiche bombatura, allineamento del registro posteriore o impostazioni di pressione potrebbe essere necessario. La misurazione regolare di queste tre posizioni migliora la precisione della piegatura e garantisce risultati uniformi su tutto il pezzo in lavorazione, riducendo le rilavorazioni e migliorando l'efficienza nelle operazioni di pressatura CNC.

Errore trovato nella posizione sinistra
Durante il funzionamento della pressa piegatrice, un è stato rilevato un errore nella posizione sinistra, influenzando la precisione del processo di piegatura. Questo problema potrebbe essere causato da diversi fattori, tra cui disallineamento del sensore, squilibrio idraulico o errori di calibrazione del software nel controller DA-66T o DA-69T. Per risolvere questo problema, gli operatori dovrebbero prima controllare i sensori di posizione, ispezionare il sistema idraulico per incongruenze di pressionee garantire il Il sistema CNC è correttamente calibratoUna manutenzione regolare e una risoluzione tempestiva dei problemi possono aiutare a prevenire tali problemi, garantendo precisione di piegatura e prestazioni della macchina costanti.
Misurato a 89°
Durante il processo di piegatura, l'angolo era misurato a 89°, deviando leggermente dai 90° previsti. Questa piccola discrepanza potrebbe essere dovuta a ritorno elastico del materiale, selezione errata del punzone e della matrice o pressione insufficiente applicata dalla pressa piegatricePer correggere questo problema, gli operatori dovrebbero prima controllare il impostazioni di tolleranza di piegatura nel controller DA-66T o DA-69T, regolare il posizionamento del registro posteriore, ed eseguire un prova di piega con compensazioneGarantire la corretta selezione degli utensili e la consistenza dei materiali può aiutare a raggiungere angoli di piegatura precisi e migliorare la precisione complessiva del funzionamento della pressa piegatrice.


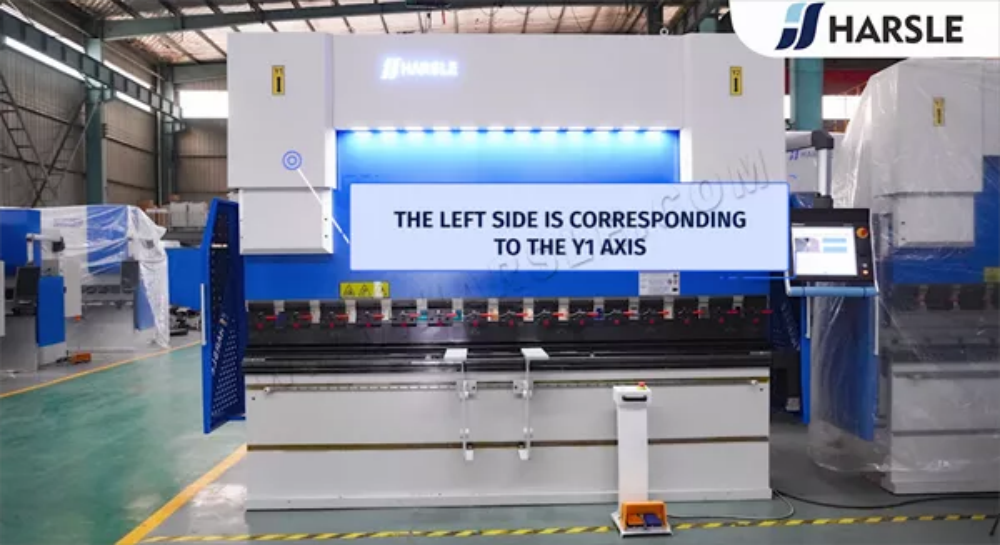
Il lato sinistro corrisponde all'asse Y1
In un pressa piegatrice CNC, IL il lato sinistro della macchina corrisponde all'asse Y1, mentre il lato destro è controllato dall'asse Y2. Questi assi idraulici indipendenti consentono controllo preciso del movimento dell'ariete, garantendo una piegatura precisa e uniforme. Se si verifica un disallineamento o un errore di piegatura sul lato sinistro, gli operatori devono controllare Calibrazione dell'asse Y1, bilanciamento della pressione idraulica e segnali dell'encoderLa corretta sincronizzazione tra Y1 e Y2 è essenziale per raggiungere angoli di piegatura uniformi e riduzione al minimo della deformazione nei processi di fabbricazione dei metalli. Una manutenzione regolare garantisce un funzionamento regolare e preciso.
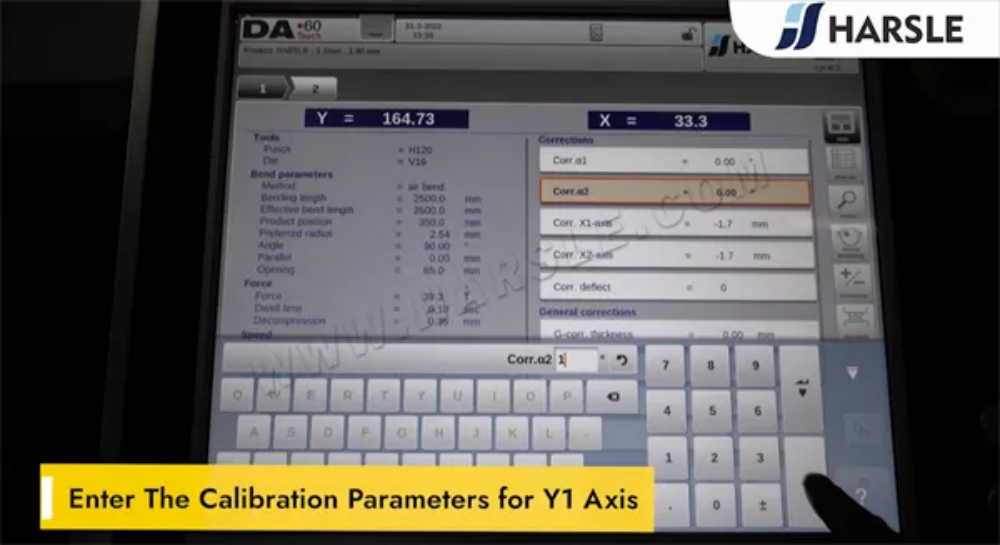
Inserire i parametri di calibrazione per l'asse Y1
Per garantire una precisione di piegatura precisa, è essenziale immettere i parametri di calibrazione per l'asse Y1 correttamente. L'asse Y1 controlla il movimento del lato sinistro dell'arietee qualsiasi disallineamento può portare a curve irregolari. La calibrazione comporta impostazione dei punti di riferimento, regolazione dei limiti di corsa e verifica della sincronizzazione con l'asse Y2. Gli operatori devono accedere al Controllore DA-66T o DA-69T, accedere al menu di calibrazione e immettere i valori richiesti in base alle specifiche della macchina. Una calibrazione regolare aiuta a mantenere precisione di piegatura costante, riduce gli errori e migliora le prestazioni complessive della pressa piegatrice.
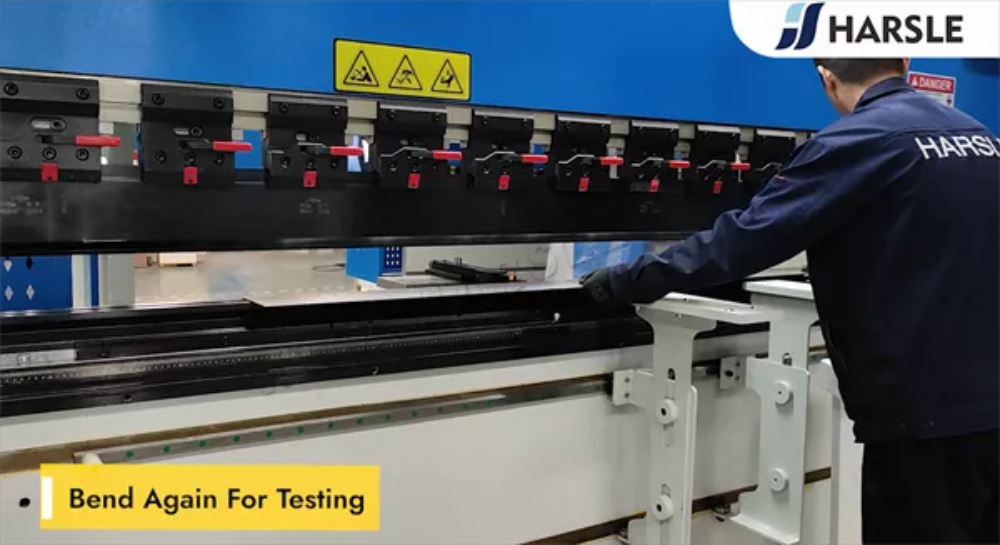
Piegare di nuovo per il test
Dopo aver apportato le modifiche alle impostazioni della pressa piegatrice, è necessario piegare di nuovo per il test per verificarne l'accuratezza. Questo passaggio garantisce che deviazioni angolari, ritorno elastico del materiale o errori di calibrazione sono stati corretti correttamente. Gli operatori dovrebbero selezionare un pezzo di prova dello stesso materiale e spessore, impostare i parametri corretti sul Controllore DA-66T o DA-69Te osservare attentamente il risultato della piegatura. Se persistono delle discrepanze, è necessario perfezionare la impostazioni di registro posteriore, penetrazione del punzone o compensazione potrebbe essere necessario. L'esecuzione di più piegature di prova aiuta a raggiungere precisione e coerenza ottimali nel processo di piegatura dei metalli.
Misurare per controllare
Dopo aver completato il processo di piegatura, è fondamentale misurare per controllare se l'angolo finale soddisfa le specifiche richieste. Utilizzando strumenti di misurazione di precisione come un goniometro, calibro angolare o calibro digitale, gli operatori possono determinare se qualcuno deviazioni o incongruenze esiste. Se l'angolo misurato non corrisponde al target, potrebbero essere necessarie delle regolazioni in forza di flessione, penetrazione del punzone o posizionamento del materialeLa misurazione costante dopo ogni piega di prova garantisce precisione, riduce gli sprechi di materiale e ottimizza l'efficienza produttivaLa verifica regolare aiuta a mantenere alta precisione e qualità nelle operazioni di pressatura CNC.
Ora è corretto
Dopo aver effettuato le regolazioni necessarie e aver eseguito le curve di prova, la misurazione finale conferma che ora è correttoL'angolo di piegatura raggiunto è conforme alle specifiche richieste, garantendo alta precisione e coerenza nel processo di formatura dei metalli. Questa fase di verifica è essenziale per confermare che impostazioni di calibrazione, selezione degli utensili e posizionamento del materiale sono stati regolati correttamente. Gli operatori possono ora procedere con la produzione su larga scala, sapendo che la macchina funziona in modo ottimale. Controlli regolari e regolazioni di precisione aiutano a mantenere precisione, ridurre gli errori e migliorare l'efficienza complessiva nelle operazioni di pressatura CNC.

Parte 6: Programmazione grafica
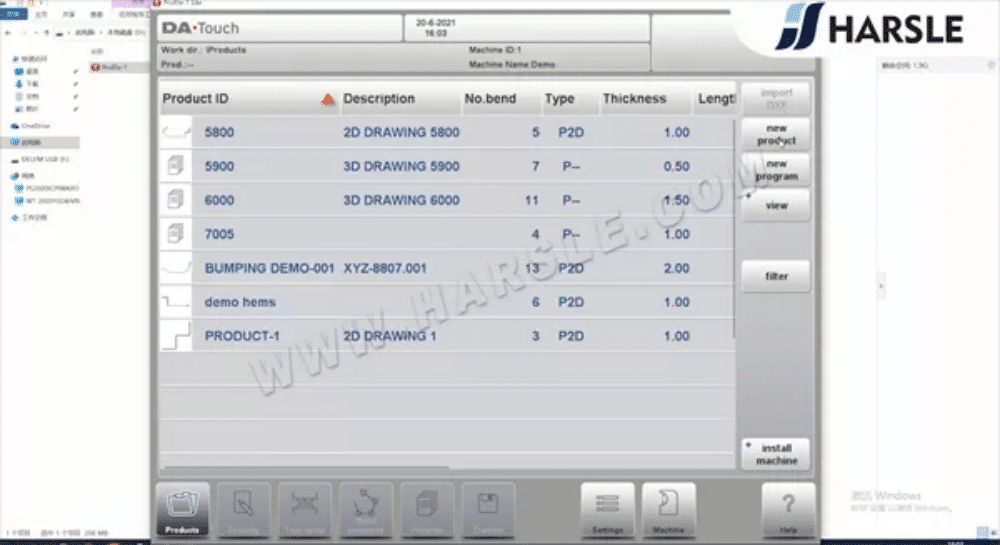
Aggiungi nuovo prodotto
Per ampliare la gamma di prodotti e migliorare l'efficienza, è essenziale aggiungere un nuovo prodotto al sistema. In un pressa piegatrice CNC, ciò comporta l'aggiornamento del Controllore DA-66T o DA-69T con nuovi parametri di piegatura, specifiche dei materiali e configurazioni degli utensili. Gli operatori devono inserire attentamente tipo di materiale, spessore, angolo di piegatura e selezione dello stampo per garantire risultati precisi. Una volta aggiunto, eseguire un prova di piegatura aiuta a verificare l'accuratezza prima della produzione su larga scala. Aggiornare regolarmente il sistema con nuovi prodotti e impostazioni ottimizzate migliora l'efficienza del flusso di lavoro, riduce i tempi di configurazione e garantisce prestazioni di piegatura costanti nella fabbricazione dei metalli.

Inserisci le informazioni sul prodotto
Per garantire operazioni di piegatura precise, gli operatori devono inserisci le informazioni sul prodotto nel sistema di pressa piegatrice CNC. Questo processo include l'inserimento di dettagli chiave come tipo di materiale, spessore, angolo di piegatura, selezione di punzone e matrice e sequenza di piegaturaSu controller come il DA-66T o DA-69T, l'inserimento accurato dei dati garantisce che la macchina segua i parametri corretti, riducendo al minimo gli errori e migliorando l'efficienza. La corretta memorizzazione delle informazioni sul prodotto consente richiamo rapido delle impostazioni, riducendo i tempi di configurazione per gli ordini ripetuti. La verifica di tutti gli input prima dell'operazione aiuta a mantenere alta precisione, coerenza e qualità nel processo di piegatura dei metalli.

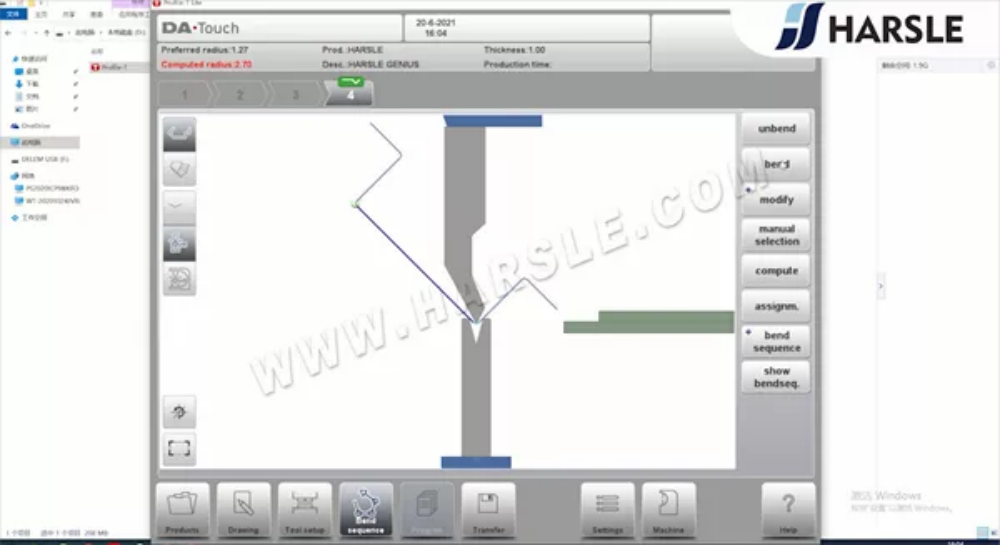
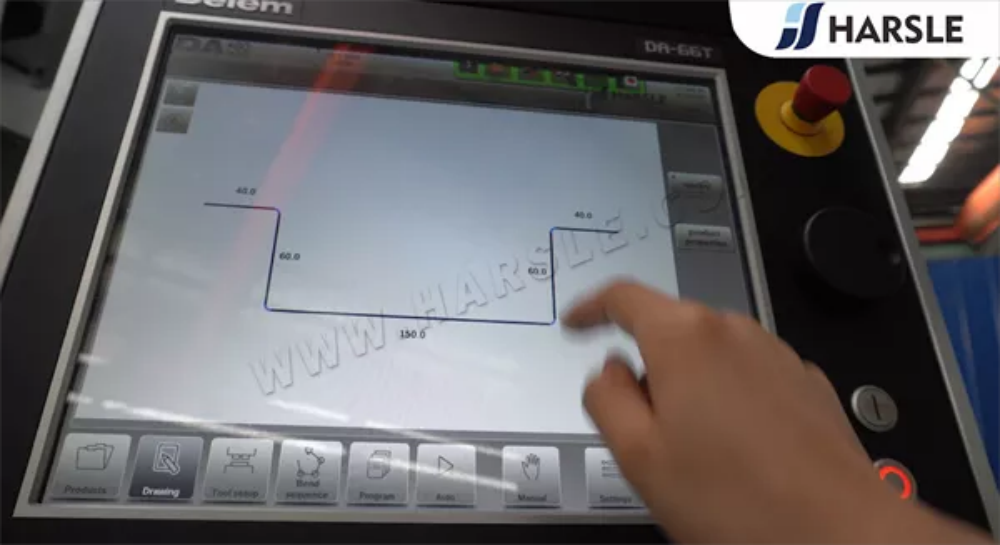
Programmazione grafica 2D
Programmazione grafica 2D è una caratteristica essenziale delle presse piegatrici CNC che consente agli operatori di progettare e simulare visivamente sequenze di piegatura prima della produzione effettiva. Utilizzando controller come DA-66T o DA-69T, gli utenti possono creare un Rappresentazione 2D della lamiera, definire gli angoli di piegatura, selezionare gli utensili e visualizzare in anteprima il processo di piegatura. Questa interfaccia intuitiva aiuta in rilevamento degli errori, posizionamento del materiale e ottimizzazione dell'ordine di piegatura per prevenire le collisioni. Programmando in 2D, gli operatori possono ottenere maggiore precisione, riduzione degli sprechi di materiale e miglioramento dell'efficienza nella fabbricazione dei metalli. Questo metodo semplifica la configurazione e migliora la precisione della produzione.

Scegli gli utensili
Scegliere gli utensili giusti è un passaggio cruciale nelle operazioni di pressatura CNC, poiché ha un impatto diretto precisione di piegatura, efficienza e qualità del materialeGli operatori devono selezionare il punzone e la matrice appropriati basato su spessore del materiale, angolo di piegatura e raggio di piegatura desideratoUtilizzando il Controllore DA-66T o DA-69T, gli utenti possono inserire le specifiche degli utensili per garantire la compatibilità con la sequenza di piegatura programmata. Fattori come durezza dell'utensile, larghezza della matrice a V e forma del punzone deve essere considerato per prevenire deformazione del materiale e usura degli utensiliLa corretta selezione degli utensili migliora precisione di piegatura, riduce i tempi di installazione e prolunga la durata della macchina nella fabbricazione dei metalli.

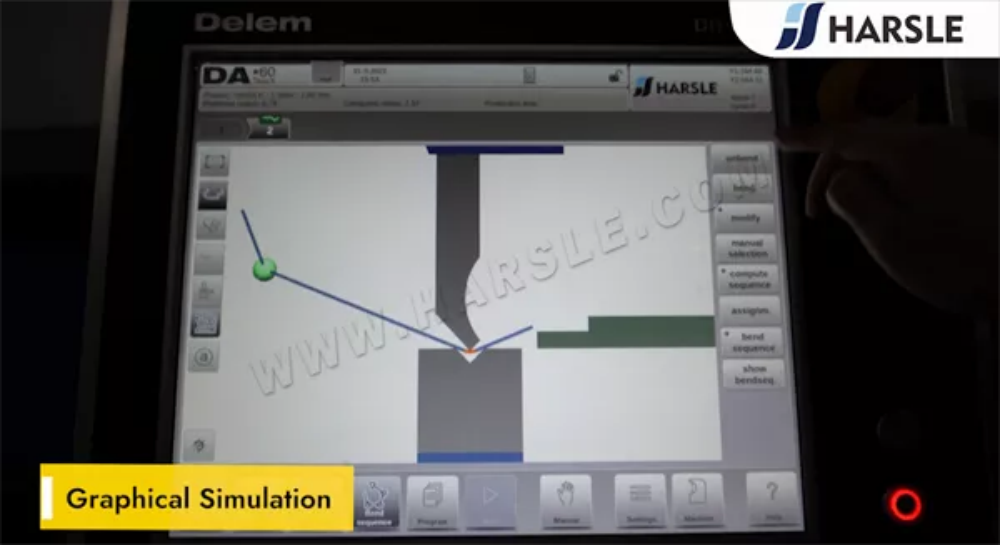
Simulazione grafica
Simulazione grafica è una potente funzionalità nei controller delle presse piegatrici CNC come DA-66T e DA-69T, consentendo agli operatori di visualizzare l'intero processo di piegatura prima dell'esecuzioneQuesta funzione fornisce una Rappresentazione 2D o 3D della sequenza di piegatura, assicurando che gli angoli programmati, la configurazione degli utensili e il posizionamento del materiale siano corretti. Aiuta a identificare potenziali errori, collisioni o disallineamenti prima della produzione effettiva, riducendo gli sprechi di materiale e migliorando l'efficienza. Simulando l'operazione di piegatura, gli operatori possono ottimizzare la sequenza di piegatura, regolare i parametri in tempo reale e ottenere una maggiore precisione, garantendo risultati costanti e di alta qualità nella fabbricazione dei metalli.


Misurare gli angoli di piegatura in tre posizioni: sinistra, centro e destra
Per garantire la precisione e la coerenza della piegatura, gli operatori devono misurare gli angoli di piegatura in tre posizioni: sinistra, centro e destraQuesto passaggio aiuta a identificare qualsiasi deviazioni, disallineamenti o distribuzione non uniforme della pressione attraverso il pezzo in lavorazione. Utilizzando un goniometro digitale o goniometro digitale, le misurazioni devono essere effettuate in ogni posizione per confermare l'uniformità. Se vengono rilevate variazioni, potrebbero essere necessarie delle regolazioni in bombatura, selezione utensile o impostazioni del controller CNC (DA-66T/DA-69T)Il controllo regolare degli angoli di piegatura in più posizioni garantisce precisione, riduce le rilavorazioni e migliora la qualità complessiva della piegatura, garantendo risultati di fabbricazione dei metalli efficienti e precisi.

Misurato a 135°
Dopo aver completato il processo di piegatura, l'angolo era misurato a 135°, confermando la precisione del funzionamento della pressa piegatrice. Utilizzando un goniometro digitale o misuratore d'angolo, la misurazione garantisce che la curvatura soddisfi le specifiche richieste. Se l'angolo devia, le regolazioni in forza di flessione, posizionamento del materiale o impostazioni di compensazione potrebbe essere necessario. Il Controllore DA-66T o DA-69T consente agli operatori di mettere a punto i parametri per ottenere il risultato desiderato. Regolare misurazione e verifica dell'angolo sono essenziali per mantenere elevata precisione, riduzione degli errori e miglioramento dell'efficienza nei processi di piegatura e fabbricazione dei metalli.


Parte 7: Programmazione grafica 3D (solo per DA-69T)
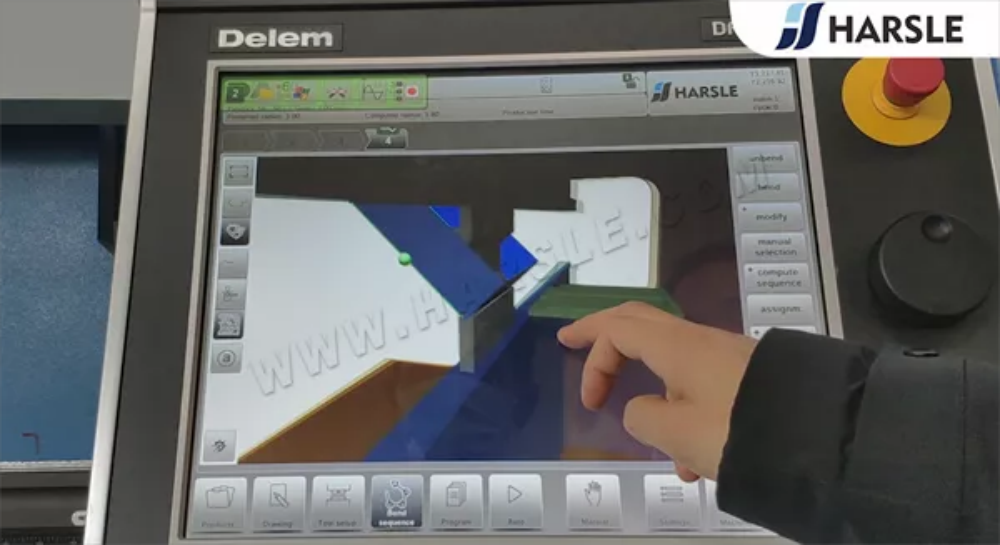
Programmazione grafica 3D
Programmazione grafica 3D è una funzionalità avanzata nei controller delle presse piegatrici CNC come DA-66T e DA-69T, consentendo agli operatori di visualizzare e simulare l'intero processo di piegatura in una vista tridimensionaleQuesta tecnologia consente agli utenti di definire sequenze di piegatura, selezionare utensili e rilevare potenziali collisioni prima di eseguire il programma. Interagendo con un modello 3D realistico, gli operatori possono ottimizzare gli angoli di piegatura, le posizioni del registro posteriore e il flusso del materiale, garantendo maggiore precisione ed efficienzaLa possibilità di visualizzare in anteprima il processo di piegatura riduce errori, spreco di materiale e tempo di installazione, fabbricazione Programmazione grafica 3D essenziale per fabbricazione di metalli di precisione.

Parte 8: Software offline
Software offline
Software offline è uno strumento potente che consente agli operatori di programmare e simulare le operazioni della pressa piegatrice CNC senza interrompere la produzione della macchinaCon controllori come DA-66T e DA-69T, gli utenti possono creare programmi di piegatura, selezionare utensili e ottimizzare le sequenze di piegatura su un postazione di lavoro del computer prima di trasferire i dati alla pressa piegatrice. Ciò migliora efficienza del flusso di lavoro, riduce i tempi di configurazione e riduce al minimo i tempi di fermo della produzioneInoltre, programmazione offline aiuta a rilevare collisioni, errori di flessione e disallineamento del materiale in anticipo, garantendo risultati precisi. Utilizzando software offline, le aziende di lavorazione dei metalli possono migliorare produttività, precisione e utilizzo delle macchine per operazioni di piegatura ad alte prestazioni.


Parte 9: Spegnimento
Premere il pedale per abbassare il punzone contro la matrice
Per avviare il processo di piegatura su un pressa piegatrice CNC, l'operatore deve premere il pedale per abbassare il punzone contro la matrice. Questa azione attiva il sistema idraulico o servo, guidando il punzone superiore verso il basso con forza controllata. Il Controllore DA-66T o DA-69T garantisce profondità e pressione precise in base alle impostazioni programmate. È fondamentale mantenere controllo costante del piede per evitare l'applicazione improvvisa di forza, che potrebbe portare a incongruenze di flessione. Il corretto funzionamento del pedale aiuta a raggiungere curve precise, riduce al minimo gli errori e migliora la sicurezza dell'operatore durante la fabbricazione dei metalli.
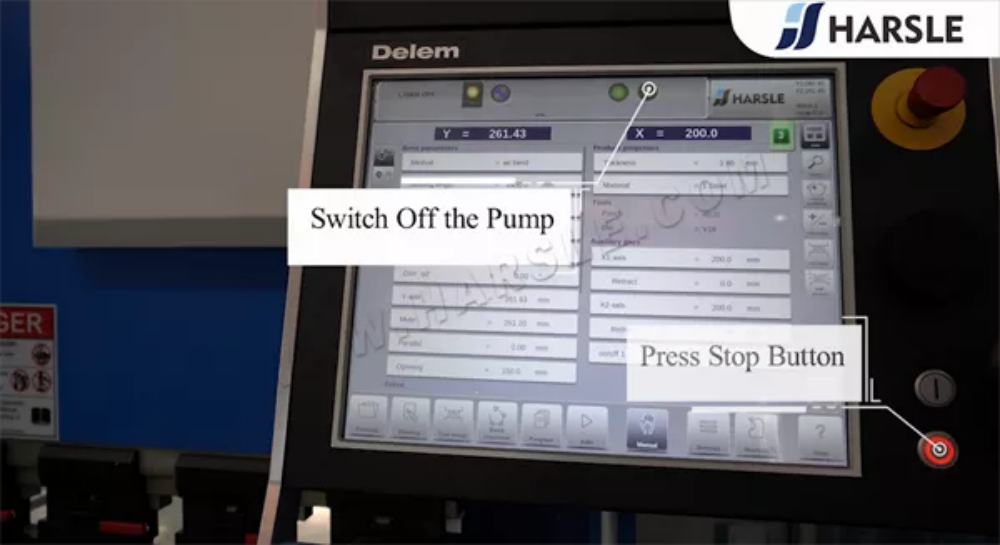
Premere il pulsante Stop
Nelle operazioni di pressatura CNC, premendo il Pulsante di arresto è una funzione critica che arresta immediatamente il movimento della macchina, garantendo la sicurezza dell'operatore e prevenendo potenziali danni. Questo pulsante può essere utilizzato in caso di emergenza, disallineamento o sequenza di piegatura errataSu controller come DA-66T o DA-69T, l'arresto della macchina consente agli operatori di rivalutare le impostazioni, apportare modifiche o risolvere i problemi prima di riprendere il lavoro. È essenziale familiarizzare con la funzione di arresto per garantire tempi di reazione rapidi quando necessario. Uso corretto del Pulsante di arresto migliora sicurezza della macchina, precisione ed efficienza complessiva nelle operazioni di piegatura dei metalli.
Spegnere la pompa
Per spegnere correttamente un pressa piegatrice CNC, è essenziale spegnere la pompa idraulica una volta completate le operazioni. La pompa è responsabile di generazione di pressione idraulica, che alimenta il processo di piegatura. Disattivarlo aiuta previene l'usura non necessaria, riduce il consumo di energia e garantisce la longevità della macchinaPrima di spegnere, assicurarsi che il la pressa piegatrice è in posizione sicurae nessun comando attivo è in esecuzione su Controllore DA-66T o DA-69TSpegnere regolarmente la pompa correttamente aiuta mantiene l'efficienza del sistema, prolunga la durata dei componenti e garantisce un ambiente di lavoro sicuro per gli operatori.
Premere i pulsanti di arresto di emergenza
IL Pulsante di arresto di emergenza (E-Stop) è una caratteristica di sicurezza cruciale su un pressa piegatrice CNC, progettato per interrompere immediatamente tutte le operazioni della macchina in caso di emergenza. Premendo il tasto Arresto di emergenza immediatamente interrompe l'alimentazione al sistema idraulico, prevenendo potenziali danni alla macchina, agli utensili o al pezzo in lavorazione. Gli operatori dovrebbero utilizzare questo pulsante in situazioni come disallineamento, movimento imprevisto o pericoli per la sicurezzaSu controller come DA-66T o DA-69T, il riavvio della macchina dopo un arresto di emergenza richiede il ripristino del sistema. Sapere quando e come utilizzare il Pulsante di arresto di emergenza assicura sicurezza dell'operatore e protezione della macchina durante la fabbricazione dei metalli.
Spegnere l'interruttore di alimentazione
Dopo aver completato il processo di piegatura, è essenziale spegnere l'interruttore di alimentazione per spegnere in sicurezza il pressa piegatrice CNCQuesto passaggio aiuta prevenire i rischi elettrici, risparmiare energia e proteggere i componenti della macchina da usura non necessaria. Prima di spegnere, assicurarsi che tutti le operazioni di piegatura sono completate, IL la pompa idraulica è spenta, e il il controller (DA-66T o DA-69T) è uscito correttamenteGli operatori devono seguire le procedure standard di spegnimento per evitare errori di sistema al riavvio. Spegnere regolarmente l'interruttore di alimentazione dopo l'uso aiuta a mantenere longevità della macchina, migliora la sicurezza e garantisce un ambiente di lavoro efficiente.

Il video qui sopra mostra il tutorial dettagliato sul funzionamento delle nostre presse piegatrici Genius DA-66T e DA-69T. Potrebbero verificarsi ulteriori problemi durante il funzionamento effettivo, vi preghiamo di lasciare un messaggio in background per comunicare con noi. HARSLE vi servirà con il massimo impegno.


