Lottando con il tuo Cesoia a ghigliottina Macchina E21S? Comprenderne il funzionamento garantisce efficienza e precisione. Semplifichiamo le impostazioni complesse e otteniamo tagli perfetti senza sforzo.
Per far funzionare il Cesoia a ghigliottina Per iniziare, accendere la macchina e impostare i parametri di taglio sul controller E21S. Regolare la distanza della lama, il registro posteriore e la lunghezza di taglio in base al materiale. Infine, posizionare saldamente il foglio e avviare il processo di taglio per risultati precisi.
Ora approfondiamo ogni fase operativa per un'esperienza di taglio impeccabile.
Parte 1 Riempire l'olio e i collegamenti dei cavi
Riempimento corretto del serbatoio dell'olio idraulico
Per garantire prestazioni ottimali del sistema idraulico, è fondamentale utilizzare olio idraulico antiusura per il serbatoio dell'olio. Iniziare individuando l'apposito foro di riempimento dell'olio sulla macchina. Versare con attenzione l'olio idraulico in questo foro, assicurandosi che soddisfi le specifiche raccomandate dal produttore. Monitorare attentamente il livello dell'olio per evitare un riempimento eccessivo o insufficiente, poiché entrambi possono influire sulla funzionalità della macchina. L'utilizzo di olio idraulico antiusura di alta qualità riduce al minimo l'usura, prolunga la durata dei componenti idraulici e ne mantiene il funzionamento regolare. Seguire sempre il manuale d'uso per istruzioni e precauzioni di sicurezza durante questa procedura.

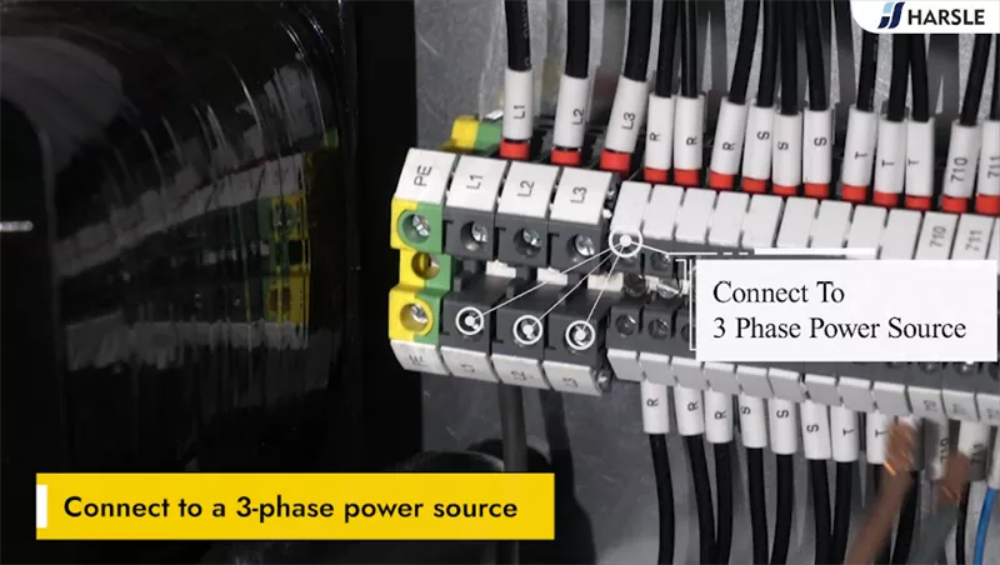
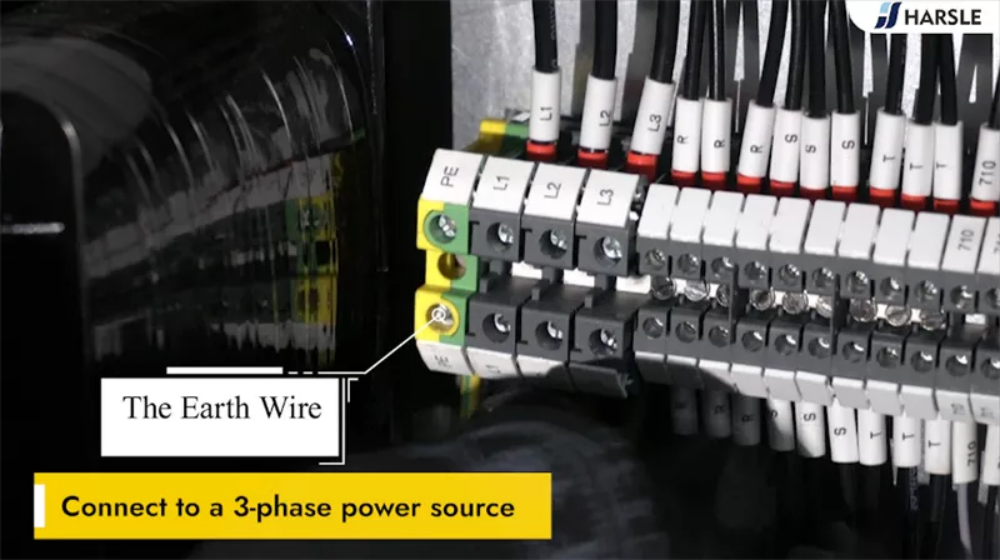
Collegamento corretto a una fonte di alimentazione trifase
Per collegare in sicurezza una macchina a una fonte di alimentazione trifase, assicurarsi che l'alimentazione soddisfi i requisiti di tensione e frequenza della macchina. Iniziare spegnendo l'alimentazione principale e controllando che i terminali di collegamento non siano danneggiati. Utilizzare cavi adeguatamente isolati per collegare i cavi di alimentazione della macchina alle fasi corrispondenti (L1, L2, L3). Fissare saldamente tutti i collegamenti e verificare che il filo di terra sia correttamente collegato per prevenire rischi elettrici. Dopo aver completato i collegamenti, accendere l'alimentazione e verificare che la macchina funzioni correttamente senza problemi. Seguire sempre le linee guida di sicurezza per evitare incidenti o danni all'apparecchiatura.

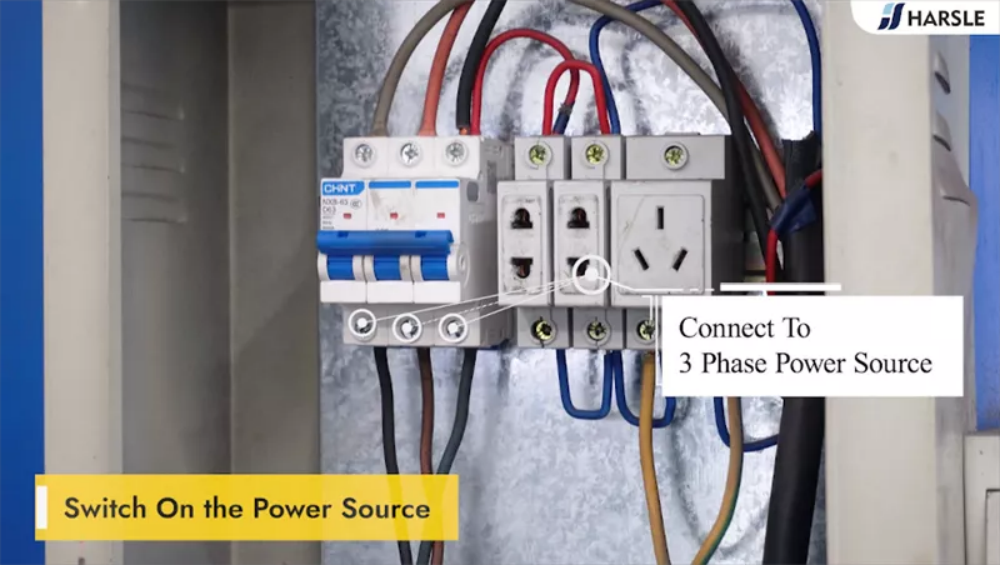
Accendere la fonte di alimentazione
Per iniziare a utilizzare la tua cesoia a ghigliottina (E21S), il primo passo è accendere l'alimentazione. Individua l'interruttore principale sulla macchina, che in genere si trova vicino al pannello di controllo. Ruota l'interruttore in posizione "ON" per accendere la macchina. Una volta accesa, controlla il pannello di controllo per assicurarti che tutti gli indicatori funzionino correttamente. Questo passaggio è fondamentale per garantire che la macchina sia pronta all'uso. Segui sempre le linee guida di sicurezza, come indossare dispositivi di protezione individuale e verificare che non vi siano ostacoli vicino all'area di taglio, prima di procedere ulteriormente.

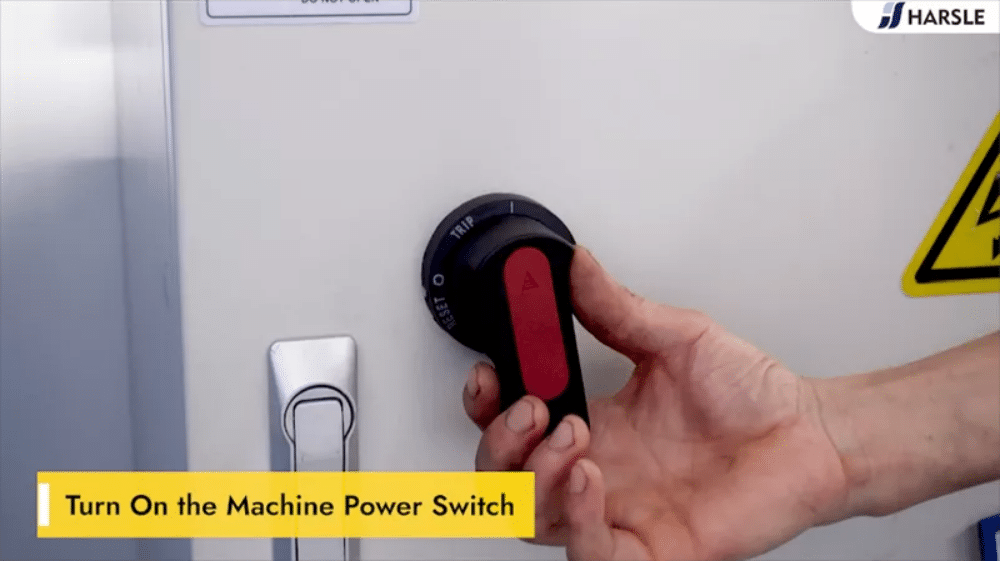
Accendere l'interruttore di alimentazione della macchina
Prima di utilizzare qualsiasi macchinario, è fondamentale assicurarsi che la macchina sia correttamente accesa per un utilizzo sicuro ed efficiente. Individuare l'interruttore di alimentazione principale, in genere situato sul pannello laterale o posteriore della macchina. Assicurarsi che la macchina sia collegata all'alimentazione e che il pulsante di arresto di emergenza sia rilasciato. Ruotare l'interruttore di alimentazione in posizione "ON" e osservare il pannello di controllo per le indicazioni di avvio. Verificare che tutti i meccanismi di sicurezza siano in posizione prima di procedere con le operazioni. Seguire questi passaggi garantisce che la macchina sia pronta all'uso e riduce il rischio di errori.
Collegare l'interruttore a pedale alla macchina
Per collegare l'interruttore a pedale alla macchina, assicurarsi innanzitutto che la macchina sia spenta per motivi di sicurezza. Individuare la porta dell'interruttore a pedale, in genere situata vicino alla base della macchina. Allineare la spina alla porta, assicurandosi che sia ben fissata per evitare collegamenti allentati durante il funzionamento. Dopo il collegamento, ricontrollare il posizionamento del cavo per assicurarsi che non ostruisca il movimento o rappresenti un rischio per la sicurezza. Una volta collegato, accendere la macchina e testare il pedale per verificarne il funzionamento. Un collegamento corretto garantisce un funzionamento fluido, migliora il controllo da parte dell'utente e riduce al minimo i potenziali problemi tecnici durante l'uso. Dare sempre priorità alla sicurezza durante questo processo.

Accendere l'interruttore di alimentazione
Per iniziare a utilizzare la cesoia a ghigliottina, individuare l'interruttore di alimentazione, solitamente posizionato sul pannello di controllo o sul lato della macchina. Assicurarsi che la macchina sia saldamente collegata all'alimentazione e che tutte le misure di sicurezza siano in atto, ad esempio assicurandosi che non vi siano oggetti liberi vicino all'area della lama. Portare l'interruttore di alimentazione in posizione "ON" e si sentiranno o vedranno degli indicatori che confermeranno che la macchina è alimentata. Verificare sempre che il sistema sia pronto per l'uso sul display di controllo o sulle spie luminose prima di procedere con ulteriori operazioni, per garantire un funzionamento sicuro ed efficiente.

Rilasciare il pulsante di arresto di emergenza e avviare la pompa dell'olio
Per riprendere le operazioni in sicurezza dopo aver utilizzato il pulsante di arresto di emergenza sulla macchina, iniziare rilasciando il pulsante di arresto di emergenza. Assicurarsi che il pulsante sia completamente disinserito, a indicare che il sistema non è più in stato di arresto di emergenza. Una volta rilasciato, procedere all'avvio della pompa dell'olio premendo il pulsante designato o attivando il comando appropriato. Questo passaggio è essenziale per ripristinare la pressione idraulica e consentire il normale funzionamento della macchina. Verificare sempre che la macchina sia in condizioni di funzionamento sicure e seguire i protocolli di sicurezza appropriati prima di riprendere le operazioni per garantire prestazioni ottimali e conformità alle norme di sicurezza.

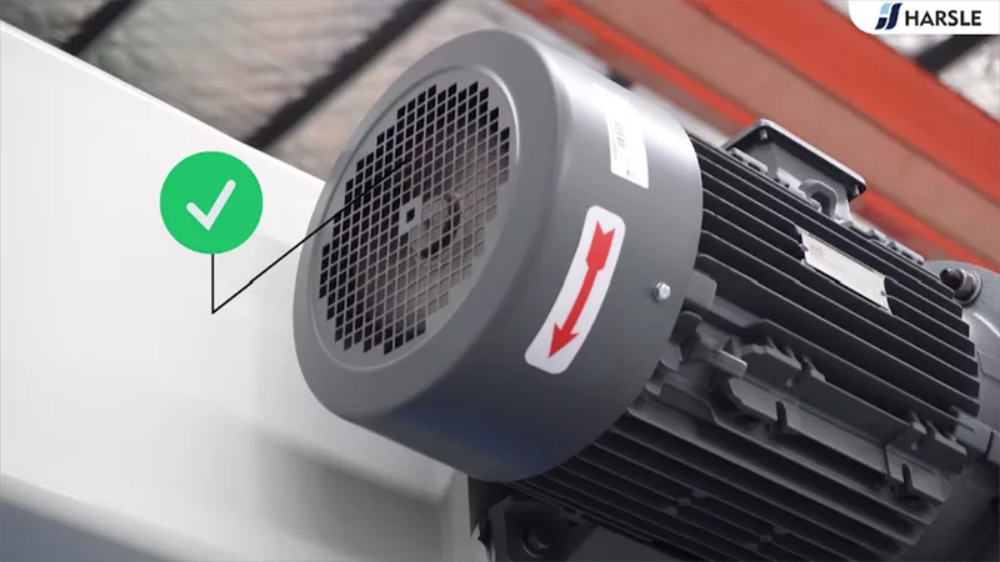
Assicurare la corretta direzione di rotazione del motore principale
Prima di utilizzare la macchina, è fondamentale verificare il senso di rotazione del motore principale per garantirne il corretto funzionamento ed evitare danni. Una rotazione errata può causare problemi operativi, riduzione dell'efficienza o persino malfunzionamenti dell'apparecchiatura. Per verificare, accendere brevemente la macchina e osservare la rotazione del motore. Confrontarla con l'indicatore di direzione, solitamente riportato sulla macchina o nel manuale utente. Se la direzione non è corretta, regolare il cablaggio del motore secondo le istruzioni del manuale o consultare un tecnico professionista. Verificare regolarmente la rotazione del motore aiuta a mantenere prestazioni ottimali e prolunga la durata della macchina.

Garantire la corretta direzione di rotazione
Quando si controlla il senso di rotazione di una macchina, è essenziale assicurarsi che ruoti in senso orario per un corretto funzionamento. Una rotazione in senso orario spesso indica che il motore o l'apparecchiatura funzionano correttamente e sono conformi al progetto del produttore. L'utilizzo di una macchina nel senso di rotazione errato può causare inefficienza, danni meccanici o persino rischi per la sicurezza. Osservare sempre la freccia direzionale o fare riferimento al manuale utente per confermare il movimento corretto. Se si nota un movimento in senso antiorario, arrestare immediatamente la macchina e regolare il cablaggio o le impostazioni secondo necessità per prevenire ulteriori problemi.

Se ruota in senso antiorario
Se il motore o un componente della macchina ruota in senso antiorario, potrebbe trattarsi di un problema di cablaggio o di configurazione che richiede un intervento immediato. Innanzitutto, controllare i collegamenti di alimentazione e assicurarsi che siano correttamente allineati secondo il manuale utente. Per i motori trifase, lo scambio di due cavi di alimentazione può modificare il senso di rotazione. Per motivi di sicurezza, spegnere sempre l'alimentazione prima di effettuare regolazioni. Se il problema persiste, controllare le impostazioni del controller o consultare un tecnico professionista. Una rapida risoluzione del problema garantisce prestazioni ottimali della macchina e previene usura inutile o potenziali danni al sistema.

Premere l'arresto di emergenza
Il pulsante di arresto di emergenza è una caratteristica di sicurezza fondamentale su tutte le macchine industriali, comprese le cesoie a ghigliottina. Consente agli operatori di arrestare immediatamente il funzionamento della macchina in caso di emergenza, come un malfunzionamento, un disallineamento del materiale o un potenziale pericolo per il personale. Per attivarlo, premere con decisione il pulsante di arresto di emergenza. Questa azione interrompe l'alimentazione alla macchina, assicurandone l'arresto immediato e prevenendo ulteriori rischi. Assicurarsi sempre che il pulsante di arresto di emergenza sia funzionante prima di iniziare qualsiasi operazione. Familiarizzare con la sua posizione e funzione è essenziale per garantire la sicurezza sul posto di lavoro.

Scambiare i due fili di collegamento
Quando si lavora con impianti elettrici, è essenziale scambiare correttamente i collegamenti a due fili per garantire sicurezza e funzionalità. Innanzitutto, spegnere la macchina o il dispositivo per evitare rischi elettrici. Individuare i due fili da scambiare e utilizzare strumenti appropriati, come cacciaviti isolati, per allentarne i terminali. Scollegare con attenzione ciascun filo, assicurandosi di ricordare la posizione originale. Scambiare i fili e serrare saldamente i terminali per evitare collegamenti allentati. Verificare nuovamente il corretto posizionamento prima di riaccendere il sistema. Seguire questi passaggi contribuirà a mantenere la sicurezza e a garantire il corretto funzionamento dell'apparecchiatura dopo la regolazione.

Parte 2 Avviamento della macchina
Accendere l'interruttore di alimentazione della macchina
Per iniziare a utilizzare la macchina, assicurarsi di aver seguito tutte le precauzioni di sicurezza necessarie. Innanzitutto, verificare che la macchina sia correttamente collegata all'alimentazione e che tutti i cavi siano ben fissati. Quindi, individuare l'interruttore di alimentazione principale, in genere situato sul lato o sul retro della macchina. Ruotare l'interruttore in posizione "On". Attendere l'inizializzazione del sistema di controllo, assicurandosi che tutti gli indicatori vengano visualizzati correttamente. Se sullo schermo vengono visualizzati avvisi o errori, consultare il manuale prima di procedere. Un avvio corretto garantisce che la macchina sia pronta per un funzionamento sicuro ed efficiente. Dare sempre priorità alla sicurezza durante questa procedura.

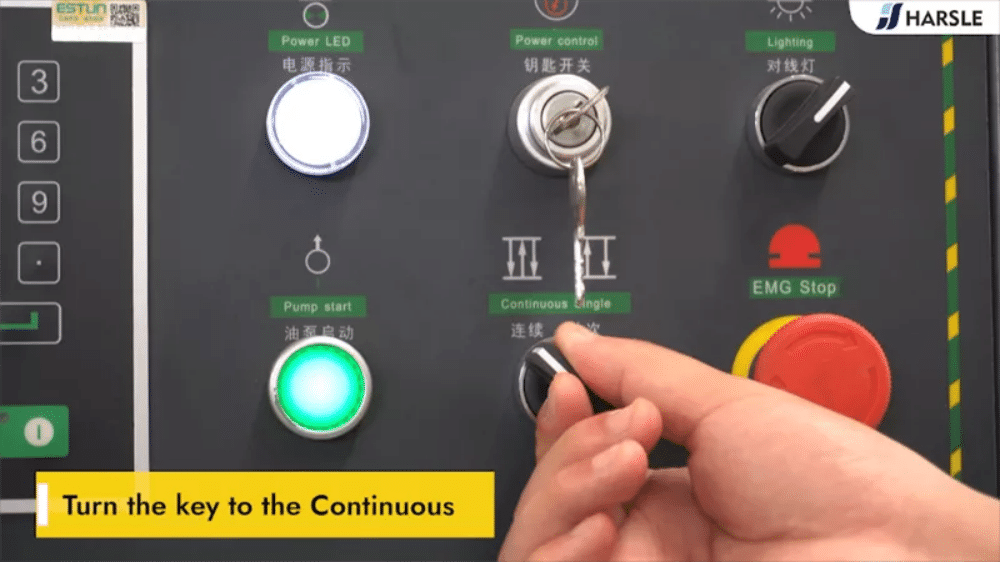
Attivare il tasto di controllo dell'alimentazione
Prima di avviare qualsiasi operazione sulla macchina, assicurarsi che la chiave di accensione sia accesa. Individuare la chiave di accensione sul pannello di controllo della macchina, che in genere è posizionata sul lato anteriore per un facile accesso. Ruotare la chiave in senso orario per attivare l'alimentazione del sistema. Una volta attivata l'alimentazione, verificare che tutte le spie luminose sul pannello di controllo funzionino correttamente. Questo passaggio è fondamentale per inizializzare i sistemi della macchina e garantirne la prontezza operativa. Seguire sempre le procedure di sicurezza appropriate quando si maneggia la chiave di accensione per evitare potenziali rischi.

Rilasciare l'interruttore di arresto di emergenza, avviare la pompa dell'olio
Per iniziare a utilizzare la cesoia a ghigliottina, assicurarsi innanzitutto che l'interruttore di arresto di emergenza sia rilasciato. Questo passaggio fondamentale ripristina il meccanismo di sicurezza della macchina, consentendone il corretto funzionamento. Una volta disinserito l'interruttore di arresto di emergenza, procedere all'avvio della pompa dell'olio. La pompa dell'olio svolge un ruolo fondamentale nell'alimentazione del sistema idraulico, consentendo un funzionamento fluido ed efficiente della cesoia. Verificare sempre che la pompa funzioni correttamente prima di procedere con ulteriori operazioni. Il rispetto di questi passaggi garantisce prestazioni sicure e ottimali, preparando la macchina per operazioni di taglio precise ed efficaci.

In attesa del caricamento del sistema
Quando si utilizza una macchina o un dispositivo, è normale che si verifichi un breve periodo di attesa durante il caricamento del sistema. Durante questo processo, il sistema si inizializza, controlla i suoi componenti e si prepara a eseguire i comandi. Ciò garantisce un funzionamento fluido ed efficiente una volta pronto all'uso. È importante attendere pazientemente senza interrompere il processo di caricamento, poiché ciò potrebbe causare errori o malfunzionamenti del sistema. Se il caricamento richiede più tempo del solito, verificare la presenza di problemi come bassa potenza, problemi di connessione o software obsoleto. Comprendere il processo di caricamento aiuta a evitare ritardi inutili e garantisce prestazioni ottimali per le apparecchiature.

Parte 3 Funzionamento del sistema
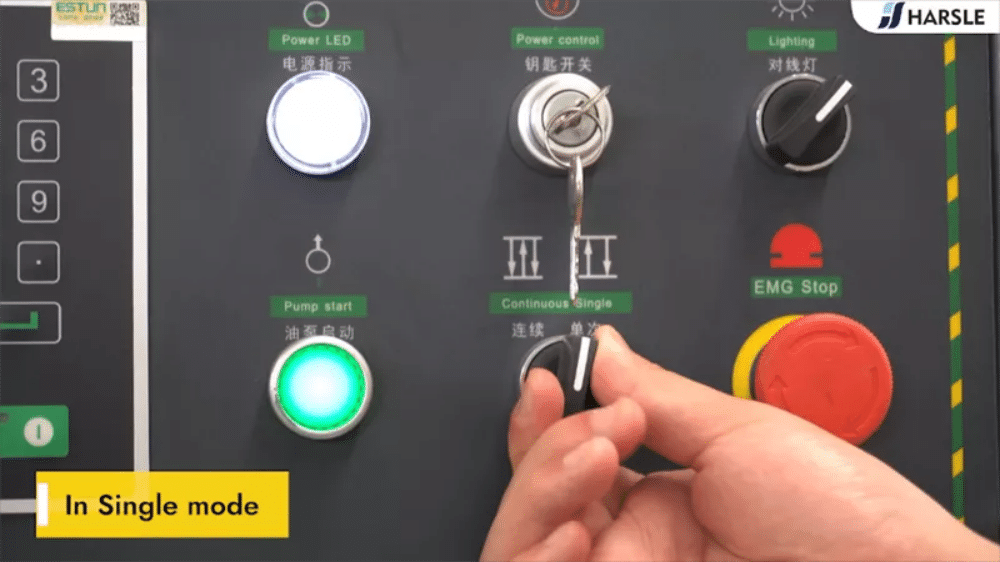
In modalità singola
Il funzionamento "Modalità Singola" del sistema consente agli utenti di eseguire singole azioni di taglio o piegatura con precisione e controllo. Questa modalità è ideale per la lavorazione di un singolo pezzo di materiale alla volta, garantendo accuratezza ed efficienza. Per operare in Modalità Singola, selezionare la modalità dall'interfaccia del controller, impostare i parametri desiderati e posizionare il materiale in modo sicuro. Premere il pulsante di funzionamento per avviare il processo. Ricontrollare sempre le impostazioni prima di iniziare e assicurarsi che tutte le precauzioni di sicurezza siano state rispettate. La Modalità Singola è particolarmente utile per attività personalizzate o a basso volume, offrendo flessibilità e precisione in ogni operazione.
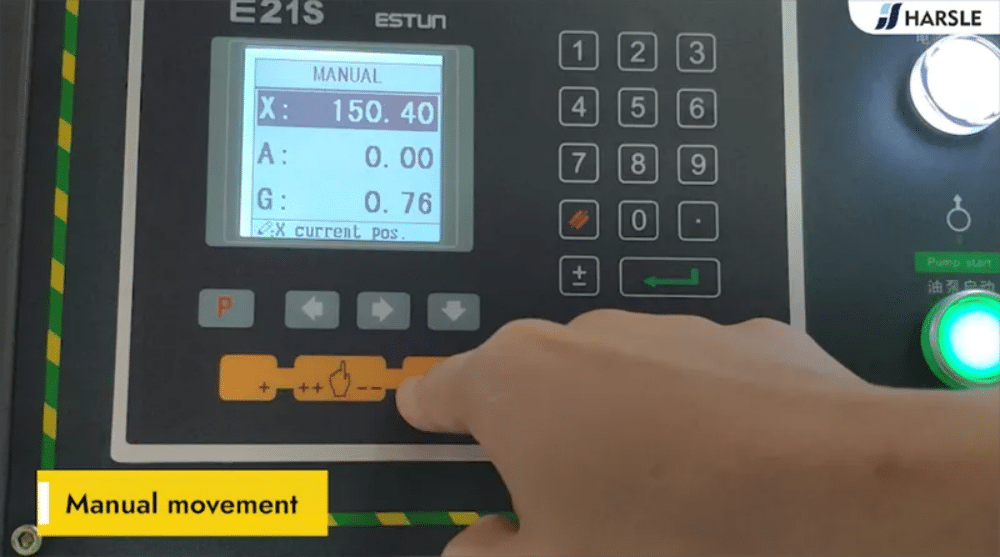
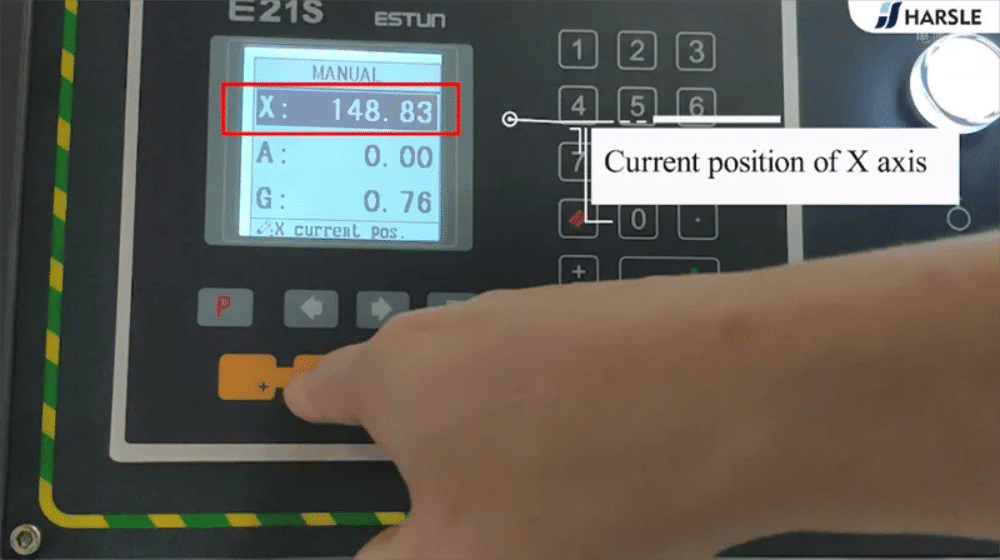
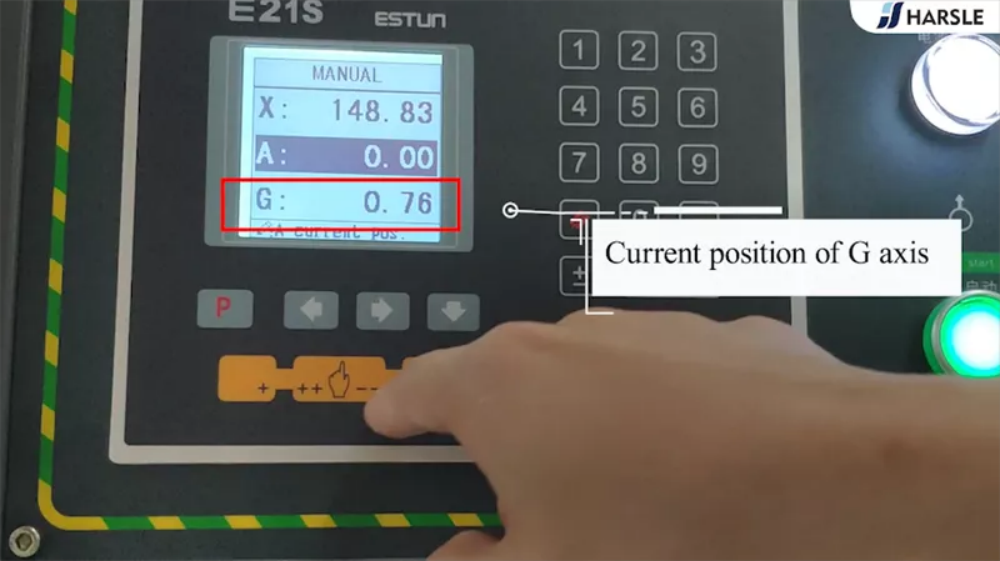
Movimento manuale
Clicca e accedi alla pagina del manuale
Clicca sul link sottostante per accedere alla pagina del manuale ed esplorare tutte le risorse essenziali per l'utilizzo e la manutenzione della tua macchina. Questa pagina include istruzioni dettagliate, suggerimenti per la risoluzione dei problemi, linee guida sulla sicurezza e ulteriori approfondimenti per aiutarti a ottenere il massimo dalla tua attrezzatura. Che tu sia un principiante o un operatore esperto, questo manuale è progettato per fornire informazioni chiare, concise e pratiche per garantire prestazioni ottimali. Non perdere questa preziosa risorsa.


Suggerimenti per un funzionamento sicuro della regolazione della velocità
Durante l'utilizzo della macchina, iniziare sempre cliccando e regolando attentamente la velocità, sia in direzione crescente che decrescente. Ciò garantisce un funzionamento fluido e controllato, riducendo al minimo rischi ed errori. Le regolazioni graduali consentono al sistema di rispondere in modo appropriato senza scosse improvvise o sollecitazioni sui componenti della macchina. Le operazioni a bassa velocità sono particolarmente importanti durante l'installazione o quando si lavora con materiali delicati, poiché garantiscono un controllo e una precisione migliori. Seguendo questa pratica, gli operatori possono garantire la sicurezza, migliorare la precisione e prolungare la durata dell'attrezzatura. Dare sempre priorità a regolazioni caute per prestazioni efficienti e sicure.

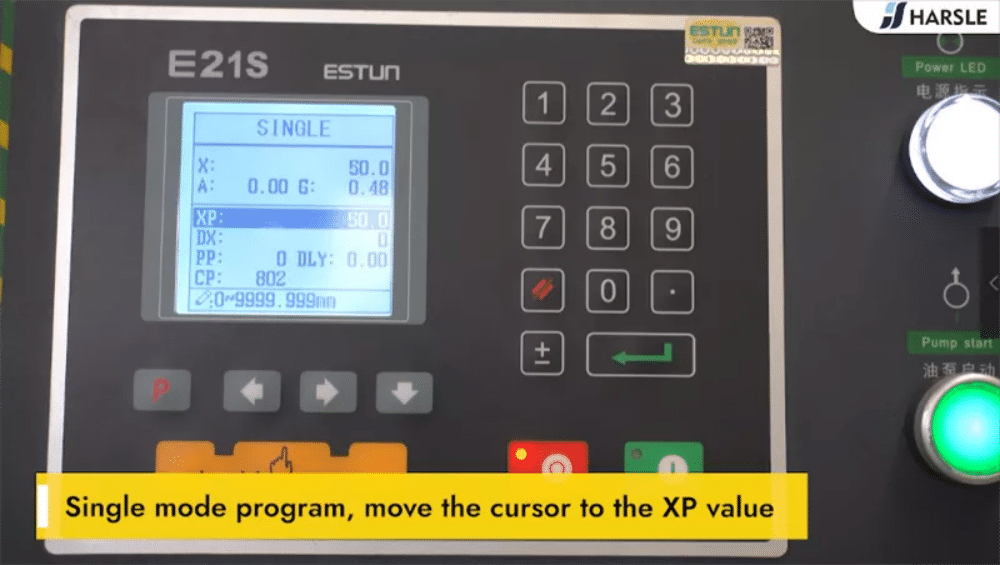
Sposta il cursore sul valore XP
Per regolare il valore XP sul controller della macchina, spostare il cursore sul parametro specifico contrassegnato con "XP" sul display. Utilizzare le frecce direzionali o il jog dial, a seconda del modello di controller, per navigare con precisione. Una volta posizionato il cursore su "XP", è possibile modificare il valore in base alle proprie esigenze inserendo i numeri desiderati. Questo passaggio è fondamentale per ottenere le impostazioni corrette, garantendo la precisione del funzionamento della macchina. Ricontrollare sempre il valore prima di confermare le modifiche per evitare errori. Seguire attentamente questi passaggi per risultati ottimali e prestazioni della macchina impeccabili.
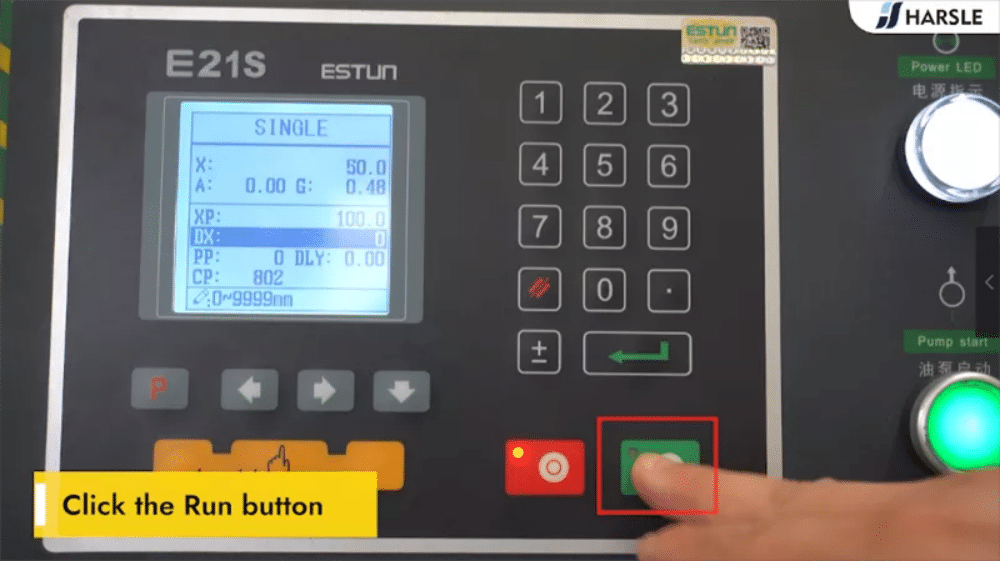
Inserisci 100 e conferma
L'impostazione "Input 100" è fondamentale per migliorare l'efficienza e la precisione del funzionamento della macchina. Comprendendo come configurare e confermare correttamente questo input, è possibile garantire prestazioni ottimali e ottenere risultati costanti. Che si lavori con presse piegatrici, cesoie o altre apparecchiature CNC, questa impostazione gioca un ruolo fondamentale nel mantenimento della precisione. Ricontrollare i parametri, confermare l'input ed eseguire un test per convalidare la configurazione. Rivedere e regolare regolarmente queste impostazioni può migliorare significativamente il flusso di lavoro di produzione e ridurre al minimo gli errori. Padroneggiare "Input 100" garantisce un funzionamento impeccabile in ogni occasione.

Fare clic sul pulsante Esegui
Per utilizzare la macchina in modo efficace, il pulsante "Run" è fondamentale. Dopo aver impostato tutti i parametri necessari, assicurarsi che il materiale sia posizionato correttamente e che i controlli di sicurezza siano stati completati. Una volta pronti, è sufficiente premere il pulsante "Run" per attivare la macchina. Questo pulsante avvia il funzionamento e consente l'esecuzione delle impostazioni programmate. Monitorare sempre il processo per individuare eventuali irregolarità e assicurarsi che siano in atto le adeguate misure di sicurezza. Una manutenzione regolare della macchina garantisce il corretto funzionamento della funzione "Run" e previene interruzioni impreviste, garantendo prestazioni costanti e risultati affidabili. È il punto di partenza per precisione ed efficienza!
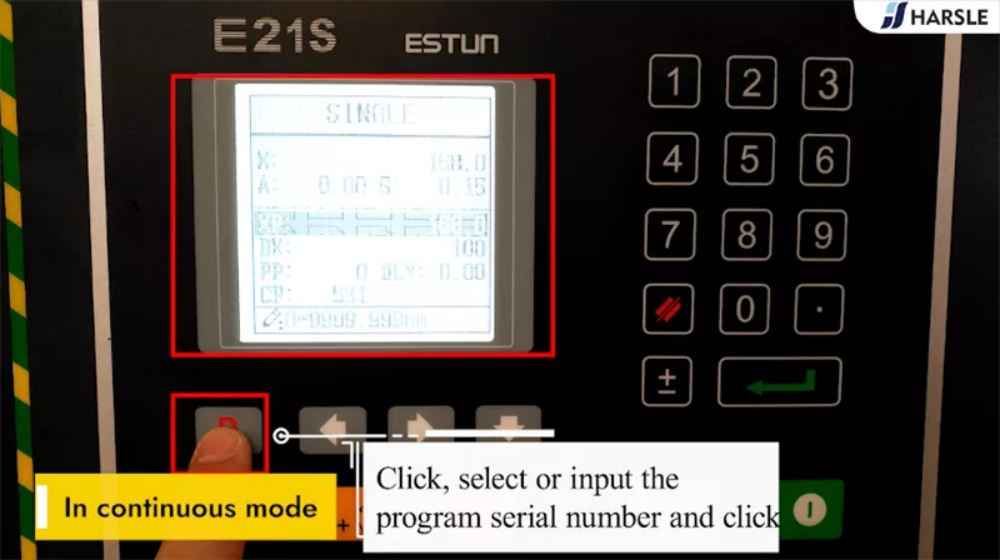
In modalità continua
In modalità continua, la macchina funziona ripetutamente senza richiedere l'intervento manuale per ogni ciclo. Questa modalità è ideale per la gestione di attività di produzione di grandi volumi, poiché migliora significativamente l'efficienza e riduce i tempi di fermo tra le operazioni. Preimpostando i parametri, la macchina completa automaticamente ogni ciclo, garantendo risultati costanti e riducendo al minimo gli errori causati dall'operazione manuale. La modalità continua è particolarmente utile nei settori che richiedono taglio o piegatura ad alta velocità. Tuttavia, è essenziale garantire che i dispositivi di sicurezza, come le protezioni e i pulsanti di arresto di emergenza, siano attivati per prevenire incidenti durante il funzionamento. Una corretta configurazione e una manutenzione regolare sono fondamentali per prestazioni ottimali.
Fare clic sul pulsante P, selezionare o immettere il numero di serie del programma e fare clic
Per selezionare ed eseguire un programma sul tuo computer, inizia cliccando su Pulsante P sul controller. Si aprirà l'interfaccia di selezione del programma. Successivamente, individua il programma desiderato sfogliando l'elenco o inserendo direttamente il numero di serie del programma per un accesso più rapido. Una volta identificato il programma corretto, clicca per confermare la selezione. Assicurati che tutte le impostazioni corrispondano ai requisiti operativi prima di procedere. Questo processo semplice garantisce precisione ed efficienza, risparmiando tempo prezioso durante la produzione. Ricontrolla sempre i dettagli del programma per evitare errori e garantire un funzionamento regolare.

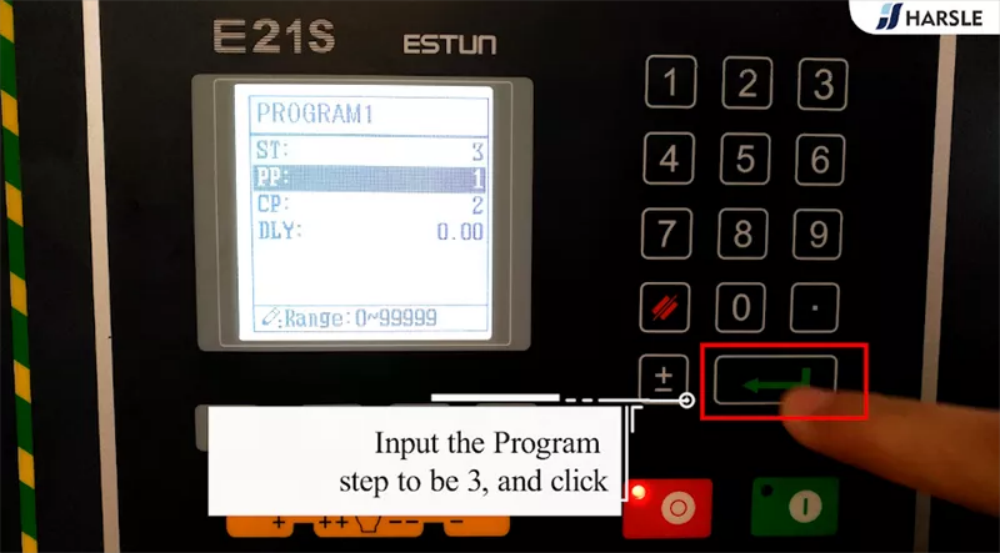
Inserisci il passo del programma su 3 e fai clic
Per impostare il passo di programma a 3 sulla macchina, accedere alle impostazioni di programma sull'interfaccia del controller. Individuare l'opzione "Passo di programma", immettere il numero 3 nel campo designato e confermare la selezione cliccando sul pulsante appropriato. Questo passo garantisce che la macchina esegua la sequenza desiderata in modo accurato. Ricontrollare l'inserimento per evitare errori e procedere con il passo operativo successivo. Seguire questa procedura garantisce un flusso di lavoro fluido e risultati precisi nelle attività di lavorazione dei metalli. In caso di problemi, consultare il manuale utente della macchina per ulteriori indicazioni o suggerimenti per la risoluzione dei problemi.
Fai clic e accedi alla pagina di configurazione del primo passaggio
Clicca sul pulsante "Configura" per accedere al primo passaggio del processo di configurazione della tua macchina. Questa pagina ti consente di inserire parametri critici, tra cui tipo di materiale, spessore e dimensioni di taglio o piegatura desiderate. Esamina attentamente le impostazioni per assicurarti che siano in linea con i requisiti del tuo progetto. Una configurazione corretta garantisce prestazioni ottimali e riduce al minimo il rischio di errori durante il funzionamento. In caso di dubbi su un parametro, consulta il manuale utente o rivolgiti a un professionista per assistenza. Una volta confermate le impostazioni, procedi al passaggio successivo per un funzionamento impeccabile della macchina.

Seleziona XP, inserisci 150 e conferma
Clicca sul pulsante "Configura" per accedere al primo passaggio del processo di configurazione della tua macchina. Questa pagina ti consente di inserire parametri critici, tra cui tipo di materiale, spessore e dimensioni di taglio o piegatura desiderate. Esamina attentamente le impostazioni per assicurarti che siano in linea con i requisiti del tuo progetto. Una configurazione corretta garantisce prestazioni ottimali e riduce al minimo il rischio di errori durante il funzionamento. In caso di dubbi su un parametro, consulta il manuale utente o rivolgiti a un professionista per assistenza. Una volta confermate le impostazioni, procedi al passaggio successivo per un funzionamento impeccabile della macchina.

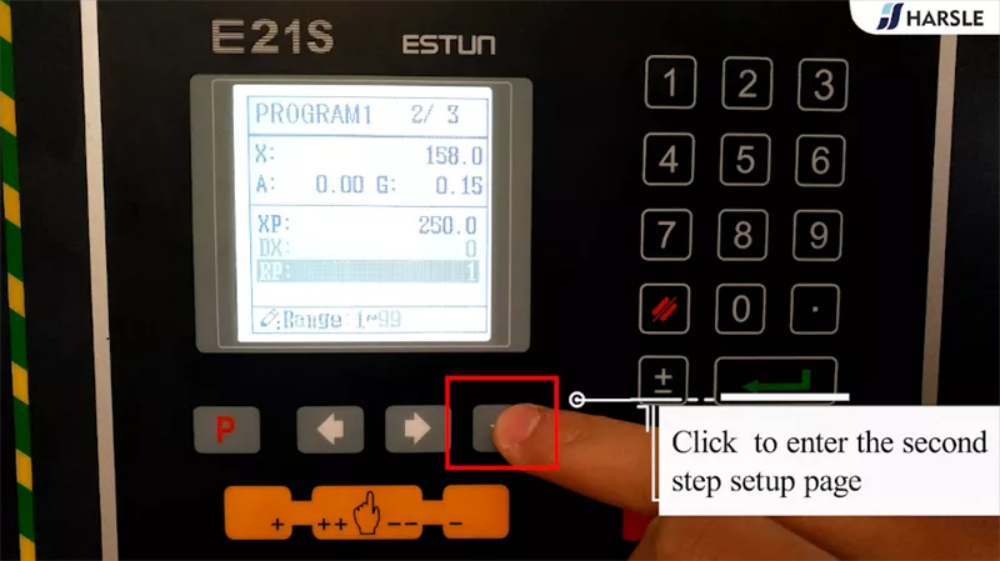
Fare clic e accedere alla pagina di configurazione del secondo passaggio
Per procedere con la configurazione delle impostazioni della macchina, fare clic sul pulsante appropriato per accedere alla pagina di configurazione del secondo passaggio. Questa pagina è fondamentale per la messa a punto dei parametri avanzati, garantendo prestazioni ottimali durante il funzionamento. Una volta all'interno, troverete un'interfaccia chiara con opzioni per la regolazione delle impostazioni chiave, come la velocità di taglio, la posizione della lama e lo spessore del materiale. Seguite attentamente le istruzioni visualizzate sullo schermo per evitare errori e garantire la precisione. In caso di dubbi su qualsiasi opzione, consultate il manuale utente o contattate l'assistenza tecnica per assistenza. Questo passaggio garantisce che la macchina sia completamente predisposta per un funzionamento fluido ed efficiente.
Seleziona XP, inserisci 100 e conferma
Per configurare l'input XP sulla macchina, inizia selezionando l'opzione "XP" sull'interfaccia del controller. Una volta selezionato, inserisci il valore "100" nel campo designato. Verifica attentamente l'accuratezza dell'input per assicurarti che le impostazioni siano in linea con i tuoi requisiti operativi. Dopo aver verificato che il valore sia corretto, premi il pulsante "Conferma" per salvare l'impostazione. Questo passaggio è fondamentale per garantire che la macchina funzioni in modo efficiente e come previsto. In caso di problemi durante la procedura, consulta il manuale utente o contatta il supporto tecnico per assistenza.

Fare clic e accedere alla pagina di configurazione del terzo passaggio
Per procedere con la configurazione della macchina, è necessario accedere alla pagina di configurazione del terzo passaggio. Iniziare cliccando sul pulsante designato sull'interfaccia del controller che corrisponde al menu di configurazione. Una volta nel menu, navigare attentamente tra le opzioni visualizzate fino a individuare la sezione "Configurazione del terzo passaggio". Cliccare per accedere a questa pagina, dove è possibile regolare parametri specifici essenziali per il funzionamento. Assicurarsi che tutti i valori siano impostati in base ai requisiti del progetto prima di procedere. Questa pagina è fondamentale per ottenere risultati accurati, quindi ricontrollare i dati immessi per garantire precisione ed efficienza nel flusso di lavoro.

Seleziona XP, inserisci 120 e conferma
Per impostare il valore XP a 120 sulla macchina, segui questi semplici passaggi per una configurazione accurata. Innanzitutto, accedi al menu delle impostazioni sul controller o sull'interfaccia della macchina. Individua il parametro "XP" tra le opzioni disponibili. Una volta trovato, utilizza il tastierino numerico o il controller per immettere il valore desiderato, che in questo caso è 120. Dopo aver inserito il numero, verificane l'esattezza e premi il pulsante di conferma per salvare le modifiche. Questo assicura che la nuova impostazione venga applicata. La verifica regolare di parametri come XP aiuta a mantenere costanti le prestazioni della macchina e la precisione nelle operazioni.

Fare clic sul pulsante Esegui
Per eseguire qualsiasi operazione sulla tua macchina, clicca semplicemente su Correre Pulsante. Questo pulsante funge da comando per avviare il processo dopo aver configurato tutte le impostazioni. Prima di fare clic, assicurarsi che tutti i parametri come dimensioni, angoli e tipo di materiale siano stati inseriti correttamente nel controller. Verificare che l'area di lavoro sia libera e che la macchina sia in condizioni di sicurezza per il funzionamento. Una volta pronti, premere il pulsante Correre per avviare la procedura. Ricordarsi di seguire i protocolli di sicurezza appropriati e di verificare le impostazioni prima di fare clic sul pulsante Correre pulsante può prevenire errori e garantire prestazioni ottimali.

Parte 4 Taglio
In modalità singola
Utilizzando la cesoia a ghigliottina in modalità singola, il processo di taglio viene eseguito passo dopo passo per un controllo preciso. Questa modalità consente agli operatori di regolare e allineare manualmente il materiale prima di ogni taglio, garantendo la precisione di ogni operazione. Per iniziare, impostare le dimensioni di taglio desiderate sul controller e posizionare il materiale in modo sicuro sul banco di lavoro. Attivare la funzione di taglio singolo e la lama eseguirà un taglio in base alle impostazioni programmate. La modalità singola è ideale per il taglio di piccoli lotti o per attività che richiedono regolazioni precise. Verificare sempre l'allineamento del materiale e le precauzioni di sicurezza prima di attivare la macchina.

Posizionamento della lamiera
Quando si utilizza una cesoia a ghigliottina, il corretto posizionamento della lamiera è fondamentale per garantire precisione e sicurezza. Innanzitutto, assicurarsi che la macchina sia spenta prima di posizionare la lamiera. Allineare la lamiera con il registro posteriore o anteriore in base alla lunghezza di taglio desiderata. Regolare saldamente la lamiera contro le guide per evitare che scivoli durante il taglio. Verificare che la lamiera sia dritta e posizionata saldamente per ottenere un taglio netto e preciso. Il corretto posizionamento non solo migliora la precisione di taglio, ma riduce anche al minimo il rischio di danni alla macchina o di lesioni all'operatore.

Assicurare il corretto allineamento del foglio con le dita di arresto
Quando si utilizza una pressa piegatrice o una cesoia, il corretto allineamento della lamiera è fondamentale per ottenere risultati accurati. La lamiera deve essere posizionata con cura in modo che tocchi i distanziatori. Questi distanziatori fungono da guida, garantendo il corretto posizionamento del materiale per operazioni di taglio o piegatura uniformi. Prima di avviare la macchina, verificare che i distanziatori siano regolati saldamente in base alle dimensioni richieste. Questo passaggio riduce al minimo gli errori e garantisce risultati precisi, riducendo gli sprechi di materiale. Il corretto allineamento con i distanziatori è essenziale per mantenere l'efficienza e fornire risultati di alta qualità nel processo di lavorazione dei metalli.

Premere l'interruttore a pedale e tagliare
Per avviare il processo di taglio sulla vostra cesoia a ghigliottina, premete con decisione l'interruttore a pedale. Assicuratevi che il materiale sia posizionato saldamente e allineato con le dimensioni di taglio desiderate prima di premere il pedale. Una volta attivato, la macchina eseguirà il taglio automaticamente, seguendo i parametri preimpostati sul controller. Mantenete sempre una distanza di sicurezza dalla lama durante il funzionamento ed evitate movimenti bruschi per garantire precisione e sicurezza. Rilasciate il pedale immediatamente dopo il completamento del taglio. Questa semplice procedura garantisce un funzionamento efficiente riducendo al minimo i rischi durante le operazioni di taglio dei metalli.

Parte 5 Misurazione
Misurazione della lunghezza del foglio grezzo 455
Per avviare il processo di taglio sulla vostra cesoia a ghigliottina, premete con decisione l'interruttore a pedale. Assicuratevi che il materiale sia posizionato saldamente e allineato con le dimensioni di taglio desiderate prima di premere il pedale. Una volta attivato, la macchina eseguirà il taglio automaticamente, seguendo i parametri preimpostati sul controller. Mantenete sempre una distanza di sicurezza dalla lama durante il funzionamento ed evitate movimenti bruschi per garantire precisione e sicurezza. Rilasciate il pedale immediatamente dopo il completamento del taglio. Questa semplice procedura garantisce un funzionamento efficiente riducendo al minimo i rischi durante le operazioni di taglio dei metalli.

Misurare il foglio dopo il taglio 355
Dopo aver completato il processo di taglio, è essenziale misurare il foglio per garantirne la precisione e soddisfare le specifiche richieste. Utilizzare uno strumento di misura affidabile, come un calibro o un righello, per verificare le dimensioni. Verificare la lunghezza, la larghezza e gli angoli del pezzo tagliato per assicurarsi che corrispondano ai parametri desiderati. Se si rilevano deviazioni, regolare le impostazioni della macchina ed eseguire ulteriori tagli, se necessario. Una misurazione costante dopo ogni taglio contribuisce a mantenere la qualità, riduce al minimo gli sprechi e garantisce che il prodotto finale soddisfi le aspettative del cliente. Dare sempre priorità alla precisione per ottenere risultati di taglio ottimali.

Parte 6 Manutenzione
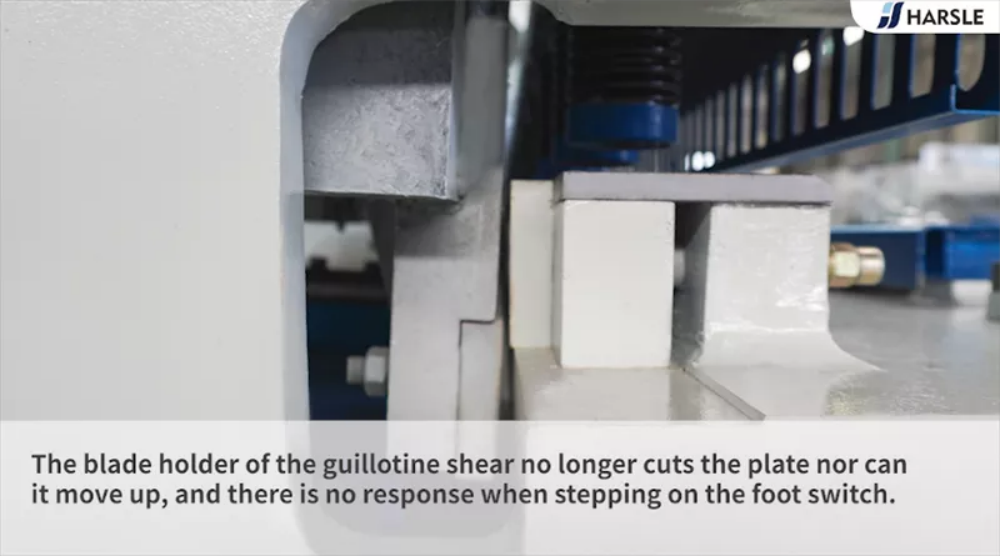
Risoluzione dei problemi relativi al supporto della lama della cesoia a ghigliottina
Se il portalama della tua cesoia a ghigliottina non taglia più le lamiere o non si muove verso l'alto e non si sente alcuna risposta quando si preme l'interruttore a pedale, ciò indica un potenziale problema meccanico o elettrico. Innanzitutto, ispeziona la lama per verificare che non sia usurata o danneggiata e sostituiscila se necessario. Successivamente, controlla eventuali ostruzioni o disallineamenti nel portalama. Verifica che il sistema idraulico funzioni correttamente, assicurandoti che non vi siano perdite o bassi livelli di fluido. Infine, verifica che l'interruttore a pedale sia correttamente collegato o danneggiato. Una manutenzione regolare può prevenire tali problemi e garantire un funzionamento regolare.
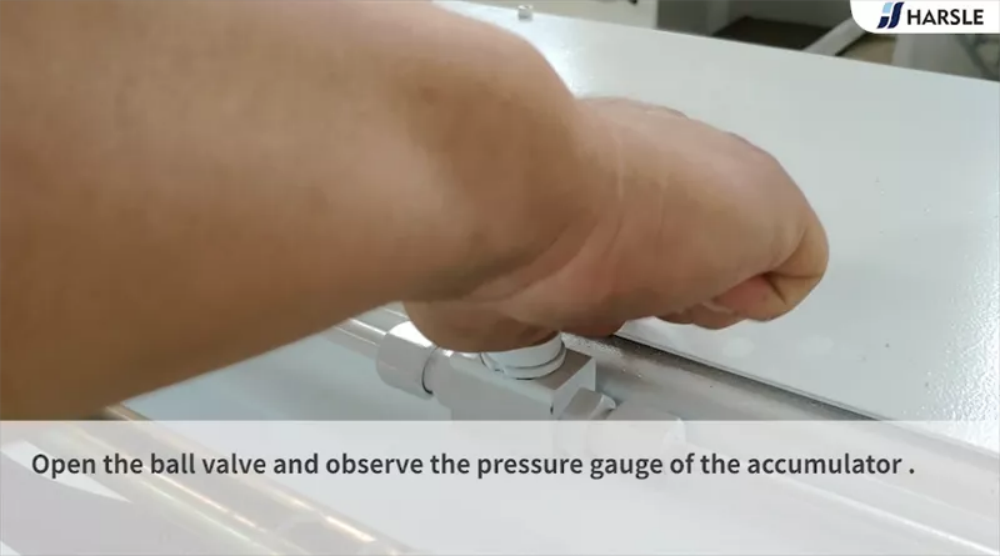
Controllo del manometro dell'accumulatore
Iniziare aprendo con cautela la valvola a sfera per garantire un flusso regolare del fluido idraulico all'interno del sistema. Una volta aperta completamente la valvola, osservare il manometro collegato all'accumulatore. Osservare le letture sul manometro per determinare se la pressione rientra nell'intervallo raccomandato specificato nel manuale della macchina. Eventuali letture anomale potrebbero indicare un problema al sistema idraulico, come una perdita o livelli di fluido insufficienti. Se la pressione è stabile e rientra nell'intervallo corretto, la macchina è pronta per un funzionamento sicuro. Un monitoraggio regolare garantisce prestazioni ottimali della macchina.

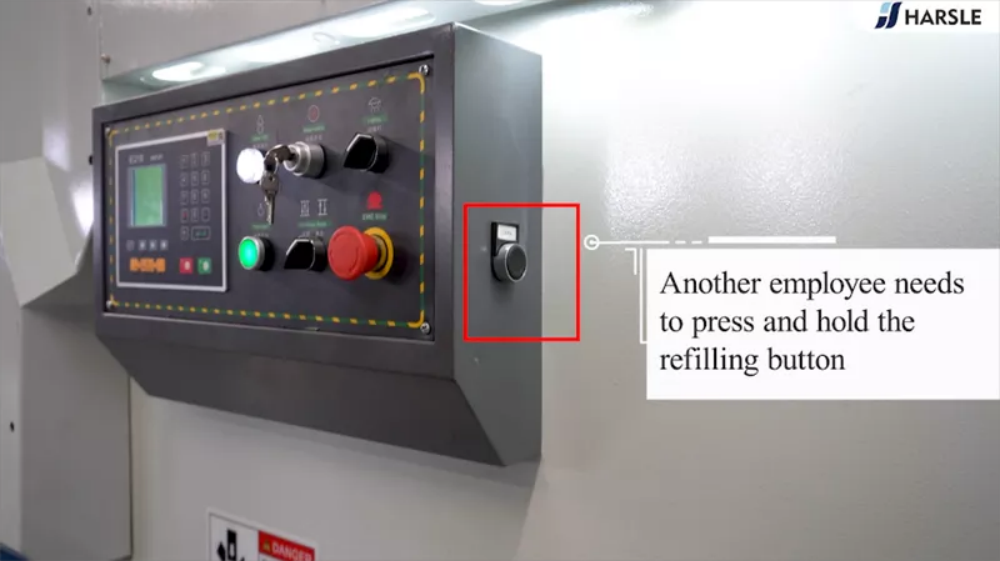
Un altro dipendente deve premere e tenere premuto il pulsante di ricarica
Per garantire un funzionamento regolare, è importante che un altro dipendente prema e tenga premuto il pulsante di rabbocco durante il processo. Questa azione mantiene un flusso costante di olio idraulico o refrigerante, evitando interruzioni o ritardi nelle prestazioni della macchina. Tenendo premuto il pulsante di rabbocco, il sistema è in grado di far circolare il liquido in modo efficiente, garantendo una lubrificazione e un raffreddamento adeguati in tutta la macchina. Questo passaggio è fondamentale per preservare la longevità e l'affidabilità dell'attrezzatura. Seguire sempre le linee guida di sicurezza durante l'esecuzione di questa attività per evitare fuoriuscite o incidenti e monitorare il sistema per verificarne il corretto funzionamento.
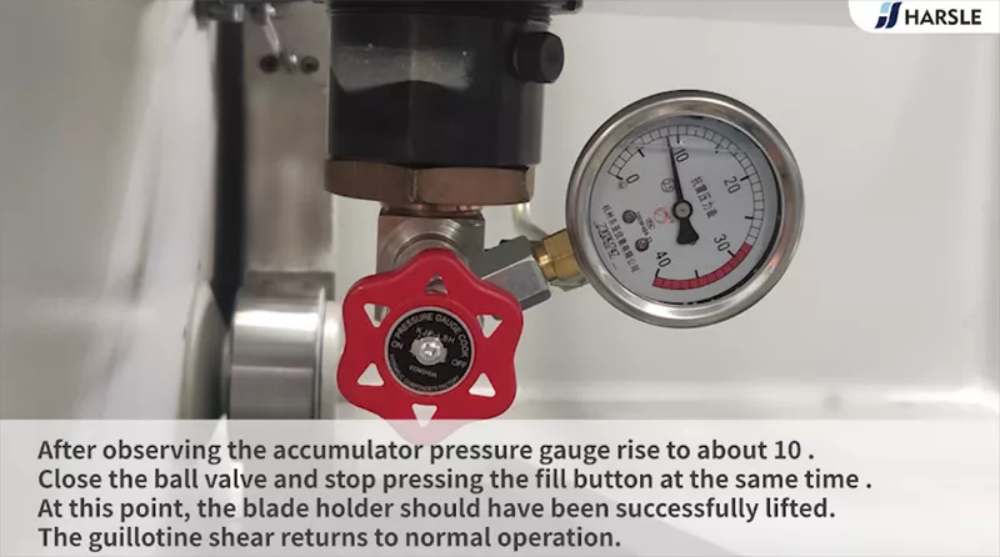
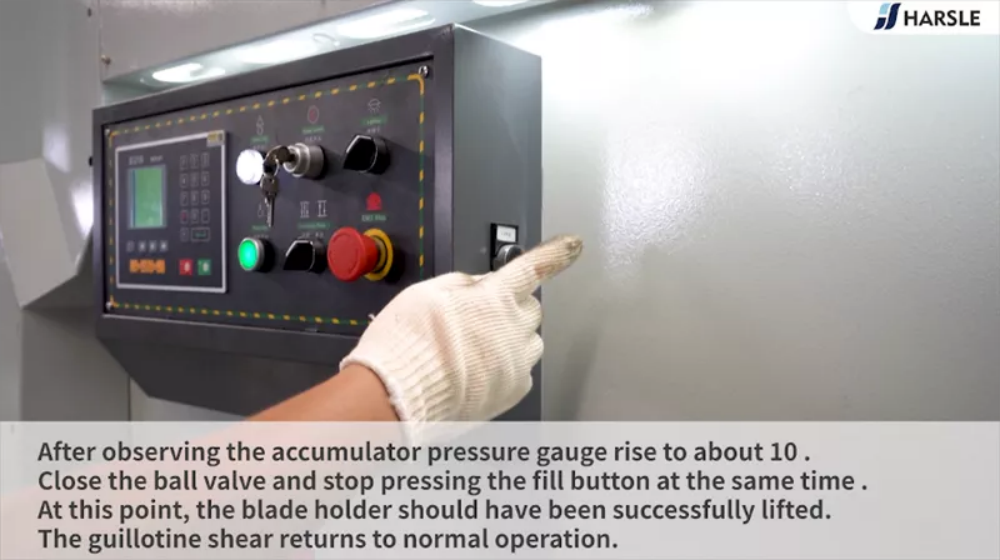
Ripristinare la cesoia a ghigliottina per il normale funzionamento
Non appena il manometro dell'accumulatore raggiunge circa 10, è essenziale intervenire immediatamente. Chiudere la valvola a sfera per sigillare il sistema e rilasciare contemporaneamente il pulsante di riempimento per evitare sovrapressurizzazione. A questo punto, il portalama dovrebbe sollevarsi correttamente in posizione, a indicare che il sistema idraulico funziona correttamente. Con il portalama ripristinato, la cesoia a ghigliottina è pronta per tornare al normale funzionamento. Seguire questi passaggi garantisce che la macchina sia ripristinata correttamente e sicura per le operazioni di taglio, mantenendo sia l'efficienza operativa che la sicurezza dell'utente.


Parte 7 Spegnimento
Premere il pulsante rosso Stop
Per spegnere la macchina in sicurezza, individuare il pulsante rosso Fermare pulsante, in genere posizionato sul pannello di controllo della macchina o vicino alla postazione dell'operatore. Premere il pulsante rosso Fermare Premere saldamente il pulsante per arrestare tutte le operazioni della macchina. Questo passaggio garantisce la completa disattivazione della macchina, prevenendo movimenti o operazioni accidentali. Verificare sempre che la macchina si sia fermata completamente prima di procedere alla pulizia o a qualsiasi intervento di manutenzione. Seguire questo passaggio è essenziale per garantire la sicurezza, prolungare la durata della macchina ed evitare un'usura non necessaria. Ricordate, la sicurezza è fondamentale quando si maneggiano apparecchiature industriali.

Premere i pulsanti di arresto di emergenza
I pulsanti di arresto di emergenza sono dispositivi di sicurezza essenziali su macchinari come le cesoie a ghigliottina. Questi pulsanti sono posizionati strategicamente sulla macchina per un accesso rapido e semplice in caso di emergenza. Premendo il pulsante di arresto di emergenza, tutte le operazioni della macchina vengono immediatamente interrotte, prevenendo potenziali incidenti o danni. Questo meccanismo di sicurezza è progettato per garantire la sicurezza dell'operatore e proteggere la macchina da malfunzionamenti imprevisti. Familiarizzare sempre con la posizione di questi pulsanti prima di iniziare qualsiasi operazione. Testarli regolarmente per verificarne la funzionalità e non esitare a utilizzarli se la sicurezza è compromessa. La sicurezza deve sempre essere al primo posto durante il funzionamento della macchina.

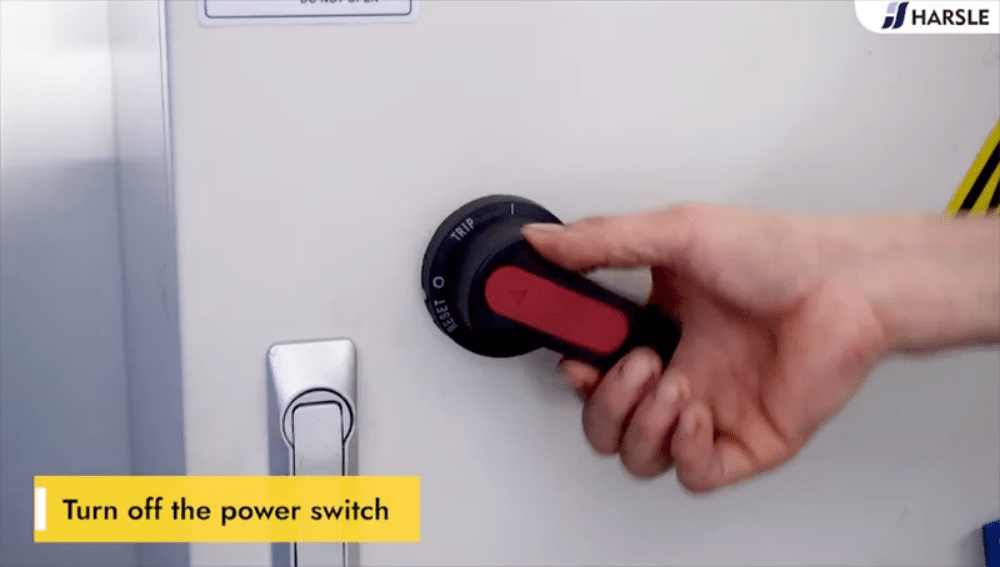
Spegnere l'interruttore di alimentazione
Prima di eseguire qualsiasi operazione di manutenzione, pulizia o regolazione sulla macchina, spegnere sempre l'interruttore di alimentazione per garantire la sicurezza. Individuare l'interruttore di alimentazione, che in genere si trova vicino al pannello di controllo o alla scatola elettrica principale. Ruotarlo o premerlo in posizione "off", assicurandosi che la macchina sia completamente spenta. Questo passaggio elimina il rischio di avviamenti accidentali che potrebbero causare danni o lesioni. Verificare che la macchina sia spenta controllando il display di controllo o le spie luminose. Seguire sempre questa semplice ma fondamentale procedura per mantenere un ambiente di lavoro sicuro e proteggere le apparecchiature.