


If you’re looking to master ET Series Mold Setting for your full electric servo bending machine, you’ve come to the right place. I will guide you through the essential steps to successfully implement this feature, optimizing your bending processes with precision and efficiency. Understanding ET Series Mold Setting is crucial for achieving accurate and consistent results, and in this article, I’ll provide you with the insights and techniques needed to make the most of this powerful tool. Whether you’re new to using this system or seeking to refine your skills, my goal is to equip you with the knowledge to enhance your production capabilities.
Step 1: Preparing the Mold Interface

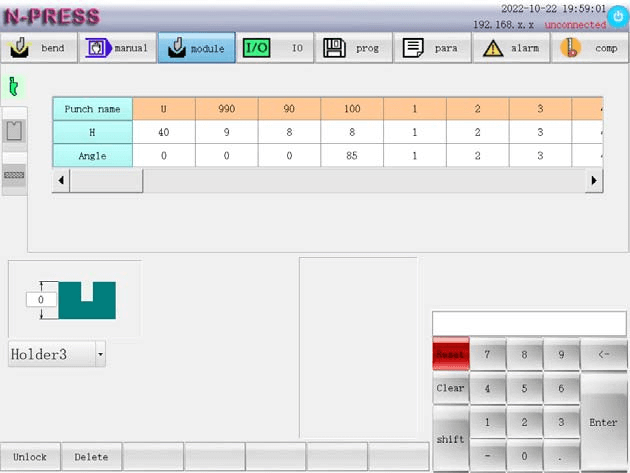
Click the function key to enter the mold interface to set the upper and lower mold parameters and set the material characteristics.
To begin with ET Series Mold Setting, carefully set the lower die base as required by your current program. Precise adjustment of the R lifting height is crucial. When the bending size is too small and the R-axis avoidance function is enabled; when the rear gear of X is positioned forward, R will be raised to this height first, and then R will be lowered after the positioning is completed to avoid the rear gear from hitting the mold. Ensure this setting prevents contact between the backgauge and the mold, enhancing both safety and efficiency.
Step 2: Configuring the Upper Mold Settings
Select and configure the upper mold by verifying its name and adjusting the height and angle. The accuracy of these parameters is essential for precise bending operations. Proper configuration can resolve potential issues like inconsistent bends or tool misalignment, ensuring your project’s success.
Step 3: Setting the Lower Mold Parameters
For the lower mold, input the essential parameters, including the mold name, height (HD), V width, angle (β), and die radius (Rd). Set an appropriate safety distance to prevent unintended contact with the mold during operations. These meticulous settings uphold safety and enhance mold performance.
Fare un passo 4: Configuring Materials for ET Series Mold Setting
Selecting the Right Material
n the ET Series Mold Setting, selecting the appropriate material is the first critical step. The system allows the user to choose from 10 types of materials, including predefined options such as iron (0), aluminum (1), and stainless steel (2). Additionally, there are options (3-9) for customer-defined materials. It’s important to note that the elastic modulus and tensile strength for default materials are constant, which ensures consistency.
To select the right material, consider the unique properties each brings to the bending process, such as:
Tensile Strength (σb): Also measured in MPA, tensile strength denotes the maximum stress a material can withstand while being stretched. Properly inputting this value will prevent process failures and improve end-product quality.
Elastic Modulus (E): Measured in MPA, this signifies the material’s ability to deform elastically. Enter the specific modulus for customer-defined materials to ensure the machine processes the material correctly.
Voltage and Deflection Compensation
Proper voltage and deflection compensation are crucial for accurate bending. In the ET Series Mold Setting, this involves adjusting the deflection compensation mechanism, which compensates for the inevitable deflection during bending. The key components include:
- Voltage Value (V): Determine and enter the correct voltage value needed for the deflection compensation mechanism. This figure ensures the mechanism performs adequately under electrical influence.
- Compensation Value (mm): Input the necessary compensation displacement. This calculates the physical adjustments required to maintain precision and uniformity in bending operations.
By meticulously configuring these values, operators can maintain consistent quality across all bending tasks, significantly reducing product defects.
Efficient Use of ET Series Mold Setting Sub Functions
To streamline your machine setup process with the ET Series Mold Setting, it is crucial to efficiently manage mold data. Utilizing the sub-function features can significantly enhance operational efficiency and reduce the chances of errors. For example, deleting unneeded entries like the lower die “A1” ensures that the system remains organized and easy to navigate.
Deleting Unused Mold Data:
Using the delete sub-function in the ET Series Mold Setting is straightforward and an essential step towards optimizing your setup process. Follow these steps to delete unwanted mold data:
- Select the Die: Identify and select the lower die name “A1” from the die list that you wish to delete.
- Execute the Delete Command: Click the sub-function key labeled ‘Eliminare‘. The system will automatically delete the selected column of data, helping maintain a clutter-free and efficient mold list.
This process is illustrated in the diagram provided in your control panel interface, ensuring visual guidance as you manage your mold data.
Domande frequenti (FAQ)
What are the troubleshooting steps if the ET Series Mold Setting is not working correctly?
If the ET Series Mold Setting doesn’t function as expected, first check the alignment of the molds and ensure they are seated correctly. Verify the software settings and update if necessary. Also, consult the error codes provided by the system to identify and rectify specific issues.
How can I improve the durability of molds used in the ET Series Bending Machine?
To enhance the longevity of the molds, is important to follow regular maintenance schedules, which include cleaning the molds after each use and storing them properly to prevent deformation. Use recommended lubricants to minimize wear and tear.
Can I customize the mold settings for unique bending operations?
Yes, the ET Series Mold Setting allows customization to accommodate various bending tasks. Utilize the numerical control system to adjust parameters, such as pressure and angle, based on the specific requirements of each project.
Conclusione
Implementing the ET Series Mold Setting successfully is crucial for maximizing the efficiency and precision of your full electric servo bending machine. To recap, focus on the key steps: accurately calibrate the mold settings, ensure all components are securely in place, and verify the integration of the numerical control system for optimal performance.
By following these guidelines, you are well-equipped to enhance the productivity and lifespan of your equipment. For further assistance or to learn more about our products, please feel free to contact HARSLE’s support team or explore additional resources available on our website.


