Cybelec CybTouch 8P Hydraulische Abkantpresse Handbuch
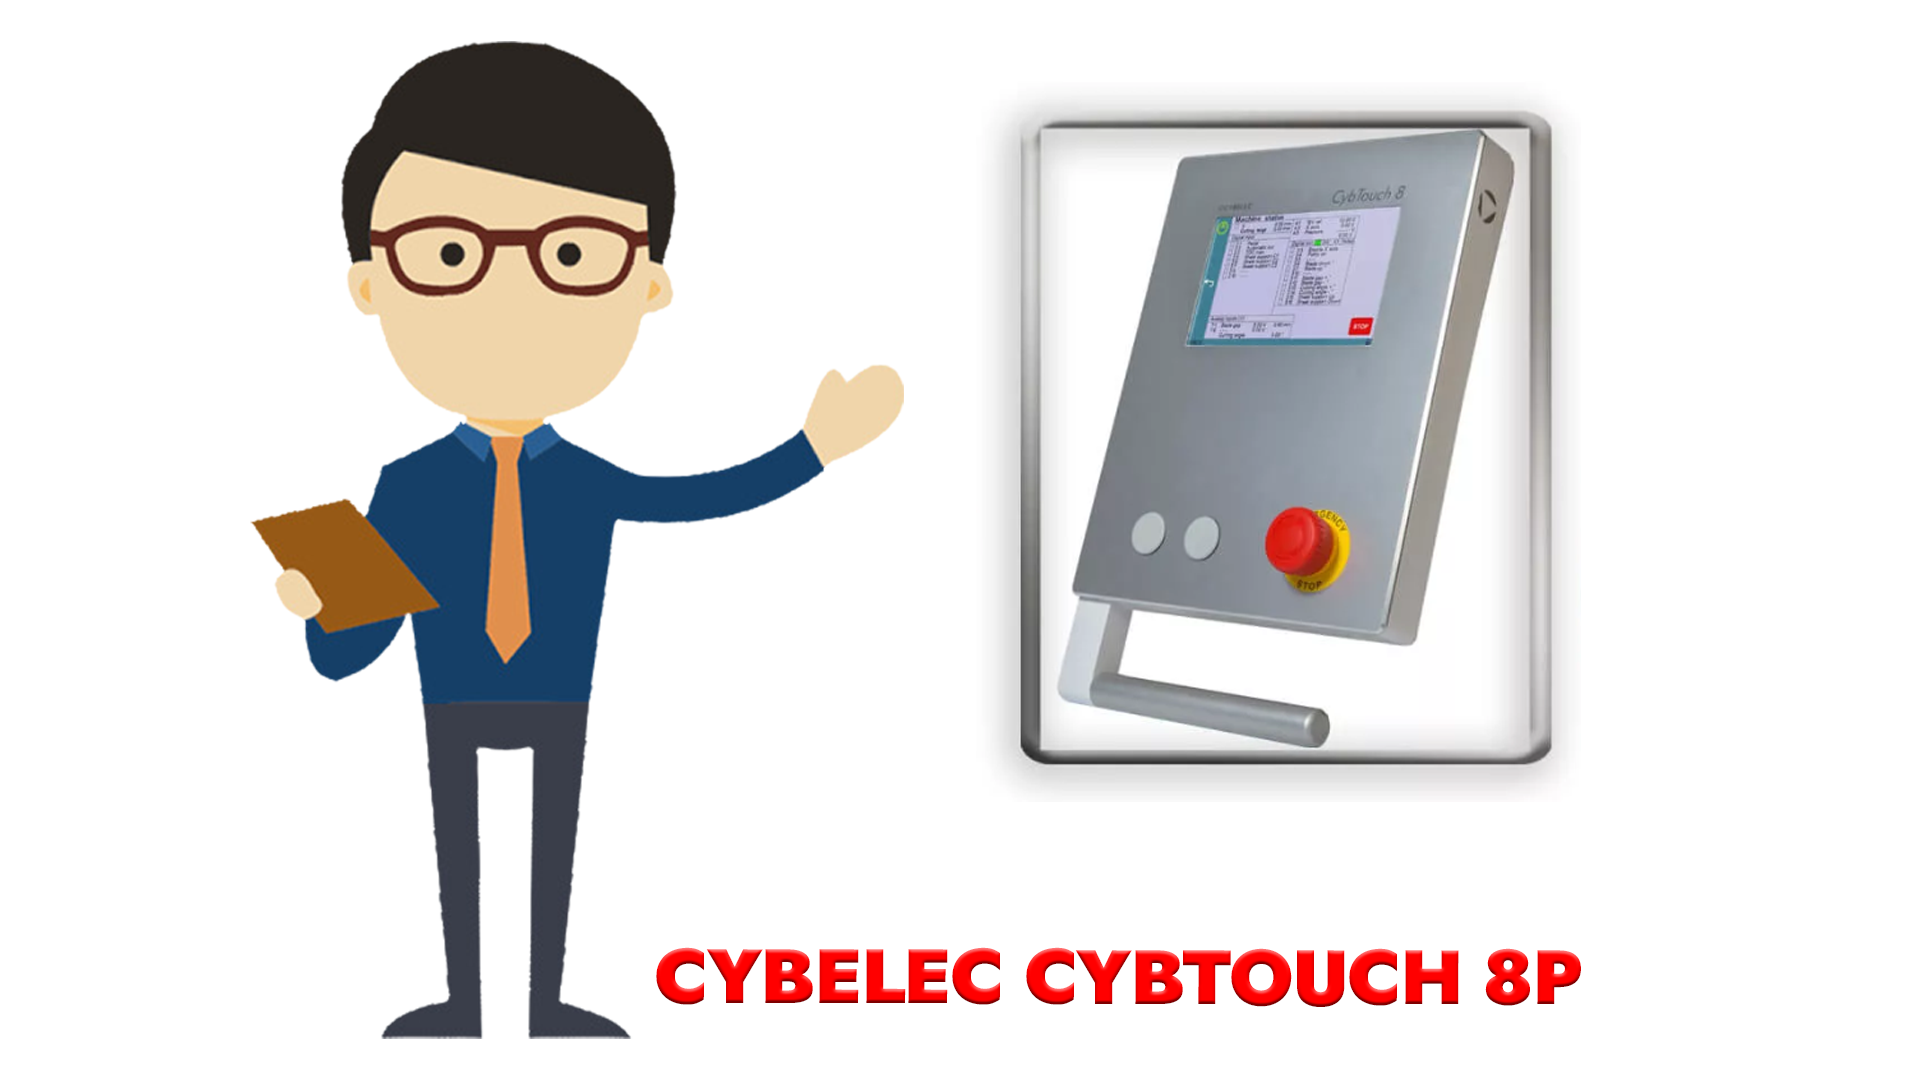
In diesem Artikel gebe ich einen umfassenden Überblick über den Cybelec CybTouch 8P Hydraulic Abkantpresse Handbuch. Als Benutzer dieser fortschrittlichen Hydraulik AbkantpresseIch weiß, wie wichtig es ist, ein ausführliches Handbuch zur Hand zu haben. Dieses Handbuch hilft Ihnen, sich mit den Funktionen, der Bedienung und der Wartung des CybTouch 8P vertraut zu machen und so das Beste aus Ihrem Gerät herauszuholen. Ob erfahrener Bediener oder Neuling, meine Einblicke erleichtern Ihnen das Verständnis und die effektive Nutzung dieses leistungsstarken Werkzeugs.
Sicherheit
●Allgemeine Sicherheit
Die Benutzer müssen die in diesem Handbuch beschriebenen Anweisungen GELESEN und VERSTANDEN haben, vor allem aber müssen sie sie RESPEKTIEREN.
Alle Personen, die mit der Maschine, auf der die numerische Steuerung installiert ist, in Kontakt kommen, unabhängig von ihrer Funktion oder dem Zustand der Maschine (Montage, Demontage, Inbetriebnahme, Produktion, Wartung, Reparatur), müssen die Sicherheitsanforderungen und die Gesamtheit der Betriebsanweisungen, die in den mit der Maschine gelieferten Handbüchern beschrieben sind, gelesen und verstanden haben.

Der Bediener muss für die Arbeit mit der Maschine, auf der die numerische Steuerung installiert ist, entsprechend geschult sein. Eine unsachgemäße Verwendung der numerischen Steuerung kann zu schweren Schäden an der Ausrüstung und/oder Verletzungen von Personen führen.
Eine Veränderung der Maschinenparameter kann zu erheblichen Materialschäden oder einer ungleichmäßigen Produktqualität führen.
Setzen Sie die numerische Steuerung keiner übermäßigen Feuchtigkeit aus, um die Gefahr eines Stromschlags und einer Beschädigung des Geräts zu vermeiden.
Stellen Sie sicher, dass die numerische Steuerung vom Stromnetz getrennt ist, bevor Sie Reinigungsarbeiten durchführen. Verwenden Sie keine Flüssigkeiten auf Alkohol- oder Ammoniakbasis.
Bei einer Störung der numerischen Steuerung einen Techniker rufen.
Setzen Sie die numerische Steuerung keiner direkten Sonneneinstrahlung oder anderen Wärmequellen aus.
Platzieren Sie die numerische Steuerung nicht in der Nähe magnetischer Geräte wie Transformatoren, Motoren oder Geräten, die Störungen erzeugen (Schweißgeräte usw.).
●Zeichen und Symbole in diesem Handbuch
Bei der Verwendung dieses Handbuchs werden Sie auf die unten dargestellten Zeichen und Symbole stoßen: Sie stehen in direktem Zusammenhang mit der Sicherheit von Personen. Befolgen Sie diese Hinweise sorgfältig und informieren Sie andere darüber.
Allgemeine Warnung
Dieses Warnzeichen erscheint in der Anleitung immer dann, wenn auf Vorschriften, Anweisungen oder Hinweise besonders geachtet werden muss. Die richtige Reihenfolge der Arbeitsschritte ist einzuhalten, um Schäden an der Maschine zu vermeiden.
Symbolisiert eine ernste Gefahr für das Personal
Information
Dieses Warnzeichen erscheint in dieser Anleitung immer dann, wenn eine wichtige Information beachtet werden muss. Beachten Sie dieses Zeichen und befolgen Sie die Anweisungen.
Einstellungen
Dieses Zeichen erscheint in dieser Anleitung bei Einstellanweisungen. Beachten Sie dieses Zeichen und befolgen Sie die Anweisungen in der angegebenen Reihenfolge.
Navigation
Dieses Symbol wird in diesem Handbuch verwendet, um Navigationsinformationen bereitzustellen und den Pfad zum im Kapitel behandelten Thema anzugeben.
Erste Schritte mit Cybelec CybTouch 8P
Abhängig von der Softwareentwicklung und der vom CybTouch gesteuerten Abkantpresse (Konfiguration/Funktionen) kann es sein, dass das vorliegende Handbuch nicht vollständig mit dem von Ihnen aktuell verwendeten CybTouch übereinstimmt. Die Unterschiede sind jedoch nur geringfügig.
Touchscreens sind druckempfindlich. Üben Sie keinen starken Druck auf den Bildschirm aus.
Durch starken Druck auf den Bildschirm wird das Display beschädigt. Solche Schäden sind nicht durch die Herstellergarantie abgedeckt!
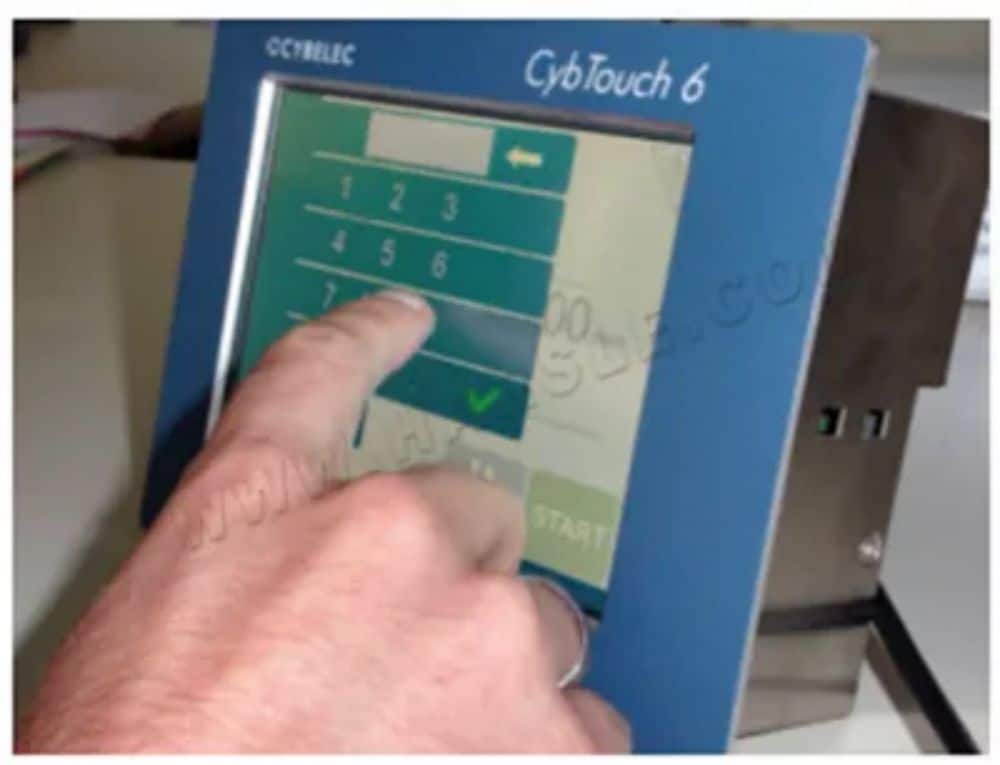
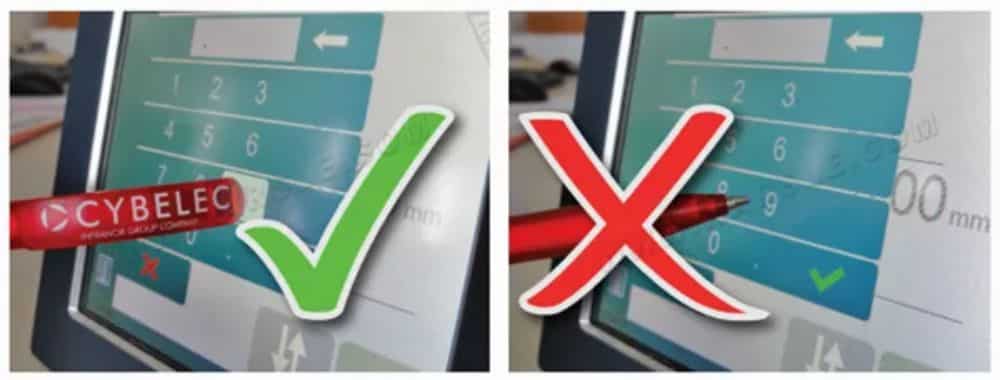
Berühren Sie den Bildschirm nicht mit scharfen und/oder spitzen Gegenständen (Blech, Schraubendreher, Metallkugelschreiber usw.).
Verwenden Sie ausschließlich Ihre Finger (mit oder ohne Handschuhe) oder einen Plastikstift. Achten Sie darauf, dass sich an den Fingerspitzen Ihrer Handschuhe keine Metallpartikel befinden, da diese ebenfalls den Bildschirm beschädigen können.
Nehmen Sie sich ein paar Minuten Zeit, um das sanfte Drücken auf den Bildschirm zu üben. Sie werden feststellen, dass der Bildschirm sehr reaktionsschnell ist und sich angenehm verwenden lässt.
●Allgemeine Navigation
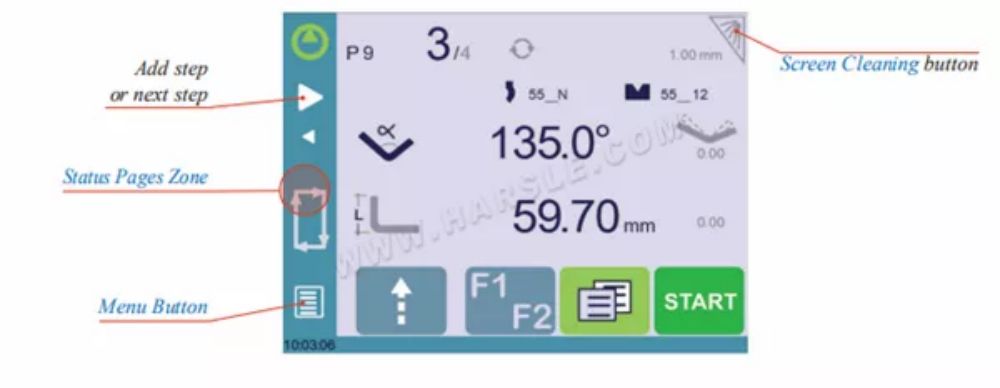
①Menütaste
Die Menütaste![]() ermöglicht Ihnen, den gewünschten Bildschirm direkt auszuwählen (hinzuzuspringen). Der Inhalt des Menüs ändert sich kontextabhängig.
ermöglicht Ihnen, den gewünschten Bildschirm direkt auszuwählen (hinzuzuspringen). Der Inhalt des Menüs ändert sich kontextabhängig.

②Statusseitenzone
Über den Bereich „Statusseiten“ haben Sie Zugriff auf die Statusseite (siehe Seite 5). Dieser Bereich ist jederzeit von jeder Seite aus aktiv (außer von der des Assistenten).
③Bildschirmreinigung
Um den Bildschirm zu reinigen, während CybTouch eingeschaltet ist, berühren Sie die ![]() Taste. Verwenden Sie nur ein feuchtes und glattes Tuch mit Seife oder einem neutralen Reinigungsmittel.
Taste. Verwenden Sie nur ein feuchtes und glattes Tuch mit Seife oder einem neutralen Reinigungsmittel.
Verwenden Sie NIEMALS Lösungsmittel, Benzin, Benzol, Alkohol usw.
●Statusseite
Die Statusseite zeigt den Status aller Ein- und Ausgänge sowie die Achsenpositionen der NC an. Diese Funktion ist sehr nützlich beim Einrichten oder beim Telefonservice einer im Feld installierten Maschine.
Sie können von überall auf diese Seite zugreifen, indem Sie auf die Statusseitenzone drücken (siehe Seite 4). Um die Statusseite zu verlassen, drücken Sie auf den Pfeil links.

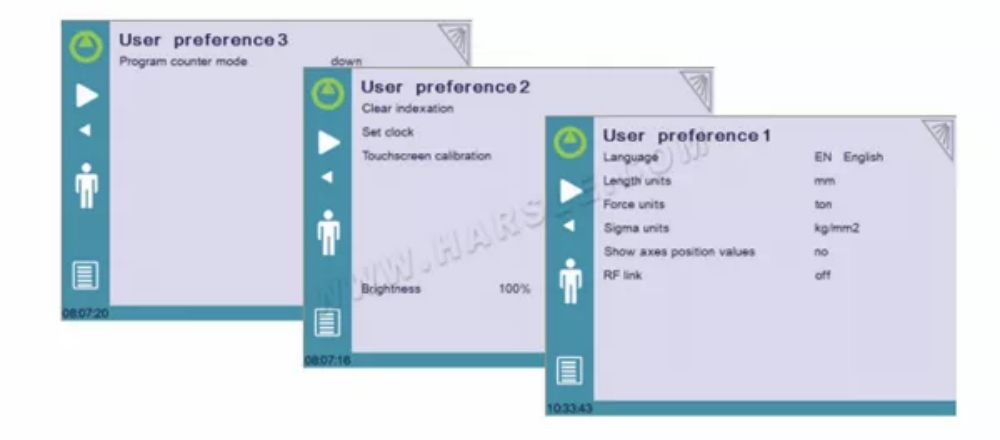
●Benutzereinstellungen
![]() (Menü-Schaltfläche) → Andere Menüs → Benutzereinstellungen
(Menü-Schaltfläche) → Andere Menüs → Benutzereinstellungen
Um die Seite „Benutzereinstellungen“ zu verlassen, berühren Sie die ![]() Taste.
Taste.
①Um die verfügbaren Sprachen zu durchsuchen, berühren Sie einfach die Option „Sprache“ auf dem Bildschirm. Verfügbare Sprachen sind:

②Längeneinheiten
Die Liste der verfügbaren Sprachen kann sich ändern und im Laufe der Zeit erweitert werden.
Mit diesem Parameter können Sie für die im CybTouch zu verwendende Längeneinheit zwischen mm, Zoll und keiner wählen.
Wenn keine Option ausgewählt ist, werden Millimeter als Einheit verwendet.
③Krafteinheiten
Mit diesem Parameter können Sie zwischen Tonne, kN und Tonnen als Krafteinheit für CybTouch wählen.
④Sigma-Einheiten
Mit diesem Parameter können Sie zwischen kg/mm2, N/mm2 und psi(*1000) für die im CybTouch zu verwendende Sigma-Einheit wählen.
⑤Achsenpositionswerte anzeigen
Diese Funktion zeigt die Achsenpositionen auf der numerischen Biegungsseite an (siehe Seite 14).
◆Bei der Einstellung „Nein“ werden die Positionen der Achsen während der jeweiligen Bewegungen angezeigt.
◆Bei der Einstellung „Ja“ werden die Positionen der Achsen ständig unter ihren jeweiligen Sollwerten angezeigt.
⑥RFLink
Wenn diese Funktion aktiviert ist, ermöglicht sie die Kommunikation zwischen dem CybTouch und einem Laptop-Computer, an den der RFLink-Dongle von Cybelec angeschlossen ist. Der Standardstatus dieser Funktion ist „Aus“ und wird bei jedem Einschalten des NC automatisch auf „Aus“ zurückgesetzt.
⑦ Klare Indexierung
Wenn diese Funktion aktiviert ist, wird der Index gelöscht und die Maschine sucht danach, wie beim Einschalten der Stromversorgung. So kann der Bediener seine Maschine neu indizieren, ohne sie auszuschalten.
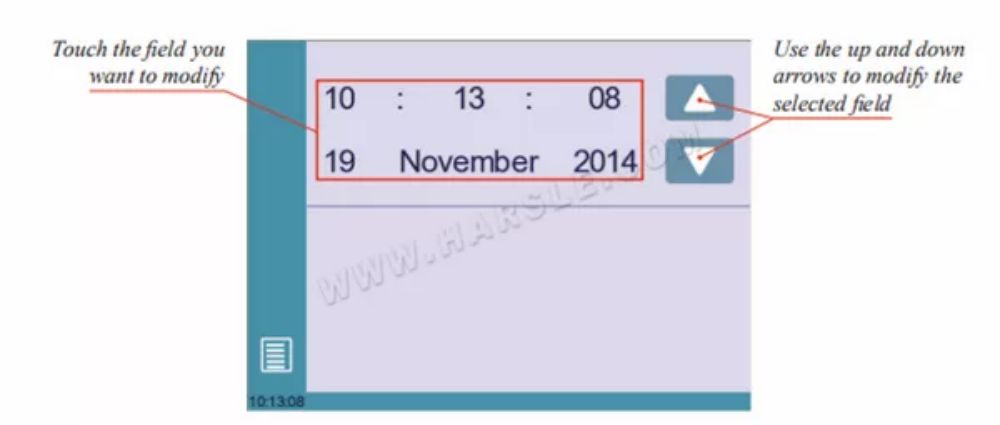
⑧Uhr einstellen
Ermöglicht dem Benutzer, Uhrzeit und Datum auf dem CybTouch einzustellen.
⑨Touchscreen-Kalibrierung
Da ein großer Bediener dazu neigt, höher auf dem Bildschirm zu tippen als ein kleinerer, ermöglicht diese Funktion die Kalibrierung des Touchscreens und stellt außerdem sicher, dass er korrekt funktioniert.
Einstellungsanleitung:
Befolgen Sie einfach die Anweisungen auf der Seite, um den Touchscreen zu kalibrieren.
Verwenden Sie zum Kalibrieren des Touchscreens Ihren Finger oder die Kunststoffspitze eines Stifts. Verwenden Sie niemals scharfe Gegenstände, da diese den Bildschirm beschädigen können.
⑩Helligkeit xx% Eco xx%
Hier kann die Helligkeit des Bildschirms für den Normalmodus und den Eco-Modus festgelegt werden:
1. Berühren Sie den Modus, für den Sie die Helligkeit ändern möchten.
2. Verwenden Sie die![]() Tasten zum Einstellen der Helligkeit.
Tasten zum Einstellen der Helligkeit.
⓫Programmzählermodus
Mit diesem Parameter können Sie den Zählmodus des Teilezählers definieren. Bei der Einstellung „Aufwärts“ zählt der Zähler bis zur gewünschten Zahl. Bei der Einstellung „Abwärts“ zählt der Zähler von der gewünschten Zahl bis 0 herunter.
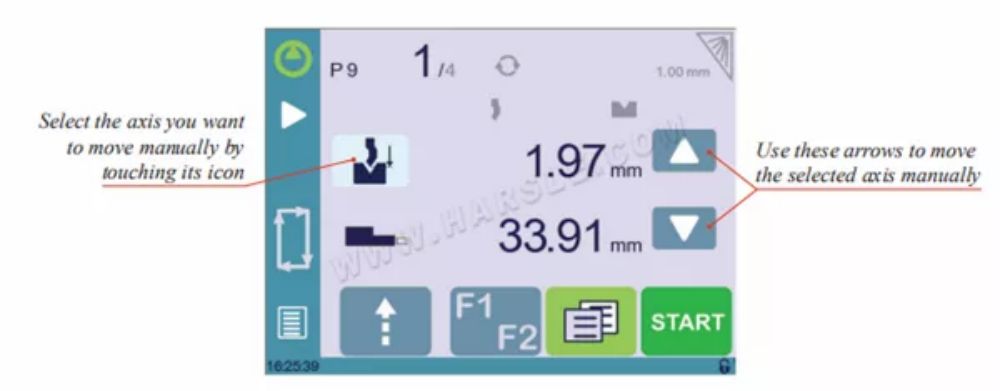
●Manuelle Achsenbewegung
Beim Einrichten einer Maschine ist es manchmal erforderlich, die Achsen manuell bewegen zu können, beispielsweise beim Werkzeugwechsel. Dies kann von zwei verschiedenen Stellen aus erfolgen:
◆ Auf der Programm- oder EasyBend-Seite.
◆ Auf der Seite „Manuelle Bewegung“.
①Auf der Programm- oder EasyBend-Seite
Auf der Seite „Programm“ oder „Easy Bend“ können Achsen nur manuell bewegt werden, wenn die Werkzeugverwaltung deaktiviert ist.
Einstellungsanleitung:
1. Berühren Sie die![]() und berühren Sie dann die
und berühren Sie dann die![]() Symbol (falls verfügbar); es wird grau.
Symbol (falls verfügbar); es wird grau.
2. Berühren Sie die![]() Schaltfläche, um zur Programmseite zurückzukehren.
Schaltfläche, um zur Programmseite zurückzukehren.
3. Berühren Sie das Y-Achsen-Symbol ![]() und verwenden Sie die manuellen Schaltflächen (
und verwenden Sie die manuellen Schaltflächen (![]() Und
Und ![]() ), um es zu verschieben.
), um es zu verschieben.
4. Gehen Sie auf die gleiche Weise vor, um die Hinteranschlagachse zu bewegen.
②Auf der Seite „Manuelle Bewegung“
Auch den Handaufzugswerken ist eine eigene Seite gewidmet, die über den unten stehenden Link aufgerufen werden kann.
![]() (Menütaste) → Manuelle Bewegung
(Menütaste) → Manuelle Bewegung
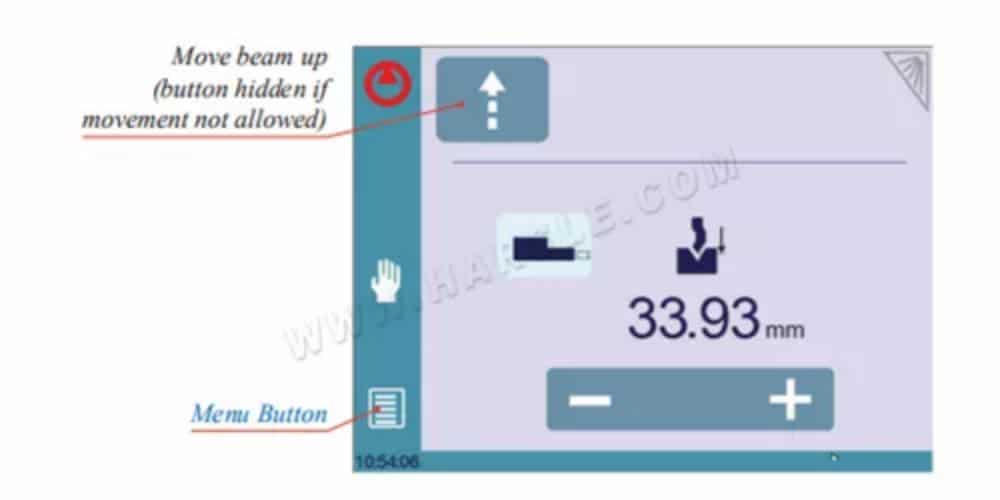
Einstellungsanleitung:
1. Wählen Sie die Achse aus, die Sie verschieben möchten:
•![]() für die X-Achse des Hinteranschlags.
für die X-Achse des Hinteranschlags.
• ![]() für die R-Achse des Hinteranschlags.
für die R-Achse des Hinteranschlags.
2. Berühren Sie die ![]() Schaltflächen, um die ausgewählte Achse zu verschieben.
Schaltflächen, um die ausgewählte Achse zu verschieben.
3. Verwenden Sie den Fußschalter (Low Speed Down-Bewegung) und diese Taste ![]() (High Speed Up), um den Strahl zu bewegen.
(High Speed Up), um den Strahl zu bewegen.
●Serviceseite
![]() (Menü-Taste) → Weitere Menüs → Service → Service
(Menü-Taste) → Weitere Menüs → Service → Service
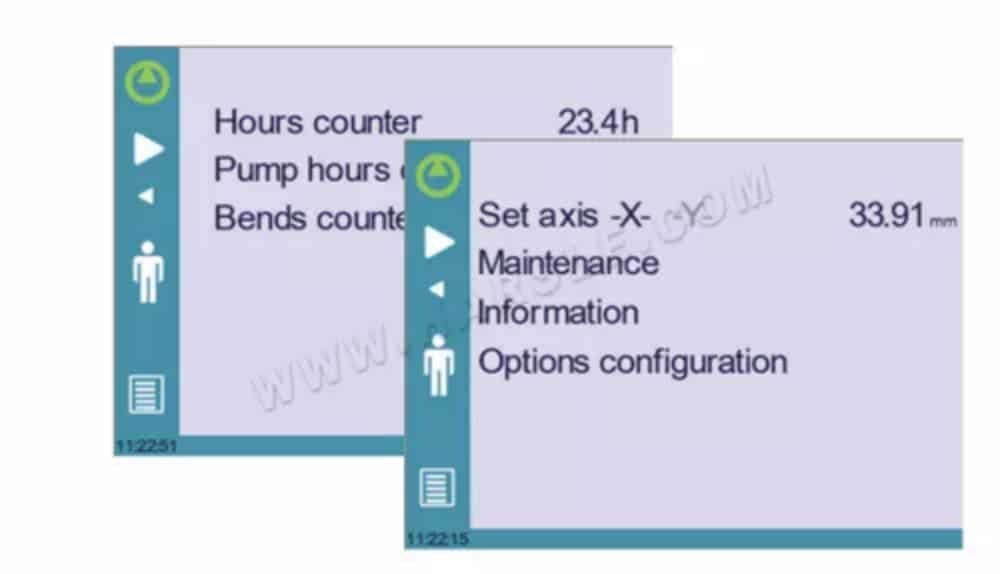
①Achse einstellen
Ermöglicht dem Bediener, die Position des hinteren Anschlags (Achse X) und des Balkens (Achse Y, falls verfügbar) manuell einzustellen.
Diese Funktion muss mit äußerster Vorsicht und nur von erfahrenen
Durch falsche Einstellungen kann es zu mechanischen Schäden an der Maschine kommen.
Nach der Indizierung der Maschine gehen die Einstellungen verloren.
②Wartung
Auf der Wartungsseite wird der Hardwarestatus des CybTouch angezeigt und der Bediener kann verschiedene Wartungsaktionen durchführen.
![]() (Menü-Taste) → Weitere Menüs → Service → Service → Wartung
(Menü-Taste) → Weitere Menüs → Service → Service → Wartung

Alle folgenden Aktionen erfordern Codes und sollten nur von Technikern oder auf Anfrage eines Technikers durchgeführt werden.
▲Defrag
Mit dieser Funktion können Sie den Speicherplatz des CybTouch neu anordnen. Berühren Sie dazu einfach den CybTouch und folgen Sie den Anweisungen im gelben Popup-Fenster.
▲Format
Mit dieser Funktion werden alle Daten im CybTouch gelöscht. Verwenden Sie diese Funktion nur mit Hilfe eines Technikers.
▲Interne Sicherung
Diese Funktion ist speziell für OEM und Support konzipiert.
Normalerweise wird vom Maschinenhersteller oder dem Wartungsunternehmen eine Sicherungskopie der Maschinenparameter erstellt. Mithilfe dieser Sicherung kann ein Wartungstechniker bei Bedarf die ursprünglichen Betriebsparameter wiederherstellen.
Sollten Parameter wiederhergestellt werden müssen, rufen Sie einen Wartungstechniker und befolgen Sie seine Anweisungen.
Versuchen Sie nicht, diese Funktion zu verwenden, es sei denn, Sie sind in dringender Not.
Bevor Sie diese letzte Funktion verwenden, stellen Sie sicher, dass alle Ihre Dateien außerhalb des CybTouch übertragen wurden (mithilfe von CybTouchTools, siehe entsprechende Bedienungsanleitung).
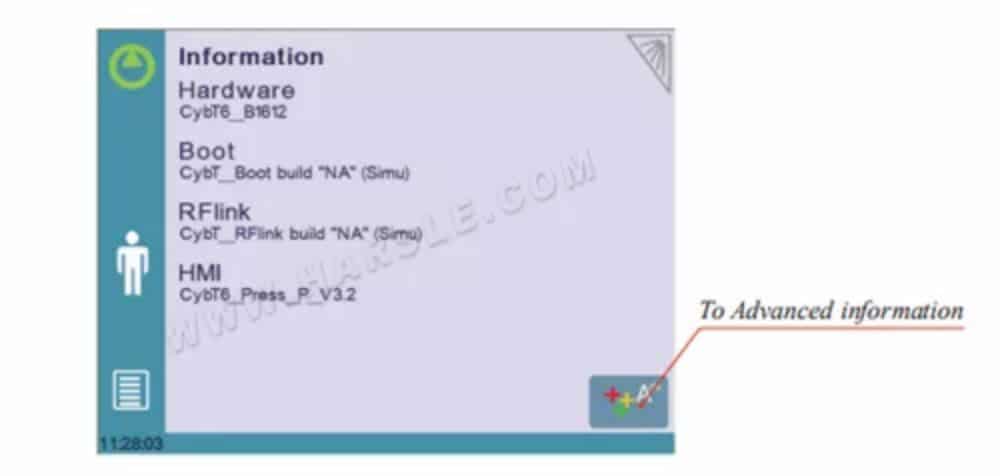
③Informationen
Auf der Informationsseite werden die Namen und Versionen der auf dem CybTouch installierten Software angezeigt. Durch Drücken der Schaltfläche „Erweitert“ werden detailliertere Informationen angezeigt.
![]() (Menü-Taste) → Weitere Menüs → Service → Service → Informationen
(Menü-Taste) → Weitere Menüs → Service → Service → Informationen
④Konfigurationsoptionen
Durch Berühren dieses Menüs wird die folgende Seite geöffnet, auf der Sie die Computeridentifikation finden und die Optionen der Maschine verwalten können.
![]() (Menü-Button) → Weitere Menüs → Service → Service → Konfigurationsoptionen
(Menü-Button) → Weitere Menüs → Service → Service → Konfigurationsoptionen
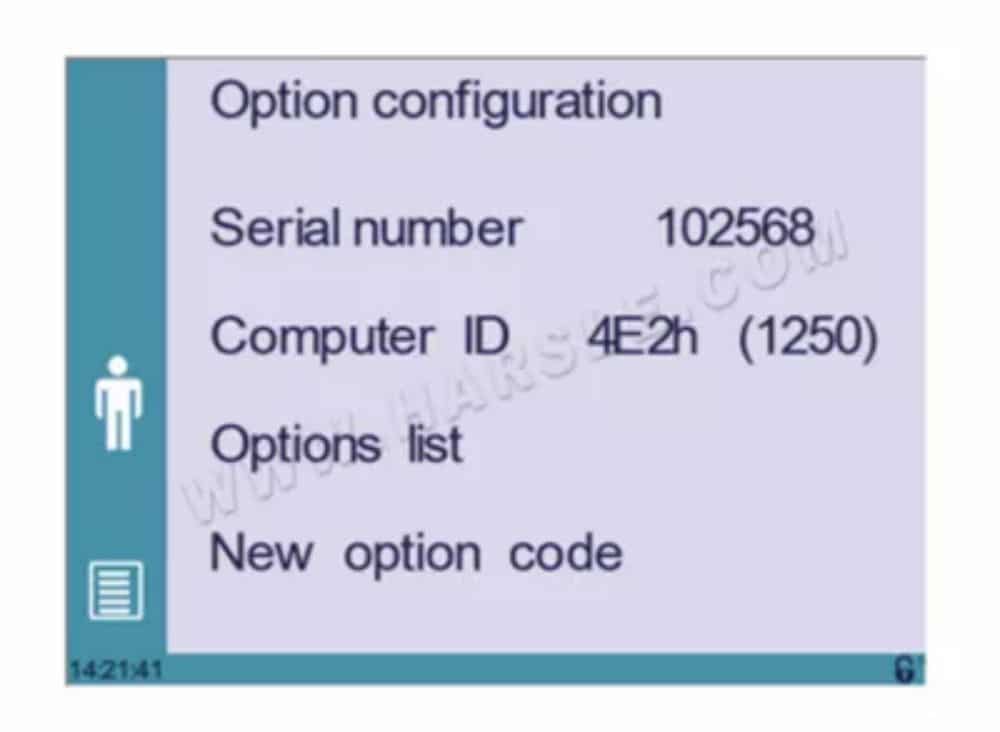
◆Seriennummer
Dies ist die Seriennummer des CybTouch. Sie wird im Werk am Ende der Ersteinrichtung der Maschine eingegeben und bezieht sich auf die Optionsliste der Maschine.
Das Ändern der Seriennummer bedeutet, dass alle auf dem
Maschine kann verloren gehen.
◆Computer-ID
Diese Zeile zeigt einen Identifikationscode an, der für jeden CybTouch einzigartig ist und zusammen mit der Seriennummer eine korrekte Identifizierung der Maschine gewährleistet.
◆Optionsliste
Diese Funktion öffnet ein gelbes Popup-Fenster, in dem alle auf dem CybTouch installierten Optionen angezeigt werden.
◆Neuer Optionscode
Die Funktion öffnet ein alphanumerisches Feld, in das der Code der neuen Option eingegeben werden muss. Das Format eines Optionscodes lautet: ABC-DEF-GHI-JKLM
Grundlegende Seitenbeschreibung
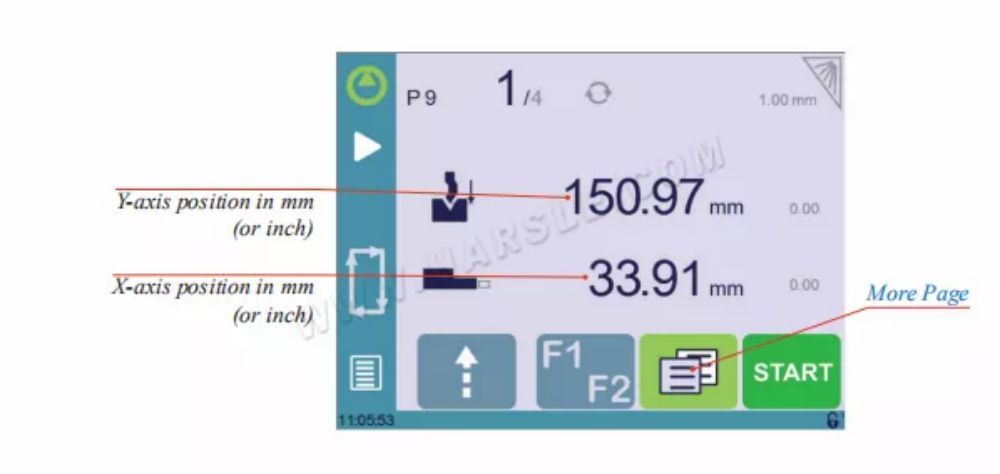
●Bend Numerical Seite
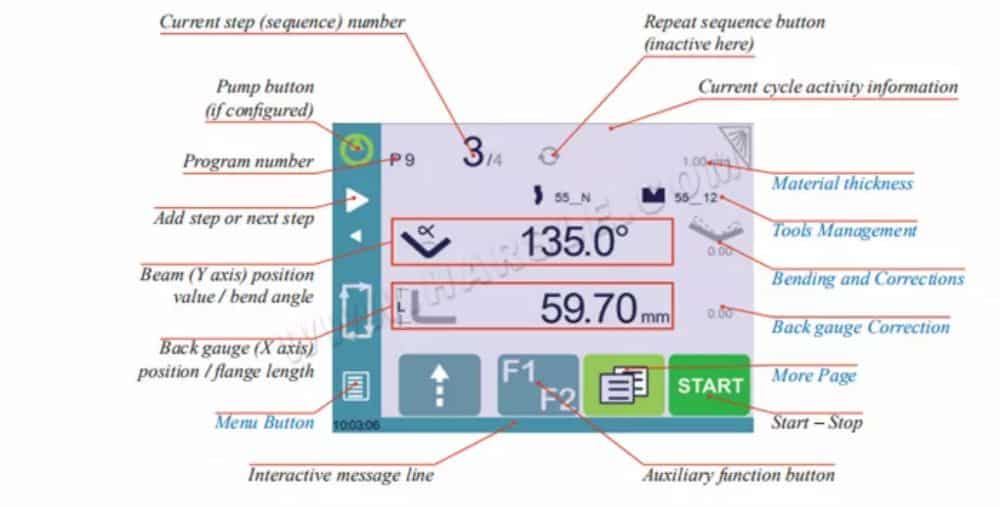
①Verfügbare Funktionen auf der Seite „Bend Num“
Die Biegungsnummerseite ist normalerweise die Arbeitsseite, von der aus die Biegungen ausgeführt werden und von der der Großteil der Navigation ausgeht und zu der sie führt.
◆Aktuelle Schritt-(Sequenz-)Nummer
Durch Berühren der Schrittnummer wird ein gelbes Popup-Fenster wie hier gezeigt geöffnet, in dem Sie zwischen drei verschiedenen Aktionen wählen können:
• Schritt einfügen: Diese Funktion fügt einen Schritt nach dem aktuellen ein.
• Schritt löschen: Diese Funktion löscht den aktuellen Schritt.
• Gehe zu Schritt: Mit dieser Funktion können Sie direkt zum gewünschten Schritt springen.

●Weitere Seite
Biegungsnummer Seite![]()
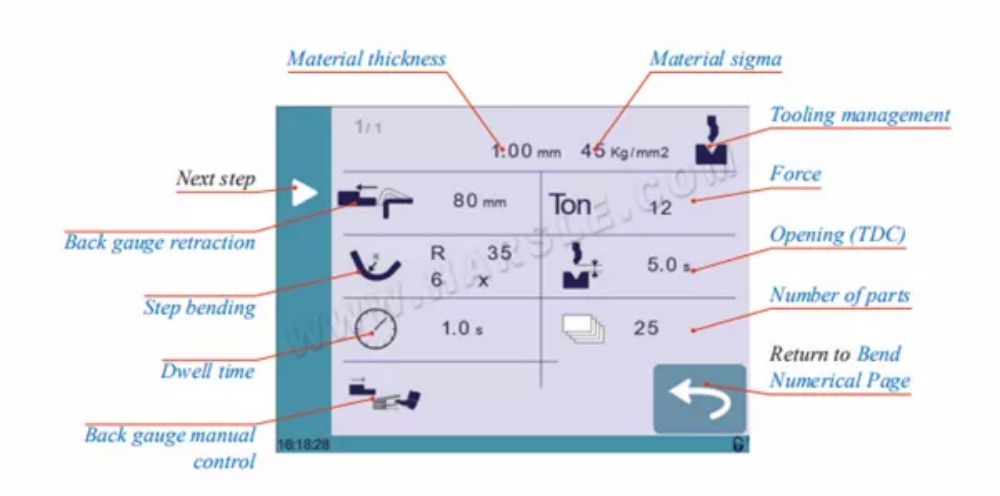
●Verfügbare Funktionen auf der Seite „Mehr“
Auf der Seite „Mehr“ werden Parameter angezeigt, die sich auf das Teil beziehen. Je nach CybTouch-Konfiguration und Art der ausgeführten Aktion werden auch verschiedene Einstellungen für die aktuelle Biegung angezeigt.
①Werkzeugverwaltung
Wenn dieses Symbol deaktiviert (ausgegraut) ist, werden die Symbole „Stempel“ (siehe Seite 19) und „Matrizen“ (siehe Seite 20) auf der numerischen Seite „Biegen“ (siehe Seite 14) deaktiviert (siehe auch „Biegen ohne Werkzeugverwaltung“, Seite 26).
②Rückzug des Hinteranschlags
Über dieses Symbol kann der Rückhub des Hinteranschlags aktiviert/deaktiviert werden. Der Wert kann durch Antippen verändert werden. Da es sich um einen Sequenzparameter handelt, kann dieser bei jedem Programmschritt verändert werden.
③Kraft
Hier muss die Kraft eingegeben werden, mit der das Teil gebogen wird. Die Erfahrung des Bedieners sowie ein Versuch-und-Irrtum-Verfahren helfen dabei, die am besten geeignete Kraft für die Biegung zu bestimmen.
④Öffnung (OT)
Wenn dieser Parameter aktiviert ist, kann die Dauer definiert werden, während der sich der Strahl vom unteren Totpunkt zurück nach oben bewegt. Dieser Wert muss so eingestellt werden, dass dem Bediener genügend Platz bleibt, um das gebogene Teil zwischen den Werkzeugen herauszuziehen.
Wenn dieses Feld deaktiviert (ausgegraut) ist, bewegt sich der Strahl bis zu seinem maximalen Endschalter zurück.
⑤Stufenbiegen
Durch Aktivieren dieses Felds können Sie eine Biegung mit großem Radius programmieren, indem Sie den Wert des Radius und die Anzahl der Schritte eingeben, in denen Sie die Biegung durchführen möchten.
Damit das Ergebnis stimmig ist, muss die Anzahl der Biegungen zur Realisierung des Winkels so bemessen sein, dass die Länge jedes Segments größer ist als die Hälfte der Länge der V-Öffnung der Matrize.
⑥Verweilzeit
Ermöglicht die Definition der Verweildauer, d. h. der Zeit, die der Stempel am unteren Totpunkt verbleibt, bevor er wieder nach oben kommt.
Wenn dieses Feld deaktiviert (ausgegraut) ist, wird der in den Maschinenparametern definierte Standardwert für die Verweilzeit angewendet.
⑦Anzahl der Teile
Der Bediener kann hier die Gesamtanzahl der zu produzierenden Teile eingeben. Jedes Mal, wenn alle Sequenzen des Programms ausgeführt wurden, also ein Teil fertiggestellt ist, wird dieser Zähler um eine Einheit aktualisiert (erhöht oder verringert, siehe Programmzählermodus, Seite 8). Wenn die Anzahl der Teile erreicht ist, wird dies dem Bediener durch ein gelbes Popup-Fenster angezeigt.
⑧ Manuelle Steuerung des Hinteranschlags
Durch Aktivieren dieses Parameters wird die Bewegung des Hinteranschlags manuell gesteuert. Dies bedeutet, dass der Bediener die Bewegung des Hinteranschlags selbst starten muss, beispielsweise mit dem Fußschalter oder der Starttaste.
⑨Materialstärke
Hier muss die Materialstärke eingegeben werden. Dieser Wert dient zur Berechnung der Biegetiefe je nach gewähltem Werkzeug. Dies ist natürlich auch ein Bauteilparameter.
⑩Material Sigma
Hier kann das Material-Sigma eingegeben werden. Dieser Wert dient als Information für den Bediener. Dies ist natürlich auch ein Teileparameter.
Werkzeugverwaltung
●Schläge

●Matrizen
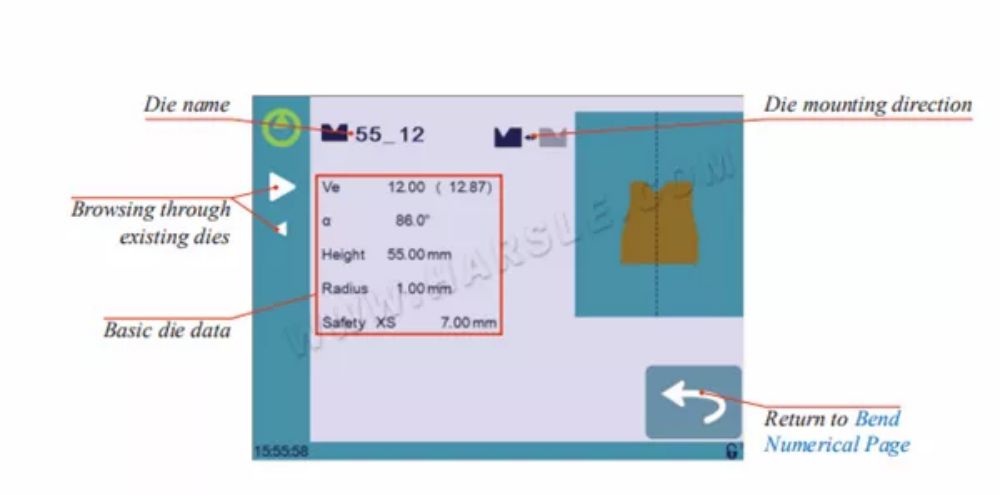
●Benennungstools
Es wird empfohlen, für Ihre Tools Namenskonventionen zu verwenden.
Nachfolgend finden Sie eine einfache Konvention, mit der Sie einen Stempel oder eine Matrize anhand ihres Namens genau identifizieren können.
Natürlich müssen Sie je nach Bedarf möglicherweise weitere Regeln für die Benennung von Stempeln und Matrizen erstellen.
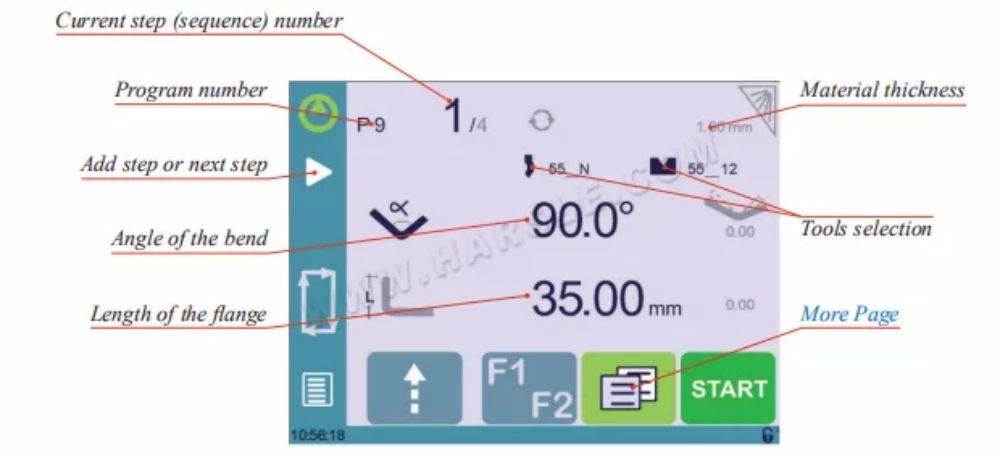
Erstellen eines Teileprogramms
Die meisten Versionen von CybTouch 6 für Pressen verfügen über eine Werkzeugverwaltung (siehe Seite 19), die aktiviert oder deaktiviert werden kann (siehe Werkzeugverwaltung, Seite 15). Einige Versionen verfügen jedoch, je nach Hersteller der Abkantpresse, überhaupt nicht über eine Werkzeugverwaltung. Dies ändert die Vorgehensweise etwas. Sie finden sie hier:
◆ Biegen mit Werkzeugverwaltung,
◆ Biegen ohne Werkzeugverwaltung (siehe Seite 26).
In diesem Kapitel gilt die Maschine als betriebsbereit: Maschinenparameter und Werkzeuge (siehe Werkzeugverwaltung, Seite 19) sind bereits konfiguriert und programmiert.
●Biegen mit Werkzeugverwaltung
Die erste Seite, die beim Einschalten des CybTouch angezeigt wird, ist die numerische Seite „Bend“.
Hier können Programme erstellt werden, die die Biegefolgen enthalten, die zur Herstellung eines vollständigen Teils erforderlich sind.
●Biegen und Korrekturen
Alle Programmkorrekturen werden auf der Seite „Biegen – Numerisch“ (siehe Seite 14) vorgenommen. Je nach Wunsch kann der Bediener alle Schritte des Programms nacheinander ausführen und dabei Korrekturen vornehmen. Oder er kann alle
Führen Sie im halbautomatischen Modus alle erforderlichen Korrekturen am selben Schritt durch, bevor Sie mit dem nächsten fortfahren.
Korrekturen können vorgenommen werden an:
◆ Der Winkel (Y-Achse, siehe Winkelkorrektur, Seite 25).
◆ Die Position des Hinteranschlags (X-Achse, siehe „Korrektur des Hinteranschlags“, Seite 25).
●Biegen ohne Werkzeugverwaltung
Bei Versionen ohne Werkzeugverwaltung ist für den Bediener die Auswahl mit oder ohne Werkzeugverwaltung (siehe Werkzeugverwaltung, Seite 15) nicht möglich. Die Auswahl ist schlichtweg nicht möglich.
Wenn Sie ohne Werkzeugverwaltung arbeiten, können Sie den Hinteranschlagwert für die X-Achse und den Biegetiefenwert für die Y-Achse nur in mm (oder Zoll) programmieren.
Alle Korrekturen werden daher auch manuell in mm/Zoll vorgenommen.
Speichern und Laden eines Programms
●Speichern eines Programms
Nach der Erstellung eines Programms kann ein Bediener das Programm speichern, um es erneut zu verwenden:
1. Berühren Sie die Programmnummer (z. B. P0).
2. Berühren Sie Programm speichern.
3. Geben Sie die Nummer ein, die Sie dem Programm geben möchten (z. B. 1 für P1), gefolgt von .
4. Das Programm heißt jetzt P1 und ist im CybTouch gespeichert.
●Laden eines Programms
So rufen Sie ein Programm auf (laden es):
1. Berühren Sie die Programmnummer (z. B. P1).
2. Berühren Sie Anrufprogramm.
3. Wählen Sie das zu ladende Programm aus der Liste aus (z. B. 002 für P2).
4. Anschließend wird das ausgewählte Programm (P2) in den Arbeitsspeicher geladen und ist einsatzbereit.
●Löschen eines Programms
So löschen Sie ein Programm:
1. Berühren Sie die Programmnummer (z. B. P1).
2. Berühren Sie Programm löschen.
3. Wählen Sie aus der Liste das zu löschende Programm aus.
4. Berühren Sie zur Bestätigung.
EasyBend-Seite
●Eine Biegung auf der EasyBend-Seite erstellen
Weitere Informationen zu den verschiedenen Steuerelementen auf der Seite „Easy Bend“ finden Sie unter „Grundlegende Seitenbeschreibung“ auf Seite 14.
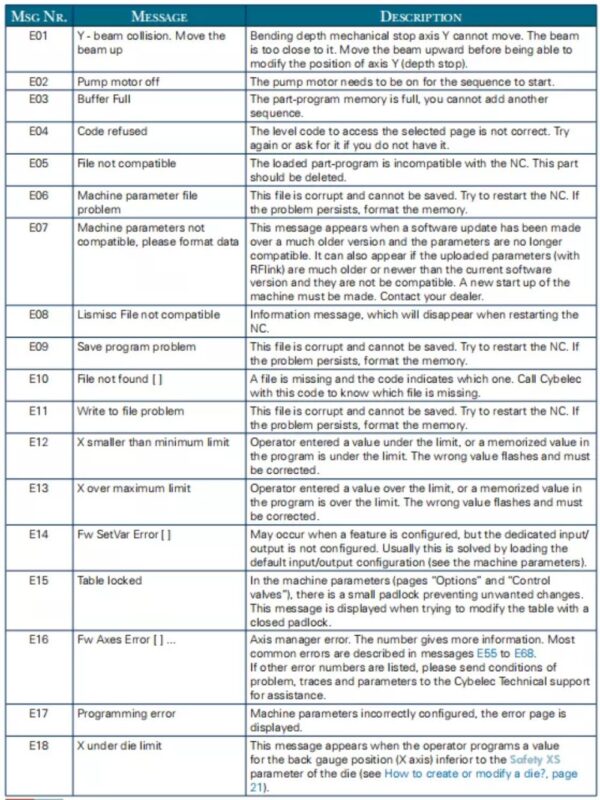
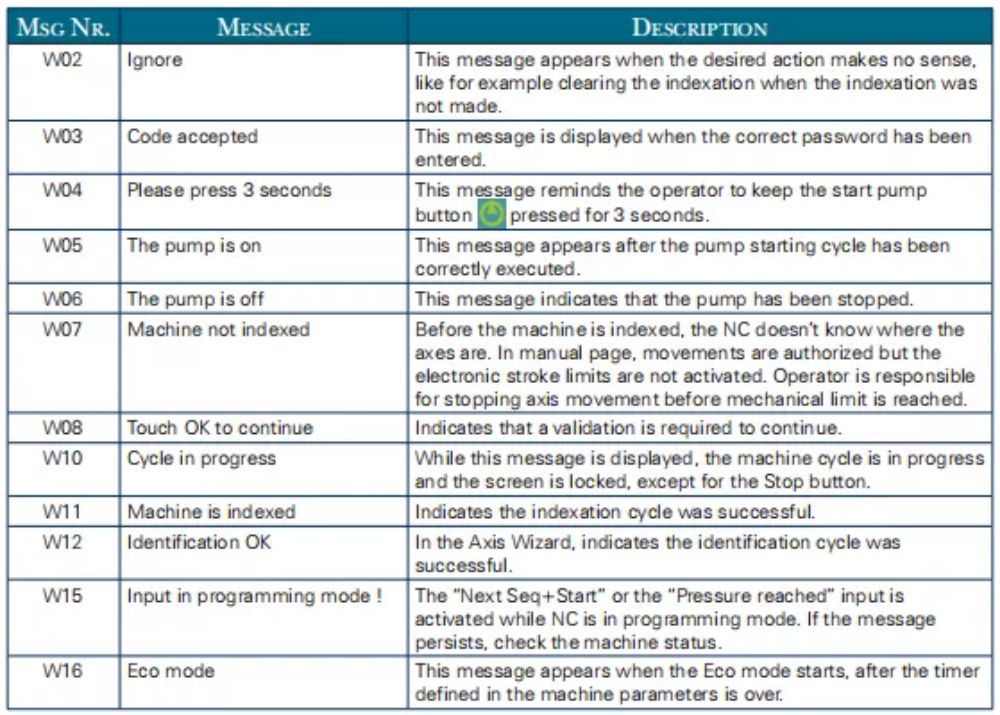
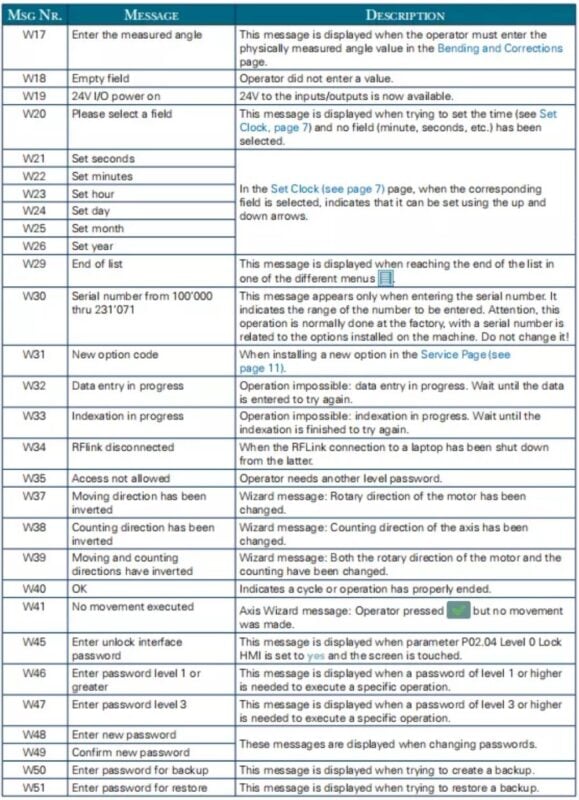
Fehler- und Warnmeldungen
●Warnmeldungen

●Fehlermeldungen