


Ungleichmäßige Schnitte? Lernen Sie, wie Sie den Klingenabstand einstellen Schermaschine kann Präzisionsprobleme lösen und die Effizienz steigern. Folgen Sie unserer Schritt-für-Schritt-Anleitung, um die Leistung zu optimieren!
Um den Klingenspalt einer Schermaschine einzustellen, lesen Sie zunächst im Handbuch der Maschine nach, welche Abstände je nach Materialstärke empfohlen werden. Lösen Sie die Einstellschrauben, stellen Sie den Spalt gleichmäßig ein und ziehen Sie sie wieder fest an. Testen Sie die Genauigkeit mit Probeschnitten. Regelmäßiges Einstellen verbessert die Schnittqualität und verhindert Schäden an Ihrer Maschine.
Sind Sie bereit, Ihre Maschine zu optimieren? Lassen Sie uns den detaillierten Prozess und die Profi-Tipps für optimale Ergebnisse erkunden.
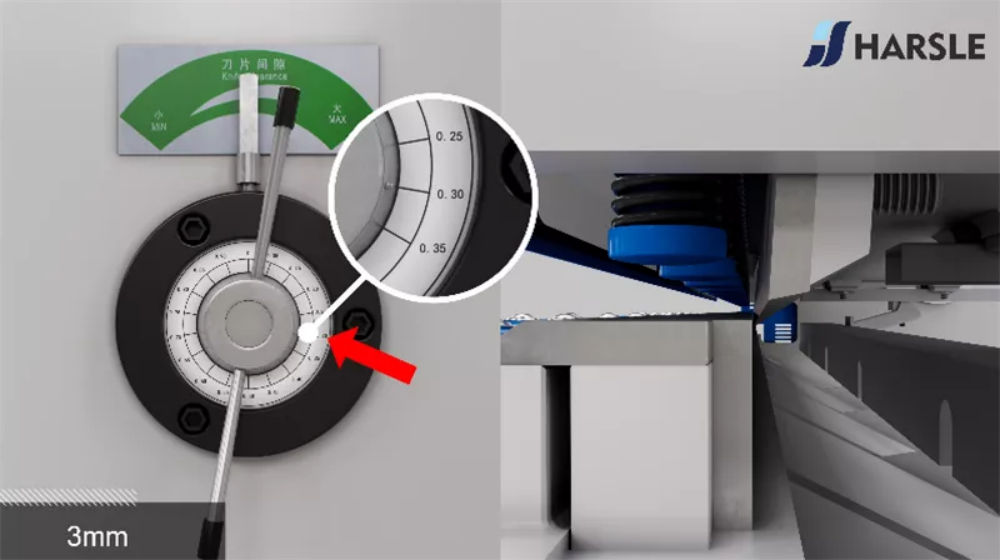
Klingenspalt an der Schermaschine einstellen
Einstellen des Schneidmesserspalts an einem Schermaschine ist ein wichtiger Vorgang, um präzises Schneiden zu gewährleisten. Hier finden Sie eine allgemeine Anleitung zur Einstellung: Handbuch beachten: Beachten Sie immer das Handbuch des Herstellers für spezifische Anweisungen zum Einstellen des Klingenspalts. Die Vorgehensweise kann je nach Schermaschine leicht abweichen. Sicherheit geht vor: Stellen Sie vor dem Einstellen sicher, dass die Maschine ausgeschaltet und vom Stromnetz getrennt ist, um Unfälle zu vermeiden. Tragen Sie geeignete persönliche Schutzausrüstung wie Handschuhe und Schutzbrille.
Einstellschraube: Die meisten Schermaschinen verfügen über Schrauben oder Bolzen, die den Klingenabstand regeln. Drehen Sie die Bolzen gegen den Uhrzeigersinn, um sie zu lösen, aber entfernen Sie sie nicht vollständig.
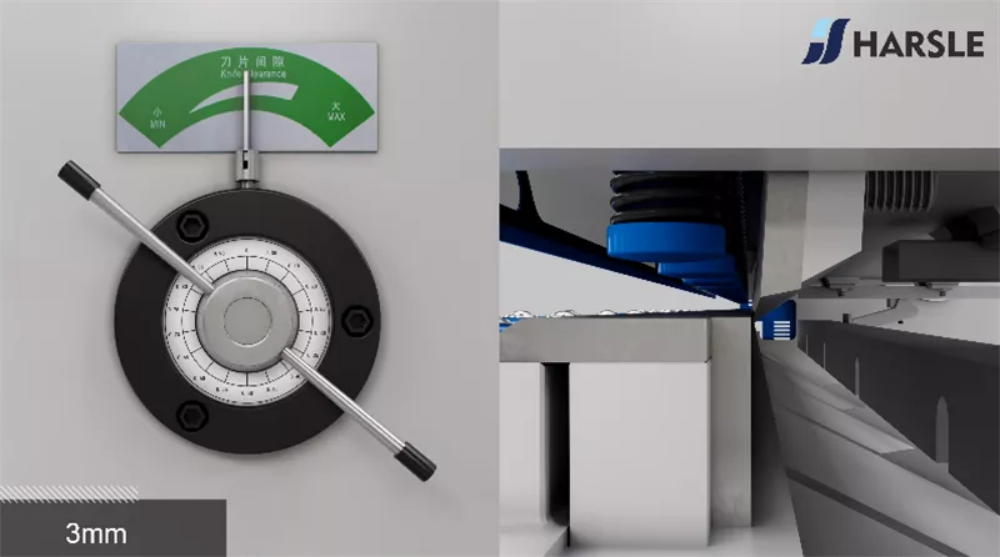
Spalt einstellen: Stellen Sie den richtigen Spalt gemäß der Parametertabelle ein. Achten Sie darauf, dass die Zeiger ausgerichtet sind. Die richtigen Einstellungen für Ihr spezifisches Material und Ihre Dicke finden Sie in der folgenden Tabelle.
Sperren des Klingenspalts mit der Einstellschraube
Der Einstellschraube spielt eine entscheidende Rolle bei der Festlegung der Klingenspalt auf einer Schermaschine. Um Sperren Sie den Klingenspalt, drehen Sie den Riegel im Uhrzeigersinn, wodurch die Klingen näher zusammenrücken und so eine präziser und sauberer SchnittDiese Anpassung trägt dazu bei, Schnittgenauigkeit, reduziert Grateund erweitert die Klingenlebensdauer. Zu festes Anziehen kann zu übermäßiger Klingenverschleiß oder sogar Schäden, also folgen Sie immer den Empfehlungen des Herstellers. Regelmäßige Überprüfung und Einstellung der Schraube gewährleistet gleichbleibende Schnittleistung und verbessert die Effizienz der MaschineUm optimale Ergebnisse zu erzielen, überprüfen Sie den Spalt nach jedem Materialwechsel, um ihn an die erforderliche Schnittstärke anzupassen.

Ausrichtung prüfen: Stellen Sie sicher, dass die Klingen nach dem Einstellen des Abstands richtig ausgerichtet sind. Falsch ausgerichtete Klingen können zu schlechter Schnittqualität und vorzeitigem Klingenverschleiß führen. Schrauben festziehen: Sobald Sie den gewünschten Klingenabstand erreicht haben, ziehen Sie die Einstellschrauben fest an, um die Klingen an Ort und Stelle zu halten.
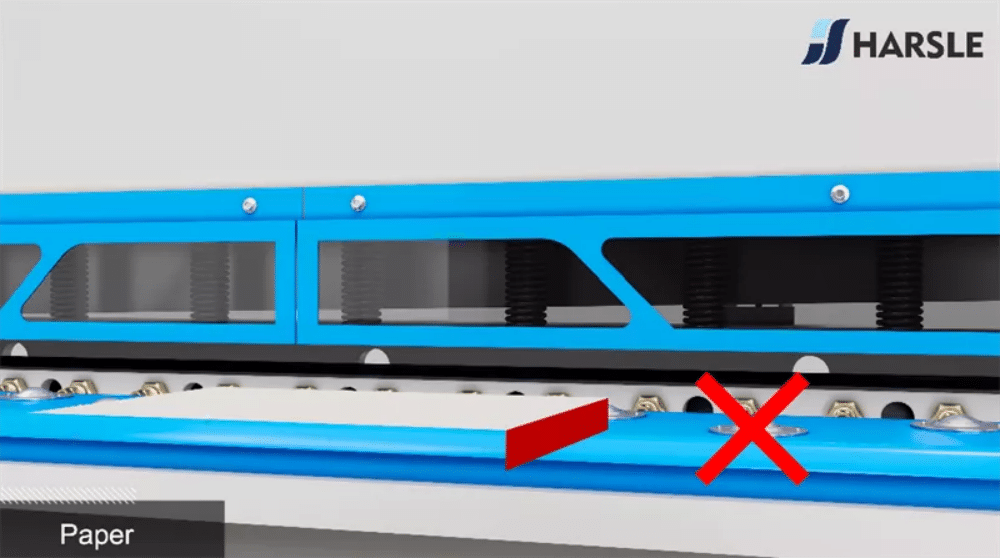
Papierschnitttest: Stellen Sie den Klingenabstand wie oben beschrieben auf 0 und schneiden Sie das Papier zum Testen. Ist der Schnitt nicht gut oder gar nicht möglich, müssen Sie die vordere Mutter verstellen, um die Position der Klinge anzupassen. Lösen Sie die große Mutter in der Mitte zur Fixierung, verstellen Sie die kleinen Schrauben vorne nacheinander, ziehen Sie die große Mutter fest und schneiden Sie das Papier zum Testen erneut. Ist der Testschnitt nicht zufriedenstellend, nehmen Sie bei Bedarf weitere Anpassungen vor, bis die gewünschte Schnittqualität erreicht ist.
Stellen Sie den Klingenspalt auf 0 ein.

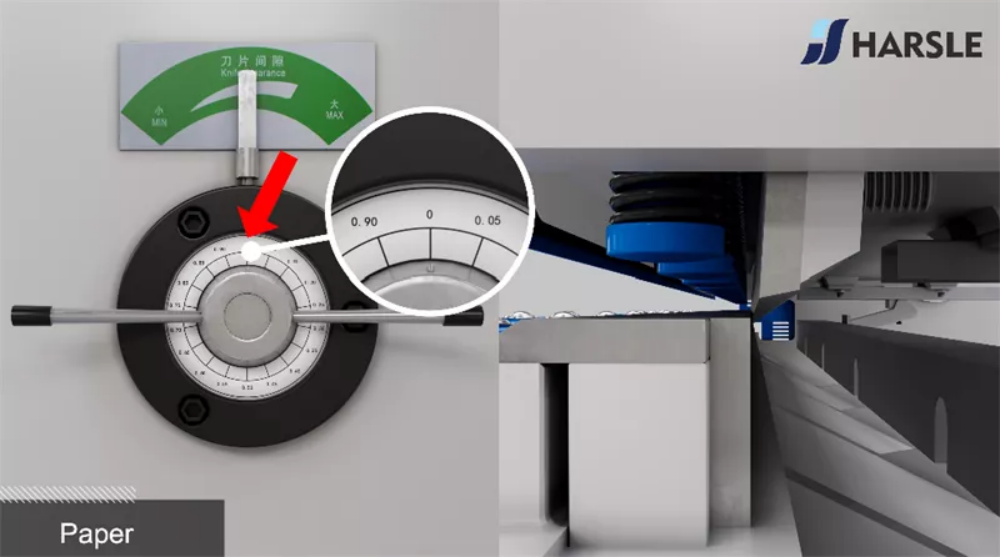
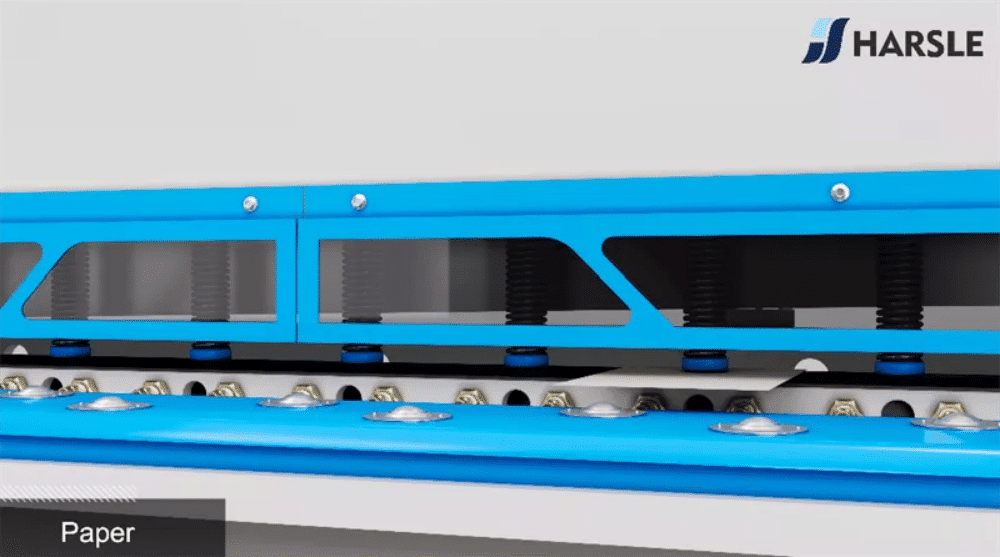
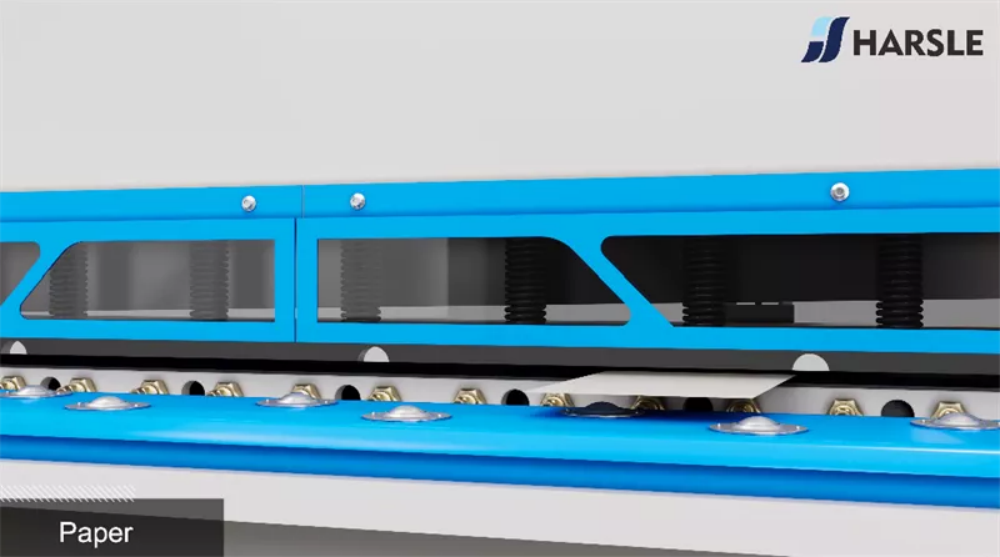
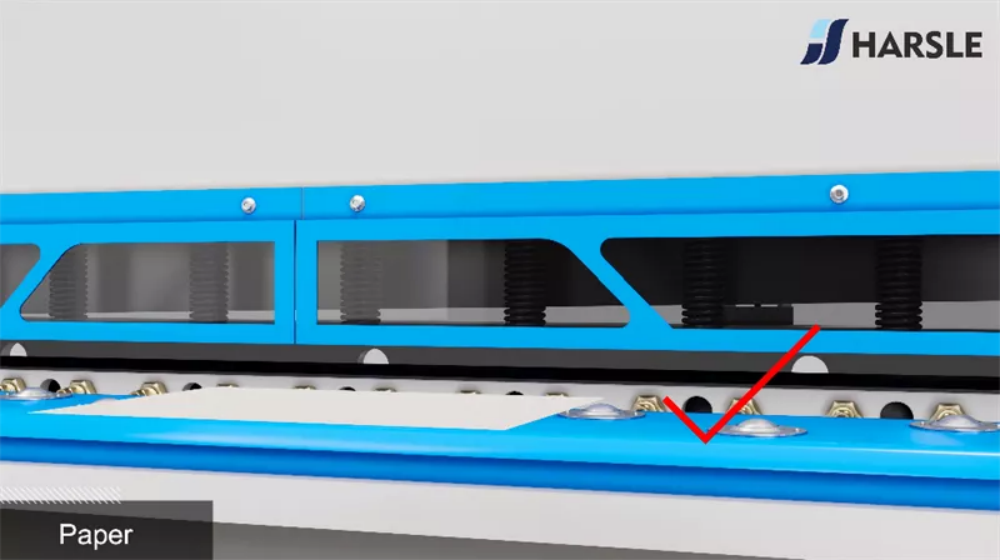
Führt Papiertestschnitte durch
Durchführen einer Papier-Testschnitt ist eine einfache und dennoch effektive Möglichkeit, die Klingenspalt auf einer Schermaschine. Legen Sie dazu ein Blatt Standardpapier entlang der Schnittkante und bedienen Sie die Maschine manuell. Die Klinge sollte das Papier über die gesamte Länge sauber und gleichmäßig schneiden. Ist der Schnitt ungleichmäßig, reißt er an manchen Stellen oder schneidet gar nicht, ist die Klingenspalt muss angepasst werdenEin richtig eingestellter Abstand sorgt dafür, präzise und gratfreie Schnitte, wodurch Materialabfall reduziert und die Effizienz gesteigert wird. Regelmäßige Papiertestschnitte tragen dazu bei, die optimale Maschinenleistung aufrechtzuerhalten.
Papier lässt sich nicht schneiden und weist eine schlechte Schnittqualität auf
Wenn Ihre Schermaschine kein Papier schneiden kann oder eine schlechte Schnittqualität liefert, liegt das Problem wahrscheinlich an der Einstellung des Klingenspalts. Ein falscher Sägeblattabstand kann zu Rissen, rauen Kanten oder unvollständigen Schnitten führen. Darüber hinaus stumpfe Klingen oder eine falsche Ausrichtung kann die Schnittpräzision beeinträchtigen. Sicherstellen, dass Der Klingenspalt entspricht der Materialstärke ist entscheidend für saubere Schnitte. Regelmäßige Wartung, Schärfen der Klinge und richtige Schmierung kann auch die Leistung verbessern. Wenn das Problem weiterhin besteht, überprüfen Sie die Hydraulikdruck oder mechanische Komponenten kann bei der Diagnose des Problems helfen. Richtige Einstellungen und Wartung gewährleisten ein reibungsloses und präzises Schneiden.
Wenn der Schnitt nicht gut ist, passen Sie ihn gemäß dem folgenden Verfahren an:
Lösen der großen Muttern zur Einstellung des Klingenspalts
Um den Klingenspalt einer Schermaschine einzustellen, müssen Sie zunächst die großen Muttern lösen die das Sägeblatt an seinem Platz halten. Diese Muttern dienen dazu, das Sägeblatt festzuhalten und Bewegungen während des Betriebs zu verhindern. Verwenden Sie eine geeignete Schraubenschlüssel oder Schraubenschlüssel Lösen Sie sie allmählich und achten Sie darauf, dass Sie gleichmäßige Kraft anwenden, um eine Beschädigung der Befestigungselemente zu vermeiden. Wenn die Muttern durch längeren Gebrauch zu fest angezogen sind, wenden Sie Kriechöl kann den Vorgang erleichtern. Nach dem Lösen können Sie mit der Einstellung des Klingenabstands fortfahren, um die gewünschte Schnittpräzision zu erreichen, bevor Sie die Muttern wieder fest anziehen.

Drehen Sie die beiden vorderen Einstellmuttern für Präzision
Um den Klingenspalt einer Schermaschine präzise einzustellen, drehen Sie zunächst nacheinander die beiden vorderen Einstellmuttern. Diese Muttern regeln den Abstand zwischen Ober- und Unterklinge und wirken sich somit direkt auf die Schnittpräzision aus. Lösen Sie zunächst den Verriegelungsmechanismus und drehen Sie dann schrittweise jede Mutter, während Sie den Spalt im Auge behalten. Stellen Sie den Spalt symmetrisch ein, um eine gleichmäßige Druckverteilung entlang der Klingenlänge zu gewährleisten. Kleine, schrittweise Drehungen helfen, den gewünschten Abstand zu erreichen und vermeiden so übermäßige Krafteinwirkung oder Fehlausrichtung. Sobald der Spalt korrekt eingestellt ist, ziehen Sie die Verriegelungsschrauben fest an, um die Stabilität zu gewährleisten. Die richtige Einstellung verbessert die Schnittpräzision, reduziert Materialgrate und verlängert die Lebensdauer der Klinge.

Sichern Sie die endgültige Befestigungsmutter ordnungsgemäß
Nach der Einstellung des erforderlichen Klingenspalts ist es wichtig, die letzte Befestigungsmutter wieder festziehen um Stabilität und Präzision der Schermaschine zu gewährleisten. Dieser Schritt verhindert unerwünschte Bewegungen oder Fehlausrichtungen der Klingen während des Betriebs, die die Schnittgenauigkeit und die Maschinenleistung beeinträchtigen könnten. Verwenden Sie den entsprechenden Schraubenschlüssel oder das passende Anziehwerkzeug, um die Mutter fest anzuziehen. Achten Sie darauf, dass sie weder zu locker noch zu fest ist, da ein zu festes Anziehen zu mechanischen Belastungen führen kann. Überprüfen Sie die Befestigung nochmals, um einen sicheren Halt zu gewährleisten. Die richtige Befestigung der Befestigungsmutter verbessert die Langlebigkeit, Sicherheit und Effizienz der Schermaschine.
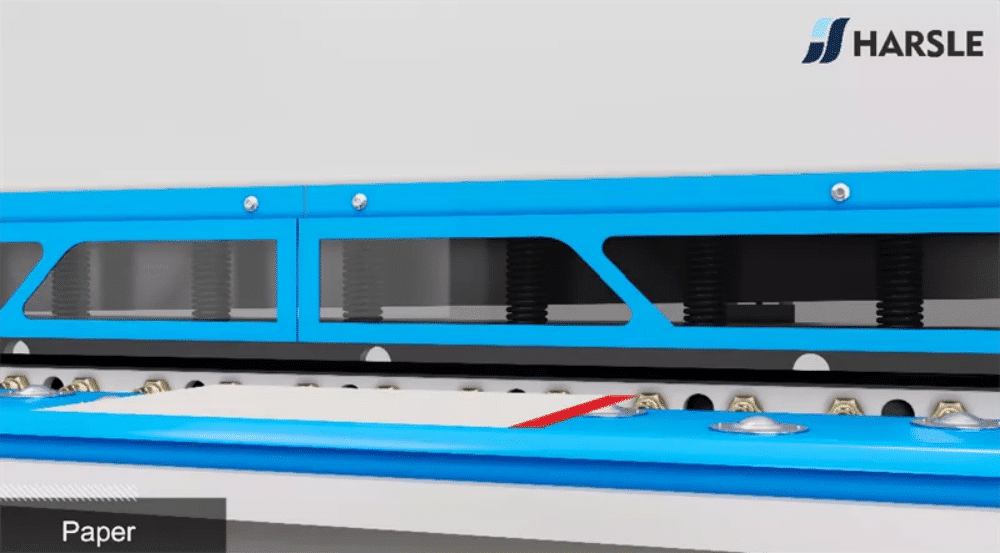
Führen Sie zur Überprüfung der Genauigkeit erneut einen Testschnitt durch
Nach der Einstellung des Klingenspalts an Ihrer Schermaschine ist es wichtig, Führen Sie den Testschnitt erneut aus um sicherzustellen, dass die Einstellungen korrekt sind. Verwenden Sie ein Musterblatt aus dem gleichen Material und der gleichen Dicke, die Sie in der Produktion schneiden möchten. Beachten Sie die Schnittkantenqualität, Gratbildung und Gesamtglätte des Schnitts. Wenn der Schnitt nicht sauber ist oder übermäßigen Kraftaufwand erfordert, justieren Sie den Klingenspalt leicht. Wiederholen Sie den Test, bis Sie eine präziser, gratfreier Schnitt. Regelmäßige Probeschnitte helfen, optimale Schneidleistung und verlängern Sie die Lebensdauer der Klingen Ihrer Schermaschine.
Abschluss des Debuggens
Der Abschluss des Debuggings ist ein entscheidender Schritt, um sicherzustellen, dass optimale Leistung und Genauigkeit der Maschine. Nach gründlichen Inspektionen und Einstellungen sind alle mechanische, elektrische und Softwarekomponenten wurden auf einwandfreien Betrieb getestet. Inkonsistenzen oder Fehlfunktionen wurden identifiziert und gelöst, um zu gewährleisten präzises Schneiden, stabile Leistung und Bedienersicherheit. Dieser letzte Schritt stellt sicher, dass die Maschine bereit ist für Serienproduktion, wodurch das Risiko von Fehlern und Ausfallzeiten minimiert wird. Nach Abschluss des Debuggings können Benutzer erwarten hohe Effizienz, Genauigkeit und Zuverlässigkeit, wodurch die Ausrüstung optimal für den Langzeitbetrieb vorbereitet ist.
Wartungsprotokolle: Dokumentieren Sie, wann der Klingenspalt eingestellt wurde und welche Einstellungen verwendet wurden. Regelmäßige Wartung und Anpassungen können die Lebensdauer Ihrer Schermaschine verlängern und eine gleichbleibende Schneidleistung gewährleisten.
Sicherheitsprüfungen: Stellen Sie immer sicher, dass alle Schutzvorrichtungen angebracht sind und die Maschine in einwandfreiem Zustand ist, bevor Sie den Normalbetrieb wieder aufnehmen. Wenn Sie bei einem Schritt unsicher sind oder Ihre Schermaschine spezielle Anforderungen hat, wenden Sie sich am besten an einen qualifizierten Techniker oder den Hersteller. Sicherheit sollte bei der Arbeit mit Industriemaschinen immer oberste Priorität haben.
Die Spalteinstellung beim Schneiden der Musterplatte ist knifflig und muss anhand der dicksten Dicke, berechnet vom konvexsten Punkt der Musterplatte, angepasst werden, anstatt die Plattendicke direkt zu verwenden. Außerdem kann das Schneiden der konvexen Seite der Schablone nach unten die Lebensdauer des Werkzeugs verlängern.
Darüber hinaus muss das Material der Platte berücksichtigt werden, insbesondere beim Schneiden von Edelstahl. Das Schneidwerkzeug muss scharf, verschleißfest und robust sein. Daher sollte die Klinge der Schermaschine besprochen werden. Neben dem Winkel der Klingenkante und anderen optischen Merkmalen, Design und Fertigungspräzision ist das ausgewählte Material ein entscheidender Faktor für die Qualität des Werkzeugs.


