


Podczas konfiguracji trybu ręcznego prasy krawędziowej DELEM DA-53T kluczowe jest zrozumienie kroków konfiguracji w celu uzyskania optymalnej wydajności. Przeprowadzę Cię przez proces konfiguracji trybu ręcznego prasy krawędziowej DELEM DA-53T, aby upewnić się, że wiesz, jak skutecznie dostroić maszynę.
Dzięki temu trybowi masz pełną kontrolę nad procesem gięcia, co umożliwia precyzyjne regulacje i maksymalizację jakości wydruku. Niezależnie od tego, czy dopiero zaczynasz korzystać ze sterowników DELEM, czy chcesz udoskonalić swoją konfigurację, ten artykuł przedstawi Ci szczegółowe kroki niezbędne do rozpoczęcia pracy i pełnego wykorzystania możliwości prasy krawędziowej.
Krok 1: Dostęp do trybu ręcznego
Zacznij od włączenia sterownik DELEM DA-53T. Po uruchomieniu przejdź do menu głównego za pomocą klawiszy interfejsu.

Znajdź i wybierz opcję „Tryb ręczny” z listy. Spowoduje to przełączenie interfejsu kontrolera z ustawień automatycznych na ręczne.
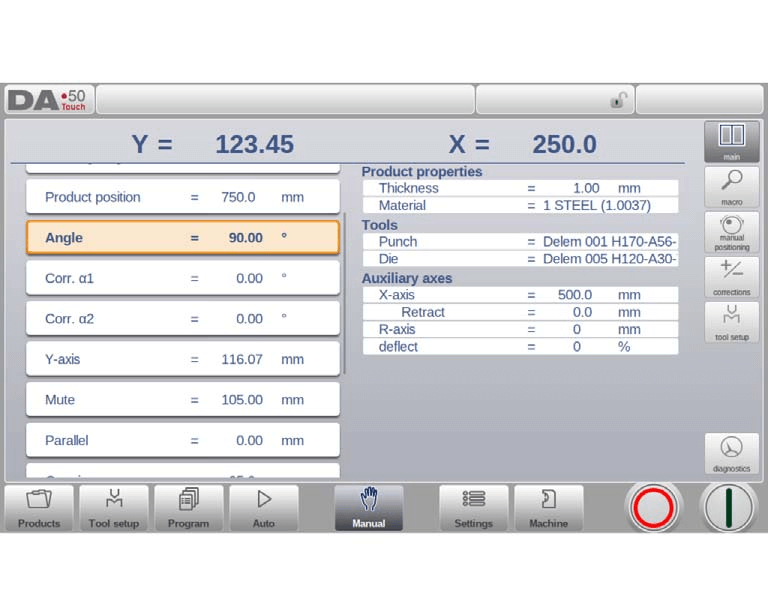
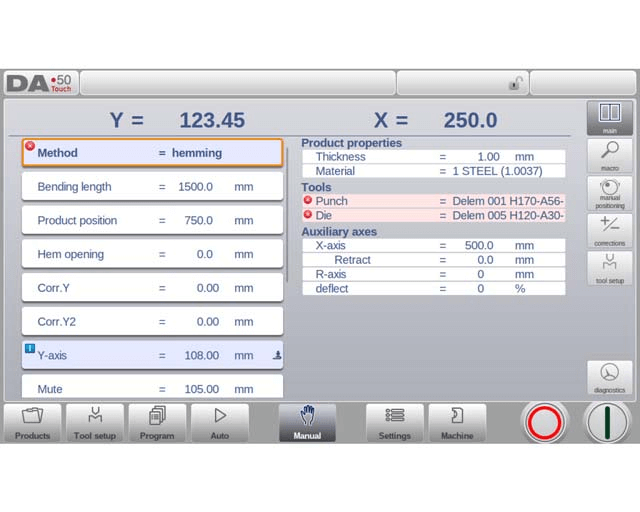
Na górze ekranu trybu ręcznego znajduje się aktualna pozycja osi Y i głównej osi X. Wszystkie pozostałe osie i funkcje są wymienione kolejno w dwóch kolumnach poniżej.
Gdy wartości osi Y i osi X są podświetlone, oznacza to, że znaczniki odniesienia tych osi zostały znalezione i są prawidłowo rozmieszczone względem zaprogramowanych wartości.
Krok 2: Zrozumienie parametrów
W trybie ręcznym należy wprowadzić wymagane parametry pracy. Obejmuje to ustawienie skoku, prędkości i pozycjonowania prasy krawędziowej, które są kluczowe dla precyzyjnej obsługi ręcznej. Ten tryb jest przydatny do testowania, kalibracji i wykonywania pojedynczych gięcia.
Za pomocą przycisków wprowadzania danych wprowadź wartości liczbowe odpowiadające żądanym ustawieniom.
Poniżej znajduje się lista dostępnych parametrów w trybie ręcznym.
Parametry gięcia
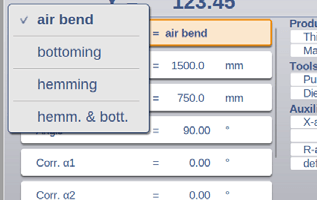
Metoda:
Wybierz żądaną metodę gięcia. Tryb ręczny DELEM DA-53T obsługuje różne metody, takie jak gięcie powietrzne, zaginanie dolne, zaginanie krawędzi oraz zaginanie i zaginanie dolne. Metody te są szczegółowo opisane w dokumentacji trybu programowania.
Długość gięcia:
Wprowadź długość gięcia arkusza, aby umożliwić dokładne przetworzenie.
Pozycja produktu:
Ustaw i monitoruj pozycję bezwzględną w kierunku Z z wartością odniesienia zero po lewej stronie maszyny.
Kąt:
Zdefiniuj kąt gięcia. Skoryguj wszelkie rozbieżności kątów, dostosowując poprawki α1 i α2. Na przykład, jeśli zaprogramowany kąt wynosi 90 stopni, a zmierzony 92 stopnie, ustaw Corr.α na -2.
Otwarcie dołu:
Określ odległość między kołnierzami podczas gięcia krawędzi. Domyślne ustawienia są dostępne w trybie ustawień.

Korekta Y:
Korekta położenia osi Y w przypadku wybrania opcji dołka.
Oś Y:
Zaprogramowana lub obliczona wartość osi Y służąca do uzyskania określonego kąta.
Niemy:
Punkt sekwencji, w którym oś Y przełącza się z szybkiej prędkości zamykania na prędkość naciskania. Jest on tutaj zaprogramowany jako wartość położenia osi Y. Zaprogramowana wartość to punkt osi Y nad arkuszem.

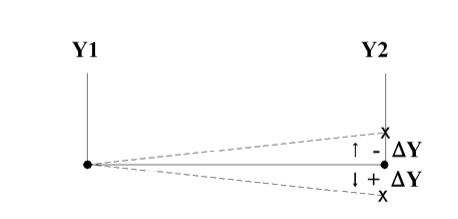
Równoległy:
Różnica między lewym a prawym cylindrem (Y1 i Y2). Wartość dodatnia oznacza, że prawa strona jest niższa. Wartość ujemna oznacza, że prawa strona jest wyższa. Zaprogramowana wartość jest aktywna poniżej punktu mocowania.
Otwór
Ten parametr powoduje powstanie określonej szczeliny między stemplem a matrycą po gięciu. Wartość dodatnia to szczelina powyżej wartości „Mute”, a wartość ujemna poniżej wartości „Mute”. Aby ograniczyć czas obróbki produktu, można zaprogramować niewielką wartość dodatnią lub ujemną.
Siła Parametry
Siła:
Zaprogramuj siłę nacisku dla poszczególnych operacji, zapewniając optymalne zastosowanie ciśnienia.
Czas przebywania i dekompresja:
Ustaw czas utrzymania w punkcie zgięcia i odległość dekompresji, aby zarządzać uwalnianiem ciśnienia.
Parametry prędkości
Prędkość:
Prędkość prasowania, prędkość osi Y podczas gięcia.
Prędkość rozkładu:
Prędkość dekompresji to programowalna prędkość wiązki na dystansie dekompresji.
Funkcje
Poczekaj na wycofanie:
Zdecyduj, czy oś Y czeka na zakończenie wycofywania, czy też porusza się w miarę rozpoczynania wycofywania, zapewniając w ten sposób efektywny przepływ pracy.
Właściwości produktu
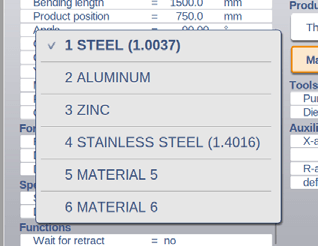
Grubość i materiał:
Wprowadź grubość blachy i wybierz materiały z 99 niestandardowych wpisów materiałowych w celu obliczenia głębokości gięcia.
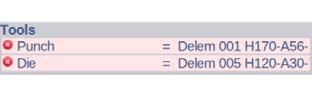
Narzędzia
Uderz i zgiń:
Wybierz lub zmodyfikuj identyfikatory stempli i matryc z odpowiednich bibliotek dla danego zadania.
Osie pomocnicze
Oś pomocnicza:
Jeśli masz jedną lub więcej osi pomocniczych (na przykład oś X, oś R lub oś Z), parametry tych osi są tutaj wyświetlane.
Wycofać:
Odległość cofania osi podczas gięcia. „Cofanie zderzaka tylnego” rozpoczyna się w punkcie zacisku.
Prędkość:
Prędkość osi w aktualnym zakręcie. Prędkość można zaprogramować jako procent maksymalnej możliwej prędkości.
Programując te parametry efektywnie w trybie ręcznym DELEM DA-53T, zapewniasz dokładność i precyzję gięcia. Po potwierdzeniu wszystkich ustawień, naciśnięcie przycisku Start aktywuje te konfiguracje.
Konfiguracja narzędzia
Programowanie ustawień narzędzi w trybie ręcznym DELEM DA-53T jest bardzo zbliżone do programowania w trybie automatycznym. Chociaż każdy tryb pozwala na unikalną konfigurację narzędzia, konfiguracja z trybu automatycznego może być zastosowana w trybie ręcznym. Po przełączeniu na tryb ręczny, kontroler DELEM DA-53T oferuje możliwość użycia istniejącej konfiguracji narzędzia. Należy jednak zachować ostrożność, jeśli konfiguracja różni się od poprzedniej.

Dodawanie narzędzi (dziurkaczy/matryc)
Podobnie jak w Ustawieniach narzędzi, za pomocą funkcji Dodaj można dodawać narzędzia.
Krok 3: Konfigurowanie parametrów
Parametry w trybie ręcznym urządzenia DELEM DA-53T można programować indywidualnie. System automatycznie oblicza wpływ każdego parametru na pozostałe. Relacje między parametrami są prezentowane wizualnie za pomocą symboli i kolorów tła.
Po zmianie parametru pojawia się symbol informacyjny.

Symbol gwiazdki oznacza, że wartość parametru różni się od obliczonej wartości kontrolnej, co może być pomocne, gdy wartości są celowo ustawione inaczej lub są ograniczone.

Symbol błędu pojawia się, gdy wartość parametru jest nieprawidłowa, np. gdy zagięcie krawędziowe zostanie zaprogramowane bez użycia narzędzi do zaginania krawędzi.
Opcje widoku
Przyciski poleceń po prawej stronie ekranu zapewniają dostęp do dodatkowych widoków poza widokiem głównym, w tym widoków Makro, Pozycjonowanie ręczne, Korekty i Diagnostyka.

Makro
Dzięki funkcji makro tryb ręczny DELEM DA-53T przełącza się na nowy widok z dużymi wartościami osi na ekranie. Ten układ jest przydatny do wyraźnego odczytu wartości osi podczas pracy w pewnej odległości od sterowania.
Krok 4: Tworzenie Ręczny ruch osi
Procedura ruchu
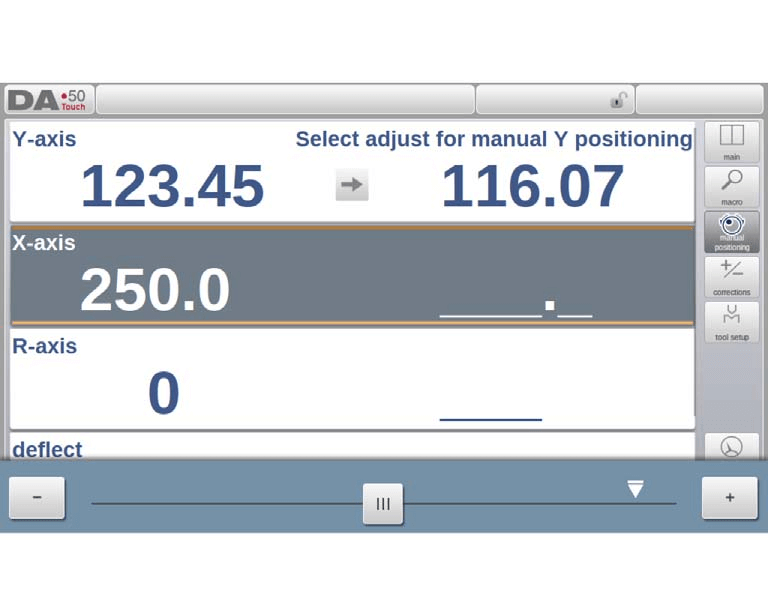
Aby ręcznie przesunąć oś w trybie ręcznym DELEM DA-53T, użyj suwaka u dołu ekranu. Po wybraniu opcji „Pozycja ręczna” na ekranie głównym, wyświetli się nowy interfejs. Przesuń dowolną wyświetlaną oś, regulując położenie suwaka od jego pozycji środkowej, która powraca automatycznie po zwolnieniu.
Osie pomocnicze
Upewnij się, że sterowanie jest zatrzymane (przycisk Stop włączony). Wybierz żądaną oś tylnego zderzaka i umieść tam kursor. Przesuń oś za pomocą suwaka.
Oś Y
Ręczne pozycjonowanie belki prasy, podobnie jak osi pomocniczych, wymaga spełnienia następujących warunków:
- Sterowanie musi być aktywne (przycisk Start włączony).
- Aktywuj funkcję „Dostosuj”. Jeśli jest nieaktywna, w prawym górnym rogu pojawi się komunikat.
- Oś Y musi znajdować się poniżej punktu wyciszenia.
- Należy wydać polecenie prasowania CNC.
Uczyć
Aby zapisać pozycję po ręcznym przesunięciu osi, dotknij nazwy osi w kolumnie „Zaprogramowane”. Ta czynność kopiuje rzeczywistą wartość (lewa strona) do pola zaprogramowanego (prawa strona).

Po powrocie do domyślnego ekranu trybu ręcznego parametr osi zachowuje ostatnio zapisaną wartość.
Postępując zgodnie z poniższymi krokami, zapewnisz płynną pracę urządzenia DELEM DA-53T w trybie ręcznym.
Poprawki
W trybie ręcznym DELEM DA-53T wyświetlane są korekty dla gięcia zaprogramowanego w tym trybie.
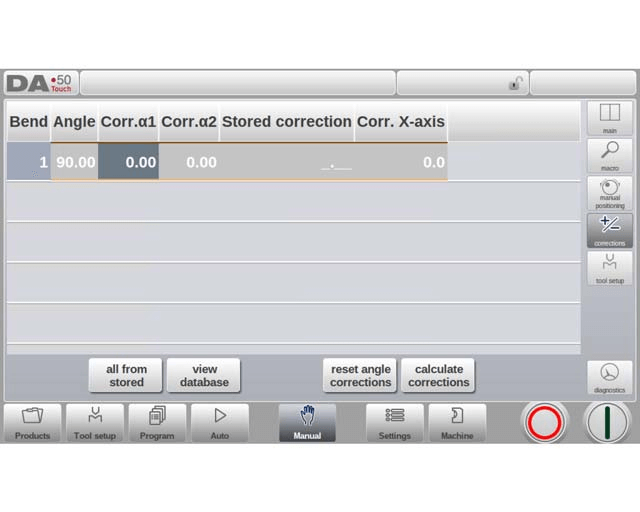
Ponieważ dotyczy to pojedynczego gięcia, zobaczysz jeden wiersz informacji. Zaprogramowane poprawki w trybie ręcznym można zweryfikować tak samo, jak w trybie automatycznym. Wpisy w bazie danych poprawek oraz poprawki początkowe są również widoczne. Dostęp do bazy danych jest kluczowy, ponieważ te wpisy znacząco wpływają na wyniki gięcia. Funkcja ta jest szczególnie przydatna do korygowania poprawek podczas gięcia próbnego i zapisywania optymalnych wyników w bazie danych.

Diagnostyka
Podczas nawigacji w trybie ręcznym DELEM DA-53T, kliknięcie przycisku Diagnostyka umożliwia podgląd stanu osi. Okno to wyświetla aktualny stan dostępnych osi i może pozostać aktywne po uruchomieniu sterowania. Korzystanie z tej funkcji umożliwia monitorowanie zachowania sterowania w czasie rzeczywistym podczas cyklu gięcia, zwiększając precyzję działania.

Status wejścia/wyjścia
W trybie ręcznym DELEM DA-53T, kliknięcie zakładki I/O w obszarze Diagnostyka zapewnia kompleksowy podgląd aktualnego stanu wejść i wyjść. Ekran ten pozostaje aktywny po uruchomieniu sterowania, umożliwiając operatorom efektywne monitorowanie zachowania systemu w całym cyklu gięcia.

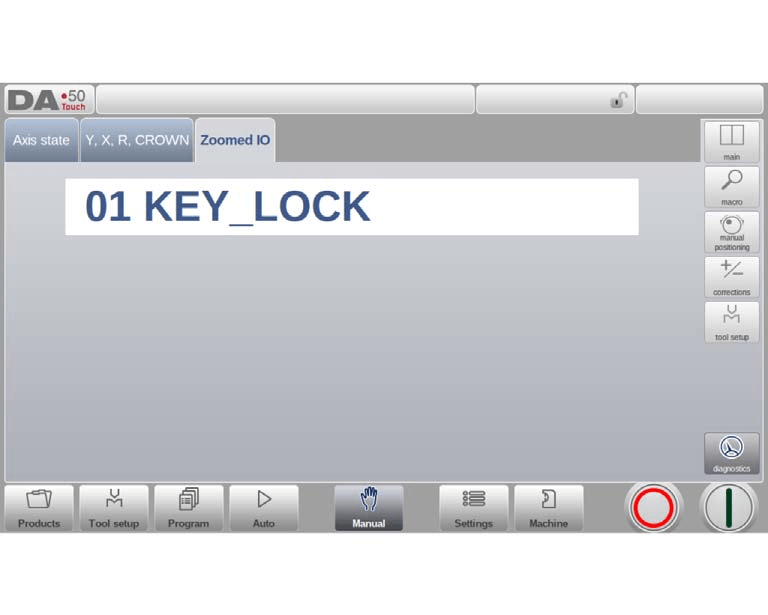
Powiększone IO
Po dotknięciu jednego lub większej liczby (maksymalnie 5) pinów tworzona jest dodatkowa strona Zoomed IO z powiększonym widokiem wybranych IO; wybrane piny będą wyświetlane w dużym formacie, co umożliwia zdalny monitoring.
Często zadawane pytania (FAQ)
Jakie środki ostrożności należy zachować podczas obsługi urządzenia DELEM DA-53T w trybie ręcznym?
Zawsze dbaj o przestrzeganie wszystkich protokołów bezpieczeństwa. Dokładnie sprawdź, czy w miejscu pracy nie ma żadnych przeszkód i czy nosisz sprzęt ochronny. Zapoznaj się z ręcznymi elementami sterowania, aby uniknąć wypadków podczas pracy.
Jaka jest zalecana częstotliwość konserwacji urządzenia DELEM DA-53T w trybie ręcznym?
Rutynową konserwację należy przeprowadzać co 500 godzin pracy maszyny. Obejmuje ona kontrolę kluczowych podzespołów, czyszczenie maszyny i smarowanie części ruchomych, aby zapewnić jej płynną pracę i długą żywotność.
Czy tryb ręczny urządzenia DELEM DA-53T można stosować do wszystkich typów operacji gięcia?
Chociaż tryb ręczny DELEM DA-53T jest wszechstronny, został on zaprojektowany przede wszystkim do operacji wymagających ręcznej regulacji i nadzoru. W przypadku bardziej złożonych lub zautomatyzowanych zadań warto rozważyć wykorzystanie funkcji CNC w DA-53T.
Wniosek
Podczas konfiguracji prasy DELEM DA-53T w trybie ręcznym, kluczowe jest przestrzeganie opisanych kroków, aby zapewnić prawidłowe działanie i optymalną wydajność. Proces obejmuje inicjalizację sterownika, wybór trybu ręcznego oraz konfigurację niezbędnych parametrów, aby spełnić specyficzne wymagania prasy krawędziowej. To zwięzłe podejście pomoże zwiększyć wydajność operacyjną i zredukować liczbę błędów.
Prawidłowa konfiguracja i konserwacja są niezbędne dla zapewnienia trwałości i wydajności prasy krawędziowej. Przestrzegając tych wytycznych i regularnie przeprowadzając konserwację, można zminimalizować przestoje i poprawić wydajność produkcji. W celu uzyskania bardziej szczegółowego wsparcia lub odpowiedzi na pytania, prosimy o kontakt z naszym zespołem. Zachęcamy również do zapoznania się z dokumentacją dostępną na naszej stronie internetowej, gdzie znajdą Państwo więcej informacji i wsparcia technicznego.


