


Когда речь идёт об эффективной обработке металла, освоение настройки пуансонов и матриц ESA S860 имеет решающее значение. Если вам нужны рекомендации по настройке этого оборудования, вы обратились по адресу.
В этой статье я подробно и кратко расскажу о процессе настройки пуансонов и матриц ESA S860. Независимо от того, новичок ли вы в работе с этим оборудованием или хотите усовершенствовать свои навыки, это руководство предоставит вам основные этапы и советы для обеспечения безупречной настройки. Понимание процесса настройки не только повысит эффективность работы, но и повысит точность металлообрабатывающих проектов.
Шаг 1: Подготовка рабочей среды
Прежде чем погрузиться в ЕКА S860 При настройке пуансонов и матриц крайне важно обеспечить порядок на рабочем месте. Чистота предотвращает случайные повреждения и повышает безопасность работы. Также убедитесь, что поверхность ровная, так как это может повлиять на точность настройки.
Шаг 2: Доступ к списку пуансонов и матриц
Для управления инструментами первым шагом является доступ к списку пуансонов и матриц. Используйте предоставленные клавиши для переключения между списками, чтобы необходимые инструменты были видны.

Нажмите ее, чтобы отобразить список пуансонов или штампов. Если появился список штампов, нажмите ее еще раз, чтобы отобразить пуансоны, и наоборот.
В случае пробивки отверстий появится следующее окно:

Окно слева — это окно списка. В центральных полях отображаются данные пуансона, на который установлен курсор (в списке). Окно справа обеспечивает предварительный просмотр пуансона, на который установлен курсор.
В случае штампов появится следующее окно:

Окно слева — это окно списка. В центральных полях отображаются данные кубика, на который установлен курсор (в списке). Окно справа позволяет просмотреть кубик, на который установлен курсор.
Когда доступных инструментов много, для быстрого выбора достаточно прокрутить колесо, визуализированное на панели, собственными прикосновениями.
Функциональные клавиши имеют следующие значения:
–[Список] для перемещения курсора в окно списка
–[Выбор] переместить курсор в поле «Выбрать» и ввести название пуансона или матрицы в ручном режиме

Для просмотра и использования функциональных клавиш [Список] и [Выбор] надо нажимать.
Как отобразить предварительный просмотр
Позволяет отобразить предварительный просмотр инструмента (для облегчения его идентификации). Функция предварительного просмотра обычно включена, но может быть отключена при необходимости. Выполните следующие действия:
– нажмите эту клавишу, чтобы войти в меню

– выберите [Предварительный просмотр] элемент.
Если элемент предварительного просмотра отключен. Повторите операцию, чтобы снова включить элемент.
Как скопировать пуансон или матрицу
Это позволяет создать копию инструмента с другим именем для последующего редактирования. Перейдите к инструменту, который вы хотите скопировать, и выполните следующие действия:
– нажмите эту клавишу, чтобы войти в меню
– выберите [Копия] элемент.
Откроется окно, в котором нужно ввести имя инструмента. После ввода имени перейдите к [ХОРОШО] кнопку и нажмите [ВХОДИТЬ]
Шаг 3: Изменение записей инструментов
Изменение параметров инструмента — важнейший аспект освоения настройки пуансонов и матриц ESA S860. Каждое действие, будь то переименование, копирование или удаление инструмента, выполняется по простой процедуре:
- Копирование: Откройте меню инструментов, выберите [Копия] элемент и введите новое имя.
- Переименование: Выберите [Переименовать] элемент, введите желаемое имя и нажмите[ВХОДИТЬ].
- Стирание: Нажмите нужную клавишу, подтвердите нажатием[ВХОДИТЬ].
Шаг 4: Сохранение и перенос инструментов
Сохранение пуансонов и матриц на USB-накопителе критически важно для резервного копирования и переноса данных в настройках пуансонов и матриц ESA S860. Убедитесь, что на USB-накопителе достаточно места:
Вставьте USB, откройте меню инструментов, выберите [Сохранить инструменты] и подтвердите действие.
Тсписок инструментов на USB-устройстве
Используется для отображения списка инструментов на USB-устройстве. Возможные операции аналогичны списку инструментов: можно копировать, переименовывать и удалять все инструменты, имеющиеся на USB-устройстве. Выберите список пуансонов и матриц и выполните следующие действия:
– вставьте в USB-порт устройство с инструментами (создано kvara S860 Touch и S 660W).
– нажмите эту клавишу

– будет отображен список пуансонов или матриц на USB-накопителе
– продолжить требуемую операцию.
Как сохранить все инструменты с USB на NC
Позволяет сохранить инструменты с дискеты в ЧПУ для последующей загрузки из другого числового программного управления. Выполните следующую процедуру:
– вставьте в USB-порт устройство с инструментами (создано kvara S 860 Touch и S 660W)
– нажмите эту клавишу
– отображается список пуансонов и матриц USB-устройства.
– нажмите клавишу, чтобы войти в меню.
– выберите [Сохранить инструменты] меню.
Все инструменты (матрицы и пуансоны) будут сохранены с USB-накопителя на ЧПУ. Инструменты можно переносить с USB-накопителя на блоки управления, что делает этот шаг необходимым для обеспечения непрерывности процесса.
Шаг 5: Рисование новых штампов
Как ввести новый пунктчас
Выберите нужный тип пуансона. Пуансон может быть полностью вырезан или можно использовать один из трёх типов готовых пуансонов с фиксированными размерами.
Доступны следующие типы предустановленных перфораторов::
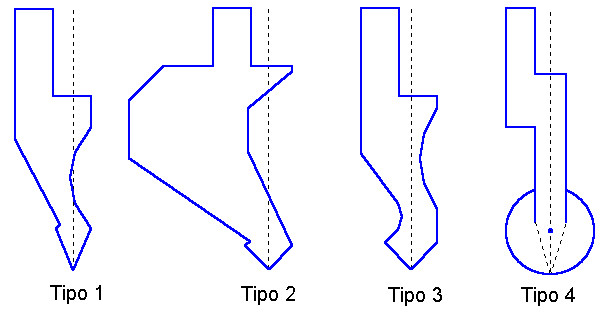
Чтобы добавить новый пуансон, выберите его тип в соответствии с вашими требованиями. Доступны предустановленные варианты или вы можете создать свой собственный:
-Использовать[Новый рисунок]для полной настройки.
-Выберите[Новый тип]при использовании предустановленных опций.
Откроется окно с запросом на ввод размеров пуансона:
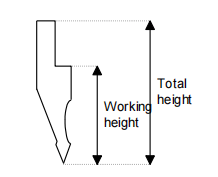
Введите общую высоту и рабочую высоту, как указано на рисунке.
Доступ к маске рисования
После ввода размеров пуансона и выбора его типа откройте маску чертежа. Маска чертежа меняется в зависимости от выбранного типа пуансона:
– переехать в [Подтверждать] кнопку и нажмите [ВХОДИТЬ].
Ударные инструменты для рисования
Маска для вытягивания пуансонов получается с помощью функции вытягивания (см. соответствующую главу в руководстве оператора).

Для точного использования чертежа пуансона в настройке пуансонов и матриц ESA S860 необходимо четко обозначить кончик.
Левое окно — окно рисования.
Четыре правых окна отображают окна ввода данных и соответственно представляют:
- Полярные данные чертежа
- Данные декартового чертежа
- Данные чертежа вершин
- Дата рисования дуги
Условные обозначения при рисовании
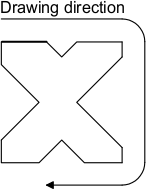
Пуансон необходимо вытягивать против часовой стрелки, помня о том, что упор находится с правой стороны самого пуансона.
Как сделать рисунокг
Для точного выполнения чертежей пуансонов с использованием сенсорной среды машины ESA S860 выполните следующие действия:
- Поле ввода:
- Начните с курсора в Поле 1 для ввода данных подсказки.
- Введите длину второй стороны (l1) и нажмите [ВХОДИТЬ] для перехода к полю ввода угла.
- Взаимодействие дизайна:
- Прикоснитесь к дисплею, чтобы войти в среду проектирования.
- Автоматическое рисование:
- Нажмите [ВХОДИТЬ] чтобы нарисовать следующий раздел и выделить его.
- Выбирать [Arc] и введите длину сечения (l2) в поле 1 и глубину (p1) в поле h. Нажмите [ВХОДИТЬ].
- Дополнительный вклад:
- Введите длину секции l3 в поле 1 и нажмите [ВХОДИТЬ].
- Введите 90,0 в поле альфа и нажмите [ВХОДИТЬ] для продолжения автоматического рисования.
Пример выдавливаемого пуансона:

Для решения задач измерения при настройке пуансонов и матриц ESA S860 операторы могут использовать графическую подсказку для точного выравнивания. Эта функция позволяет корректировать угол на ±1° и длину на ±1 мм, чтобы чертеж соответствовал фактической настройке пуансона:
- Доступ к меню осуществляется нажатием назначенной клавиши.
- Выберите 3&ДИНАМИЧЕСКИЙ вариант.
Используйте стрелки вправо/влево для регулировки угла и стрелки вверх/вниз для регулировки длины.
Рисование криволинейных сечений
Чтобы нарисовать криволинейные секции, нажмите [Arc]и введите длину и глубину. Кривая будет построена автоматически.
Исправление введенных данных
При настройке пуансонов и матриц ESA S860 вы можете столкнуться с некорректными вводами данных. Чтобы исправить их и эффективно перемещаться по разделам чертежа:

Используйте эту клавишу для перехода к предыдущему полю записи, чередуя поля раздела (1) и угла (альфа).

Эта клавиша позволяет перейти к следующему разделу, а именно к разделу Поле записи (l).
Нажмите [ВХОДИТЬ] для продвижения вперед, чередуя поля сечения (l) и угла (альфа).
Исправление ошибок
Избегайте ввода длин секций в виде углов, обеспечив [ВХОДИТЬ] Нажатие после установки углов. При необходимости вернитесь к корректным полям.
Сохранение рисунка
Чтобы сохранить настройки, нажмите клавишу сохранения, введите имя пуансона и подтвердите нажатием [ВХОДИТЬ]. Имена могут включать буквы и цифры, например, каталожные коды.
Допустимые символы имени
Введенное имя может быть образовано комбинацией цифр и букв (например, можно использовать код пуансона в каталоге).
Предустановленные пуансоны
В настройках пуансонов и матриц ESA S860 отображается предустановленная маска пуансона с чертежом и данными, определяющими её форму. С помощью стрелок или [ВХОДИТЬ] Клавиша выделяет соответствующее измерение на чертеже. Изменив любое значение и нажав [ВХОДИТЬ] обновляет чертеж, чтобы отразить изменения.
Шаг 6: Рисование новых штампов
Как ввести новый дие
Для новых штампов процесс аналогичен созданию пуансонов. Пользовательские или предустановленные параметры зависят от типа необходимого штампа:
- Нажмите клавишу опций для новых штампов и выберите тип чертежа.
- Программируйте свой штамп с помощью маски чертежа, сохраняя точность для функциональной безошибочности.
Эти измерения можно изменять с целью изменения масштаба и конструкции штампа:
Если вводимый штамп похож на один из предложенных типов (можно начертить как квадратный, так и перевёрнутый Т-образный штамп), целесообразно использовать готовые штампы, так как это упростит чертеж. Штамп необходимо чертить полностью, если он не входит в категории готовых штампов, если требуется начертить штамп с несколькими полостями или если необходимо использовать квадратные или прессовые полости.
В настройке пуансонов и матриц ESA S860 чертеж матрицы критически важен для проверки на столкновение и точного расчёта глубины гибки. Если полное рисование матрицы вызывает затруднения, используйте предустановленную матрицу и адаптируйте её с помощью предопределённых данных:
- Нажимать:
- [Новый рисунок] для полного проектирования.
- [Новый предопределенный] для предустановленных данных штампа.
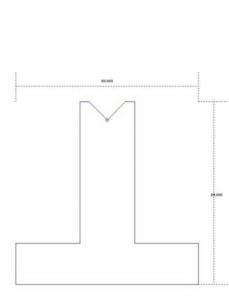
Появится окно с предложением ввести размеры штампа:

Введите высоту и ширину, как показано.
Откройте маску чертежа после ввода размеров штампа и выбора типа. Маска корректируется в зависимости от типа штампа. Перейти к [Подтверждать] и нажмите [ВХОДИТЬ].
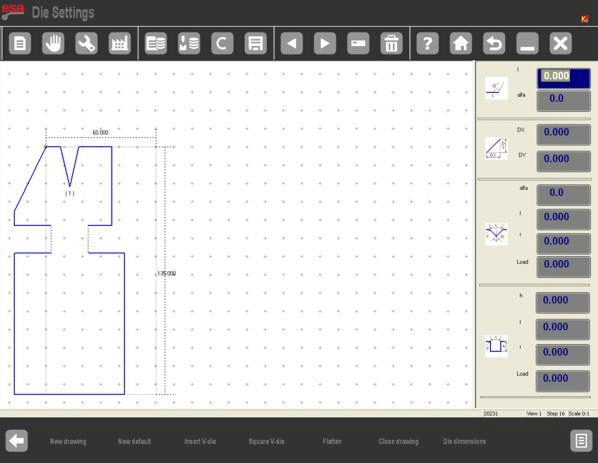
Штампы для рисования
Маска для вытяжки штампов получается с помощью функции вытяжки (см. соответствующую главу в руководстве оператора).
Левая часть служит окном для рисования пуансонов и матриц ESA S860. Четыре окна ввода данных справа:
- Данные полярного чертежа;
- Декартовы данные чертежа;
- Данные чертежа V-образной полости;
- Данные чертежа квадратной полости.
Условные обозначения при рисовании
Вытягивать кубик необходимо по часовой стрелке, помня о том, что стопор находится с правой стороны самого кубика.
Выделенная линия представляет собой линию, изначально предложенную в маске чертежа.
Hкак сделать рисунок
Предположим, что необходимо вытянуть следующий кубик:
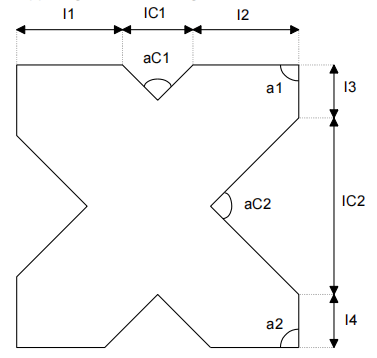
Курсор находится в Поле 1 окна ввода данных полярного чертежа:
- Введите длину, соответствующую сечению l1 в Поле 1 для настройки пуансонов и матриц ESA S860.
- Нажмите [ВХОДИТЬ]: Курсор переместится в поле α. Введите здесь угол относительно следующего сечения, чтобы определить первую полость матрицы для настройки пуансонов и матриц ESA S860.
Чтобы настроить полости во время настройки пуансонов и матриц ESA S860, выполните следующие действия.
- Конфигурация первой полости:
- Нажмите [Вставить полость] для переключения на ввод данных о полости.
- Введите угол полости (aC1) и нажмите [ВХОДИТЬ].
- Введите ширину полости (lC1) и нажмите [ВХОДИТЬ].
- Введите радиус полости (R) и нажмите [ВХОДИТЬ].
- Введите нагрузку на полость (максимум тонн на метр) и нажмите [ВХОДИТЬ].
- Полость рисуется, и курсор возвращается в окно ввода следующего раздела.
- Определите дополнительные разделы:
- Введите длину сечения l2 и нажмите [ВХОДИТЬ].
- Введите угол a1 и нажмите [ВХОДИТЬ].
- Повторите процесс для следующих секций (l3, l4 и т. д.), чередуя длину и углы.
- Конфигурация второй полости:
- Нажмите [Вставить полость] для переключения на следующий ввод данных полости.
- Введите угол полости (aC2), длину (lC2), радиус (R) и нагрузку, нажав [ВХОДИТЬ] после каждого.
- Рисуется следующая полость, продолжая процесс ввода длины и угла.
Внесено исправление данных
При настройке пуансонов и матриц ESA S860 могут возникнуть ошибки при вводе чертежей. Исправьте их и перейдите к другим разделам, используя следующие методы:
- Используйте клавишу для возврата к предыдущему полю ввода, затем попеременно переключайтесь между полем ввода сечения (l) и полем ввода угла (альфа).
- Клавиша осуществляет переход непосредственно к следующему разделу, а именно к полю ввода раздела (l).
- Нажмите [ВХОДИТЬ] для перехода к следующему полю ввода и переключения между полем ввода сечения (l) и полем ввода угла (альфа).
Вход в квадратную полость
Чтобы ввести квадратные полости в настройку пуансонов и матриц ESA S860, выполните следующие действия в поле ввода угла α:
- Нажмите [Квадратная полость] для доступа к окну ввода данных.
- Введите и подтвердите глубину, ширину, радиус и нагрузку полости (максимум тонн на метр), нажав [ВХОДИТЬ] после каждого значения.
Прессование входа в полость
Для прессовых полостей определите сечения, влияющие на закрытие штампа, и изобразите их в виде сжатых сечений:
- Нарисуйте открытый профиль штампа с уголком детали.
- Начертите открытый штамп с выемкой в сплющивающейся части.
- Установите курсор на вертикальную секцию.
- Нажмите [Нажмите] для штриховки сплющивающейся части, отмечающей завершение настройки пуансонов и матриц ESA S860.
На следующем рисунке показан пример гибочно-плющильного штампа.
Как проникать в полости для раздавливания пневматики
Чтобы определить полости для пневматических элементов сжатия в настройке пуансонов и матриц ESA S860:
- Определение раздела:
- Укажите два сплющенных участка размером 0,001 мм с обеих сторон матрицы.
- Начертите профиль штампа с выемкой для сплющивания, введя для соответствующего сечения значение 0,001 мм (как в закрытом виде).
- Этапы настройки:
- Наведите курсор на раздел для сжатия и нажмите [Давить].
- Сплющенная часть будет слегка заштрихована.
- Нажмите [Размеры штампа], введите 1 в поле «Пневматика», перейдите к [ХОРОШО], и нажмите [ВХОДИТЬ].
- Функция 2 теперь доступна на загнутых изгибах.
Вход для пневматического выравнивающего штампа
Начиная с версии 13.2:
- Введите данные в маску конфигурации общих параметров.
- Настройка позволяет выполнять сплющивание в графическом режиме со стандартными штампами, без специальных чертежей гибочно-плющильных штампов.
Сохранение рисунка
- Завершите рисунок и нажмите клавишу для сохранения.
- Введите название кубика, переместите его в [ХОРОШО], и нажмите [ВХОДИТЬ].
Соглашения об именовании
Названия могут включать цифры и буквы с использованием каталожных кодов для удобства поиска в настройке пуансонов и матриц ESA S860.
Предварительно настроенные штампы
Предварительно заданная маска штампа, необходимая для настройки пуансонов и матриц ESA S860, отображается в виде предварительно нарисованного штампа с данными, определяющими его форму. Прокручивая эти данные с помощью стрелок или [ВХОДИТЬ] Клавиша выделяет соответствующее измерение на чертеже. Изменение значения и нажатие [ВХОДИТЬ] обновляет чертеж, чтобы отразить изменения.
Часто задаваемые вопросы (FAQ)
Как откалибровать оперативную память в ESA S860?
Чтобы откалибровать плунжер во время настройки станка ESA S860, активируйте функцию калибровки, нажав соответствующую кнопку. Опустите плунжер ниже нулевой отметки, а затем вручную поднимите его, нажав на педаль. Для обеспечения точности работы убедитесь, что плунжер совмещен с нулевыми отметками на оптических линиях цилиндров.
Что делать, если при вводе чертежа я столкнулся с ошибками?
Если на этапе рисования в программе настройки станка ESA S860 возникли ошибки, вернитесь к неверной записи с помощью клавиш со стрелками. Введите правильные данные повторно и подтвердите все введенные данные с помощью клавиш [ВХОДИТЬ] ключ к эффективной корректировке рисунка.
Заключение
В заключение, овладение настройкой станка ESA S860 имеет решающее значение для обеспечения оптимальной функциональности и точности при обработке металлов. Ключевые этапы включают подготовку рабочей зоны, подключение питания и настройку системы ЧПУ, а также управление основными операциями, такими как калибровка ползуна и осей упоров. Чистое и ровное рабочее место в сочетании с надлежащим обслуживанием станка минимизирует количество ошибок и максимально повышает производительность.
Для продления срока службы и повышения производительности вашего оборудования крайне важно регулярно проводить техническое обслуживание и соблюдать рекомендации по настройке. Такой подход поможет сократить время простоя и повысить эффективность производства.
Если вам нужна дополнительная помощь, более подробная поддержка или у вас есть вопросы по настройке станка ESA S860, пожалуйста, свяжитесь с нашей командой. Кроме того, мы приглашаем вас ознакомиться с другими нашими документами, где вы найдете больше информации и советов по оптимизации вашего оборудования.


