


يُعد فهم الإعداد الأولي لجهاز ESA S530 أمرًا بالغ الأهمية لأي شخص يسعى لتحسين أداء هذا النظام المتقدم. إذا كنت ترغب في البدء بشكل صحيح في الإعداد الأولي لجهاز ESA S530، فأنت في المكان المناسب.
في هذا الدليل، سأشرح لك الخطوات الأساسية لتشغيل جهاز ESA S530 بكفاءة. في النهاية، ستفهم بوضوح عمليات التشغيل الأولية، بما في ذلك تحديد أحجام الكبش ومحاور تحديد المواقع، وكيفية تصميم اللكمات والقوالب المخصصة. ستضمن لك هذه المعلومات دقة إعدادك وتكييفه مع احتياجاتك الخاصة، مما يعزز الإنتاجية والأداء منذ البداية. سواء كنت تقوم بالإعداد لأول مرة أو تقوم بضبط نظامك الحالي بدقة، ستوفر لك هذه المقالة الإرشادات اللازمة.
مقدمة إلى ESA S530
يشتهر جهاز ESA S530 بقدراته القوية وميزاته المتقدمة، مما يجعله الخيار الأمثل للدقة والكفاءة في مختلف التطبيقات. بفضل واجهته سهلة الاستخدام، وأنظمة التحكم عالية الأداء، ومرونة التخصيص، يبرز جهاز ESA S530 كحل متعدد الاستخدامات لتلبية احتياجات التصنيع الحديثة.
فهم أهمية وكالة الفضاء الأوروبية S530 يُعدّ الإعداد الأولي أمرًا بالغ الأهمية للاستفادة القصوى من إمكانات الجهاز. فالإعداد الأولي السليم لا يضمن فقط الاستفادة من جميع ميزات الجهاز المتطورة، بل يلعب أيضًا دورًا محوريًا في تحسين الأداء ومنع أي أعطال تشغيلية. يتيح لك إتقان الإعداد الأولي لجهاز ESA S530 من البداية الاستفادة الكاملة من استثمارك، مما يضمن لك نجاح تشغيلي طويل الأمد.
عمليات التشغيل الأولية
أثناء التشغيل الأولي لجهاز ESA S530، من الضروري ضبط حجم ذاكرة الوصول العشوائي (RAM) بشكل صحيح لتمكين الآلة من الوصول إلى المرحلة التلقائية وتنفيذ برنامج التشغيل بكفاءة. مع أن تحديد حجم محاور تحديد المواقع اختياري، إلا أنه يُنصح به بشدة في حال وجود شك في أهداف محاور تحديد المواقع الحالية. قد ينشأ هذا الشك في حال تحريك محور في الوضع اليدوي مع إيقاف تشغيل التحكم الرقمي.
تحديد حجم الكبش
لضمان الدقة والضبط أثناء الإعداد الأولي لجهاز ESA S530، اتبع الخطوات التالية لتحديد حجم ذاكرة الوصول العشوائي بشكل صحيح:
- ابدأ العملية بالضغط على هذا الزر

- إذا تم وضع الكبش لأعلى، اضغط على دواسة الأسفل لخفضه إلى ما دون علامات الصفر.
- اضغط على دواسة الوقود. إذا تمت إعادة الضبط مسبقًا، فستُمكّنك هذه العملية من الصعود يدويًا.
سيصعد الكبش حتى يصل إلى علامات الصفر للخطوط البصرية للأسطوانتين، مُحددًا نقطة ضبط الحجم. يتيح هذا الإجراء تنفيذ البرامج تلقائيًا.
إذا كنت بحاجة إلى تكرار إجراء إعادة الضبط دون إيقاف تشغيل NC، فما عليك سوى الضغط على [تكرار الحجم] ثم اضغط على دواسة الصعود مرة أخرى.
تحديد حجم محاور تحديد المواقع
يُعدّ تحديد أحجام محاور تحديد المواقع بدقة أمرًا بالغ الأهمية لإعداد الآلة بكفاءة، خاصةً عند وجود شك في موقعها الحالي. إليك كيفية تحديد أحجام محاور تحديد المواقع أثناء الإعداد الأولي لجهاز ESA S530:
- يضعط
- يضعط

ستتحرك محاور تحديد الموقع نحو مفتاح تحديد الحجم. بمجرد ملامستها لهذا المفتاح، سينعكس اتجاهها. بعد تحرير مفتاح تحديد الحجم، ستُحدد محاور تحديد الموقع حجمها عند أول علامة صفر للمُشفِّر، مما يضمن محاذاة دقيقة.
إن دمج هذه الخطوات في الإعداد الأولي لجهاز ESA S530 يضمن لك أساسًا دقيقًا وموثوقًا به، مما يعمل على تحسين أداء جهازك منذ البداية.
قائمة اللكمات والقوالب
عند إعداد نظام ESA S530 الأولي، يُعد فهم إدارة المثاقب والقوالب، وهي مكونات أساسية لمختلف مهام تشغيل المعادن، أحد الجوانب الرئيسية. يوفر النظام قائمة شاملة بالمثاقب والقوالب المتاحة، ويمكن الوصول إليها بسهولة.
- اضغط على هذا الزر لعرض قائمة اللكمات أو قائمة القوالب

- إذا ظهرت قائمة القوالب، اضغط عليها مرة أخرى لعرض اللكمات، والعكس صحيح.
ستظهر النافذة التالية في حالة اللكمات:
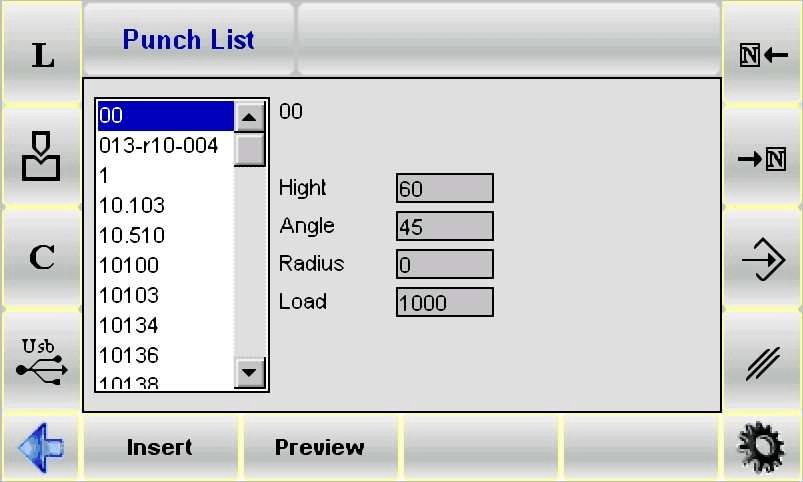
تعرض نافذة القائمة الموجودة على اليسار البيانات أو المعاينة للأداة المحددة، بينما يمكن إدارة التنقل عبر هذه الأدوات بسهولة باستخدام مفاتيح التمرير.
ستظهر النافذة التالية في حالة قائمة القوالب:

النافذة اليسرى هي نافذة القائمة. تحتوي المربعات المركزية على بيانات أو معاينة للنرد الذي يوجد عليه المؤشر (في القائمة). يتم الاختيار باستخدام مفتاح الوظيفة الثاني.
استخدم هذين المفتاحين فقط للتنقل بين الأدوات المتوفرة في القائمة:


مفاتيح الوظائف لها المعاني التالية:
- [أدخل] لإدراج اللكمة أو القالب المحدد في برنامج التصنيع أو في الانحناء المحدد.
يتغير معنى مفتاح الوظيفة الثاني وفقًا لنوع الشاشة التي يتم تنشيطها:
- سيكون المعنى [معاينة] إذا كان يجب عرض معاينة الأداة أو [بيانات] إذا كان يجب عرض بيانات الأداة.
كيفية رسم اللكمة أو الموت
يسمح للمستخدم بسحب اللكمة أو النرد بالكامل. اتبع الإجراء الموضح أدناه:
- اضغط على زر "الإعدادات" للوصول إلى القائمة

- حدد رسم جديد لللكمة أو رسم قالب جديد اعتمادًا على القائمة المعنية.
- ستظهر أداة رسم القناع.
كيفية إنشاء لكمة أو قالب من النوع المحدد مسبقًا
يُستخدم لإنشاء أدوات من النوع المُعَد مسبقًا. اتبع الإجراء التالي:
- اضغط على زر "الإعدادات" للوصول إلى القائمة.
- حدد النوع الجديد 1 أو النوع الجديد 2 أو النوع الجديد 3 أو النوع الجديد 4 عنصر، حسب نوع اللكمة المطلوب إنشاؤها. وإلا، فاضغط على "جديد مُعرّف مسبقًا" إذا كنت ترغب في إنشاء قالب من النوع المُعرّف مسبقًا.
- استخدم القناع الذي يظهر لإدخال بيانات الأداة.
كيفية عرض المعاينة/البيانات
يعرض معاينة/بيانات الأداة (لتسهيل التعرف عليها). عادةً ما تكون مُفعّلة، ولكن يُمكن أيضًا تعطيلها. اتبع الإجراء التالي:
- اضغط على زر "الإعدادات" للوصول إلى القائمة.
- حدد معاينة غرض.
- سيتم تعطيل معاينة الأداة أو نافذة البيانات (اعتمادًا على حالة مفتاح الوظيفة الثاني)؛
- فقط كرر العملية لإعادة تمكين الوظيفة.
نسخة من اللكمة أو القالب
يُستخدم لإنشاء نسخة من أداة باسم مختلف، بحيث يمكن تعديلها. انتقل إلى الأداة المراد نسخها، واتبع الإجراء التالي:
- اضغط على زر "الإعدادات" للوصول إلى القائمة.
- حدد ينسخ غرض.
- أدخل اسم الأداة في النافذة التي تظهر.
- بعد إدخال الاسم، انتقل إلى [يتأكد] الزر واضغط [يدخل].
كيفية إعادة تسمية لكمة أو يموت
يُستخدم لتغيير اسم الأداة. انتقل إلى الأداة المُراد تغيير اسمها، واتبع الإجراء التالي:
- اضغط على زر "الإعدادات" للوصول إلى القائمة.
- حدد إعادة التسمية غرض.
- أدخل اسم الأداة الجديدة في النافذة التي تظهر.
- بعد إدخال الاسم، انتقل إلى [يتأكد] الزر واضغط [يدخل].
كيفية إنقاذ اللكمة أو الموت
يُستخدم لحفظ أداة على مفتاح USB لنقلها إلى وحدة تحكم رقمية أخرى أو إلى جهاز كمبيوتر kvara (مفيد أيضًا لإنشاء نسخ احتياطية). انتقل إلى الأداة المراد حفظها واتبع الإجراء التالي:
- يضعط

- سيتم حفظ الأداة المحددة على مفتاح USB.
كيفية إلغاء اللكمة أو الموت
يُستخدم لإزالة أداة. انتقل إلى الأداة المراد إزالتها، واتبع الإجراء التالي:
- يضعط

- يضعط [يدخل].
- سيتم إلغاء الأداة المحددة.
كيفية حفظ جميع الأدوات على مفتاح USB
يتم استخدامه لحفظ جميع الأدوات على مفتاح USB بحيث يمكن نقلها بعد ذلك إلى عنصر تحكم رقمي آخر أو إلى جهاز كمبيوتر kvara (مفيد أيضًا لإنشاء نسخ احتياطية).
اتبع الإجراء التالي:
- قم بإدخال مفتاح USB مع توفير مساحة كافية للأدوات.
- اضغط على زر "الإعدادات" للوصول إلى القائمة.
- حدد حفظ الأدوات غرض.
- سيتم حفظ جميع الأدوات (اللكمات والقوالب) على مفتاح USB.
كيفية إلغاء جميع الأدوات
يُستخدم لإلغاء جميع الأدوات. اتبع الإجراء التالي:
- اضغط على زر "الإعدادات" للوصول إلى القائمة.
- حدد أدوات الإلغاء غرض.
- سيتم إلغاء جميع الأدوات (يُطلب التأكيد قبل إلغاء كل أداة).
قائمة الأدوات على مفتاح USB
عند إعداد جهاز ESA S530، يُعدّ إدارة أدواتك بكفاءة عبر منفذ USB من الجوانب الأساسية. أثناء الإعداد الأولي لجهاز ESA S530، من الضروري معرفة كيفية التنقل بين قائمة الأدوات المخزنة على مفتاح USB واستخدامها.
بإدخال مفتاح USB مع أدوات مُحمّلة مسبقًا من Kvara، يمكنك الوصول بسهولة إلى قائمة أدوات الثقب أو القوالب. بخطوات بسيطة - أدخل مفتاح USB، ثم اضغط على الزر المناسب لعرض القائمة - يمكنك نسخ أي أداة أو إعادة تسميتها أو حذفها حسب الحاجة، مع ضمان تخصيص كل شيء وفقًا لمتطلبات إعدادك الخاصة.
كيفية حفظ جميع الأدوات من مفتاح USB إلى NC
يعد نقل الأدوات من مفتاح USB إلى التحكم الرقمي (NC) عملية مباشرة وحيوية لضمان المرونة والتوافق مع الأنظمة الأخرى.
- أدخل مفتاح USB يحتوي على الأدوات (التي تم إنشاؤها بواسطة kvara).
- يضعط

- سيتم عرض قائمة اللكمات أو القوالب الموجودة على مفتاح USB.
- اضغط على زر "الإعدادات" للوصول إلى القائمة.
- حدد حفظ الأدوات غرض.
- سيتم حفظ جميع الأدوات (القوالب واللكمات) من مفتاح USB إلى NC.
يضمن هذا الجزء من الإعداد الأولي لجهاز ESA S530 إمكانية تحميل الأدوات من وحدة تحكم رقمية أخرى أو مباشرةً من جهاز كمبيوتر Kvara، مما يُحسّن سير عملك ويعزز تعدد استخدامات الجهاز. باتباع هذه الخطوات، تضمن تجهيز جهاز ESA S530 بالشكل الصحيح لأي مهمة تشغيل معادن قادمة.
الأسئلة الشائعة
كيف أقوم بتحديد حجم ذاكرة الوصول العشوائي (RAM) بشكل صحيح أثناء الإعداد الأولي لجهاز ESA S530؟
يُعدّ تحديد حجم الكبش المناسب أمرًا بالغ الأهمية أثناء الإعداد الأولي لجهاز ESA S530. قِس الأبعاد المطلوبة لعملياتك المحددة، واضبط حجم الكبش باتباع التعليمات المفصلة الواردة في دليل المستخدم. تضمن هذه الخطوة دقة وسلامة تشغيل الآلة.
لماذا يعد تحديد حجم محاور تحديد الموقع أمرًا مهمًا في الإعداد الأولي لـ ESA S530؟
يُعدّ ضبط محاور تحديد المواقع بدقة أمرًا بالغ الأهمية لضمان دقة وضع قطعة العمل أثناء التشغيل. في الإعداد الأولي لجهاز ESA S530، اتبع الإرشادات بدقة لضبط محاور تحديد المواقع، مما يُحسّن دقة وكفاءة الجهاز.
ما هي أهمية إدراج اللكمات والقوالب أثناء الإعداد؟
يُساعد إدراج أدوات الثقب والقوالب في الإعداد الأولي لجهاز ESA S530 على تنظيم الأدوات المتاحة، مما يُسهّل اختيار المعدات المناسبة لمهامك. تُحسّن هذه الممارسة كفاءة سير العمل وتُقلّل من وقت التوقف.
خاتمة
في الختام، يُعدّ التنفيذ السليم للإعداد الأولي لجهاز ESA S530 أمرًا بالغ الأهمية لزيادة كفاءة ودقة عملياتك. يُعدّ ضمان تحديد حجم الكبش الصحيح وتحديد حجم محاور تحديد المواقع بشكل مناسب خطوتين أساسيتين لا يُمكن إغفالهما. علاوة على ذلك، يُحسّن تصميم الأدوات المُخصصة، مثل سحب اللكمات والقوالب الجديدة، من وظائف جهازك ويُصمّمه لتلبية احتياجات الإنتاج المُحددة.
إذا كنت بحاجة إلى مزيد من المساعدة أو المعلومات حول كيفية إدارة الإعداد الأولي لجهاز ESA S530 بشكل أفضل، فلا تتردد في التواصل مع فريق خبرائنا. نحن هنا لتقديم دعم أكثر تفصيلاً والإجابة على أي استفسارات لديك. بالإضافة إلى ذلك، استعرض وثائقنا الإضافية لمزيد من المعلومات والإرشادات حول صيانة وتحسين أداء آلة ثني الكبس.


