


Wenn Sie die Kunst des Blechbiegens beherrschen möchten, ist das Verständnis der Grundlagen der CYBELEC CybTouch 6 C-Programmierung unerlässlich. In diesem Artikel führe ich Sie durch die Erstellung eines Teileprogramms mit der CYBELEC CybTouch 6 C und stelle sicher, dass Sie die nötigen Einblicke erhalten, um Ihre Effizienz in der Metallbearbeitung zu steigern. Egal, ob Sie Anfänger sind und die Grundlagen der Programmierung erlernen möchten oder ein erfahrener Techniker, der seine Fähigkeiten verfeinern möchte – dieser umfassende Überblick liefert Ihnen die Informationen, um das volle Potenzial Ihrer Abkantpressen auszuschöpfen. Lassen Sie uns die Besonderheiten der Programmierung mit der CYBELEC CybTouch 6 C kennenlernen und Ihre Fähigkeiten in der Metallbearbeitung verbessern.
Einführung
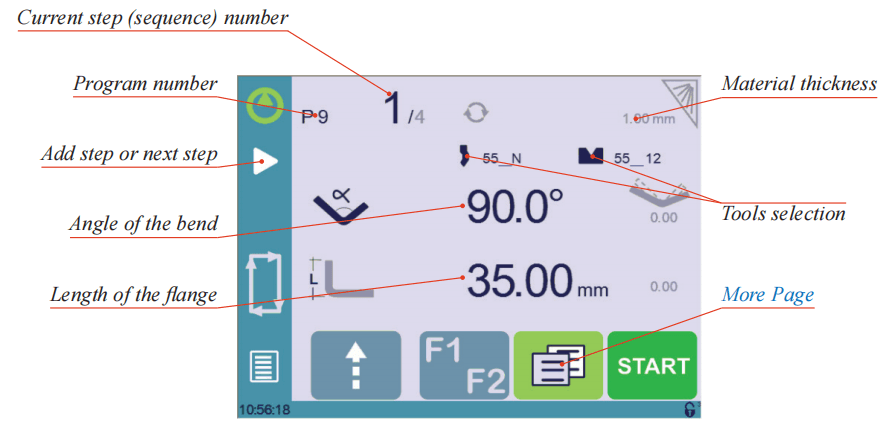
Wenn Sie das CYBELEC CybTouch 6 C, die erste angezeigte Seite ist die numerische Seite für Biegungen. Dieser wichtige Ausgangspunkt ist der ideale Ausgangspunkt für die Programmierung mit CYBELEC CybTouch 6 C. Sie können damit Programme erstellen, die die spezifischen Biegefolgen für die Herstellung eines vollständigen Teils enthalten. Das Verständnis der Navigation und Nutzung dieser Seite ist für die Beherrschung der CYBELEC CybTouch 6 C-Programmierung unerlässlich.
Biegen mit Werkzeugverwaltung
Einstellungsanleitung:
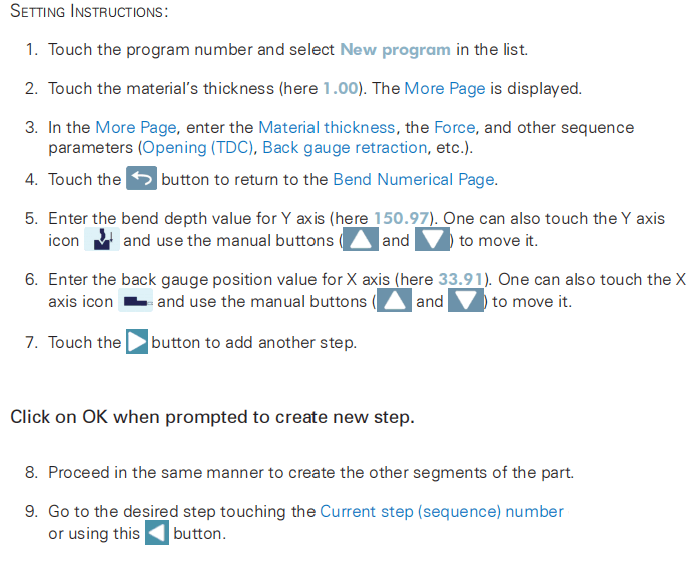
1. Berühren Sie die Programmnummer und wählen Sie Neues Programm in der Liste.
2. Tippen Sie auf die Materialstärke (hier 1,00). Die Seite „Mehr“ wird angezeigt.
3. Im Mehr Seitegeben Sie den Materialstärke, Die Gewaltund andere Sequenzparameter (Öffnung (TDC), Rücklauf des hinteren Anschlags usw.).
4. Berühren Sie ggf. die Schaltfläche, um die Werkzeugverwaltung.
5. Berühren Sie die Schaltfläche, um zum Biegungsnummer Seite.
6. Wählen Sie die für das Teil zu verwendenden Werkzeuge aus, indem Sie die entsprechenden Symbole berühren.
7. Berühren Sie den numerischen Wert neben dem Winkelsymbol und geben Sie den Wert für die erste Biegung ein, die Sie erstellen möchten (hier 90°).
8. Berühren Sie den numerischen Wert neben dem Symbol für die Segmentlänge und geben Sie den Wert für das erste Segment ein, das Sie erstellen möchten (hier 35,00 mm).

9. Fügen Sie die nächste Biegung zum Programm hinzu, indem Sie

10. Gehen Sie auf die gleiche Weise vor, um die anderen Segmente des Teils zu erstellen.
11. Gehen Sie zum gewünschten Schritt, indem Sie die Aktuelle Schrittnummer (Sequenznummer) oder über diese Schaltfläche

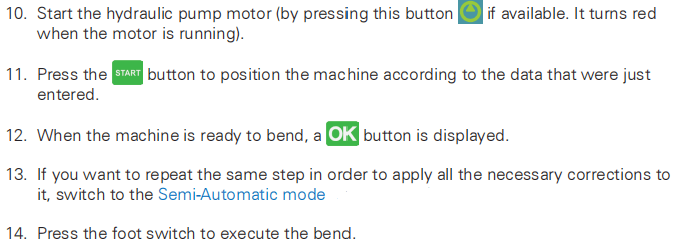
12. Starten Sie den Hydraulikpumpenmotor (durch Drücken dieser Taste

falls vorhanden. Bei laufendem Motor leuchtet sie rot).
13. Drücken Sie die START Schaltfläche, um die Maschine entsprechend den gerade eingegebenen Daten zu positionieren.
14. Wenn die Maschine zum Biegen bereit ist, OK Die Schaltfläche wird angezeigt.
15. Wenn Sie den gleichen Schritt wiederholen möchten, um alle notwendigen Korrekturen vorzunehmen, wechseln Sie in den Halbautomatischer Modus.
16. Drücken Sie den Fußschalter, um die Biegung auszuführen.
Biegen und Korrekturen
Um die CYBELEC CybTouch 6 C-Programmierung zu meistern, werden alle Programmkorrekturen effizient auf der numerischen Biegeseite durchgeführt. Je nach persönlichen Vorlieben können Bediener die Programmschritte sequenziell ausführen und dabei notwendige Korrekturen vornehmen. Alternativ können sie den halbautomatischen Modus nutzen, um alle erforderlichen Korrekturen auf einen einzelnen Schritt anzuwenden, bevor sie fortfahren.
Korrekturen können vorgenommen werden an:
- Der Winkel (Y-Achse, siehe Winkelkorrektur).
- Die Position des Hinteranschlags (X-Achse, siehe Korrektur des Hinteranschlags).
Halbautomatisch Modus

Um die Programmierung des CYBELEC CybTouch 6 C zu beherrschen, ist das Verständnis des halbautomatischen Modus entscheidend. Dieser Modus ist ideal für Bediener, die Korrekturen an Biegungen einzelner Teile vornehmen müssen. Er ermöglicht die unbegrenzte Wiederholung derselben Sequenz und ermöglicht Anpassungen, bis das gewünschte Ergebnis erreicht ist. Sobald Sie mit einem Schritt zufrieden sind, können Sie mit der Taste zum nächsten wechseln. Das Aktivieren oder Deaktivieren des halbautomatischen Modus ist ganz einfach: Berühren und halten Sie die Taste länger als eine Sekunde.
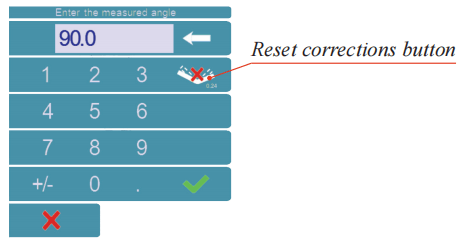
Winkelkorrektur
Wenn nach der physikalischen Messung des Winkels Korrekturen vorgenommen werden sollen, müssen diese wie folgt und nicht direkt im Programmschritt durchgeführt werden.
Einstellungsanleitung:
Berühren Sie das Symbol für die Winkelkorrektur und geben Sie den physikalisch gemessenen Winkelwert ein. Die numerische Steuerung berechnet automatisch die Y-Achsenkorrektur.
Hinterer Anschlag Korrektur
Um die Programmierung des CYBELEC CybTouch 6 C zu beherrschen, ist es wichtig zu wissen, wie Korrekturen effizient angewendet werden. Sie können die Position des Hinteranschlags auf der X-Achse einfach durch Antippen der kleinen Zahl neben der Flanschlänge auf dem Display anpassen. Erforderliche Korrekturen, ob positiv oder negativ, sollten zur Gewährleistung der Präzision manuell eingegeben werden. Durch die Integration dieser Technik in Ihren Programmierablauf steigern Sie die Genauigkeit und Effizienz Ihrer Abläufe und holen das Beste aus Ihrem CYBELEC CybTouch 6 C-System heraus.
Biegen ohne Werkzeugverwaltung
Bei der CYBELEC CybTouch 6 C-Programmierung ohne Werkzeugverwaltung können Sie den Hinteranschlagwert für die X-Achse und die Biegetiefe für die Y-Achse nur in Millimetern oder Zoll programmieren. Diese Funktion ist besonders nützlich, wenn keine Werkzeugverwaltung verfügbar ist, da sich der Bediener auf präzise Messungen und manuelle Anpassungen direkt in mm oder Zoll konzentrieren kann. Dieser Ansatz vereinfacht den Programmierprozess und gewährleistet präzise Biegevorgänge ohne komplexe Werkzeugauswahl.

Dieses Verfahren ist auch gültig, wenn die Werkzeugverwaltung deaktiviert wurde.
Next-Part-Funktion
Die Next-Part-Funktion in der CYBELEC CybTouch 6 C-Programmierung ist eine leistungsstarke Funktion, die es Bedienern ermöglicht, mehrere Teileprogramme nahtlos ineinander zu schalten. Diese Funktion ist besonders nützlich für die Erstellung komplexer dreidimensionaler Teile, wie z. B. einer Schachtel, oder die Montage eines Endprodukts aus mehreren Komponenten.
Während der Ausführung beendet der CybTouch das aktuelle Programm und wechselt automatisch zum nächsten ausgewählten Programm, das als P+nnDieser Prozess läuft effizient ab, vorausgesetzt, dass jedes Teil mit einem nachfolgenden Programm konfiguriert wird.
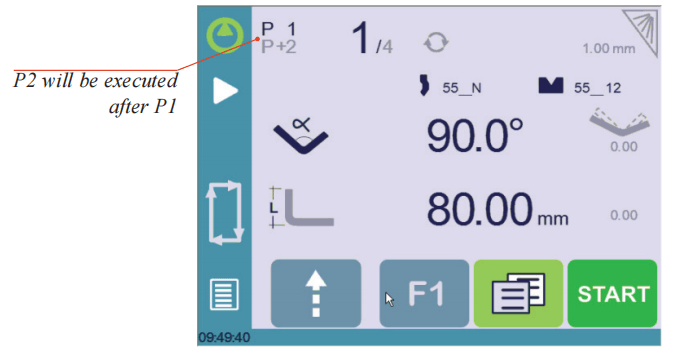
Einstellanleitung
1. Um die Next-Part-Funktion zu aktivieren, berühren Sie die Programmnummer und halten Sie diese gedrückt, bis der folgende Ziffernblock angezeigt wird.
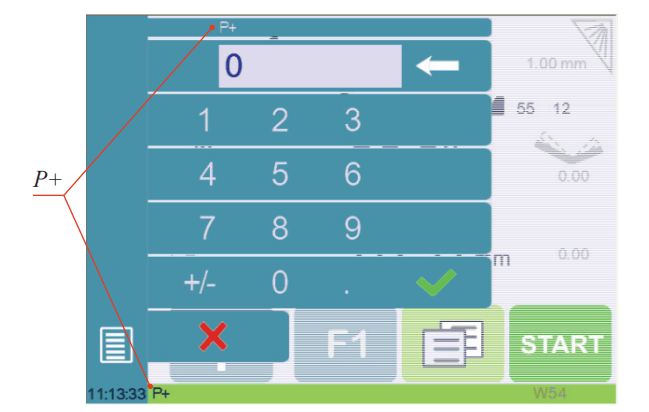
2. Geben Sie die Nummer des Programms ein, das am Ende des aktuellen Programms ausgeführt werden muss.
3. Speichern Sie das Programm.
Zyklen und Mengen
Das Beherrschen der CYBELEC CybTouch 6 C-Programmierung erfordert das Verständnis der zyklischen Natur von Programmsequenzen.

Beim Konfigurieren einer Baugruppe, die mehrere Programme erfordert, beispielsweise eine Sequenz, bei der Programm 1 zu Programm 2 und anschließend zu Programm 3 führt, schließt der letzte Übergang von Programm 3 zurück zu Programm 1 den Zyklus ab.
Dieses Design stellt sicher, dass der Teilezähler erhöht wird, wenn die Sequenz auf ein Programm mit niedrigerer Nummer zurückgesetzt wird. Bei der CYBELEC CybTouch 6 C-Programmierung ist es wichtig sicherzustellen, dass die Programmnummern chronologisch ansteigen, wenn eine Serie für ein einzelnes Teil dargestellt wird.
Häufig gestellte Fragen (FAQ)
Wie beginne ich mit der Erstellung eines Teileprogramms mit CYBELEC CybTouch 6 C-Programmierung?
Rufen Sie zunächst die Programmieroberfläche Ihres CybTouch 6-Controllers auf. Navigieren Sie zum Bereich „Programme“ und wählen Sie „Neues Programm erstellen“. Folgen Sie den Anweisungen, um die erforderlichen Spezifikationen wie Abmessungen und Biegefolgen einzugeben. Stellen Sie sicher, dass alle Angaben Ihren Projektanforderungen entsprechen.
Was soll ich tun, wenn während des CYBELEC CybTouch 6 C-Programmiervorgangs ein Fehler auftritt?
Wenn ein Fehler auftritt, überprüfen Sie zunächst, ob alle Programmdaten korrekt sind. Achten Sie auf Abweichungen bei Teileabmessungen oder Sequenznummern, da diese zu Betriebsproblemen führen können. Tipps zur Fehlerbehebung für die angezeigte Fehlermeldung finden Sie im CybTouch 6-Benutzerhandbuch.
Wie kann ich sicherstellen, dass die CYBELEC CybTouch 6 C-Programmierung korrekt ist?
Um die Genauigkeit zu gewährleisten, kalibrieren Sie Ihre Maschine regelmäßig mit einem digitalen Messgerät und überprüfen Sie alle programmierten Maße, bevor Sie das Teileprogramm ausführen. Erwägen Sie die Durchführung eines Testzyklus, um mögliche Fehler zu identifizieren und zu beheben, ohne das Material zu beeinträchtigen.
Abschluss
Um die CYBELEC CybTouch 6 C-Programmierung zur Erstellung eines Teileprogramms zu beherrschen, ist es wichtig, die beschriebenen Schritte zu befolgen, um einen effizienten Betrieb zu gewährleisten. Durch das Verständnis der Programmsequenzierung und die genaue Verwaltung von Teilezählern optimieren Sie die Leistung Ihrer CNC-Maschinen.
Um Ihre Fähigkeiten weiter zu vertiefen oder spezifische Fragen zu beantworten, empfehlen wir Ihnen, sich an unser Team zu wenden, um fachkundige Unterstützung zu erhalten oder zusätzliche Ressourcen auf unserer Website zu erkunden. Dieser proaktive Ansatz hilft Ihnen, Ihre Programmiertechniken und Produktionskapazitäten zu optimieren.


