


Wenn Sie die Einrichtung von Stempeln und Matrizen der ESA S630 beherrschen möchten, sind Sie hier richtig. In der Welt der Präzisionsbearbeitung ist die genaue Einrichtung von Stempeln und Matrizen entscheidend für eine optimale Leistung.
In diesem Artikel führe ich Sie durch die einzelnen Schritte zur Einrichtung von Stempeln und Matrizen der ESA S630 und stelle sicher, dass Sie diese Aufgabe sicher bewältigen können. Egal, ob Sie ein erfahrener Profi oder ein Neuling sind, dieser Leitfaden bietet Ihnen die nötige Klarheit und Einblicke, um den Prozess effektiv zu meistern.
ESA S630 Stempel- und Matrizenliste
Die Optimierung Ihrer Maschineneffizienz mit dem ESA S630 Punches and Dies Setup ist der Schlüssel zur Steigerung der Produktivität und Präzision in Ihren Abläufen. So verwalten Sie die Liste der Stempel und Matrizen effektiv:
1. Zugriff auf die Liste der Stempel und Matrizen

Um auf die Stempel- und Matrizenliste zuzugreifen oder zwischen ihnen umzuschalten, drücken Sie diese Taste.
Wenn Sie zunächst die Matrizenliste sehen und die Stempel anzeigen möchten, drücken Sie einfach erneut die Taste. Die Anzeigen umfassen:

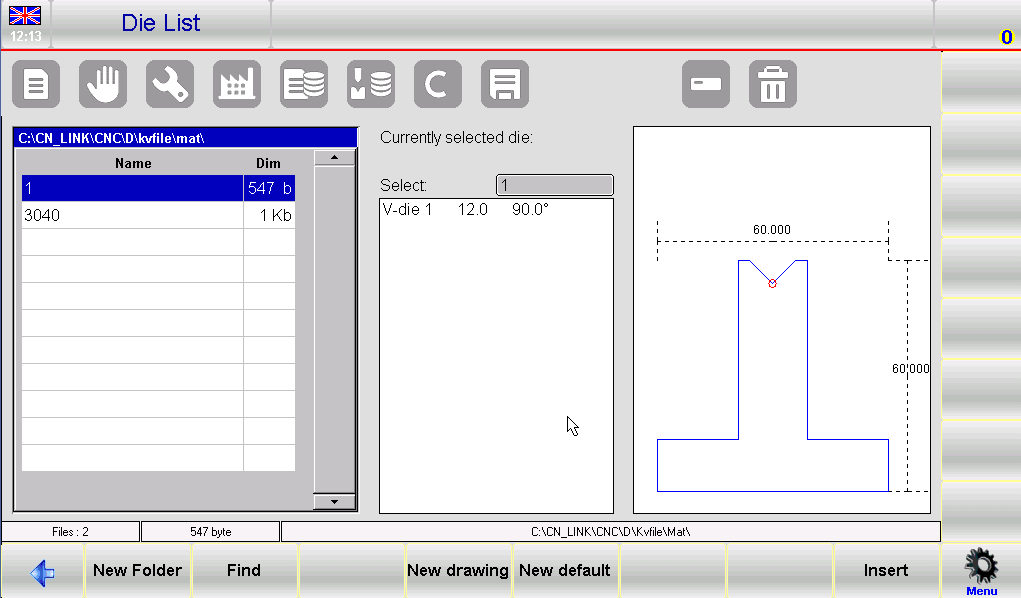
- Linkes Fenster: Zeigt entweder die Stempel- oder Matrizenliste.
- Zentrale Felder: Zeigen detaillierte Daten zum ausgewählten Werkzeug an.
- Rechtes Vorschaufenster: Bietet eine visuelle Vorschau des ausgewählten Werkzeugs.
Wenn Sie mit einer umfangreichen Liste von Werkzeugen arbeiten, können Sie die Auswahl mithilfe der Bildlaufleiste beschleunigen.
2. Verwenden von Funktionstasten
Das Verstehen und Verwenden der Funktionsschaltflächen kann bei der Organisation und Bearbeitung Ihrer Tools erheblich hilfreich sein:
- [Neuer Ordner]: Erstellen Sie einen Ordner zum Speichern von Tools.
- [Finden]: Suchen Sie nach einem bestimmten Stempel oder einer bestimmten Matrize.
- [Neue Zeichnung]: Entwerfen Sie einen neuen Stempel oder eine neue Matrize.
- [Neuer Typ 1-4]: Greifen Sie auf voreingestellte Stempel mit verschiedenen Formen zu, einschließlich runder Stempel.
- [Einfügen]: Fügen Sie das ausgewählte Werkzeug zum Arbeitsprogramm hinzu.
3. Werkzeugverwaltungsvorgänge
Verwalten Sie Ihre Tools effizient, indem Sie Aktionen ausführen wie:
- Vorschauanzeige: Stellen Sie sicher, dass diese Option zur schnellen Identifizierung aktiviert ist. Schalten Sie die Vorschau ein, indem Sie das Menü aufrufen und die 4>> Vorschau Element. Das Vorschauelement ist deaktiviert. Wiederholen Sie den Vorgang, um das Element wieder zu aktivieren.
- Kopierwerkzeuge: Um ein Werkzeug zu duplizieren, wählen Sie das 0>> Kopieren Element aus dem Menü.
- Umbenennungstools: Zum Umbenennen wählen Sie die 1>> Umbenennen Element und folgen Sie dem Umbenennungsprozess.
4. Werkzeugwartung
Regelmäßige Wartung, wie das Löschen veralteter Tools oder das Speichern wichtiger Tools, ist entscheidend:
- Löschwerkzeuge: Wählen Sie ein Werkzeug aus und bestätigen Sie das Löschen über das Menü.
- Sicherungstools: Speichern Sie alle Tools zur Sicherung auf einem USB-Gerät. Stecken Sie das Gerät einfach ein, wählen Sie 2>> Werkzeuge speichern aus dem Menü, und alle Elemente werden übertragen.
- Alle Werkzeuge löschen: Wählen Sie die 3>> Werkzeuge löschen Element, um bei Bedarf alle Werkzeuge zu löschen.
5. USB-Gerätebetrieb
Nutzen Sie USB-Geräte, um Ihre Tools extern zu verwalten:
- Zeigen Sie Tools direkt vom USB-Stick an und verwalten Sie sie.
- Speichern Sie Kopien der erforderlichen Tools vom USB-Stick auf der NC-Festplatte und stellen Sie sicher, dass sie auf verschiedenen Maschinen zugänglich sind.
Durch die effektive Einrichtung und Verwaltung der ESA S630-Stanzen und -Matrizen können Sie Ihre Betriebseffizienz steigern.
So geben Sie einen neuen Stempel ein
Um einen neuen Stempel effizient in Ihr ESA S630-Stanz- und Matrizen-Setup einzugeben, befolgen Sie diese genauen Schritte, um die Arbeitsablaufintegration zu verbessern:
- Zugriff auf Stempeleintrag:
Drücken Sie diese Schaltfläche, um die Liste der Stempel oder Matrizen anzuzeigen.
Wenn die Matrizenliste angezeigt wird, drücken Sie die Taste erneut, um auf die Stempelliste zuzugreifen.
2. Stanztyp auswählen:
Wählen Sie den gewünschten Stempeltyp. Die ESA S630 bietet fertig gezeichnete Stempel oder drei voreingestellte Stempeltypen mit festen Maßen, die an Ihre individuellen Bedürfnisse angepasst werden können. Voreingestellte Stempeltypen erleichtern die Einrichtung, wenn sie Ihrem gewünschten Design genau entsprechen, da sie den Zeichenprozess vereinfachen.

3. Initiierung eines neuen Stempeldesigns:
Drücken [Neue Zeichnung] um manuell einen kompletten Schlag auszuführen.
Verwenden [Neuer Typ 1], [Neuer Typ 2], [Neuer Typ 3], oder [Neuer Typ 4](Rundlocher) für voreingestellte Lochertypen, die Ihren Anforderungen entsprechen.
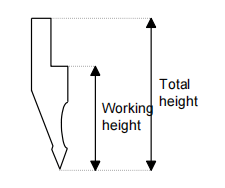
4. Geben Sie die Stanzmaße ein:
Geben Sie die erforderlichen Abmessungen einschließlich Gesamt- und Arbeitshöhe an, wie in der Referenzabbildung dargestellt.
5. Zugriff auf die Zeichenseite:
Nachdem Sie die Abmessungen eingegeben und einen Stanztyp ausgewählt haben, gelangen Sie zur Zeichnungsseite. Der Inhalt dieser Seite variiert je nach gewähltem Stanztyp.
Bestätigen Sie Ihre Eingaben durch Auswahl des [OK] Taste.
Durch die effektive Navigation durch diese Schritte im ESA S630 Punches and Dies Setup verfeinern Sie Ihre Maschinenabläufe.
Schläge zum Ziehen
Um mit der Stanzzeichnung zu beginnen, nutzen Sie die speziell für diese Aufgabe entwickelte Zeichenfunktion.

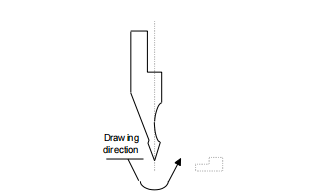
Die Benutzeroberfläche umfasst ein linkes Fenster zum Zeichnen und vier rechte Dateneingabefenster für Polar-, kartesische, Scheitelpunkt- und Bogendaten. Beachten Sie, dass der Stempel gegen den Uhrzeigersinn gezogen werden muss, mit den hinteren Anschlägen auf der rechten Seite.
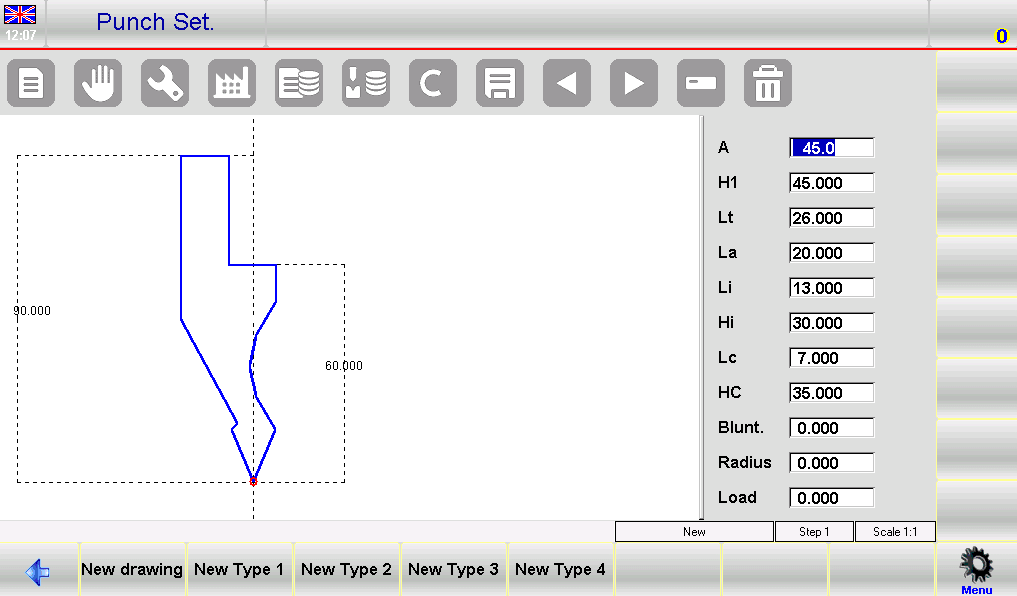
Beginnen Sie mit der Definition der Spitze des Stempels: Geben Sie die Länge „lp“ ein und bestätigen Sie mit [OK]Geben Sie anschließend Spitzenwinkel, Fase, Radius und Tragfähigkeit an und drücken Sie dabei immer [OK] um jeden Eintrag zu speichern.
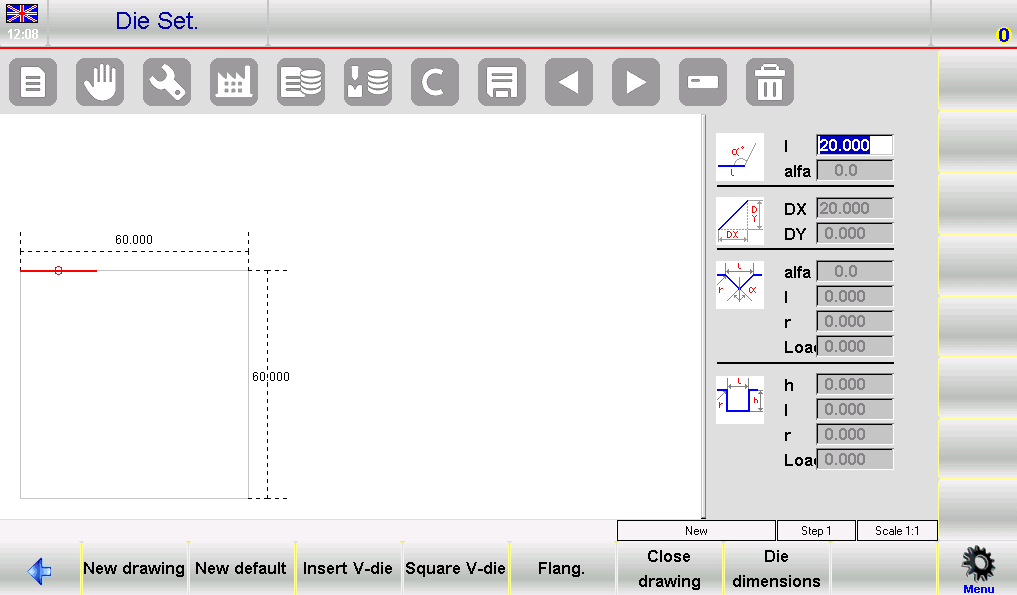
So erstellen Sie die Zeichnung
Um einen Stempel zu zeichnen, beginnen Sie im Feld „lp“ des Dateneingabefensters. Geben Sie die Spitzendaten und dann die zweite Seitenlänge der Spitze ein. Durch Auswahl der Alpha Feld wird eine Soft-Tastatur angezeigt, um die Dateneingabe zu erleichtern.

Durch Drücken dieser Taste wird die nächste Länge im automatischen Modus gezeichnet.
Verwenden Sie die [Bogen] Funktion für gekrümmte Abschnitte durch Eingabe der Länge „l“ und der Tiefe „h“. Der Vorgang erfordert Genauigkeit; daher gewährleistet die Eingabe realistischer Maße eine korrekte, repräsentative Zeichnung.

Grafische Hilfen
Grafische Hilfsmittel vereinfachen komplexe Abschnitte, indem sie Winkel- und Längenanpassungen mit den Pfeiltasten ermöglichen und so mit dem ESA S630 Punches and Dies Setup eine Übereinstimmung zwischen gezeichneten und tatsächlichen Stempeleinstellungen ermöglichen.
Rufen Sie das Menü auf, wählen Sie die 3>> DYNAMISCHDurch Drücken der rechten Pfeiltaste wird der Winkelwert um 1° erhöht und durch Drücken der linken Pfeiltaste jeweils um ein Grad verringert.
Zeichnen gekrümmter Abschnitte und Datenkorrektur
Beim Zeichnen von Kurvenabschnitten verwenden Sie die [Bogen] , um das Fenster zur Bogendateneingabe aufzurufen. Geben Sie die Länge „l2“ und die Tiefe „h“ des Bogens ein. Die den eingegebenen Daten entsprechende Kurve wird automatisch gezeichnet.
Falsche Eingaben können korrigiert werden, indem Sie mithilfe der entsprechenden Schaltflächen zwischen den Feldern navigieren und so Änderungen an Längen- und Winkeleingaben vornehmen.
Speichern der Zeichnung
Nachdem Sie Ihre Zeichnung fertiggestellt haben, speichern Sie sie zur späteren Verwendung im internen Speicher.
Indem Sie diese detaillierten Schritte für die Einrichtung von Stempeln und Matrizen des ESA S630 befolgen, optimieren Sie die Funktionalität der Maschine, was zu einem verbesserten Arbeitsablauf und einer höheren Betriebseffizienz führt.
Voreingestellte Stempel
Die voreingestellte Stanzseite wird in Form einer vorgezeichneten Stanzung zusammen mit einer Reihe von Daten dargestellt, die die Form dieser Stanzung charakterisieren.
Durch Ändern eines beliebigen Wertes und Drücken von [OK], wird die Zeichnung unter Berücksichtigung des geänderten Wertes neu gezeichnet.
Speichern der Zeichnung
Drücken Sie am Ende der Zeichnung die Taste, um sie im internen Speicher zu speichern.
So geben Sie einen neuen Würfel ein
Um eine neue Matrize in Ihre ESA S630-Maschine einzugeben, gehen Sie wie folgt vor:
- Drücken Sie die Taste: Beginnen Sie, indem Sie die entsprechende Schaltfläche drücken, wodurch die Liste der Stempel oder Matrizen angezeigt wird.
- Navigieren Sie durch die Liste: Sollte die Liste der Stempel erscheinen, drücken Sie einfach erneut die Taste, um zur Liste der Matrizen zu wechseln.
- Wählen Sie den Matrizentyp aus: Wählen Sie den gewünschten Matrizentyp. Sie haben die Möglichkeit, eine komplett neue Matrize zu zeichnen oder eine voreingestellte Matrize mit festen Abmessungen zu verwenden.

Wenn der von Ihnen eingereichte Würfel einem der vorgeschlagenen voreingestellten Typen ähnelt, z. B. sowohl quadratische als auch umgedrehte T-Stempel, empfiehlt es sich, diese Voreinstellungen zu verwenden, um den Ziehvorgang zu vereinfachen. Sie müssen den Würfel jedoch vollständig zeichnen, wenn er nicht in die voreingestellten Kategorien passt, insbesondere wenn es sich um einen Würfel mit mehreren V-Stempeln, einen quadratischen V-Stempel oder einen holländischen Faltstempel handelt.
Notiz: Wenn Sie beim vollständigen Zeichnen einer Matrize auf Schwierigkeiten stoßen, können Sie einen voreingestellten Matrizentyp verwenden und ihn mithilfe der vordefinierten Daten so anpassen, dass er der tatsächlichen Form möglichst nahe kommt:
- [Neue Zeichnung]: Um die Matrize komplett von Grund auf neu zu entwerfen.
- [Neuer Standard]: Um die Daten einer voreingestellten Matrize zu nutzen.
Sobald Sie eine Option ausgewählt haben, werden Sie in einem Fenster aufgefordert, die Matrizenabmessungen einzugeben. Geben Sie die Matrizenbreite und -höhe wie angegeben ein, indem Sie mit dem Finger die Felder „Breite“ und „Höhe“ auf der Benutzeroberfläche auswählen.
Matrizen zum Zeichnen
Die Seite mit den zu zeichnenden Matrizen wird mithilfe der Zeichenfunktion abgerufen (siehe entsprechendes Kapitel im Benutzerhandbuch).
Das linke Fenster dient als Zeichenfenster, während die vier rechten Fenster für die Eingabe von Zeichnungsdaten vorgesehen sind. Diese Fenster sind in folgende Kategorien unterteilt:
- Polarzeichnungsdaten,
- Kartesische Zeichnungsdaten,
- V-Die-Zeichnungsdaten,
- Daten zum Ziehen von quadratischen Matrizen.
Zeichenkonventionen
Die Matrize muss im Uhrzeigersinn gezogen werden. Beachten Sie dabei, dass sich die hinteren Anschläge auf der rechten Seite der Matrize befinden.
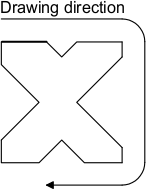
Die markierte Linie stellt die ursprünglich auf der Zeichenseite vorgeschlagene Linie dar.
HSo machen Sie die Zeichnung
Angenommen, es muss folgender Würfel gezogen werden:
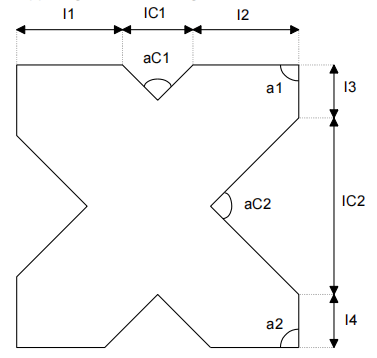
Konzentrieren Sie sich zunächst auf Feld 1 im Eingabefenster der Polarzeichnung. Geben Sie zunächst die Länge „l1” für den Abschnitt, an dem Sie arbeiten, und wählen Sie das Feld mit dem Finger aus. Drücken Sie [OK], wodurch der Cursor in das Feld α bewegt wird, um den Winkel relativ zum nächsten Abschnitt einzugeben. Dies markiert die Definition des ersten V-Matrizenteils der zu ziehenden Matrize.
V-Matrizen-Eintrag
Um das V-Die-Setup zu definieren, führen Sie die folgenden Schritte aus:
- Drücken [V-Matrize einsetzen] , um das V-Die-Dateneingabefenster zu öffnen.
- Geben Sie den V-Matrizenwinkel „aC1“ ein und bestätigen Sie mit [OK].
- Geben Sie die V-Matrizenbreite „l“ (lC1 Länge) ein und drücken Sie [OK].
- Geben Sie den V-Matrizenradius „R“ an und bestätigen Sie.
- Geben Sie abschließend die V-Matrizenlast (maximale Tonnen pro Meter) ein und drücken Sie [OK]. Ihr V-Wurzel wird nun gezeichnet und die Länge für den nächsten Abschnitt wird automatisch eingegeben. Dadurch kehrt der Cursor zum Polardateneingabefenster zurück.
Geben Sie die Länge „l2“ ein, bezogen auf den nächsten Abschnitt, und drücken Sie [OK]. Geben Sie dann den Winkelwert „a1“ ein, indem Sie [OK] Bestätigen Sie die Eingabe jedes Mal. Dadurch wird automatisch der Rahmen für den nächsten Abschnitt festgelegt. Fahren Sie mit dieser Reihenfolge fort, um die restlichen Längen und Winkel entsprechend einzugeben. Überprüfen Sie dabei stets, ob sie den Vorgaben entsprechen, mit denen Sie arbeiten.
Wiederholen Sie die Schritte für den zweiten V-Würfel mit den angepassten Werten „aC2“, „lC2“ usw. und achten Sie dabei auf die Richtigkeit der Eingaben. Korrigieren Sie Fehler, indem Sie mit den Schaltflächen durch die Felder navigieren und die Werte gegebenenfalls anpassen.
Quadratischer V-Matrizeneingang
Bei der Eingabe einer quadratischen V-Matrize wechseln Sie vom Alpha-Eingabefeld zum Dateneingabefenster der quadratischen V-Matrize. Definieren Sie die Parameter wie Tiefe „h“, Breite „l“, Radius „r“ und Belastung, indem Sie drücken [OK] nach jeder Eingabe. Dadurch wird sichergestellt, dass Ihr quadratischer V-Würfel präzise in das System eingezogen wird.
Holländischer Falt-V-Matrizen-Eintrag (Saum-V-Matrize)
Bei holländischen V-Faltmatrizen müssen Sie sich auf die Definition der Längen konzentrieren, die sich bewegen, um die Matrize zu schließen und eine gequetschte Falte zu erzeugen. Markieren Sie den Abflachungsteil, zeichnen Sie das offene Matrizenprofil und verwenden Sie die [Flang.] , um die Abflachungslinie in Ihrer Zeichnung hervorzuheben. Legen Sie gegebenenfalls Parameter für die pneumatische Funktion fest und speichern Sie Ihre Arbeit.
Die folgende Abbildung zeigt ein Beispiel für die Biege-Niederländische Faltmatrize.

Speichern der Zeichnung
Denken Sie nach Abschluss daran, Ihre Zeichnung im internen Speicher zu speichern, indem Sie auf die Schaltfläche „Speichern“ klicken und Ihrem Würfel einen entsprechenden Namen geben.
Durch die Beherrschung der Einrichtung von Stempeln und Matrizen des ESA S630 steigern Sie nicht nur die Präzision Ihrer Vorgänge, sondern verbessern auch Ihren Arbeitsablauf durch optimierte Verfahren und zuverlässige Ergebnisse.
Voreingestellte Matrizen
Die Seite mit den voreingestellten Stanzformen wird in Form einer vorgezeichneten Stanzform zusammen mit einer Reihe von Daten dargestellt, die die Form dieser Stanzform charakterisieren.

Durch Ändern eines der Werte wird die Zeichnung unter Berücksichtigung des geänderten Werts neu geplottet.
Speichern der Zeichnung
Drücken Sie am Ende der Zeichnung die Taste, um sie im internen Speicher zu speichern.
Häufig gestellte Fragen (FAQ)
Wie beginne ich mit dem Einrichtungsprozess für ESA S630-Stanzen und -Matrizen?
Um mit der Einrichtung der Stempel und Matrizen der ESA S630 zu beginnen, stellen Sie zunächst sicher, dass alle erforderlichen Werkzeuge und Materialien bereitliegen. Rufen Sie das Einrichtungsmenü der Maschine auf und folgen Sie den Anweisungen, um die Stempel und Matrizen entsprechend Ihren Projektanforderungen auszuwählen und anzupassen.
Wie kann ich meine benutzerdefinierte Stempel- und Matrizenkonfiguration für zukünftige Projekte speichern?
Nachdem Sie die Einstellungen für die ESA S630-Stanzen und -Matrizen vorgenommen haben, drücken Sie die Speichertaste an der Maschine, um die Einstellungen im internen Speicher zu speichern. Benennen Sie die Konfiguration entsprechend, damit Sie sie bei späterer Verwendung leicht wiedererkennen können.
Kann ich ein gespeichertes ESA S630-Stanz- und Matrizen-Setup ändern?
Ja, Sie können ein gespeichertes ESA S630-Stanz- und Matrizen-Setup ändern. Greifen Sie einfach auf die gespeicherte Konfiguration zu, nehmen Sie die erforderlichen Anpassungen an den Stempel- und Matrizenwerten vor und speichern Sie das aktualisierte Setup anschließend unter demselben oder einem anderen Namen.
Abschluss
Die Beherrschung der ESA S630-Stanz- und Matrizeneinrichtung ist entscheidend für die Optimierung Ihres Produktionsprozesses und das Erreichen präziser Ergebnisse. In diesem Artikel haben wir wichtige Schritte zum Verständnis und zur effizienten Ausführung der Einrichtung erläutert. Dazu gehört die Nutzung der voreingestellten Matrizenfunktion zur mühelosen Anpassung und Anpassung von Konfigurationen sowie die Speicherung Ihrer optimierten Einstellungen für die zukünftige Verwendung.
Für weitere Unterstützung oder detaillierte Hilfestellung zur Einrichtung der ESA S630-Stanzen und -Matrizen kontaktieren Sie bitte unser Team. Nutzen Sie außerdem unsere Dokumentation, um Ihr Verständnis zu vertiefen und Ihre Abläufe zu verbessern. Ihr nächster Schritt zur Meisterung ist nur ein Gespräch entfernt – kontaktieren Sie uns und wir helfen Ihnen, optimale Ergebnisse zu erzielen.


