


Lottando con il tuo Pressa piegatrice E310P NC Configurazione? Un funzionamento corretto è essenziale per una piegatura efficiente e prestazioni ottimali. Ecco i passaggi chiave.
In questo tutorial, ti guideremo nell'utilizzo efficace della pressa piegatrice E310P NC. Dall'impostazione alle regolazioni, imparerai tutto il necessario per migliorare la precisione di piegatura e garantire risultati di alta qualità. Pronto a iniziare a padroneggiare la tua pressa piegatrice E310P NC? Analizziamo i passaggi dettagliati.
Benvenuti al nostro tutorial completo sull'utilizzo di Controllore E310P per le nostre presse piegatrici a controllo numerico. Questa guida è progettata per aiutarti a comprendere le funzioni chiave e la programmazione multi-step del controller E310P, garantendoti di poter utilizzare la macchina con sicurezza e precisione. Che tu sia un utente alle prime armi o che desideri rinfrescare le tue conoscenze, questo tutorial passo passo ti guiderà attraverso la configurazione, la programmazione e l'utilizzo del controller per ottenere risultati ottimali. Iniziamo!
Passaggi del tutorial
Programmi di clic
Per iniziare a far funzionare il Pressa piegatrice E310P NC, vai al “Programmi” sezione sul controller. Questa funzione consente agli utenti di creare, modificare e gestire le sequenze di piegatura in modo efficiente. Facendo clic su “Programmi,” Gli operatori possono inserire parametri come angolo, spessore del materiale e forza di piegatura. Il sistema calcola quindi il posizionamento ottimale per una piegatura di precisione. La selezione del programma corretto garantisce ripetibilità e accuratezza in produzione. Per configurazioni avanzate, gli utenti possono modificare o salvare programmi personalizzati per un utilizzo futuro. Padroneggiare questa funzione aumenta la produttività e riduce al minimo i tempi di configurazione, rendendola un passaggio fondamentale per un funzionamento efficiente della pressa piegatrice.

Fare clic su Nuovo
Durante il funzionamento del Pressa piegatrice E310P NC, il primo passo per creare un nuovo programma di piegatura è selezionare “Fai clic su Nuovo” sull'interfaccia del controller. Questa opzione consente agli utenti di avviare una nuova sequenza di piegatura, garantendo una formatura del metallo precisa ed efficiente. Una volta selezionata, immettere i parametri necessari come tipo di materiale, spessore, angolo di piegatura e selezione dell'utensileL'interfaccia intuitiva del controller E310P semplifica il processo di configurazione, riducendo gli errori manuali e migliorando l'efficienza del flusso di lavoro. Configurando correttamente un nuovo programma, gli operatori possono ottenere curve coerenti e precise, massimizzando le prestazioni e la produttività della macchina.

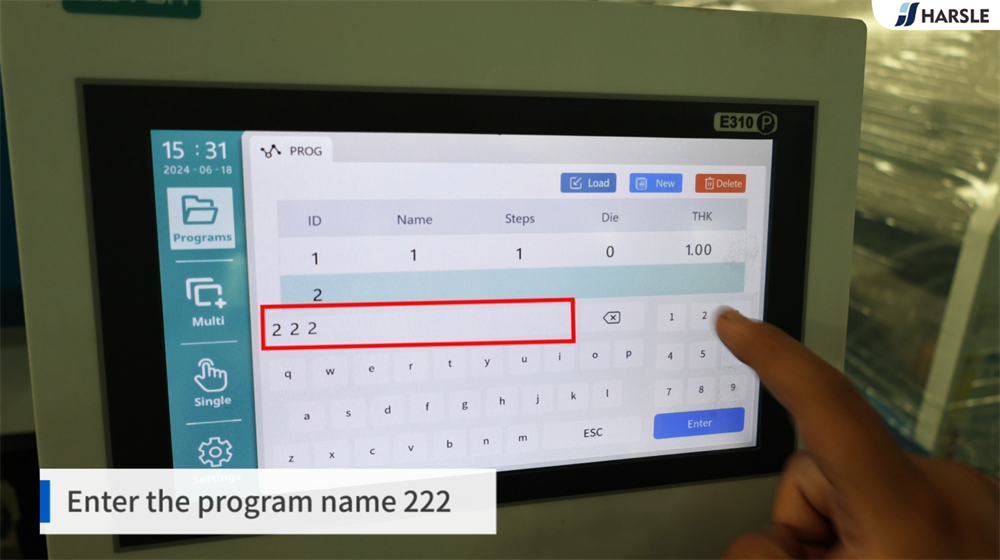
Inserisci il nome del programma 222
Per entrare Nome del programma 222 sul Pressa piegatrice E310P NC, seguire questi passaggi: Per prima cosa, accendere la macchina e accedere al Pannello di controllo NC. Vai a menu di programmazione, quindi seleziona “Nuovo programma” o il campo di input designato. Utilizzando la tastiera, digitare “222” come nome del programma e confermare premendo “Entra” o il tasto funzione corrispondente. Assicurarsi che il programma sia stato salvato correttamente prima di procedere con la regolazione dei parametri. Questo passaggio consente all'operatore di gestire e richiamare in modo efficiente le sequenze di piegatura per un utilizzo ripetuto, ottimizzando la produttività e la precisione nelle operazioni di piegatura dei metalli.
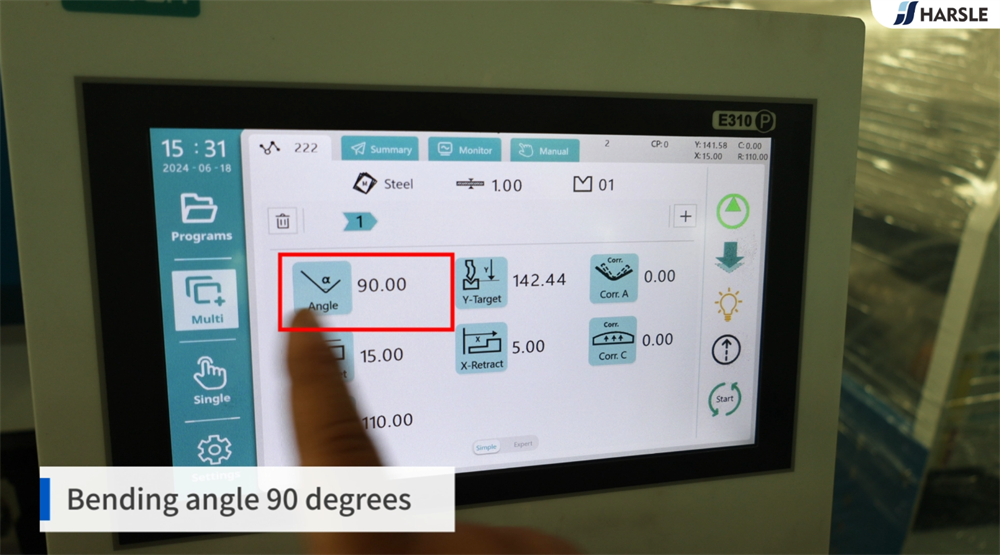
Angolo di piegatura 90 gradi
Raggiungere un curvatura precisa di 90 gradi sul Pressa piegatrice E310P NC richiede un'attenta configurazione e un controllo accurato. Per prima cosa, seleziona il corretto punzonare e morire combinazione per abbinare lo spessore del materiale. Quindi, regolare la registro posteriore e forza di piegatura in base alle proprietà del materiale. Utilizzare il Controllore E310P per inserire i parametri di piegatura, assicurando la corretta tolleranza di curvatura e compensazioneEseguire una piega di prova e misurare l'angolo; se necessario, regolare con precisione pressione o profondità del punzone. Corretto regolazione della corona aiuta a mantenere la coerenza nelle curve più lunghe. Seguire questi passaggi garantisce precisione, ripetibilità ed efficienza nelle operazioni di piegatura dei metalli.
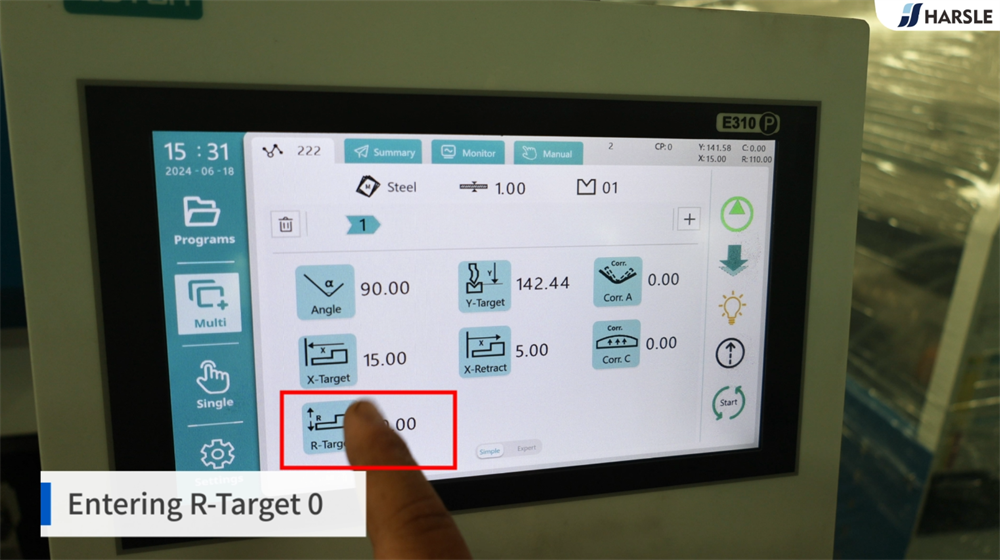
Inserimento di R-Target 0
Entrando R-Target 0 sul Pressa piegatrice E310P NC è fondamentale per il posizionamento preciso del registro posteriore durante le operazioni di piegatura. Per impostarlo, accedere al pannello di controllo e accedere Impostazioni dell'asse R. Ingresso 0 come valore target per reimpostare l'altezza del registro posteriore, garantendo un posizionamento accurato per la piegatura del materiale. Questa regolazione aiuta a raggiungere angoli di piegatura coerenti e previene il disallineamento del materiale. Confermare sempre l'inserimento prima di procedere con le operazioni di piegatura. Configurare correttamente il R-Target migliora l'efficienza e riduce gli errori, rendendolo un passaggio essenziale nell'ottimizzazione prestazioni della pressa piegatrice.
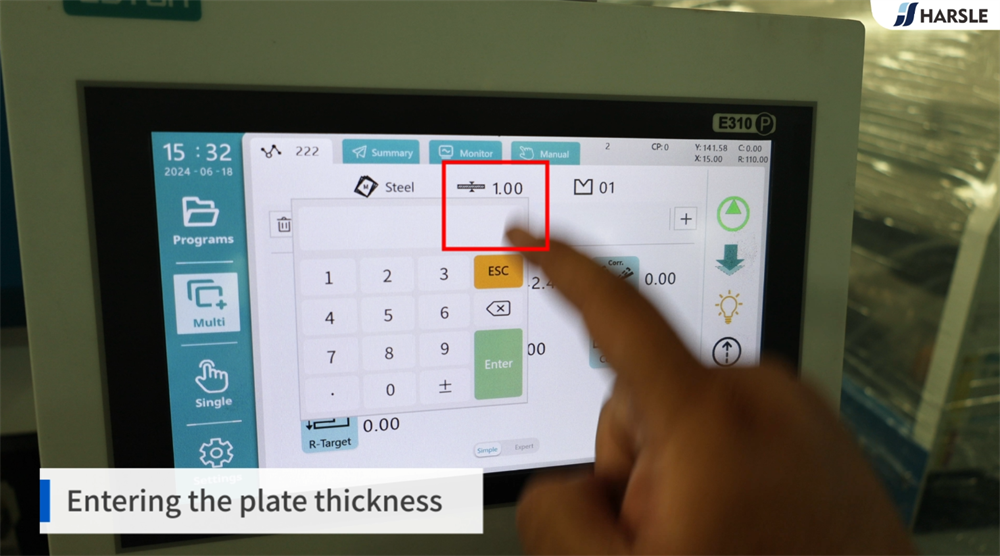
Inserimento dello spessore della piastra
Inserire correttamente il spessore della piastra nel Pressa piegatrice E310P NC è fondamentale per ottenere curve precise. Il sistema calcola la quantità richiesta compensazione della forza di flessione e dell'angolo in base a questo input. Per immettere lo spessore, accedere alle impostazioni del materiale su Controllore E310P, seleziona l'unità di misura appropriata (mm o pollici) e inserisci lo spessore esatto della lamiera. Assicurati che il valore corrisponda al materiale effettivo per evitare angoli di piegatura errati o un'usura eccessiva degli utensili. L'impostazione corretta dello spessore migliora precisione di piegatura, prolunga la durata dell'utensilee garantisce la coerenza nei progetti di fabbricazione dei metalli.
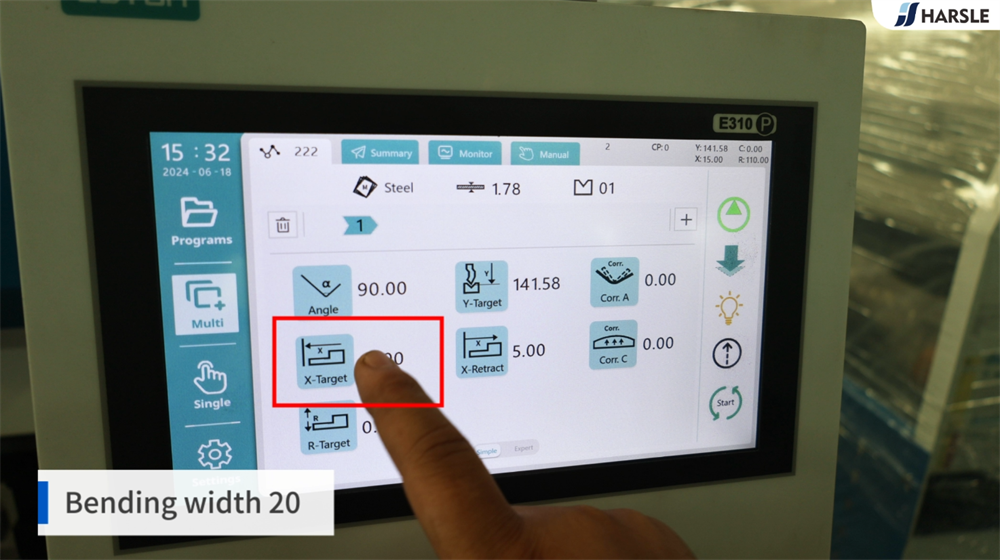
Larghezza di piegatura 20
Larghezza di piegatura si riferisce alla distanza su cui la lamiera viene piegata utilizzando il Pressa piegatrice E310P NCUno standard larghezza di piegatura di 20 assicura precisione costante E deformazione uniforme attraverso il pezzo in lavorazione. Questo parametro gioca un ruolo cruciale in ottenere curve precise riducendo al minimo lo spreco di materiale. L'impostazione della larghezza dipende da fattori come spessore del materiale, selezione dello stampo e angolo di piegatura. Corretta regolazione del larghezza di piegatura migliora l'efficienza e riduce gli errori, portando a una migliore risultati della formatura dei metalliLa comprensione di questa funzionalità aiuta gli operatori a ottimizzare i loro prestazioni della pressa piegatrice per piegatura efficiente e di alta precisione.
Aggiungere i passaggi di piegatura 2,3,4

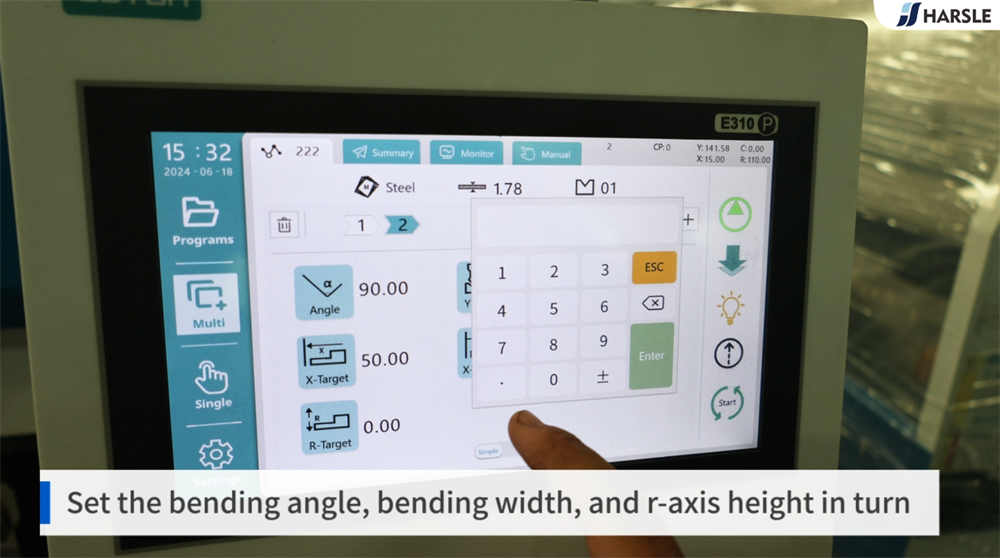
Impostare a turno l'angolo di piegatura, la larghezza di piegatura e l'altezza dell'asse r
Per ottenere una piegatura precisa con il Pressa piegatrice E310P NC, è necessario impostare il angolo di piegatura, larghezza di piegatura e altezza dell'asse R in sequenza. Inizia inserendo il desiderato angolo di piegatura nel pannello di controllo per garantire la precisione. Quindi, regolare il larghezza di piegatura, che determina il posizionamento della lamiera per risultati coerenti. Infine, impostare il Altezza dell'asse R per controllare il movimento verticale del registro posteriore, ottimizzando il processo di piegatura per diversi pezzi. La corretta configurazione di questi parametri aumenta la precisione, riduce gli errori e migliora l'efficienza nelle operazioni di piegatura della lamiera. Ricontrollare sempre le impostazioni prima di avviare la produzione.
Clicca su Start
Il funzionamento della pressa piegatrice inizia con un semplice passaggio: Fare clic su StartUna volta accesa la macchina, assicurarsi che Controllore NC E310P sia impostato correttamente. Verificare i parametri di piegatura, inclusi lo spessore del materiale, l'angolo di piegatura e la selezione degli utensili. Regolare posizione del calibro posteriore per un allineamento accurato e garantire la caratteristiche di sicurezza sono attivati. Prima di premere il pedale, eseguire una prova di piegatura per confermare la precisione. Con un'interfaccia intuitiva, la pressa piegatrice E310P NC semplifica le operazioni di piegatura, migliorando l'efficienza e la coerenza. La padronanza di questi passaggi garantisce funzionamento regolare, riduzione degli errori e maggiore produttività nella fabbricazione dei metalli.

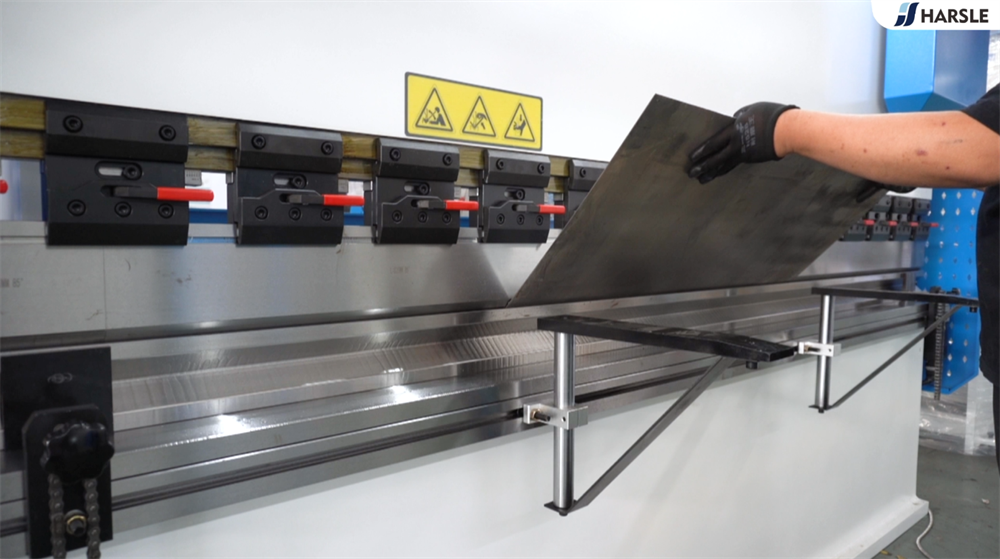
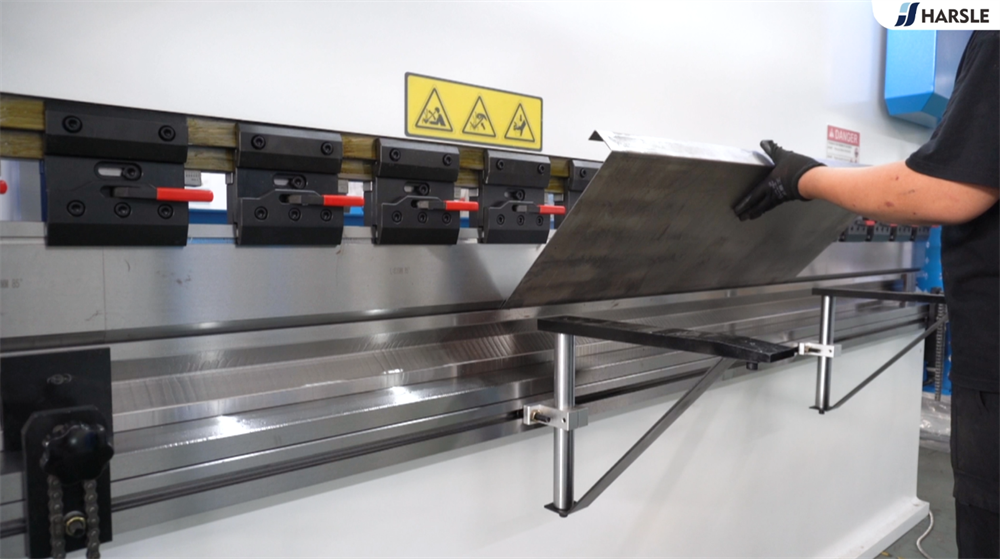
Dimostrazione di piegatura
IL Pressa piegatrice E310P NC consegna piegatura precisa ed efficiente, rendendolo una scelta ideale per la lavorazione dei metalli. In questa dimostrazione, mostriamo come impostare la macchina, posizionare la lamiera ed eseguire una piegatura perfetta. L'intuitivo Controllore E310P consente una rapida programmazione degli angoli di piegatura, del posizionamento del registro posteriore e delle impostazioni di pressione, garantendo accuratezza e coerenza in ogni operazione. Con la sua telaio robusto e sistema idraulico avanzato, questa pressa piegatrice aumenta la produttività mantenendo risultati di alta qualità. Guarda questa dimostrazione di piegatura per vedere come Pressa piegatrice E310P NC semplifica con facilità le complesse operazioni di piegatura.
Congratulazioni! Hai completato il tutorial sull'utilizzo del controller per le nostre presse piegatrici. Con queste conoscenze, dovresti sentirti sicuro nell'impostare e utilizzare la macchina per soddisfare le tue esigenze di produzione in modo efficiente. Ricorda, il nostro team è sempre a tua disposizione per supportarti, quindi per qualsiasi domanda o ulteriore assistenza, non esitare a contattarci. Grazie per aver scelto le nostre presse piegatrici e ti auguriamo un continuo successo nelle tue attività.


