


Se stai cercando di iniziare a utilizzare CYBELEC CybTouch 12, sei nel posto giusto. Capire come utilizzare questo avanzato sistema di controllo touch è fondamentale per chiunque operi nel settore della lavorazione dei metalli. In questo articolo, ti guiderò attraverso i passaggi e le funzionalità essenziali di CYBELEC CybTouch 12, assicurandoti di poter integrare efficacemente questa tecnologia nel tuo flusso di lavoro. Che tu sia un principiante o un professionista esperto che desidera ottimizzare le operazioni delle tue macchine, questa guida ti fornirà le informazioni necessarie per sfruttare al meglio le capacità di CybTouch 12.
Introduzione
Quando si inizia con il CYBELEC CybTouch 12È importante notare che, a seconda dell'evoluzione del software e della pressa piegatrice controllata dal controller CybTouch (configurazione/capacità), questa guida potrebbe non corrispondere completamente alla versione specifica di CybTouch in uso. Tuttavia, le eventuali differenze sono minime, garantendo una transizione e un processo di apprendimento senza intoppi.
Navigazione generale

- Pulsante del menu
Il pulsante Menu consente di selezionare direttamente (passare a) la schermata desiderata.

2. Zona della pagina di stato
Per iniziare a utilizzare CYBELEC CybTouch 12, è importante familiarizzare con la sua interfaccia intuitiva, inclusa la zona delle pagine di stato. Toccando brevemente la zona delle pagine di stato si accede alle Pagina di statoToccando questa zona per più di 2 secondi si attiverà il Modalità semi-automatica.
3. Pulizia dello schermo
Per pulire lo schermo mentre CybTouch è acceso, toccare il pulsante. Utilizzare solo un panno morbido e umido con sapone o detergente neutro.
Pagina di stato
Per iniziare a utilizzare CYBELEC CybTouch 12, è necessario innanzitutto esplorare la Pagina di Stato, che visualizza lo stato di tutti gli ingressi, le uscite e le posizioni degli assi del CNC. Questa funzionalità è essenziale durante la configurazione e la risoluzione dei problemi, soprattutto per le macchine installate sul campo.
Accedi facilmente da qualsiasi luogo premendo il tasto Zona Pagine di Statoe uscire premendo la freccia a sinistra.

Gli assi hanno indicatori specifici. Il loro colore indica la posizione dell'asse rispetto alla tolleranza.
Gli stati possibili sono:

Preferenze utente

Per uscire dalla pagina Preferenze utente, toccare il pulsante Menu.
- Lingua
Per iniziare a utilizzare CYBELEC CybTouch 12, un passaggio fondamentale è configurare le impostazioni della lingua per garantirne un utilizzo ottimale. Basta toccare l'opzione "Lingua" sullo schermo per sfogliare le lingue disponibili:
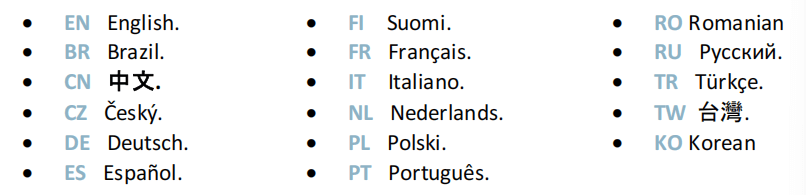
L'elenco delle lingue disponibili è soggetto a modifiche e potrebbe aumentare nel tempo.
2. Unità di lunghezza
Scegli tra mm, pollici o nessuno. Se non selezioni nessuno, il sistema imposta automaticamente i millimetri.
3. Unità di forza
Selezionare tra tonnellate, kN o tonnellate per stabilire l'unità di misura della forza.
4. Forza / Lunghezza Unità
Configurare questa unità su ton/m, kN/m o tonnellate/piede per misurare con precisione la forza per lunghezza.
5. Unità Sigma
Le opzioni includono kg/mm², N/mm² e psi (*1000) per la selezione dell'unità di misura sigma.
6. Mostra assi Valori di posizione
Questa funzione visualizzerà le posizioni degli assi sul Piega la pagina numerica.
- Quando impostato su NO, la posizione degli assi Y1, X e R viene visualizzata durante i movimenti della trave.
- Quando impostato su sì1, le posizioni degli assi (Y1, Y2, X e R) vengono visualizzate durante i rispettivi movimenti.
- Quando impostato su sì2, le posizioni degli assi (Y1, Y2, X e R) vengono costantemente visualizzate sotto i rispettivi valori di set-point.
7. Mostra grafica Pagina della parte
Quando impostato su SÌ, questo pulsante

viene visualizzato sul Piega la pagina numerica per tutte le parti grafiche e dà accesso al Pagina grafica.
8. Mostra pagina L-alfa Num
Quando impostato su SÌ, questo parametro dà accesso al Modalità L-AlfaQuesto pulsante

viene quindi visualizzato nella pagina Modalità TouchProfile.
9. Mostra parte piegata
Questo parametro, se attivato, consente all'operatore di visualizzare lo stato del pezzo prima e dopo la piegatura nel Pagina di sequenziamento delle pieghe.
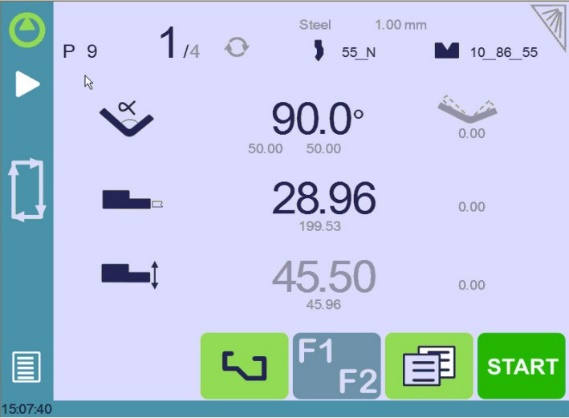
10. Piegatura numerica Pagina
Quando si inizia a utilizzare CYBELEC CybTouch 12, è essenziale personalizzare le impostazioni del display. Il sistema offre un parametro per scegliere come vengono presentate le informazioni sul display. Piega la pagina numerica.
Selezionando “tutto in uno"puoi visualizzare tutti i parametri relativi al tuo pezzo o alla tua piega, una caratteristica esclusiva di CybTouch 12 grazie alle dimensioni dello schermo.
Quando impostato su “Altre pagine”, questo pulsante

appare nella pagina numerica Bend e dà accesso alla pagina speciale mostrata di seguito.

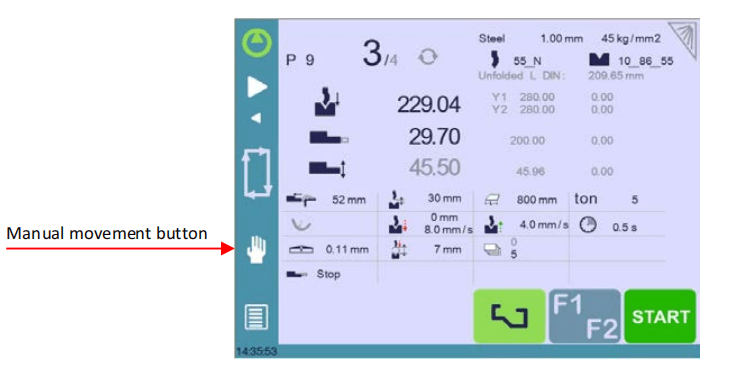
11. Mostra manuale Pulsante
Se impostato su Sì, questo parametro visualizza un pulsante manuale sul lato sinistro dello schermo, consentendo l'accesso diretto alla pagina Movimento manuale degli assi.
12. Materiali
Per iniziare a utilizzare CYBELEC CybTouch 12 e gestire in modo efficiente i tuoi materiali, puoi accedere alla pagina Materiali, dove puoi modificare le caratteristiche predefinite o configurare nuovi materiali. Tieni presente che l'accesso a questa pagina può dipendere dalle impostazioni dei parametri della tua macchina e che è richiesta una password di livello 2.

Nella pagina Materiali puoi visualizzare e modificare diversi dettagli importanti:
- Materiale: Materiale attualmente selezionato, come l'acciaio.
- Spessore predefinito: Selezionato automaticamente durante la creazione di una nuova parte, in base al materiale.
- Sigma predefinito: Ad esempio, 45 per l'acciaio, essenziale per i calcoli relativi alle proprietà dei materiali.
- Visualizzato: Indica la disponibilità del materiale per la selezione e l'uso.
- K DIN 6935: Fattore correttivo per il calcolo della lunghezza del pezzo grezzo secondo la norma DIN 6935. Si noti che questo valore modifica lo spessore nella formula.
- Spessore predefinito.: È possibile definire fino a sette spessori diversi per il materiale selezionato.
- Spessore min/max: Imposta l'intervallo per lo spessore accettabile del materiale.
- Correzione del ritorno elastico: Applicato automaticamente durante la creazione di nuove parti, con una tabella personalizzabile in base al materiale.
Il sistema fornisce tre materiali predefiniti: acciaio, acciaio inossidabile e alluminio. Tuttavia, è possibile aggiungerne facilmente altri in base alle esigenze. Per aggiungere un nuovo materiale:
- Scorrere e selezionare un materiale non configurato (ad esempio, Mater X) dall'elenco.
- Inserisci le caratteristiche del nuovo materiale.
- Tocca il nome (ad esempio Mater X) per visualizzare la tastiera e immettere il nome del nuovo materiale.
13. Correzione del ritorno elastico
Per iniziare a utilizzare CYBELEC CybTouch 12, è fondamentale padroneggiare la correzione del ritorno elastico per una piegatura accurata. Ogni materiale ha un calcolo specifico per la deduzione della piega (BDC), ma possono verificarsi delle deviazioni. Se necessario, è possibile personalizzare la tabella di correzione del ritorno elastico in base all'esperienza.
È possibile programmare fino a tre correzioni in base all'angolo di piegatura, con interpolazione lineare per i valori intermedi. Ad esempio, se puntando a 135° si ottiene una piegatura di 139°, è possibile inserire una correzione di 4° nella categoria >130° per garantire che le piegature future raggiungano i 135°.

Queste correzioni vengono applicate automaticamente, quindi controllare la tabella per eventuali errori se le pieghe sono costantemente fuori tolleranza.
14. Correzione BDC
Per iniziare a utilizzare CYBELEC CybTouch 12, è essenziale comprendere parametri chiave come la correzione del Punto Morto Inferiore (BDC). Questa regolazione viene applicata costantemente, sebbene non sia visualizzata nella pagina di correzione. Se si notano risultati inaspettati, controllare il valore di questo parametro. Se le pieghe non rientrano nei limiti di tolleranza, consultare un tecnico per verificare il valore dell'indice di trave della macchina.
15. RFLink
Quando inizi a usare CYBELEC CybTouch 12, scoprirai la sua capacità di comunicare con un laptop tramite il dongle RFLink di Cybelec. Questa funzionalità, inizialmente spento di default e reimpostato a ogni avvio, viene utilizzato principalmente dai tecnici durante l'inizializzazione della macchina.
16. Cancella indicizzazione
Una volta attivata, questa funzione cancella l'indice e la macchina lo cercherà, come avviene quando si accende l'alimentazione, consentendo all'operatore di reindicizzare la macchina senza spegnerla.
17. Esploratore USB
Quando questo parametro è impostato su sì, è possibile esplorare la chiave USB dalla pagina Trasferimento USB per accedere a cartelle specifiche. (vedere Trasferimento USB)
Quando impostato su NO, tutti i dati (strumenti, parti) saranno in una cartella chiamata datiCybT nella radice della chiavetta USB durante l'esportazione dei file. Se si desidera importare file, assicurarsi che i dati si trovino nella stessa cartella.
18. Ritiro predefinito
Quando si inizia a utilizzare CYBELEC CybTouch 12, è importante comprendere la funzione di retrazione del registro posteriore. Questo parametro imposta il valore predefinito nel Parametri di piegatura aggiuntivi, attivato quando è necessaria la retrazione.
In Modalità grafica, il sistema calcola automaticamente questo valore, ma è possibile regolarlo manualmente per un controllo preciso delle operazioni.
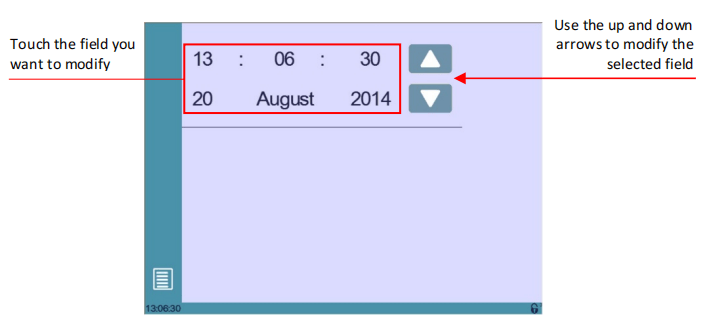
19. Imposta orologio
Consente all'utente di impostare l'ora e la data sul CybTouch.
20. Punto di pizzicamento offset Funzione
Quando questo parametro è impostato su SÌ, la funzione Offset Pinch Point è disponibile nei Parametri di piegatura extra.
21. Luminosità xx% Eco xx%
Qui è possibile definire la luminosità dello schermo per la modalità normale e la modalità Eco:
- Toccare la modalità per la quale si desidera modificare la luminosità.
- Utilizzare il

pulsanti per impostare la luminosità.
22. Contatore di programma Modalità
Puoi impostarlo per contare "su" al numero desiderato o "giù" a zero. Il ciclo si interromperà una volta raggiunto il totale e il valore del contatore verrà salvato automaticamente allo spegnimento del sistema.
23. Mostra prima L
Per iniziare a utilizzare CYBELEC CybTouch 12, è necessario configurare la modalità di inserimento dati del registro posteriore. Impostarla su "SÌ" per visualizzare la lunghezza della flangia per le dimensioni esterne, oppure "NO" per mostrare la posizione del registro posteriore in millimetri per le dimensioni interne.
Scegliendo “Mai" " disconnette la posizione dalle modifiche dell'angolo di piegatura, che è l'impostazione predefinita. Un ripristino completo ripristinerà le impostazioni predefinite. Nota: questa modalità non è disponibile per le parti grafiche.
24. Disabilitare Ricalcolo a Carico del prodotto
Quando si inizia a utilizzare CYBELEC CybTouch 12, è essenziale gestire il ricalcolo dei valori di posizione degli assi quando un pezzo viene caricato, soprattutto se le dimensioni dell'utensile o le impostazioni del registro posteriore sono cambiate. Per impostazione predefinita, questo ricalcolo è disattivato, ma si consiglia di utilizzare le correzioni per la messa a punto del programma.
25. Aiuti all'indicizzazione
Quando si inizia a utilizzare CYBELEC CybTouch 12, abilitare gli aiuti all'indicizzazione può essere fondamentale. Questa funzione visualizza un pop-up in caso di errori durante l'indicizzazione della trave, interrompendo il ciclo per evitare movimenti infiniti verso l'alto e guidando gli utenti ad abbassare manualmente la trave, se necessario, garantendo un funzionamento fluido.
26. Il raggio si ferma durante ritrattazione
Se abilitata, la trave si ferma nel punto di schiacciamento durante la retrazione del registro posteriore. Se disabilitata, la trave rallenta leggermente ma continua a piegarsi mentre il registro posteriore si ritrae.
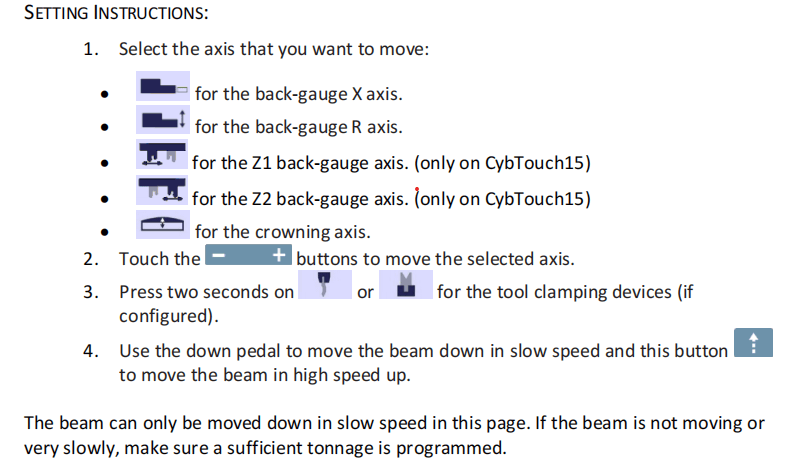
Movimento manuale degli assi
Durante la configurazione di una macchina, a volte è necessario poter muovere manualmente gli assi, ad esempio quando si cambia l'utensile. Questa operazione può essere eseguita in questa pagina.
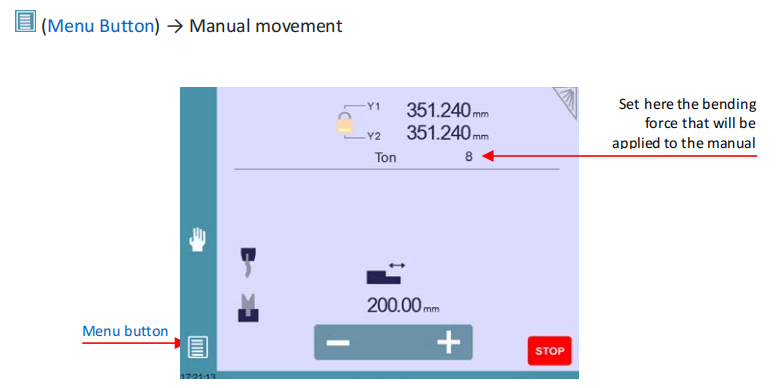
Desincronizzato Trave
Per iniziare a utilizzare CYBELEC CybTouch 12, sbloccare il lucchetto per selezionare e muovere Y1 o Y2 separatamente a bassa velocità. Questa funzione consente di riallineare facilmente una trave non sincronizzata al tavolo. Una volta sbloccato, viene selezionata automaticamente la posizione Y più alta, consentendo di abbassarla con il pedale di discesa per raddrizzare la trave.
Pagina di servizio
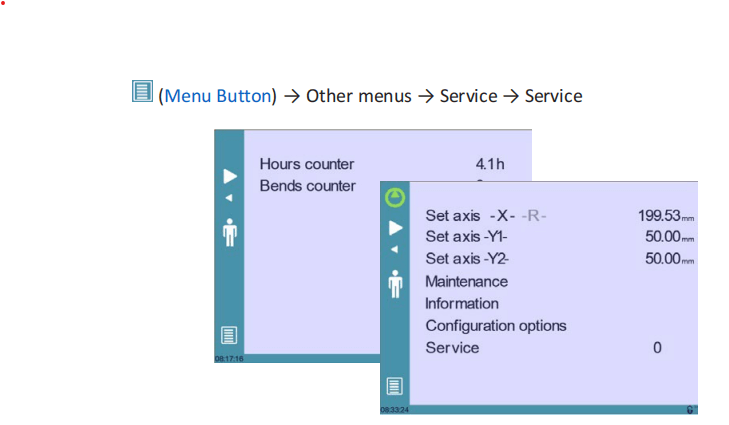
- Imposta asse
Consente all'operatore di regolare manualmente la posizione del registro posteriore (assi X e R) e della trave (assi Y1 e Y2).
2. Manutenzione
La pagina Manutenzione visualizza lo stato hardware del CybTouch e consente all'operatore di eseguire diverse azioni di manutenzione.
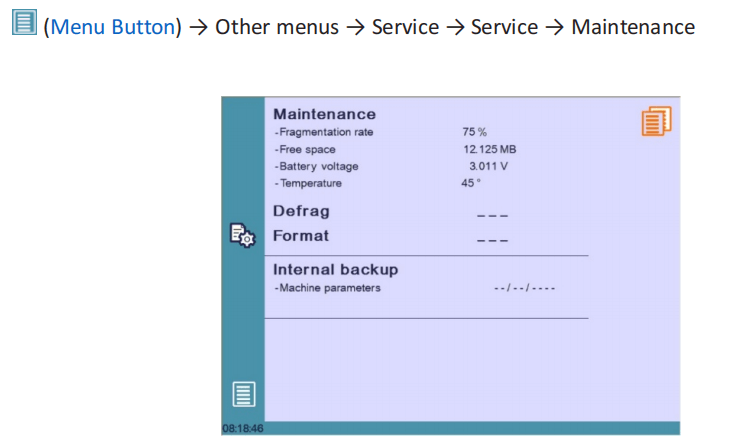
Tutte le seguenti azioni richiedono codici e devono essere eseguite solo da tecnici o su richiesta di un tecnico.
3. Informazioni
La pagina Informazioni mostra i nomi e le versioni del software installato sul CybTouch. Premendo il pulsante Avanzate vengono visualizzate informazioni più dettagliate.

4. Configurazione Opzioni

- Numero di serie
Essenziale per la configurazione, il numero di serie è collegato alle opzioni della macchina. Modificarlo potrebbe comportare la perdita delle opzioni installate. - ID del computer
Univoco per ogni unità, garantisce la corretta identificazione della macchina insieme al numero di serie. - Elenco delle opzioni
Un pop-up giallo mostra tutte le opzioni installate, aiutandoti a tenere traccia delle funzionalità disponibili. - Nuovo codice opzione
Inserisci un codice nel formato ABC-DEF-GHI-JKLM per aggiungere nuove opzioni. Consulta un tecnico o il produttore per assistenza.
Trasferimento USB

Per garantire trasferimenti di file fluidi con CYBELEC CybTouch 12, tenere a mente queste precauzioni:
- Compatibilità USB: Utilizzare chiavette USB di tipo "Memory stick". Sebbene le chiavette USB 3.0 compatibili con USB 2.0 di solito funzionino, i risultati possono variare. Evitare CD e HDD esterni.
- Risoluzione dei problemi: Se una chiavetta USB non è compatibile, sostituiscila con un'altra.
Suggerimenti per un trasferimento rapido:
- Chiave USB dedicata: Utilizzare una chiavetta USB dedicata ai trasferimenti di file CybTouch.
- Limita i file: Un numero inferiore di file velocizza il trasferimento.
- Limite di caratteri: Mantieni i percorsi dei file al di sotto dei 255 caratteri.
Seguendo questi passaggi, potrai iniziare a usare CYBELEC CybTouch 12 in modo efficace.
Domande frequenti (FAQ)
Quali sono i passaggi iniziali per configurare CYBELEC CybTouch 12 per una nuova pressa piegatrice?
Per prima cosa, installa il controllo CYBELEC CybTouch 12 sulla tua nuova pressa piegatrice. Accenditi il sistema ed esegui la configurazione iniziale, che include la calibrazione degli assi e l'impostazione dei protocolli di comunicazione. Assicurati di aver installato gli ultimi aggiornamenti software forniti dal produttore.
Come posso risolvere i problemi più comuni durante l'utilizzo di CYBELEC CybTouch 12?
In caso di problemi con CYBELEC CybTouch 12, controllare i collegamenti e assicurarsi che l'alimentazione sia costante. Consultare i codici di errore sul display e fare riferimento alla sezione relativa alla risoluzione dei problemi del manuale utente per soluzioni specifiche. Contattare l'assistenza clienti se il problema persiste.
Conclusione
Una corretta configurazione del CYBELEC CybTouch 12 è fondamentale per massimizzare l'efficienza e le prestazioni della vostra macchina. Seguendo i passaggi descritti, potrete garantire un funzionamento fluido ed efficace della vostra attrezzatura, riducendo al minimo il rischio di errori e tempi di fermo. Una manutenzione regolare e il rispetto delle best practice prolungheranno ulteriormente la longevità del vostro sistema.
Per un supporto più dettagliato o per qualsiasi domanda, non esitate a contattare il nostro team dedicato. Inoltre, non esitate a consultare la nostra documentazione per una guida completa su come ottimizzare le prestazioni del vostro computer.
Comprendendo queste sfumature, potrete utilizzare al meglio CYBELEC CybTouch 12 e ottimizzare le operazioni della vostra pressa piegatrice con il minimo disagio. Per istruzioni dettagliate e risorse aggiuntive, continuate a consultare la nostra documentazione o contattate il nostro team di supporto.


