


Padroneggiare la programmazione di piegatura ESA S630 può migliorare significativamente la precisione e l'efficienza dei tuoi progetti di lavorazione dei metalli. Se stavi cercando un modo per ottimizzare i tuoi processi di piegatura utilizzando questo potente strumento, sei nel posto giusto.
In questo articolo, vi guiderò attraverso tecniche e suggerimenti essenziali per sfruttare appieno il potenziale dell'ESA S630, garantendovi risultati precisi e affidabili ogni volta. Che vogliate affinare le vostre competenze o siate alle prime armi, questa guida offre gli spunti di cui avete bisogno.
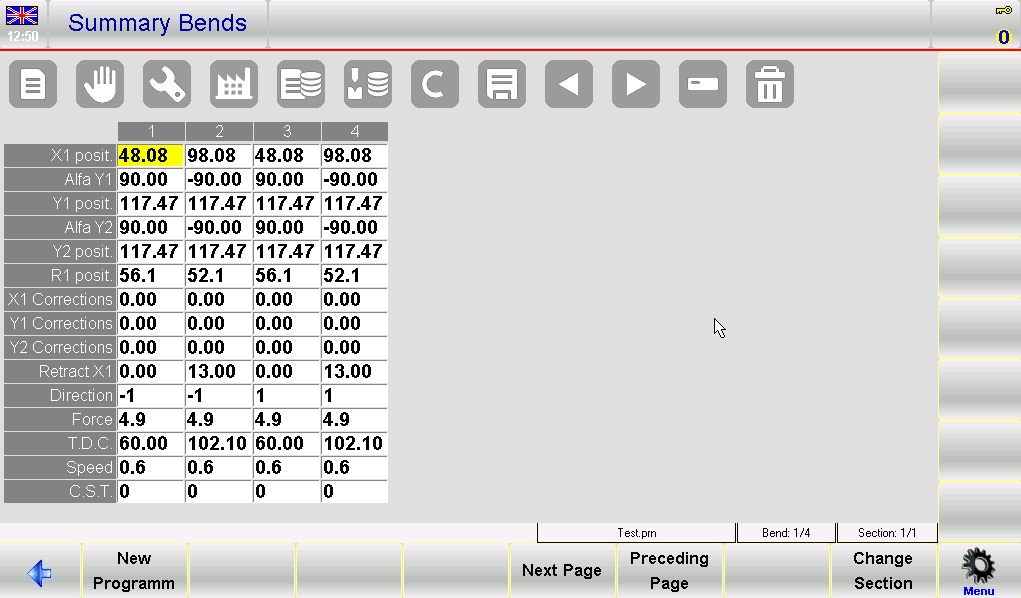
Navigazione nella pagina Riepilogo curve
La pagina Riepilogo piegature in ESA S630 Bend Management offre una visualizzazione semplificata di tutte le attività di piegatura all'interno di un programma, disposte in una tabella in cui ogni colonna rappresenta una piegatura e le righe visualizzano i dati associati.
Come entrare nella pagina di riepilogo della curva
Accedere a questa pagina è semplice: dalla pagina Editor, apri il menu, seleziona “10>> Riepilogo Bend", e ottieni informazioni immediate sui numeri di piegatura, descrizioni, selezioni correnti e dettagli del programma. Tasti di navigazione come [Nuovo programma], [Pagina successiva], [Pagina precedente], E [Cambia sezione] migliorare l'usabilità, consentendo una gestione e una modifica fluide del programma.
Come utilizzare la pagina di riepilogo della curva
L'utilizzo della pagina Riepilogo Curve è efficiente e intuitivo. È possibile spostare le selezioni con i pulsanti freccia, aggiungere nuove curve e visualizzarne altre scorrendo. È possibile modificare i valori toccando le celle, inserendo nuovi dati con la "tastiera software" e confermando con "Ok". [Cambia sezione] il tasto facilita le transizioni di sezione.
Come creare un nuovo programma
Creare un nuovo programma è altrettanto intuitivo. Premere il tasto [Nuovo programma] tasto, inserisci specifiche come larghezza del foglio, spessore, resistenza del materiale (calcolando automaticamente il materiale in base alla resistenza), specifiche di matrice e punzone ed eventuali commenti aggiuntivi. Conferma ogni input selezionando [OK].

Avviare il “X1 positivo" E "Alfa Y1" dati inseriti; gli altri dati di piegatura verranno calcolati automaticamente. Ricorda, se i dati predefiniti sono abilitati nella pagina Editor, i valori predefiniti verranno applicati automaticamente, passando attraverso la finestra di configurazione.
Salva la configurazione assegnando un nome al programma e confermando, assicurandoti un facile accesso per le operazioni future.
Configurazione dei parametri utente
La configurazione dei parametri utente sulla ESA S630 Bend Programming è essenziale per mantenere la precisione e ottimizzare le prestazioni della macchina. Accessibile tramite il menu delle impostazioni senza password, la pagina "Parametri utente" consente di apportare modifiche importanti.
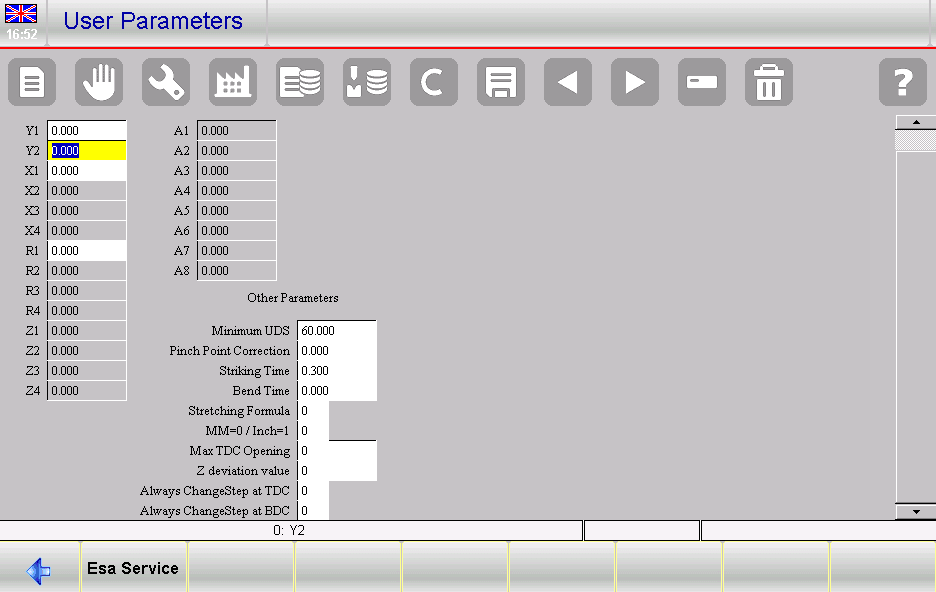
Apri il menu e seleziona la voce 4>> Parametri utente; si aprirà la seguente finestra:
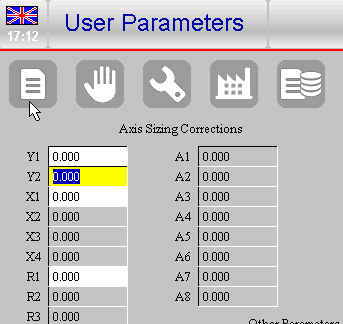
CORREZIONI AI parametri di RIFERIMENTO DELL'ASSE
Un aspetto cruciale è il parametro "CORREZIONI AL RIFERIMENTO ASSI", che consente di aggiornare i valori di riferimento degli assi configurati. Questo è particolarmente importante se la meccanica della pressa piegatrice inizia a deteriorarsi.
Ad esempio, i dati di fabbrica della macchina riguardanti i valori di riferimento degli assi del pistone sono 230,93 millimetri per Anno 1 E 230,09 millimetri per Anno 2.

Supponiamo che sia necessario apportare una correzione di -0,09 millimetri per Anno 1 E 0,1 millimetri per Anno 2: è necessario immettere i valori di correzione nel Anno 1 E Anno 2 campi del PARAMETRI UTENTE pagina, come nella figura 55.

I dati di fabbrica dei parametri dell'asse del pistone non vengono modificati, ma da ora, dopo aver effettuato la calibrazione dell'asse del pistone, Anno 1 verrà calibrato automaticamente a un valore di 230,84 millimetri E Anno 2 ad un valore di 230,19 millimetri.
Salvataggio dei parametri utente
Per salvare queste regolazioni, premere il pulsante Salva per memorizzarle in un file esterno denominato UserTara.par.
Reimpostazione delle correzioni
Se il costruttore della pressa decide di modificare i parametri di fabbrica dei valori di riferimento degli assi che hanno una correzione, ad esempio il Anno 1 asse, sul display apparirà il seguente messaggio, per avvisare della modifica:

La correzione relativa della pagina Parametri Utente verrà automaticamente reimpostata e il valore di riferimento tornerà ad essere quello dei parametri dell'asse ram:
Utilizzo della pagina Dati generali
La pagina "Dati generali" in ESA S630 è fondamentale per una programmazione precisa delle pieghe, consentendo regolazioni su tutte le pieghe o su pieghe specifiche in base a criteri come l'angolo Y1.
Come accedere alla pagina “Dati generali”
Per accedere a questa pagina, naviga dalla pagina Editor e seleziona la voce 8>> Dati generaliL'interfaccia rispecchia la pagina dell'Editor e utilizza indicatori colorati per le modifiche e i ricalcoli:
– i campi in cui l'utente ha modificato il valore vengono visualizzati con i colori invertiti

– i campi in cui il valore è stato modificato per effetto di un ricalcolo effettuato dal programma, avranno uno sfondo rosso

Le funzioni chiave includono la [Annulla correzione.] pulsante per annullare le modifiche, [Programma Ok] per applicare modifiche a tutte le curve del programma e opzioni specifiche della sezione come [Sezione Ok] E [Conf. Sec. Piegatura uguale] per modifiche mirate.

Come apportare correzioni al programma di piegatura
Per apportare correzioni, naviga da Redattore alla pagina Dati Generali, dove vedrai una replica dei dati di piegatura correnti, pronta per la modifica. Apporta le modifiche desiderate, che saranno evidenziate con un colore diverso per distinguerle dai campi non modificati. Ricorda, la pagina mostra una copia della piegatura; le modifiche qui non influiranno sul programma effettivo finché non confermi premendo uno dei pulsanti appropriati.
Come applicare le modifiche apportate solo alla sezione corrente
Per implementare modifiche specifiche su tutte le curve nella sezione corrente, utilizzare [Sezione Ok] Pulsante. Questo garantirà che tutte le modifiche evidenziate vengano applicate uniformemente e che i ricalcoli necessari vengano eseguiti automaticamente. Per le modifiche che devono essere applicate solo alle curve con lo stesso angolo di piega nella sezione corrente, premere il pulsante [Conf. Sec. Piegatura uguale] pulsante. Al termine, i campi torneranno ai loro colori originali, indicando che le modifiche sono state finalizzate.
Come annullare le modifiche apportate
Per annullare le modifiche apportate alla pagina dei dati generali premere il tasto [Annulla correzione.] pulsante.
Ricorda che le modifiche strutturali come l'aggiunta o l'eliminazione di curve richiedono il ritorno alla pagina dell'Editor. Questo processo semplificato contribuisce a migliorare la precisione e l'efficienza della programmazione delle curve.
Abilitazione della funzione macchina per la lavorazione dei metalli
Abilitare la funzione "Macchina per la lavorazione dei metalli" nella configurazione di programmazione della piegatura dell'ESA S630 è un passaggio fondamentale per migliorare l'efficienza nella lavorazione dei metalli. Ecco una guida completa su come abilitare questa funzione e sfruttare al meglio la funzione "Nuova piega".
Come abilitare la funzione “Macchina per la lavorazione dei metalli”
Per iniziare a utilizzare le funzionalità della "Macchina per la lavorazione dei metalli", seguire questi passaggi:
- Vai al Redattore pagina e premere il tasto per aprire il menu.
- Seleziona la voce di menu 2>> Configurazione per accedere alla pagina di Configurazione.
- Scegliere 6>> Parametri della macchina dalla lista.
- Inserisci la password richiesta e conferma premendo [OK].
- Premere Parametri 2 per procedere.
- Nel gruppo di parametri Funzioni ausiliarie, immettere il valore 1 nel Macchina per la lavorazione dei metalli campo.
Una volta completati questi passaggi, le funzioni "Nuova piega" e "Piegatura olandese forzata" saranno attivate nell'interfaccia di programmazione della piegatura ESA S630, consentendo operazioni di piegatura più efficienti.
Funzione “Nuova curva”
La funzione "Nuova piega" è preziosa per gestire in modo efficiente le operazioni di piegatura ripetitive all'interno della programmazione di piegatura ESA S630. Questa funzionalità è particolarmente utile quando è necessario mantenere la coerenza tra più piegature. È operativa nei seguenti scenari:
- Funzione di piega successiva: Premere il pulsante mentre ci si trova sull'ultima curva della sezione per aggiungere una nuova curva alla fine. Questa nuova curva includerà gli stessi dati della precedente.
- Inserisci funzione passo: Selezionando il Inserisci il passaggio voce dal menu, è possibile aggiungere una nuova piega nella posizione corrente, replicando i dati della piega precedente.
Per le operazioni tradizionali, il [Nuovo passo] Il pulsante crea curve con solo dati generali.
Inoltre, la funzione di forzatura della piegatura olandese semplifica la creazione di una piegatura olandese impostando il campo Angolo Y1 su 0, garantendo versatilità nelle attività di lavorazione dei metalli.
Domande frequenti (FAQ)
Che cos'è la funzionalità "New Bend" nella programmazione Bend di ESA S630 e come può aiutarmi?
La funzionalità "Nuova piega" consente di creare piegature che riprendono i dati delle operazioni precedenti. Questa funzionalità è particolarmente utile per garantire coerenza ed efficienza nelle attività ripetitive. Utilizzando questa funzionalità, è possibile aggiungere rapidamente nuove piegature con i dati esistenti, risparmiando tempo e riducendo gli errori.
Come posso garantire angoli di piegatura precisi nella programmazione di piegatura ESA S630?
Per angoli di piegatura precisi, assicurati che la macchina sia correttamente calibrata. Utilizza la funzione "Prossima piega" per aggiungere nuove piegature senza soluzione di continuità, garantendo la massima continuità dei dati. Inoltre, controlla attentamente il campo "Angolo Y1" per la piegatura olandese per mantenere l'uniformità in tutte le operazioni.
Cosa devo fare se creo accidentalmente delle pieghe indesiderate nella programmazione delle pieghe ESA S630?
Se ti accorgi di aggiungere curve involontariamente a causa di errori nella funzione "Prossima curva", usa il pulsante di scorrimento invece di premere ripetutamente il pulsante "Prossima curva" alla fine di una sezione. Questo eviterà di aggiungere curve non necessarie.
Conclusione
Padroneggiare Programmazione della curvatura ESA S630 può migliorare significativamente la precisione e l'efficienza delle vostre operazioni di lavorazione dei metalli. I passaggi chiave includono l'abilitazione della funzione "Macchina per la lavorazione dei metalli" per sbloccare funzionalità avanzate come "Nuova piega" e "Piegatura olandese forzata". Con questi strumenti, è possibile semplificare le operazioni di piegatura ripetitive e mantenere la coerenza dei dati.
Per ulteriore assistenza o richieste più dettagliate, vi invitiamo a contattare il nostro team di supporto HARSLE. Inoltre, vi invitiamo a esplorare le nostre risorse complete e la documentazione correlata per sfruttare appieno le funzionalità di ESA S630 Bend Programming. Il vostro viaggio verso l'efficienza avanzata nella lavorazione dei metalli inizia qui.


