


Padroneggiare la programmazione di piegatura con ESA S860 può sembrare inizialmente scoraggiante, ma con la giusta guida, ne sfrutterai appieno il potenziale per la piegatura di precisione dei metalli. Se stai cercando un approccio chiaro e passo dopo passo per padroneggiare la programmazione di piegatura con ESA S860, sei nel posto giusto.
In questo articolo, ti guiderò attraverso le tecniche essenziali, i suggerimenti e le best practice per aiutarti a programmare e ottimizzare con sicurezza le curve utilizzando il sistema ESA S860. Che tu sia un principiante che desidera iniziare o un operatore esperto che desidera affinare le proprie competenze, questa guida ti fornirà le conoscenze necessarie per eccellere nella programmazione delle curve con ESA S860.
Programmazione e gestione della curvatura
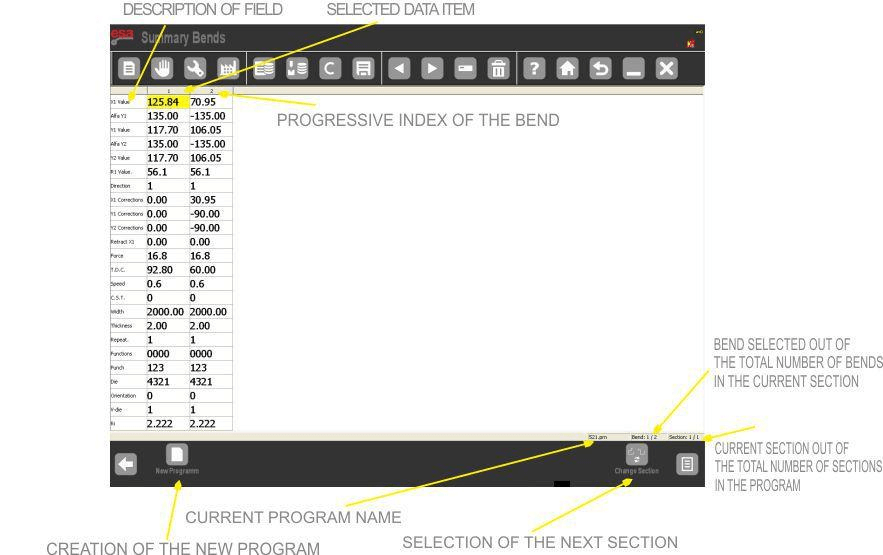
La maschera di riepilogo delle pieghe in ESA S860 Bend Programming fornisce una panoramica completa di tutte le pieghe nel programma corrente. Organizzata in un formato tabellare intuitivo (simile all'interfaccia grafica di TRIA), questa maschera consente di rivedere e modificare i dati di piegatura in modo efficiente.
Come accedere alla maschera Riepilogo piegatura
Per aprire il Maschera di riepilogo piega In Programmazione di piegatura ESA S860, segui questi passaggi:
- Dal Maschera delle impostazioni, premere il tasto Tasto Menu.
- Selezionare Riepilogo di Bend (8) per aprire la tabella.
Caratteristiche principali della maschera di riepilogo delle pieghe
- Ogni colonna rappresenta una curva nel programma, etichettata con un numero progressivo.
- IL prima colonna visualizza la descrizione di ciascun valore.
- IL valore selezionato è evidenziato in giallo per facilitarne l'identificazione.
- Visualizza il nome del programma, curva selezionata, E sezione corrente.
- Include tasti funzione:
- [Nuovo programma] – Crea un nuovo programma.
- [Cambia sezione] – Salta alla prima curva nella sezione successiva.
Come utilizzare la maschera Riepilogo piegatura
Navigare in modo efficiente nell'interfaccia di programmazione delle pieghe dell'ESA S860 è fondamentale per ottimizzare il flusso di lavoro. Ecco come utilizzare la maschera di riepilogo delle pieghe per spostare le selezioni, modificare i valori e cambiare sezione senza problemi.
Spostamento della selezione
Per spostarti tra le curve del tuo programma:
- Premere ◄ E ► tasti per spostare la selezione.
- Se premi ► mentre all'ultima curva verrà automaticamente aggiunta una nuova curva alla coda.
- Utilizzare la funzione touch (sui modelli ESA S860 Touch/S660W) per passare alla prima/ultima curva o cambiare lato della curva selezionata.
Nota:
- Se le colonne superano la larghezza dello schermo, è possibile visualizzare le curve nascoste scorrendo verso destra e spostando le colonne verso sinistra.
- Se le righe si estendono oltre lo schermo, scorrere verso l'alto o verso il basso per spostarsi tra di esse.
Modifica dei valori
Per modificare un valore nella programmazione di piegatura ESA S860:
- Selezionare la cella desiderata.
- Inserisci il nuovo valore.
- Premere ENTRA (tastiera software su S860 Touch/S660W): la selezione si sposterà automaticamente verso il basso.
Modifica delle sezioni
- Premere [Cambia sezione] per saltare alla prima curva del tratto successivo.
- Se nell'ultima sezione, premendo [Cambia sezione] aggiungerà una nuova sezione al programma.
Come creare un nuovo programma
Creare un nuovo programma di piegatura in ESA S860 Bend Programming è un processo semplice. Segui questi passaggi per impostare il programma in modo efficiente:
Guida passo passo:
- Avvia un nuovo programma
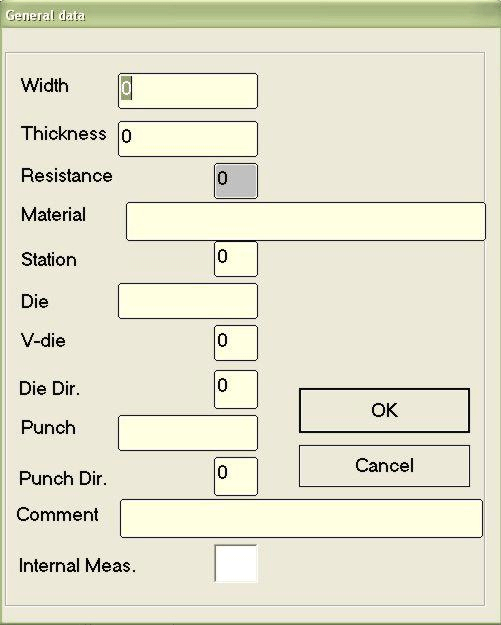
- Premere il tasto [Nuovo programma] chiave per aprire il Dati generali finestra.
- Inserisci le specifiche del foglio
- Larghezza del foglio: Inserire la larghezza della lamiera.
- Spessore del foglio: Definisce lo spessore del materiale.
- Resistenza del materiale: Seleziona in base al tipo di materiale:
- Alluminio: 0–30
- Lamiera: 31–50 (ideale: 42)
- Acciaio inossidabile: >50
(Nota: la resistenza viene calcolata automaticamente.)
- Seleziona utensili
- Morire: Scegli un dado predefinito (deve essere disegnato prima).
- Cavità: Inserire il numero della cavità dello stampo (utilizzare 1 se cavità singola).
- Punch: Seleziona un punzone predefinito (deve essere disegnato prima).
- Conferma e procedi
- Premere [Confermare] (O ENTRA su modelli touch come S860 Touch).
- Inserisci i dettagli della curva
- Il cursore si sposta su Alfa Y1—inserire i parametri di piegatura rimanenti.
- Salva il programma
- Assegna un nome al tuo programma, quindi conferma con [Confermare] (O ENTRA sui modelli touch).
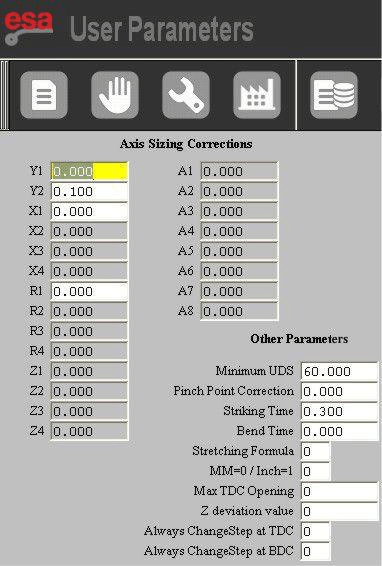
Utilizzo della maschera “Parametri utente”
Il sistema di programmazione Bend ESA S860 include un “Parametri utente” Maschera progettata per la comodità dell'operatore, salvaguardando al contempo le impostazioni critiche della macchina. Questa funzionalità, senza password, consente agli utenti finali di regolare parametri personalizzabili senza accedere alle configurazioni principali della macchina.
Come accedere ai parametri utente nella programmazione Bend ESA S860:
- Dal Impostazioni maschera, premere il tasto designato per aprire il menu.
- Selezionare “Parametri utente” (4) per aprire la finestra di configurazione.
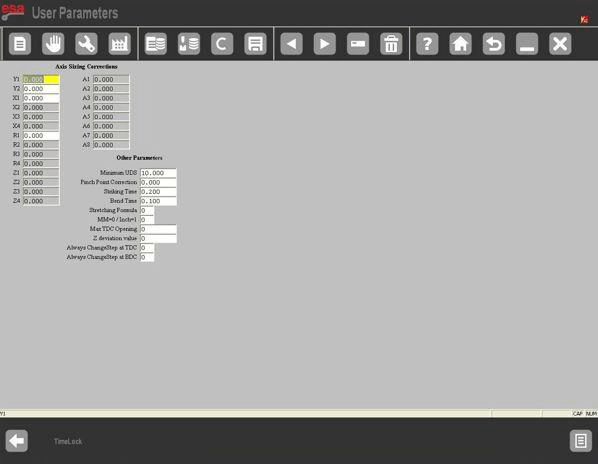
CORREZIONI A CALIBRAZIONE DELL'ASSE parametri
Quando si lavora con ESA S860 Bend Programming, potrebbe essere necessario regolare i parametri di calibrazione degli assi a causa dell'usura meccanica o del deterioramento della pressa piegatrice. Il sistema consente di modificare l'altezza di ripristino rispetto alle impostazioni di fabbrica per mantenere la precisione.

Per esempio:
- Le altezze di ripristino di fabbrica potrebbero essere 230,93 millimetri (Y1) E 230,09 millimetri (Y2).
- Se le correzioni di -0,09 millimetri (Y1) E +0,1 millimetri (Y2) sono necessari, immettere questi valori nel PARAMETRI UTENTE maschera.

Note chiave:
- I dati di fabbrica rimangono invariati, ma dopo la calibrazione:
- Anno 1 verrà ripristinato a 230,84 millimetri
- Anno 2 verrà ripristinato a 230,19 millimetri
- Salvare le regolazioni premendo il tasto salva (memorizzato in UserTara.par).
Reimpostazione delle correzioni
Se il produttore aggiorna i parametri di fabbrica, il sistema:
- Visualizza una notifica.
- Ripristina automaticamente le correzioni, ripristinando l'altezza originale dell'asse del pistone.
Padroneggiando queste tecniche di calibrazione nella programmazione di piegatura ESA S860, si garantisce una precisione costante nelle operazioni di piegatura.
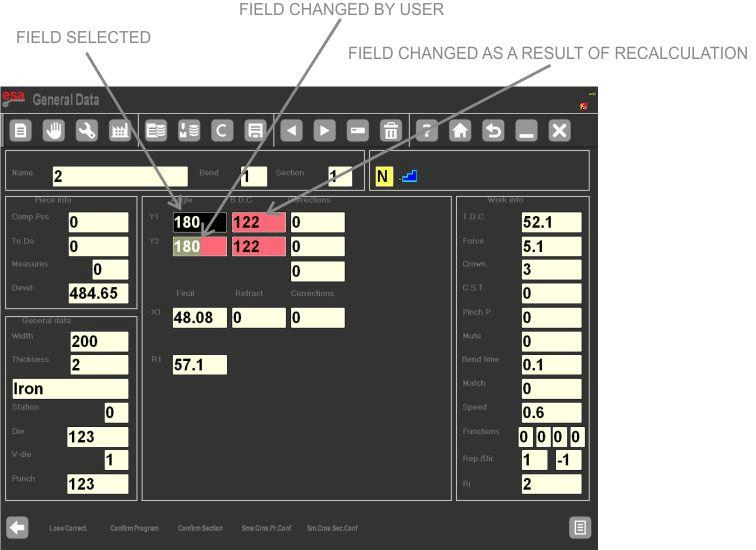
Modifica dei dati generali
IL “Dati generali” La funzionalità di Bend Programming di ESA S860 consente di modificare in modo efficiente le pieghe e di applicare le modifiche all'intero programma. Ecco come funziona:
Dopo aver regolato una curva, puoi aggiornare immediatamente:
- Tutte le curve in una sezione con angoli Y1 corrispondenti – Ottimizza sezioni specifiche mantenendo l'uniformità dell'angolo.
- Tutte le curve nel programma – Applicare le modifiche in modo universale per coerenza.
- Tutte le curve nella sezione – Modifica solo i segmenti selezionati del tuo programma.
- Tutte le curve con angoli Y1 corrispondenti – Sincronizza automaticamente le regolazioni per angoli di piega identici.
Come accedere alla nuova maschera “Dati Generali”
Per accedere al Dati generali maschera in ESA S860 Bend Programming, segui questi semplici passaggi:
- Dal Impostazioni maschera, premere il tasto menu.
- Selezionare Dati generali (6) per aprire la maschera.
Caratteristiche principali della maschera dati generale:
[Conf. Stessa Sez. Ang.] – Applica modifiche alle curve con stesso angolo Y1 (solo sezione corrente).
Campi modificati: I valori modificati dall'utente vengono visualizzati con colori invertiti.
Campi ricalcolati automaticamente: I valori aggiornati dal programma vengono visualizzati con un sfondo rosso.
Pulsanti di azione:
[Ignora Corr.] – Ignora le modifiche temporanee.
[Conferma programma] – Applica modifiche a tutte le curve nel programma.
[Conferma sezione] – Applica le modifiche solo alle curve nel sezione corrente.
[Conf. Stesso Pr. Ang.] – Applica modifiche alle curve con stesso angolo Y1 (intero programma).
Come apportare correzioni al programma di piegatura
Il sistema di programmazione delle pieghe ESA S860 consente di modificare i dati di piegatura in modo efficiente. Ecco come effettuare le regolazioni:
Modifica dei dati di piegatura
- Apri il Maschera dati generale—visualizza gli stessi parametri della curva attiva.
- Modifica i valori richiesti. I campi modificati saranno evidenziati con un colore diverso per facilitarne l'identificazione.
- Nota: La curva visualizzata è una copia, non la curva del programma attivo. Le modifiche saranno applicate solo dopo la conferma.
Applicazione delle modifiche
- [Conferma sezione]: Aggiorna tutte le curve nella sezione corrente con i valori modificati.
- [Conf. Stessa Sez. Ang.]: Applica le modifiche solo alle curve con angoli corrispondenti nella sezione.
- Dopo la conferma, i campi tornano ai colori predefiniti.
Annullamento delle modifiche
Premere [Ignora correzioni] per ignorare tutte le modifiche senza salvare.
Navigazione e limitazioni
- Utilizzo ◄ E ► frecce o inserisci manualmente Curva E Sezione numeri per navigare.
- Nota: Non puoi aggiungere o eliminare curve qui: torna a Maschera delle impostazioni per quelle azioni.
Domande frequenti (FAQ)
Quali sono gli errori più comuni a cui dovrei fare attenzione quando utilizzo la programmazione Bend di ESA S860?
Alcuni errori comuni includono la selezione errata dell'utensile e il posizionamento improprio del materiale. Assicuratevi di verificare sempre le impostazioni e di utilizzare la funzione di simulazione del programma per identificare eventuali problemi prima della piegatura effettiva. Questo garantirà un'esperienza di programmazione della piegatura fluida con ESA S860.
Posso integrare ESA S860 Bend Programming con altri sistemi?
Sì, ESA S860 Bend Programming è estremamente versatile e può essere integrato con diversi sistemi CAD/CAM. Questa integrazione semplifica l'intero processo di piegatura importando i dati direttamente dal software di progettazione, consentendo operazioni di piegatura più efficienti e precise.
Cosa devo fare se il sistema non risponde durante il funzionamento?
Se il sistema di programmazione Bend ESA S860 non risponde, riavviare il sistema e verificare la presenza di aggiornamenti software. Assicurarsi che tutti i cavi e le connessioni siano ben saldi. Se i problemi persistono, contattare l'assistenza tecnica per la risoluzione dei problemi specifici del sistema di programmazione Bend ESA S860.
Conclusione
Per padroneggiare la programmazione di piegatura con ESA S860 è necessario comprendere i passaggi cruciali trattati in questa guida. Tra i punti chiave rientrano la familiarizzazione con l'interfaccia, l'ottimizzazione della selezione degli utensili e la garanzia di una calibrazione precisa. Seguendo questi passaggi, è possibile migliorare l'efficienza della programmazione e la produttività complessiva.
Per chi fosse interessato ad approfondire la programmazione Bend di ESA S860 o desiderasse un supporto personalizzato, vi invitiamo a contattare i nostri esperti. Potete anche visitare il nostro sito web per accedere a ulteriori risorse o leggere la documentazione correlata per approfondire le vostre conoscenze. Non esitate a contattarci per consigli e indicazioni personalizzati!


