


Quando se trata de dominar a usinagem CNC com precisão e eficiência, a Programação de Produtos DELEM DA-66S se destaca como uma habilidade essencial para operadores. Se você quer entender como editar programas neste sistema, você veio ao lugar certo.
Editando programas com eficiência na Programação de Produtos DELEM DA-66S, você pode aumentar a produtividade e garantir a precisão em cada dobra e corte. Neste guia, estou aqui para guiá-lo pelas etapas necessárias para iniciar, modificar e otimizar seus esforços de programação usando a interface DELEM DA-66S, garantindo que você obtenha o máximo de suas operações CNC.
Veja como você pode gerenciar e editar eficientemente seus programas CNC para obter o desempenho ideal.
Introdução

Editar programas CNC pode ser desafiador. No entanto, dominar a programação de produtos do DELEM DA-66S pode parecer desafiador à primeira vista. Felizmente, entender como editar programas no DELEM DA-66S pode otimizar seu fluxo de trabalho e aumentar a precisão da sua produção.

Para editar programas CNC de forma eficaz com a Programação de Produto DELEM DA-66S, siga estas etapas simplificadas para um processo otimizado:
- Selecione o modo de programa
Para um programa CNC existente, selecione o produto desejado na visão geral de Produtos e clique no botão "Programa". Se estiver iniciando um novo programa, selecione "Novo Programa", insira as principais propriedades do produto e a configuração da ferramenta, e o sistema alternará automaticamente para o modo Programa. - Acesse a tela de programação
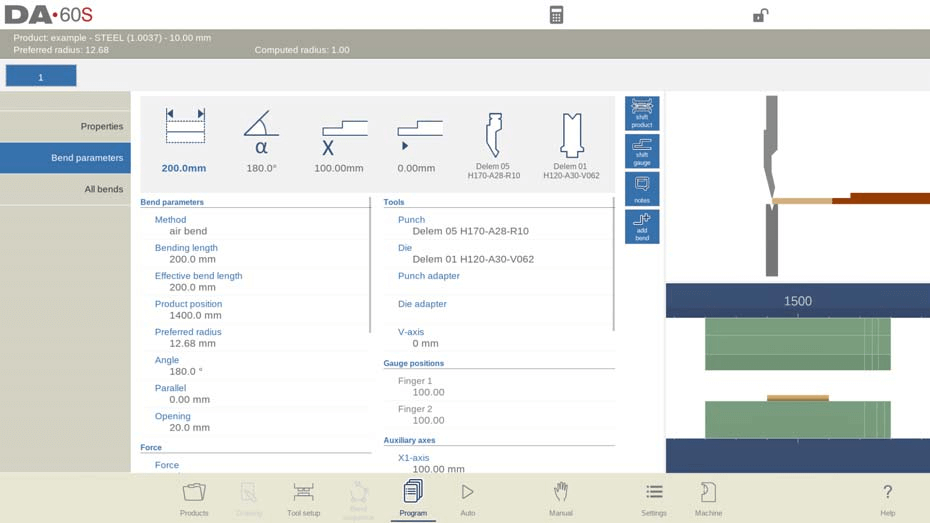
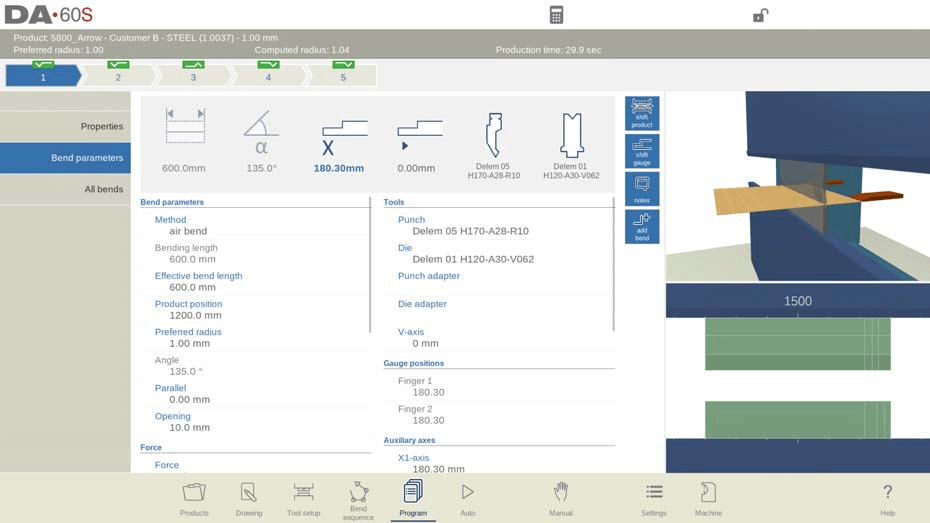
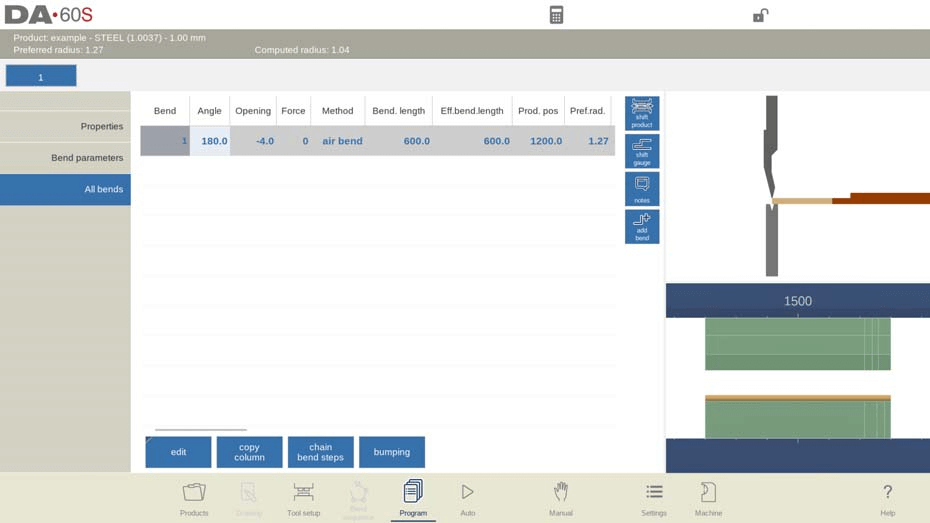
Ao editar um programa existente ou iniciar um novo, você verá uma tela de programa numérico. Esta tela exibe a dobra atual ou a primeira dobra para novos programas, juntamente com uma representação gráfica da estação de ferramentas. - Navegar pelas curvas
Use o seletor de dobras na parte superior para navegar pelas diferentes dobras. Basta tocar nas dobras indicadas para selecionar e modificar os dados de dobra desejados. - Modificar parâmetros do programa
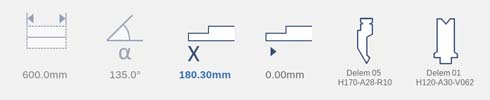
Acima dos dados numéricos, você verá ícones grandes (blocos) exibindo os parâmetros mais usados. Selecione esses blocos para modificações rápidas. Você também pode encontrar esses valores entre todos os outros parâmetros numéricos do programa para a programação do produto DELEM DA-66S.
Seguindo essas etapas, você pode editar seus programas com eficiência, aumentando a precisão e a produtividade de suas operações CNC com a Programação de Produto DELEM DA-66S.
Ao lado das informações numéricas, as visualizações e funções são indicadas com botões de comando.
Funções:
Os seguintes modos/funções estão disponíveis:

Dados principais de curvatura numéricos que podem ser combinados, mediante escolha, com informações gráficas / exibidos simultaneamente (se disponíveis).
Todas as curvas mostram todos os dados de curvatura em uma tabela, mediante escolha, simultaneamente com informações gráficas da curvatura selecionada (se disponível).

Propriedades do produto: dá acesso às propriedades do produto que são gerais para o produto, não específicas da dobra.

Deslocamento de produto, permite o posicionamento do produto em relação às posições das ferramentas.

O Shift Gauge permite o reposicionamento dos dedos do batente traseiro. Dependendo do tipo de produto e do software opcional do assistente de medição, ele pode oferecer o assistente gráfico de medição para encontrar posições alternativas do medidor.

Notas: abre uma janela que permite visualizar e editar notas sobre o produto atual ou dobra específica. Essas notas ficam disponíveis durante a produção.

Adicionar Curvatura, adiciona uma nova curvatura ao programa existente.
Agora, vamos nos aprofundar em cada etapa do processo.
Modo de programa, explicação de parâmetros
Navegar até o modo correto é o primeiro passo na edição de programas no DELEM DA-66S.
A tela principal mostra as dobras disponíveis e, a partir desta tela principal, de cada dobra disponível, parâmetros específicos podem ser visualizados e editados.
O ID do produto e a descrição do produto são exibidos na linha superior da tela.
No caso de um produto gráfico, informações gráficas também podem ser exibidas.
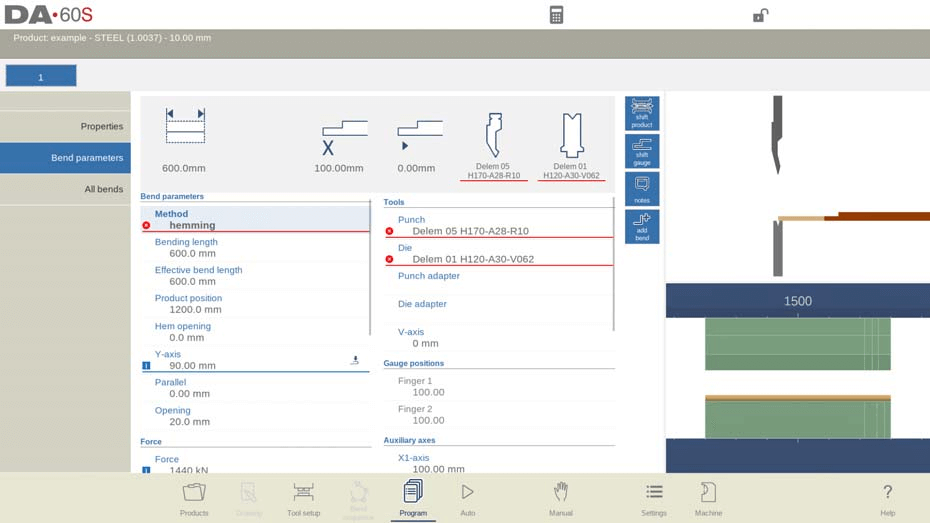
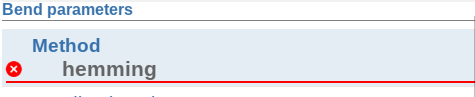
Parâmetros de curvatura
Método:
Selecione o método de dobra desejado. O controle suporta os seguintes métodos padrão:
• curva de ar
• fundo
• bainha
• bainha e bainha
• manuseio
Métodos de dobra:
curva de ar

A chapa é dobrada no ângulo programado, levando o punção até a profundidade necessária. O controle calcula a posição necessária no eixo Y para obter o ângulo programado.
fundo

A chapa é dobrada pressionando-a entre o punção e a matriz. O controle assume a posição inferior da matriz conforme necessário no eixo Y.
bainha
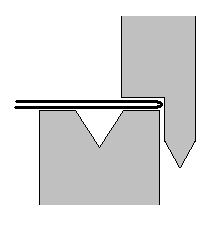
A folha é dobrada em duas. Isso é possível após a folha ter sido dobrada em um ângulo agudo em uma dobra anterior. O controle calcula a posição precisa no eixo Y para esta ação: a superfície da matriz mais o dobro da espessura da folha. O posicionamento no eixo Y pode ser ajustado programando uma "abertura de bainha".
bainha e bainha
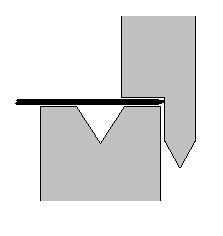
O mesmo que bainha, mas agora o controle assume a parte superior da matriz conforme a posição necessária no eixo Y. A folha dobrada é pressionada entre o punção e a matriz.
manuseio
Sem movimento do eixo Y, o que significa que a etapa atual do programa se torna uma etapa sem dobra. Somente os eixos do batente traseiro serão posicionados de acordo com os valores programados, por exemplo, para permitir o manuseio do produto. É necessária uma mudança de etapa externa (entrada C).
Nota 1
As dobras da bainha são mostradas aqui com um socador de bainha especial, mas isso não é necessário.
Nota 2
Quando a operação de base é selecionada, a posição final da curvatura da viga do eixo Y depende
na força de trabalho. Se, no entanto, a força for suficiente para que a viga vá até o ponto calculado
Posição final da curvatura do eixo Y, o curso do feixe será limitado pelo valor da posição.
Método de deflexão
dinâmico =>O coroamento será controlado automaticamente em tempo real durante a dobra, aplicando as correções adequadas quando necessário. não dinâmico =>O coroamento se comportará como um coroamento hidráulico padrão; não haverá correções em tempo real.
Comprimento de curvatura
Comprimento da folha entre ferramentas.
Comprimento efetivo da curvatura
O comprimento efetivo da chapa entre as ferramentas, que é usado para o cálculo da força e do dispositivo de coroamento (se presente). Este comprimento efetivo de dobra é calculado a partir da geometria do produto; para dobras adicionais e simultâneas, este valor calculado é a soma dos comprimentos das linhas de dobra individuais.
Posição do produto
O valor absoluto da posição do produto na direção Z. O lado esquerdo da máquina é a posição de referência zero.
Raio preferido
O raio pretendido que está programado. Como valor inicial, a espessura programada do produto é usada para o cálculo do raio padrão. Este raio também pode ser um raio maior, exigindo ferramentas de raio grande.
Ângulo
O ângulo necessário para esta dobra. Este parâmetro só aparece se a programação de ângulo for selecionada com o parâmetro "Seleção de ângulo" e o método de dobra for uma dobra pneumática.
Abertura da bainha
A dobra da bainha pode ser feita com uma certa distância de abertura entre os dois flanges. O valor da abertura da bainha será usado para calcular a posição da viga no processo de bainha. Por padrão, este parâmetro tem o valor do parâmetro "Abertura Padrão da Bainha" do modo Configurações.
Bainha rápida
Quando a bainha rápida estiver habilitada, o eixo Y se moverá em alta velocidade para baixo assim que estiver abaixo do topo da matriz, até que a abertura de carga da bainha seja atingida. Isso reduzirá o tempo do ciclo, especialmente no caso de bainha com uma matriz em U. Disponível somente quando habilitado pelo fabricante da máquina.
Eixo Y (posição de curvatura)
A posição necessária do eixo Y para esta dobra. Este parâmetro só aparece se a programação absoluta for selecionada com o parâmetro "Seleção de ângulo". Este parâmetro também aparece se o método de dobra for base e/ou bainha.
Mudo
Ponto de sequência em que o eixo Y é alternado da velocidade de fechamento rápido para a velocidade de prensagem. O valor programado aqui é a distância do ponto de silenciamento acima da chapa. Por padrão, é utilizado o valor de silenciamento da matriz programada. A presença ou não deste parâmetro depende das configurações da máquina.
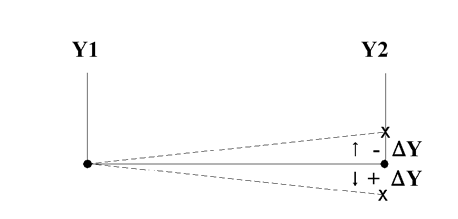
Paralelo
Diferença entre os cilindros esquerdo e direito (Y1 e Y2). Quando positivo, lado direito mais baixo. Quando negativo, lado direito mais alto. O valor programado está ativo abaixo do ponto de fixação.
Abertura
Este parâmetro resulta em uma certa abertura de folga entre o punção e a matriz após a dobra. Um valor positivo é a abertura de folga acima de Mute, um valor negativo abaixo de Mute. Quando você quiser limitar o tempo de manuseio do produto, pode programar um pequeno valor positivo ou negativo.
Vigor
Vigor
Força máxima ajustada durante a prensagem (calculada automaticamente).
Tempo de permanência
Tempo de retenção do punção no ponto de flexão.
Descompressão
Distância de descompressão após a flexão para liberar a pressão de trabalho do sistema. A distância de descompressão pode ser definida opcionalmente para um ponto específico no ciclo. A distância de descompressão é calculada como padrão, sendo o valor mínimo necessário. Opcionalmente, pode-se escolher entre "Mudo", o ponto de silenciamento calculado, ou "Grampo", o ponto de fixação calculado. Ambas as opções têm uma distância maior que a calculada.
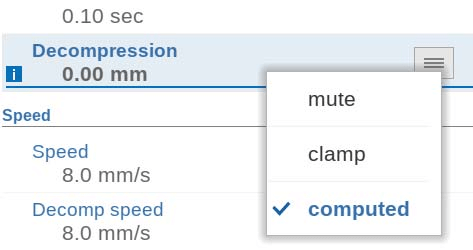
Velocidade
Velocidade
Velocidade de trabalho (velocidade de prensagem). Inicialmente, o valor deste parâmetro é copiado do parâmetro Velocidade de Prensagem Padrão no modo Configurações.
Velocidade de decomposição
A velocidade de descompressão é a velocidade programável do feixe durante a distância de descompressão.
Funções
Configurações de repetição
Na programação do produto DELEM DA-66S, você pode controlar a frequência com que uma dobra é realizada. Definir a repetição como 0 ignora a dobra. Defina entre 1 e 99 para dobras repetidas.
Aguarde a retirada
Determine se o eixo Y deve esperar durante uma retração.
- Não: O eixo Y continua além do ponto de fixação sem parar.
- Sim: O eixo Y para no ponto de fixação até que a retração esteja completa antes de avançar.
Configurações de código
Códigos de mudança de etapa programáveis determinam quando novos parâmetros entram em vigor:
- ER: Alterações no final da descompressão.
- MUDO: Alterações na posição de silenciamento durante a abertura do feixe.
- UDP: Alterações no ponto morto superior.
- PARADA UDP: Alterações no ponto morto superior, interrompendo todos os movimentos.
- EXTERNO: Alterações na ativação do sinal de entrada C, sem movimento do feixe.
- UDP EXTERNO: Alterações com sinal de entrada C no ponto morto superior, permitindo movimento de feixe e retração.
- UDP PST: Alterações no ponto morto superior quando os suportes das peças retornam a zero, aplicável se o suporte das peças estiver presente.
Tempo de atraso
O tempo de atraso define quanto tempo esperar antes de uma mudança de etapa, variando de 0 a 30 segundos.
Ao dominar essas configurações, você otimizará a programação do produto DELEM DA-66S para precisão e eficiência.
Ferramentas
Na programação do produto DELEM DA-66S, o gerenciamento eficiente das ferramentas é crucial para a precisão nas operações de dobra. Aqui está um guia simplificado:
- Acesse o menu de configuração da ferramenta
Navegue até o menu Configuração de ferramentas na programação do produto DELEM DA-66S para visualizar e modificar o conjunto atual de ferramentas. - Selecione ferramentas para cada dobra
Se forem necessárias ferramentas específicas para dobras individuais, você pode selecioná-las adequadamente na programação do produto DELEM DA-66S. - Modificar detalhes do soco
- Soco: Toque para alterar o soco selecionado ou escolha um novo na biblioteca de socos.
- Modificar detalhes da matriz
- Morrer: Toque para alterar o dado selecionado ou escolher um novo na biblioteca de dados.
- Seleção do adaptador de perfuração
- Adaptador de perfuração: Modifique ou selecione na biblioteca de adaptadores de punção. A programação de um adaptador depende da configuração "Usar adaptador de punção" no modo Máquina.
- Seleção de adaptador de matriz
- Adaptador de matriz: Modifique ou selecione na biblioteca de adaptadores de matriz. Isso também depende da configuração "Usar adaptador de matriz" no modo Máquina.
- Visão geral das ferramentas de alteração
Pressione o botão "Alterar Ferramentas" para acessar uma visão geral de todas as ferramentas disponíveis na biblioteca. Utilize a função "Orientação" para alterar a orientação da ferramenta, se necessário.
Posições do medidor
Dedo (1/2/3/4)
A posição do dedo (contato), correspondente à posição do eixo X e à posição de repouso.
Eixos auxiliares
Eixo auxiliar
A posição do eixo selecionado.
Retrair
Distância de retração do eixo selecionado na dobra atual. A "retração do batente traseiro" é iniciada quando a viga está pinçando a chapa.
Velocidade
Velocidade do eixo selecionado na dobra atual. A velocidade pode ser programada em porcentagem da velocidade máxima possível.
Suporte de peças
Configurações eficientes de suporte de peças na programação do produto DELEM DA-66S aumentam a precisão nas operações de dobra. Siga estas etapas para configuração:
- Alternar suporte de peças (eixo PST)
- Ligado/Desligado: Selecione para ativar ou desativar o suporte de peças. Quando desativado, ele permanece na posição zero durante a curvatura.
- Definir posição R
- Configuração de altura: Ajuste a altura do suporte da peça antes e depois da dobra. O padrão é na parte superior da matriz (0,00 mm), habilitado pelo fabricante da máquina.
- Seleção de Método
- Retorno na UDP: O suporte parcial retorna quando o eixo Y atinge o ponto morto superior.
- Devolução ao abrir: Retorna durante a abertura do eixo Y.
- Inclinação do produto: Adiciona inclinação para evitar colisões, ajustando a altura do suporte com base na localização.
- Suporte de ângulo estático: Fixa o suporte da peça em um ângulo estático, atuando como uma mesa de apoio.
- Opções de inclinação do produto
- Ângulo de inclinação: Ajusta o ângulo do movimento do suporte parcial; o suporte frontal se move para cima, o suporte traseiro para baixo.
- Velocidade de inclinação: Defina a velocidade para atingir o ângulo de inclinação, como uma porcentagem da velocidade máxima.
- Folga de inclinação: Distância adicional para movimento de inclinação além da distância de descompressão programada.
- Opções de suporte de ângulo estático
- Ângulo: Define o ângulo estático antes do início da dobra.
- Velocidade: Velocidade para atingir esse ângulo estático, definida como uma porcentagem da velocidade máxima.
- Ângulos de retorno e iniciais
- Velocidade de retorno: Determina a velocidade de retorno pós-curvatura, como uma porcentagem da velocidade máxima.
- Ângulo de parada de segurança: Ângulo para pausar o movimento de retorno por segurança; requer reinicialização manual.
- Ângulo inicial: Ângulo para configuração de pré-curvatura, válido para apoios na parte frontal da máquina.
- Velocidade angular inicial: Velocidade para atingir o ângulo inicial para apoios frontais.
Implemente essas configurações na programação do produto DELEM DA-66S para otimizar o suporte de peças e garantir operações de dobra suaves e precisas.
Modos de edição/visualização
Todas as curvas
Gerenciar sequências de dobras com eficiência é crucial na programação do produto DELEM DA-66S. Aqui está um guia simplificado para navegar e editar dobras no seu programa CNC:
- Tela de acesso a todas as curvas
Pressione o botão "Todas as Dobras" para visualizar uma lista completa de todas as dobras do seu programa. Aqui, você pode editar os parâmetros das dobras, reorganizar, adicionar ou excluir dobras. - Navegando pelas colunas
Percorra os parâmetros e colunas disponíveis deslizando os dedos para uma experiência de interação intuitiva na interface de programação do produto DELEM DA-66S. - Funções de edição
Use estes comandos principais para modificar sua sequência de dobra:- Inserir Dobra: Para adicionar uma dobra, selecione uma posição e a dobra atual será copiada e inserida.
- Mark Bend: Marque uma curva para prepará-la para ações como mover ou trocar.
- Excluir Bend: Remove uma curva selecionada da sequência.
- Opções de edição avançadas
Após marcar uma curva, funções adicionais ficam disponíveis:- Mover Curva: Altere a ordem das dobras marcando-as e colocando-as em uma nova posição.
- Curvas de troca: Troque as posições de duas curvas marcando uma, selecionando outra e escolhendo “Trocar curvas”.
- Abortar marca: Cancele todas as marcas atuais, se necessário, limpando as seleções.
- Gerenciamento de Parâmetros
- Copiar coluna: Duplique um valor de parâmetro de uma curva para todas as outras para manter a consistência.
- Etapas de curvatura da corrente: Conecte as curvas definindo o número de etapas na corrente e ajustando o deslocamento da posição do batente traseiro, permitindo deslocamento positivo ou negativo para flexibilidade.
Estas etapas na programação do produto DELEM DA-66S ajudarão você a gerenciar e otimizar efetivamente suas sequências de dobra para melhorar a eficiência da produção.
Ferramentas de mudança
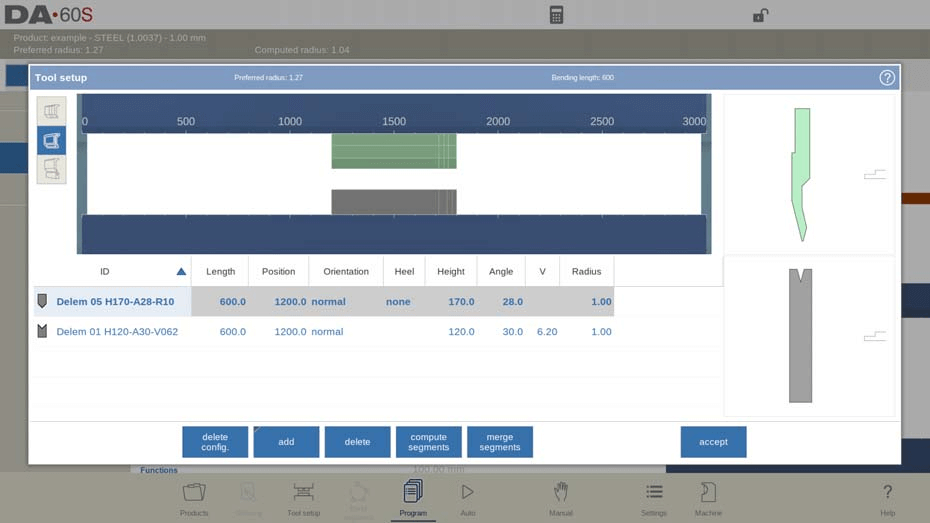
Para alterar as ferramentas, o menu Configuração de Ferramentas pode ser usado. Ao usar o modo Programa para programação numérica, a Configuração de Ferramentas será usada como padrão. Se a configuração da ferramenta precisar ser alterada para apenas uma etapa de dobra, o botão Alterar Ferramentas pode ser usado. O controle sempre perguntará se as alterações devem ser feitas em toda a configuração ou apenas para uma dobra. Se for necessária a configuração completa da ferramenta, o menu Configuração de Ferramentas será alternado automaticamente para.
Produto de mudança
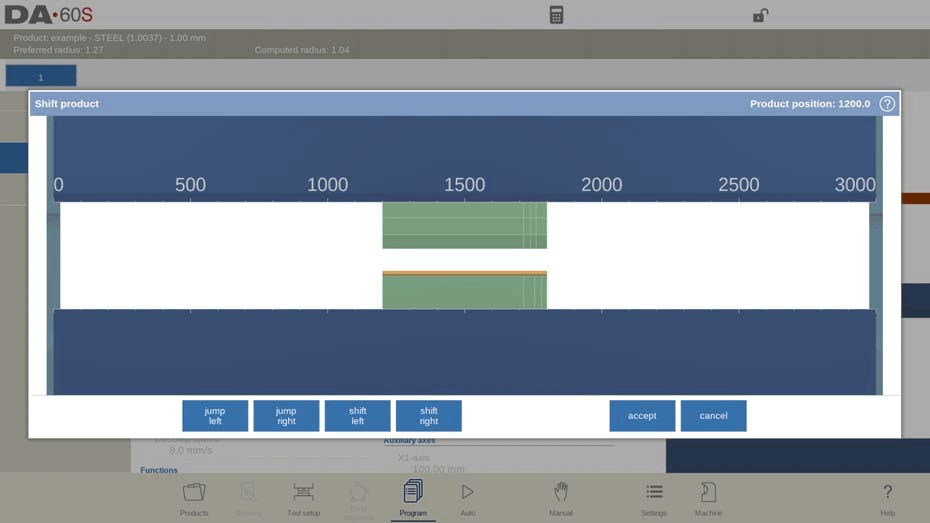
Para deslocar a posição do produto, a função Deslocar Produto abre uma caixa de diálogo que permite deslocar o produto sobre e entre as ferramentas. O produto pode até ser deslocado sobre estações de ferramentas. Durante o deslocamento, o usuário recebe ajuda para encaixar pontos. A posição do produto pode ser facilmente movida para a lateral das ferramentas ou para o meio da estação.
Funções:
Pular para a esquerda
Mova o produto para outra combinação de conjunto de ferramentas na direção esquerda.
Pular para a direita
Mova o produto para outra combinação de conjunto de ferramentas na direção correta.
Deslocar para a esquerda
Desloque o produto 1 milímetro para a esquerda dentro do mesmo conjunto de ferramentas.
Deslocar para a direita
Desloque o produto 1 milímetro para a direita dentro do mesmo conjunto de ferramentas.
Medidor de mudança de marcha
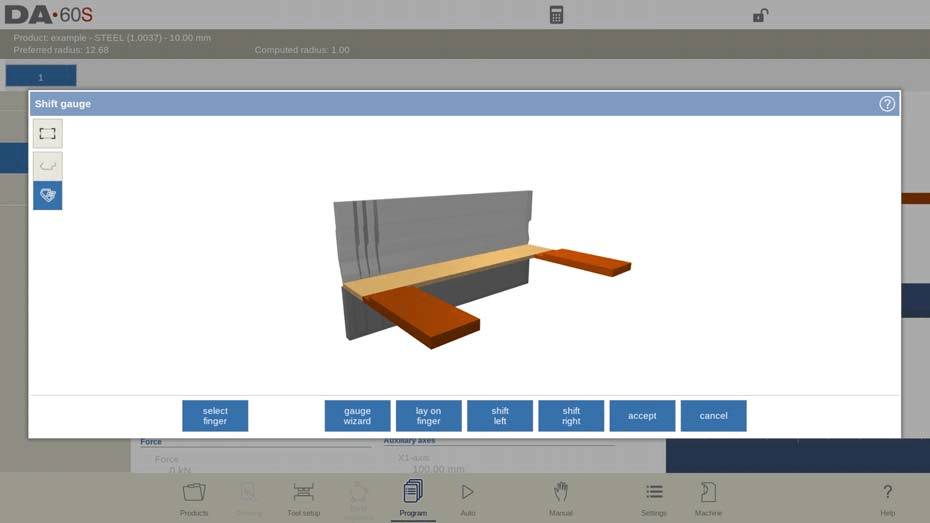
O ajuste das posições do batente traseiro é um componente essencial da programação do produto DELEM DA-66S, permitindo o manuseio preciso dos materiais. Veja como gerenciar esses ajustes com eficiência:
- Função do medidor de deslocamento de acesso
Comece abrindo a caixa de diálogo do Medidor de Deslocamento. Este recurso permite ajustar visualmente as posições do medidor traseiro, aumentando a precisão na programação do produto DELEM DA-66S. - Modificar posições do batente traseiro
Arraste os dedos do batente traseiro para a posição desejada. À medida que você ajusta, o sistema alinha automaticamente os dedos com a lateral do produto, simplificando o processo de configuração. - Selecione o dedo para mover
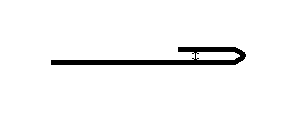
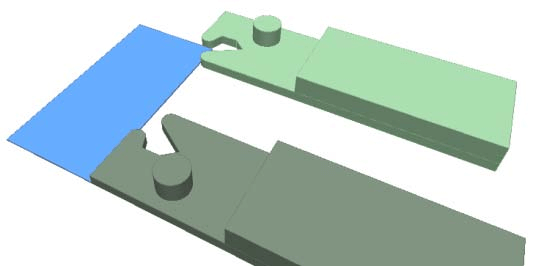
Selecione o dedo específico que deseja ajustar. Essa flexibilidade permite modificações específicas na configuração de programação do seu produto DELEM DA-66S. - Canto de aperto (se disponível)
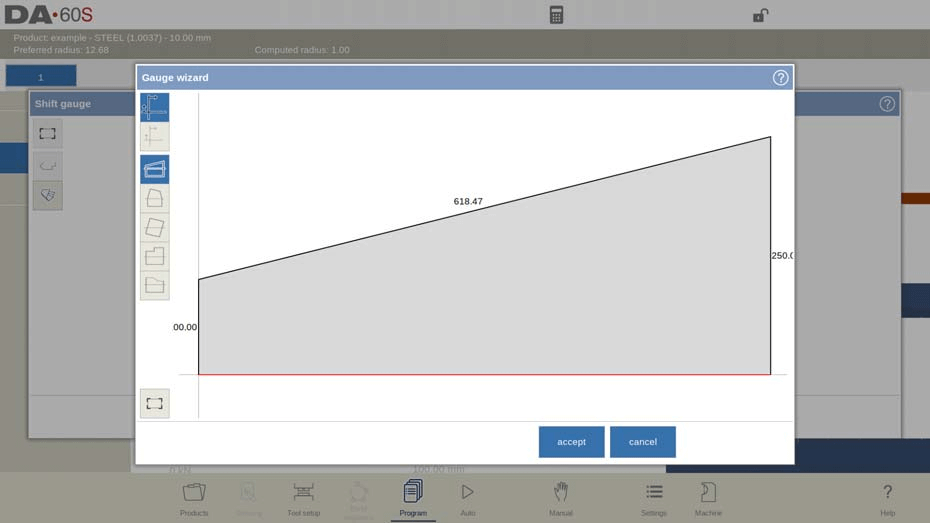
Use esta opção para fixar o pino do batente traseiro ao redor do canto do produto, garantindo estabilidade nas direções X e Z. Observação: este recurso requer uma máquina com pinos de aperto especiais e opções de controle compatíveis. (Consulte a figura acima) - Usar o Assistente de Medidor
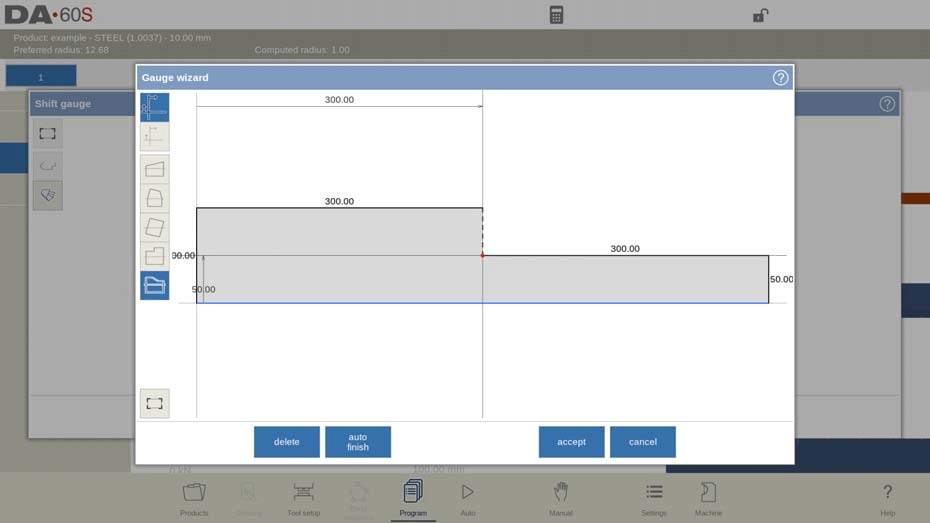
Para programas numéricos, o Assistente de Medição ajuda a definir o formato desejado da lateral do produto. Ative a "Programação do ângulo X" para um reposicionamento aprimorado dos dedos com base no formato do produto. (Consulte a figura acima) - Selecione e ajuste formas
Escolha entre quatro modelos de formato padrão fornecidos pelo Gauge Wizard ou crie um formato personalizado para posicionamento preciso dos dedos na programação do produto DELEM DA-66S. - Mudança e Posições de Deitar
- Mudar de lado: Percorra as posições disponíveis do batente traseiro para obter a configuração ideal.
- Coloque no dedo: Ajuste as posições de colocação do produto, disponíveis se sua máquina incluir um eixo R.
- Mudar a posição dos dedos
- Deslocar para a esquerda: Mova um dedo selecionado 1 mm para a esquerda.
- Deslocar para a direita: Mova um dedo selecionado 1 mm para a direita.
- Finalizar ajustes
- Cancelar: Sair sem salvar as alterações.
- Aceitar: Salve suas modificações e saia da tela.
Seguindo essas etapas, você pode garantir ajustes precisos do batente traseiro na programação do produto DELEM DA-66S, otimizando o manuseio de materiais e a eficiência geral da produção.
Propriedades do produto
Para alterar as principais propriedades do produto, toque em Propriedades. Esses parâmetros do programa são os mesmos para todas as dobras do programa (dados principais do programa).
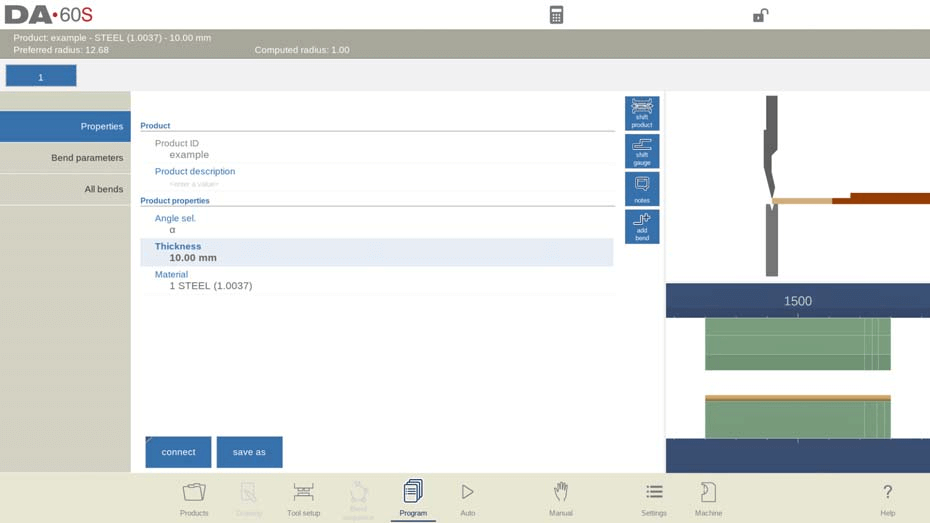
Explicação dos parâmetros
ID do produto
Um nome exclusivo para identificar um programa de produto. O comprimento máximo é de 25 caracteres. O ID do produto pode conter letras e números.
Descrição do produto
Um número ou descrição deste programa. O comprimento máximo é de 25 caracteres. A descrição do produto pode conter letras e números.
Ângulo sel.
Seleção do modo de programação para o eixo Y.
0 = absoluto: programe a posição absoluta do eixo Y para uma dobra.
1 =α: programa o ângulo a ser dobrado. A posição necessária no eixo Y é calculada.
Dependendo deste parâmetro, o parâmetro Ângulo ou o parâmetro Curvatura
A posição aparecerá em uma etapa de curvatura.
Espessura
Espessura da folha.
Material
Seleção de um dos materiais programados, que são usados para calcular as profundidades de dobra. O controle contém 4 materiais pré-programados. No total, 99 materiais podem ser programados no controle. Os materiais podem ser programados na página Materiais, no modo Configurações.

Comprimento em branco
O comprimento necessário da chapa original a partir da qual o produto é dobrado. Este valor é calculado a partir de um desenho 2D.
Gerenciar as propriedades do produto é um aspecto fundamental da programação do produto DELEM DA-66S. Aqui está um guia claro e conciso para ajudar você a navegar e definir esses parâmetros com eficiência:
- Use a função Conectar
- Programas de conexão: Para criar produtos 3D, vincule vários programas:
- Projete produtos em diferentes direções.
- Conecte programas por meio das Propriedades do Produto, escolhendo o ID do programa a ser vinculado.
- Organize vários programas sequencialmente, se necessário.
- Programas de conexão: Para criar produtos 3D, vincule vários programas:
- Executar programas conectados
- Selecione o primeiro programa: Comece com o programa inicial em sequência.
- Ativar Modo Automático: Programe a quantidade necessária do produto.
- Iniciar produção: Inicie o processo com a tecla Iniciar. O sistema executará os programas conectados automaticamente.
- Ajustar e gerenciar programas
- Programa de Desconexão: Interrompa a sequência se necessário.
- Salvar como: Crie uma cópia inserindo um novo ID de produto.
- Remover desenho: Elimine desenhos gráficos se necessário.
- Notas de edição: Acesse e modifique notas relacionadas ao seu produto.
Seguindo essas etapas, você aumentará sua eficiência e precisão na programação do produto DELEM DA-66S, garantindo produção e personalização perfeitas de suas operações de dobra.
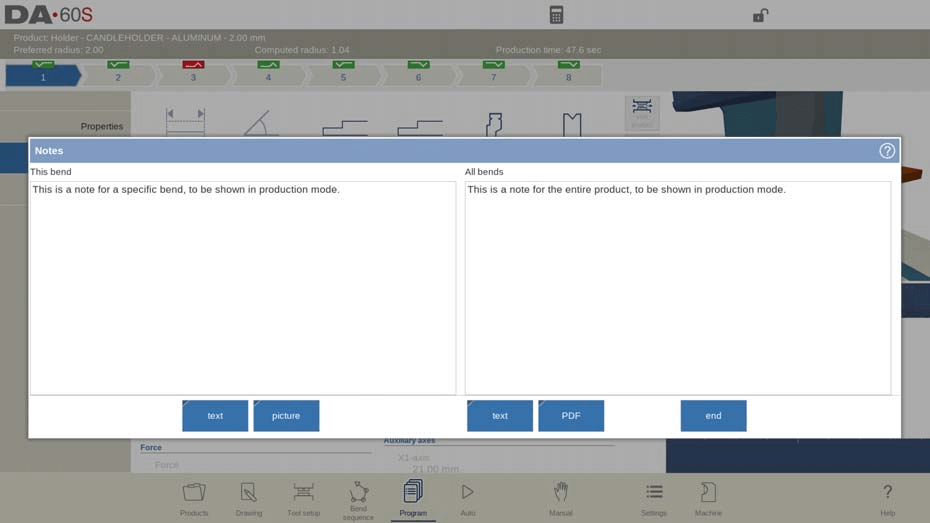
Notas
Adicionando notas na programação do produto DELEM DA-66S
Na programação de produtos DELEM DA-66S, você pode aprimorar facilmente o gerenciamento de projetos adicionando notas. Este recurso permite armazenar comentários ou informações básicas específicas para cada produto ou dobra individual.
Cada nota é um campo de texto simples projetado para fornecer contexto ou lembretes sem afetar os valores do produto ou alterar os cálculos da sequência de dobra. Incorporar notas à programação do seu produto DELEM DA-66S pode melhorar seu fluxo de trabalho, garantindo que informações críticas permaneçam organizadas e acessíveis.
Ao utilizar esse recurso de forma eficaz, você aumentará a eficiência geral e a clareza dos processos de programação do seu produto DELEM DA-66S.
Nota em PDF
Para anexar um arquivo PDF à nota, toque em Anexar PDF. Através do navegador de diretórios, um arquivo PDF pode ser selecionado e incorporado ao arquivo do produto.
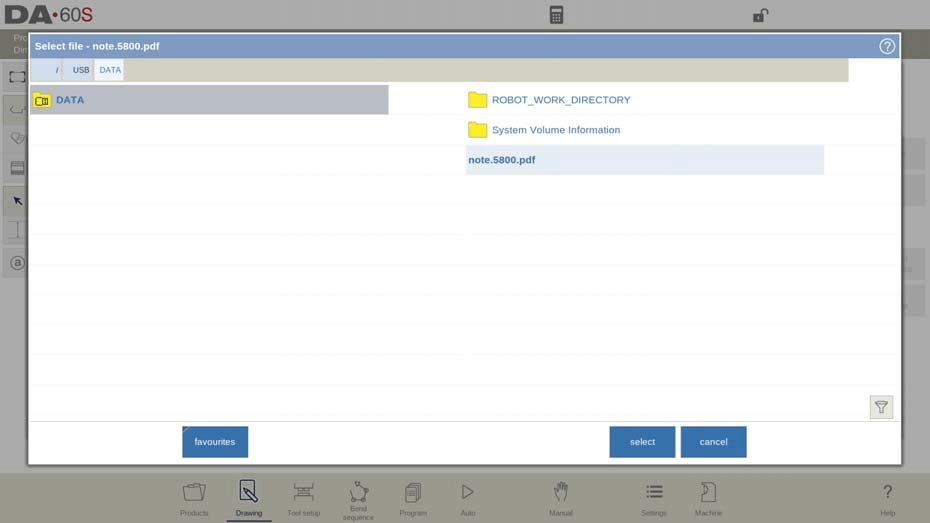
Quando apenas um arquivo PDF é anexado sem uma nota textual, o PDF será exibido instantaneamente quando o usuário pressionar o indicador Notas no modo Automático.
Notas de fotos
Para anexar uma foto a uma dobra específica, toque em Adicionar Imagem. Através do navegador de diretórios, é possível selecionar um arquivo PNG ou JPG, que será incorporado ao arquivo do produto. Quando uma foto é anexada a uma dobra específica, ela pode ser exibida durante o processamento dessa dobra.
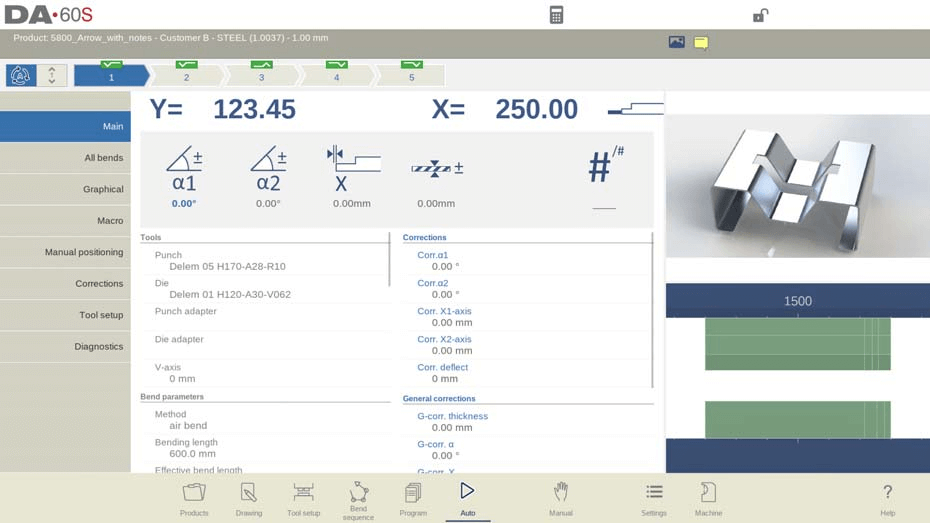
Um modo de visualização gráfica adicional permite a visualização em tela cheia da imagem no modo Automático. Uma foto específica pode ajudar o operador a entender propriedades específicas do produto ou lembrá-lo de prestar atenção em algo específico.
Adicionar curva
Para adicionar uma nova dobra após a última dobra. Quando pressionado, a última dobra é copiada e adicionada após a última dobra.
Batendo
A partir de programas puramente numéricos, uma única etapa de curvatura pode ser transformada em uma curvatura acentuada.
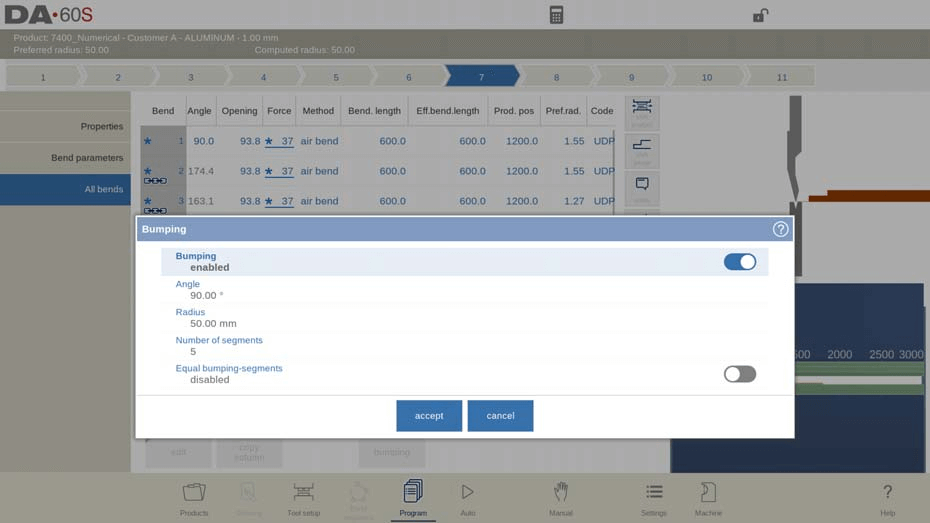
O Bumping é um recurso avançado na programação do produto DELEM DA-66S, essencial para obter curvas precisas de raio grande. Aqui está um guia simplificado sobre como configurá-lo:
- Habilitar Bumping
Na visualização "Todas as Curvas", selecione "Bumping". Uma janela pop-up será exibida. Escolha:- Desabilitado: Trata o impacto como uma curva de ar normal com ângulo e raio definidos.
- Habilitado: Permite criar grandes raios por meio de múltiplas etapas de dobra de ar.
- Definir ângulo e raio
Defina o ângulo preciso e o raio desejado para a curvatura dentro das configurações de programação do produto DELEM DA-66S. - Determinar o número de segmentos
Decida em quantos segmentos dividir o raio. Mais segmentos significam mais dobras, garantindo tolerâncias mais precisas e transições mais suaves. Lembre-se: um número maior de segmentos requer uma abertura menor na matriz em V para uma dobra eficaz. - Ajustar tamanho do segmento
- Segmentos de colisão iguais: Escolha entre:
- Habilitado: Todos os segmentos terão o mesmo tamanho.Desabilitado: As extremidades são reduzidas à metade para melhores resultados, mas podem complicar a seleção da matriz em V.
- Segmentos de colisão iguais: Escolha entre:
- Utilize correções de colisão
No modo Automático, o sistema auxilia na distribuição de correções entre dobras relacionadas, garantindo resultados ideais na programação do produto DELEM DA-66S.
Seguindo essas etapas, você pode implementar com eficiência o bumping na programação do seu produto DELEM DA-66S, melhorando a qualidade e a precisão das suas operações de dobra.
Modificar dados numéricos
Cada programa CNC editado começa com modificações precisas de dados numéricos.
No modo de programa, você verá blocos exibindo os principais parâmetros. Toque neles para revelar detalhes e ajustar dobras ou valores numéricos conforme necessário para o seu trabalho específico.
Quando um símbolo de informação é exibido com parâmetros após um valor editado, este parâmetro foi alterado devido à última entrada alterada.

Um símbolo de estrela é exibido com os parâmetros se o valor do parâmetro for diferente do valor calculado pelo controle. Isso pode ser útil se um valor for programado intencionalmente diferente ou se o valor de um parâmetro for limitado pelos limites dos parâmetros.

Um símbolo de erro é exibido com parâmetros caso o valor não esteja correto de acordo com os valores programados atualmente. Isso ocorre, por exemplo, quando uma dobra de bainha é programada sem ferramentas de bainha programadas.

Compreendendo os parâmetros na programação do produto DELEM DA-66S
Para iniciantes na programação do produto DELEM DA-66S, compreender a importância de cada parâmetro é essencial. Neste sistema, cada alteração pode influenciar todo o programa. Portanto, prestar atenção aos símbolos que indicam os ajustes dos parâmetros é crucial. Esses símbolos servem como guias, mostrando onde edições adicionais podem ser necessárias para garantir uma programação suave e precisa do produto DELEM DA-66S.
Perguntas Frequentes (FAQ)
Como posso identificar alterações nos parâmetros dentro da programação do produto DELEM DA-66S?
O sistema DELEM DA-66S utiliza símbolos específicos para indicar quando um parâmetro foi modificado. Observar esses símbolos ajuda a identificar edições necessárias e a manter a precisão na sua programação.
O que devo fazer se precisar conectar vários programas na programação do produto DELEM DA-66S?
Na programação do produto DELEM DA-66S, você pode conectar vários programas para criar produtos 3D complexos. Basta acessar a seção Propriedades do Produto, vincular os IDs dos programas relevantes e organizá-los na sequência desejada.
Com que frequência os programas de produtos devem ser revisados no DELEM DA-66S para garantir precisão?
É aconselhável revisar regularmente as configurações de programação do seu produto DELEM DA-66S, especialmente antes de iniciar a produção. Isso inclui verificar os ajustes de parâmetros e as notas para garantir que tudo esteja configurado corretamente para um desempenho ideal.
Conclusão
Dominar a programação do produto DELEM DA-66S envolve entender o impacto de cada parâmetro e usar recursos como adição de notas para otimizar seu fluxo de trabalho. Ao compreender esses elementos-chave, você pode aumentar a precisão e a eficiência das suas tarefas de programação.
Para aqueles que desejam aprofundar seus conhecimentos ou buscar mais assistência, recomendamos que entrem em contato com nossa equipe. Além disso, você pode explorar a documentação mais detalhada disponível em nosso site. Se você precisa de aconselhamento personalizado ou recursos mais abrangentes, estamos aqui para apoiar sua jornada na otimização do seu DELEM DA-66S. programação de produtos.


