


Quando se trata de aumentar a eficiência da dobra de metais, a programação ESA S630 desempenha um papel fundamental. Se você tem curiosidade sobre como essa programação pode otimizar seus processos de dobra e melhorar a produtividade geral, você está no lugar certo.
Neste artigo, explorarei como a programação da ESA S630 pode aumentar significativamente a eficiência da dobra, oferecendo uma visão detalhada de seus recursos e vantagens. Seja você um profissional experiente ou iniciante em programação CNC, este guia fornecerá os insights essenciais necessários para aproveitar a ESA S630 e obter a máxima eficiência na dobra.
Lista abrangente de programas de dobra
A programação do ESA S630 oferece uma gama versátil de programas personalizados para aprimorar as operações de dobra em diversos cenários. Aqui está uma visão geral dos diferentes tipos de programas e suas aplicações:
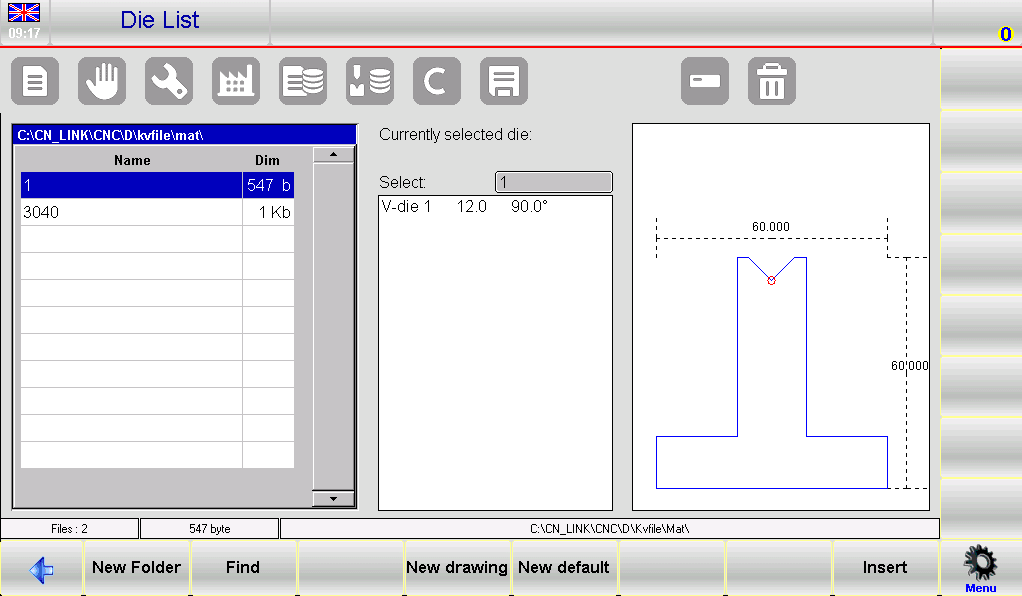
- Gerenciamento de lista de programas:
Acesse a lista de programas através do menu designado. Esta lista fornece uma visão organizada dos programas disponíveis, com dados detalhados dos programas acessíveis através do posicionamento do cursor.
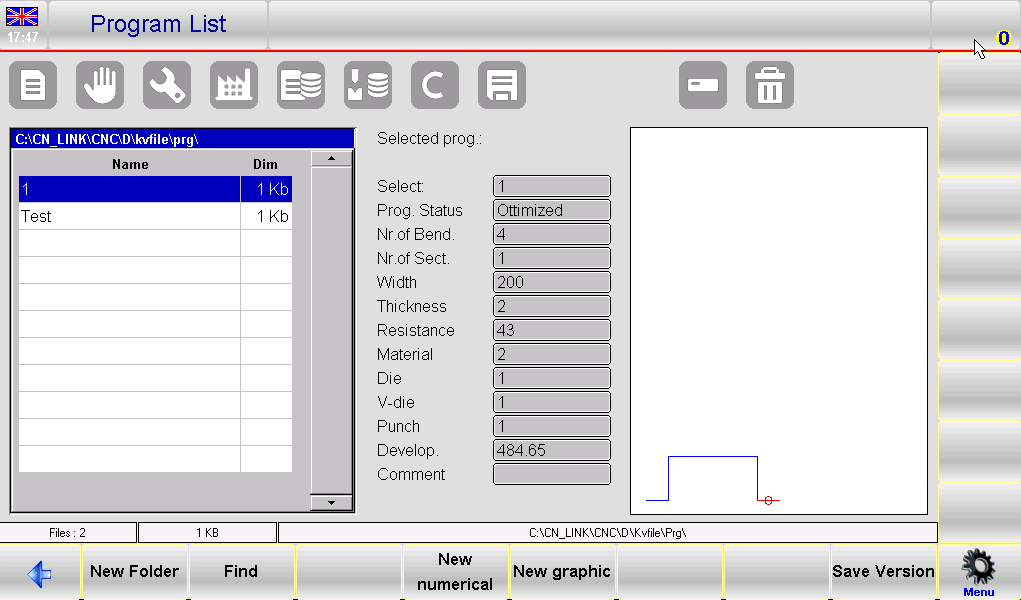
Use a barra de rolagem para navegar pela lista com eficiência.
2. Criação e personalização de programas:
- Nova pasta: Organize seus programas criando novas pastas para facilitar o gerenciamento.
- Novos Programas Numéricos e Novos Programas Gráficos: Configurar novos programas com base em dados numéricos ou gráficos visuais, melhorando a precisão e a visualização em operações complexas.
- Funções de cópia e renomeação: Duplique rapidamente programas com novos nomes, permitindo modificações e adaptações fáceis a requisitos específicos de dobra.
- Pré-visualização e edição do programa:
Habilite as pré-visualizações de programas para visualizar programas gráficos. Este recurso pode ser desativado se você preferir uma visualização simplificada. Realize edições como renomear ou copiar diretamente do menu, agilizando o processo de gerenciamento.
3. Backup e transferência de dados:
Salve programas em um dispositivo USB para transferi-los entre diferentes máquinas ou para fins de backup. Este recurso garante que suas operações de dobra sejam suportadas de forma consistente, independentemente da localização.
Salve ou exclua vários programas simultaneamente usando as opções dedicadas, garantindo um gerenciamento de dados eficiente.
Para alterar a unidade de trabalho usando a programação ESA S630, siga estas etapas:
- Pressione o botão para acessar o Lista de Programas.
- Navegue até o Menu pressionando o botão correspondente.
- Selecione a opção 5 para Mudar a unidade de trabalho.
- Use o dedo para escolher uma unidade de trabalho na lista exibida.
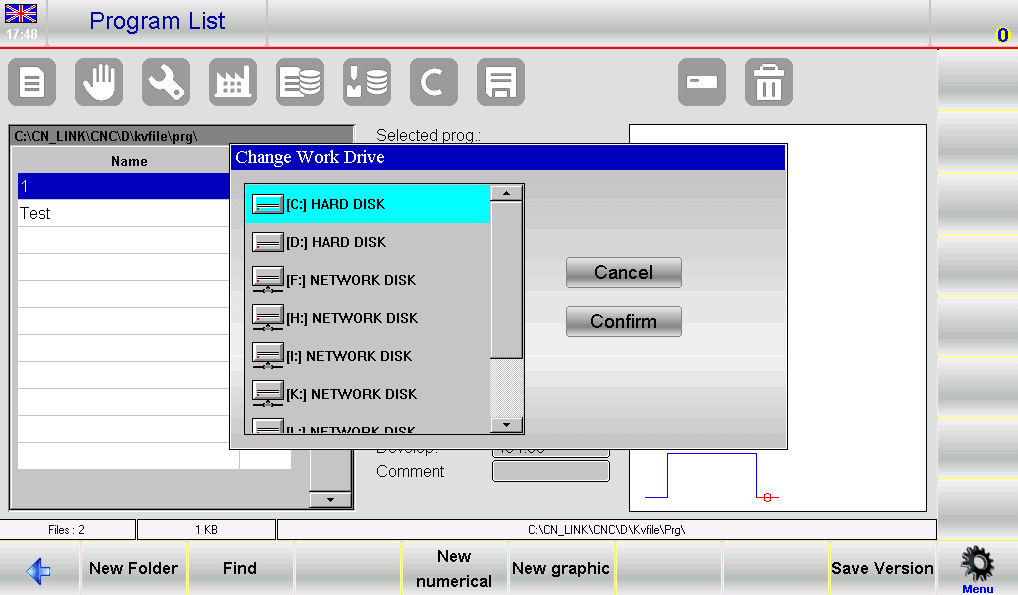
Esta sequência garante que você utilize a programação ESA S630 de forma eficiente, aprimorando o processo de configuração e mantendo o desempenho ideal da máquina.
Entrada de programa numérica vs. gráfica
Inserindo um programa numérico
Para inserir um novo programa numérico, pressione [Novo Programa] na página Editor de um programa numérico e selecione [Novo numérico]:
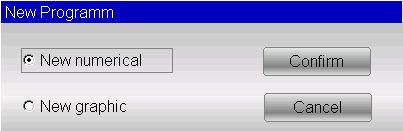
Ou pode ser criado a partir da lista de programas pressionando e [Novo numérico] .
A programação do ESA S630 otimiza significativamente as operações de dobra, simplificando tarefas essenciais. Aqui está um guia conciso:
- Definindo os dados da peça
Será aberta uma janela para inserção dos dados do programa:

- Largura da chapa metálica: Toque no campo, insira a largura e selecione [OK].
- Espessura da chapa metálica: Insira a espessura de forma semelhante.
- Valores de resistência:
- Alumínio: 0-30
- Ferro: 31-50
- Aço inoxidável: >50
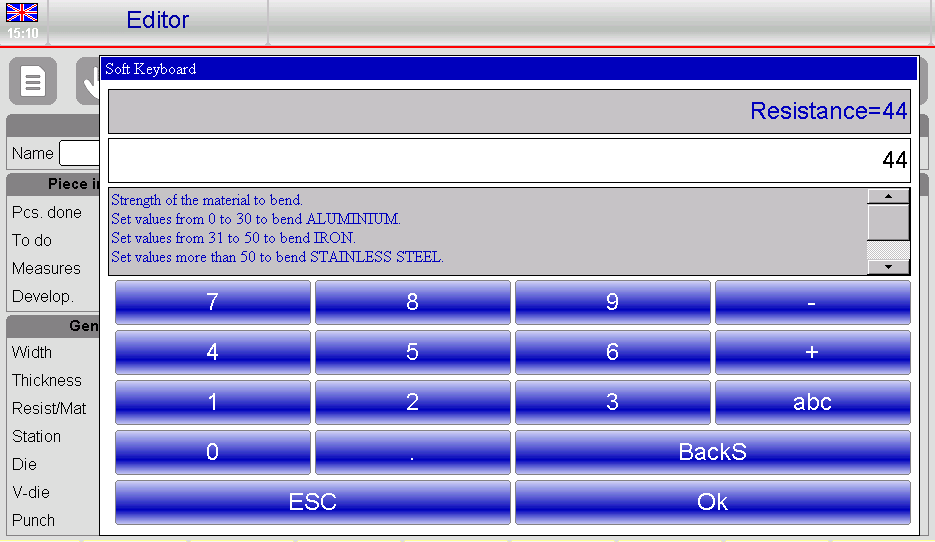
- Cálculo Automático de Material: O sistema calcula o material com base na resistência, reduzindo a entrada manual.
- Configuração da estação de trabalho: Insira o número da estação, se aplicável; caso contrário, deixe como 0.
- Seleção de matrizes e matrizes em V:
- Selecione um dado da lista tocando no campo, rolando e pressionando [Inserir].
- Selecione o dado em V apropriado se houver múltiplos; se houver apenas um, insira 1.
- Seleção de socos: Escolha o soco de forma semelhante acessando a lista, rolando e pressionando [Inserir].
2. Configuração e ajuste de curvas
- Insira o ângulo de curvatura desejado no Ângulo Y1 campo.
- Defina o comprimento da curva no campo Final X1.
- Os dados são calculados automaticamente, mas podem ser personalizados.
3. Gerenciando dados de trabalho
- Acesso 7>>Informações de trabalho para revisar TDC, Mudoe Ponto de aperto dados.
- Sair selecionando [OK].
4. Operações de Dobra
- Copiar Curva: Navegue até a curva de destino, abra o menu e selecione5>> Etapa de cópia.
- Inserir Dobra: Posição após o ponto de entrada, escolha4>> inserir etapa.
- Digite a curva copiada: Coloque-o antes da curva alvo seguindo passos semelhantes.
5. Raio e curvas especializadas
- Usar [Aumentar um raio] para inserir ângulos e raios de rolamento, confirmando com [Confirmar].
- Ajustar Dobragem holandesa e cone modificando LDC e pontos mortos inferiores em Y1 e Y2.
6. Manuseio de aplicações especializadas
- Curvas cônicas: Insira ângulos cônicos através do [Cônica] função.
- Dobras fora da matriz em V: Insira valores finais no LDC Y1/Y2 e garanta pontos de pinçamento e silenciamento mais altos.
7. Gestão de Programas
- Salvar programas com 2>> Salvar como…. para novas variações de programas existentes.
Quando uma ferramenta muda no seu projeto de programação ESA S630, siga estas etapas para atualizar o programa:
- Baixar: Acesse e baixe o programa da sua lista.
- Editor aberto: Vá para a página do Editor e abra o menu.
- Programa de atualização: Escolher 3>> Atualização do programa para abrir a janela de atualização.
- Recalcular: Clique [OK] para recalcular todos os dados, garantindo que as correções sejam aplicadas.
- Salvar: Salve o programa atualizado, se necessário.

Essas práticas eficientes usando a programação ESA S630 podem aumentar a precisão e reduzir erros, otimizando suas operações de dobra.
Inserindo um programa gráfico (Opcional no modelo S630)
Para entrar em um novo programa gráfico, pressione [Novo Programa] na página Editor de um programa numérico e selecione [Novo gráfico]:
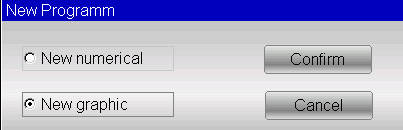
Ou pode ser criado a partir da lista de programas pressionando e [Novo gráfico] .
- Configuração dos dados gerais
Ao utilizar a programação do ESA S630, inserir os dados gerais corretos é essencial para acessar a função de desenho. Siga estes passos:
- Detalhes da chapa metálica:
- Entre no largura e grossura, selecionando cada campo e confirmando com [OK].
- Material de entrada resistência; o sistema calcula propriedades com base nisso.
- Configuração de ferramentas e estações:
- Digite o número da estação de trabalho ou deixe como 0 se for único.
- Selecione e insira o dado da lista.
- Indique o V-die (digite 1 se houver apenas um).
- Definir orientação da matriz e do punção (0 = padrão, 1 = girado 180°).
- Selecione e insira o soco da lista.
2. Janela de desenho
A página da janela de desenho será aberta.
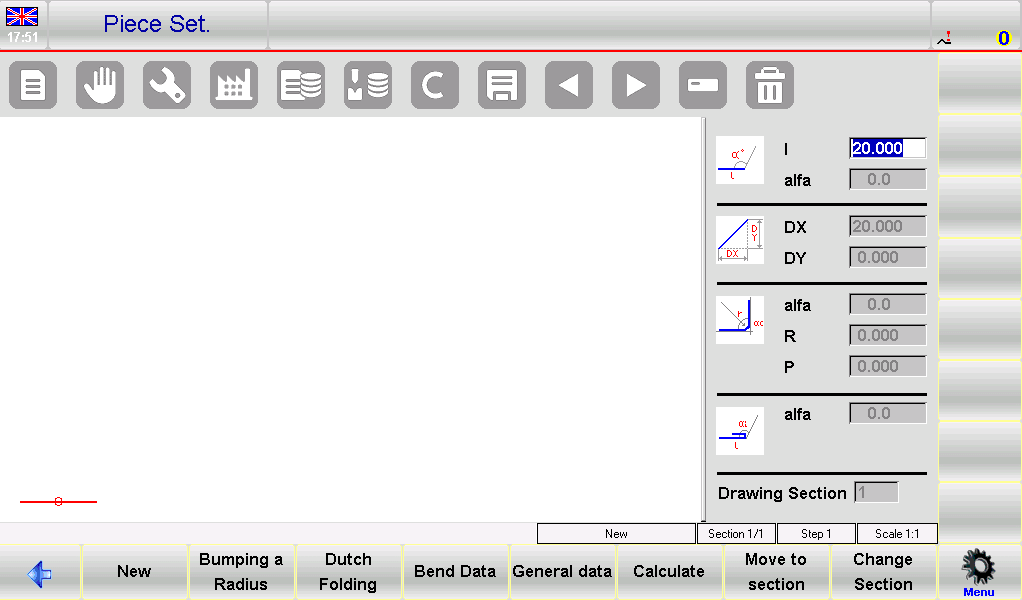
- Esquerda: Janela de desenho principal.
- Certo: Quatro janelas de entrada de dados para:
- Dados de desenho polar
- Dados de desenho cartesiano (geralmente não usados)
- Curvas de raio
- Dobraduras holandesas (bainhas)
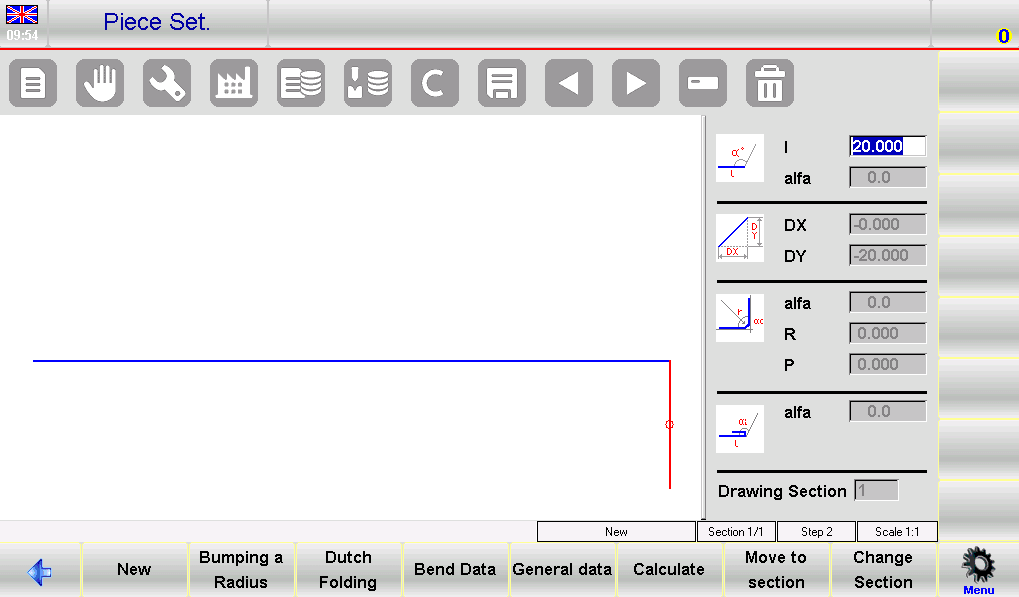
3. Processo de entrada:
- Comece no Conjunto de peças página onde o primeiro segmento tem como padrão 20,0 mm.

- Modifique isso selecionando o campo “l” para abrir o “Teclado virtual”.
- Após confirmar as alterações, prossiga ajustando o desenho polar “alfa” utilizando os ângulos do “Teclado Virtual”.

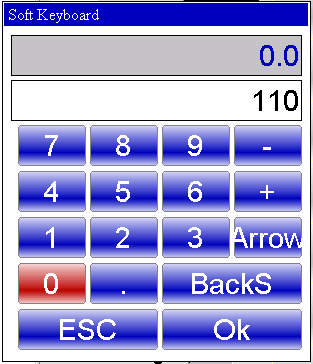
- Defina ângulos predefinidos ou insira ângulos personalizados e, em seguida, passe para o próximo campo de comprimento para continuar o design.
4. Sequenciamento de curvatura
- Acesse a página gráfica AUTOMÁTICA.
- Selecione0>> Sequência de flexão para gerenciar e navegar em diferentes curvas de forma eficiente.
5. Alterar cor de fundo
- Abra o menu na página AUTOMÁTICO.
- Selecione 1>> Alterar cor para personalização visual.
6. Visualizador 3D (opcional)
- Acesse a visualização 3D na página AUTOMÁTICO. selecione o item 3>> Visualizador 3D.
- Alternar entre 3D e Vistas 2D conforme necessário.
7. Realizar o desenho de uma peça
Vamos supor que temos que desenhar a peça ilustrada na figura abaixo:

- Configurar: Na janela de desenho, insira o comprimento do segmento inicial (por exemplo, 20,0) no campo “l” e pressione [OK].
- Entrada de ângulo e comprimento:
- Insira o primeiro ângulo (120,0°) no “alfa” campo e confirme com [Ok].
- Prossiga com o desenho automático para o próximo comprimento. Certifique-se de que ele esteja destacado.
- Insira o segundo comprimento (47,11) no campo “l” e confirme.
- Entradas sequenciais:
- Insira o próximo ângulo (-120,0°) no “alfa” campo e pressione [OK].
- Continue com a terceira entrada de comprimento (70,0) no campo “l”.
- Defina o terceiro ângulo (-90,0°) usando a programação ESA S630 e confirme a entrada.
- Conclusão:
- Insira o quarto comprimento (40,0), seguido de seu ângulo (90,0°) usando o “alfa" campo.
- Adicione o quinto e último comprimento (30,0) para completar o processo de desenho.
8. Realizar uma curva de raio
Para realizar uma curvatura de raio, é necessário ter em mente que, conforme a convenção, deve haver um comprimento de chapa metálica antes e depois do raio.
Vamos supor que temos que desenhar a peça ilustrada na figura abaixo:
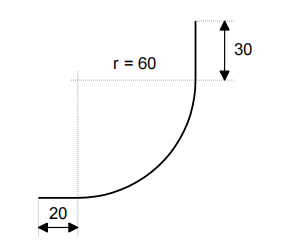
Para criar eficientemente uma curva de raio usando a programação ESA S630, siga estas etapas concisas:
- Comprimento de inicialização: Digite o comprimento inicial da peça (por exemplo, 20,0) no campo “I” e pressione [OK].
- Definir parâmetros de raio:
- Selecione [Aumentar um raio] para abrir as configurações de raio.
- Insira o ângulo de rolamento (por exemplo, 90,0°) em “alfa” e pressione [OK].
- Insira o raio de rolamento (por exemplo, 60,0) em “R” e confirme.
- Defina Pitch: Especifique o passo de rolamento no campo “P” e pressione [OK]. O sistema prosseguirá automaticamente.
- Finalizar Comprimento: Insira o comprimento final da peça (por exemplo, 30,0) no campo “I” e confirme com [OK].
9. executar uma dobra holandesa (bainha)
Suponhamos que temos que desenhar a peça ilustrada na figura:

- Entrada inicial: Insira o comprimento do lado da bainha (30,0) no campo “l”.
- Dobragem holandesa:
- Imprensa [OK] e selecione [Dobragem holandesa].
- Defina o ângulo de dobragem (45,0°) no “alfa" campo.
- Desenho automatizado: Confirme com [Ok] para desenhar e destacar automaticamente o próximo comprimento.
- Comprimentos e ângulos adicionais: Insira os comprimentos subsequentes (100,0) em “I” e defina os ângulos (-90,0°) em “alfa”.
- Etapas finais: Insira o último comprimento lateral (22,0) em “I” e complete com [OK].
Cálculos de sequência de dobra: automático vs. manual
Selecionar o método apropriado para o cálculo da sequência de dobra em prensas dobradeiras CNC pode afetar significativamente a eficiência. Aqui está uma comparação concisa dos métodos automático e manual, com insights sobre como a programação ESA S630 otimiza o processo.
Cálculo Automático
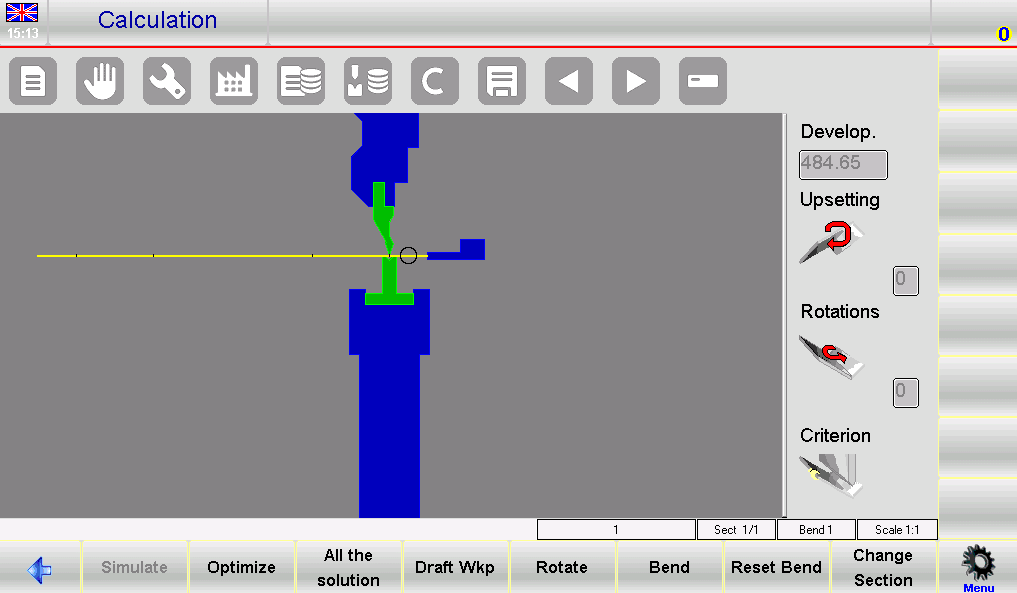
- Processo: Inicie através da página de desenho pressionando [Calcular]. Uma simulação exibe a configuração para dobra.
- Otimização: A programação do ESA S630 determina automaticamente a sequência ideal pressionando [Otimizar].
- Benefícios:
- Eficiência: Reduz erros e tempo de ciclo por meio de sequenciamento ideal.
- Segurança: Prioriza a segurança do operador escolhendo sequências que mantêm mais material em zonas de manuseio seguras.
Cálculo manual
- Processo: Os operadores forçam manualmente as sequências da página de desenho.
- Flexibilidade: Permite controle total ou parcial sobre a sequência, adequado para curvas complexas.
- Benefícios:
- Controlar: Oferece maior influência direta sobre o processo para operações personalizadas.
- Resolução de problemas: Permite ajustes precisos ao lidar com curvas desafiadoras.
Quando usar cada método
- Automático: Ideal para tarefas consistentes e diretas, onde a eficiência é fundamental.
- Manual: Ideal para tarefas complexas ou personalizadas que exigem controle detalhado e resolução de problemas.
A programação ESA S630 se destaca em ambos os métodos, oferecendo otimização automática aprimorada em comparação a modelos mais antigos, como o S540, melhorando assim a eficiência e a adaptabilidade da dobra.
Dobramento Eficiente de Caixas
Para dobrar uma caixa com precisão usando a programação ESA S630, siga estas etapas simplificadas:
- Configuração da seção de dobra:
- Crie dois programas: Utilize a programação do ESA S630 para criar programas separados para dobras horizontais e verticais. Execute-os sequencialmente, começando pela seção com a menor largura de chapa metálica.
- Gerenciamento de Seção:
- Adicionar seções: Imprensa [Alterar Seção] para adicionar uma nova seção.
- Excluir Seções: Navegue até a seção, abra o menu e escolha 6>> Excluir seção para removê-lo e retornar à dobra 1 da seção 1.
- Enfrentando desafios comuns:
- Desalinhamento: Use o recurso de simulação do ESA S630 para verificar sequências de dobra e alinhamento correto.
- Tempo de ciclo: Otimize a ordem de operação na programação do ESA S630 para minimizar o reposicionamento e reduzir os tempos de ciclo.
Com essas etapas concisas, a programação ESA S630 permite uma dobra de caixas precisa e eficiente.
Perguntas Frequentes (FAQ)
Como a programação do ESA S630 pode reduzir o desperdício de material durante as operações?
Utilizando a programação ESA S630, os operadores podem simular o processo de dobra antes da operação real. Isso permite ajustes e ajustes finos para minimizar erros, reduzindo assim a quantidade de material descartado gerado.
É possível integrar a programação do ESA S630 com máquinas CNC existentes?
Sim, a programação do ESA S630 foi projetada para ser compatível com uma variedade de máquinas CNC. Certifique-se de que sua máquina atenda aos requisitos de sistema necessários para uma integração perfeita. Consulte o manual do software ou entre em contato com o suporte para obter orientações.
Quais são algumas dicas comuns de solução de problemas para problemas de programação do ESA S630?
Se você encontrar problemas com a programação do ESA S630, primeiro certifique-se de que todas as atualizações de software tenham sido instaladas. Verifique a conexão entre a máquina CNC e o software. Reinicie os componentes e consulte a seção de solução de problemas do manual do usuário. Se o problema persistir, entre em contato com o suporte técnico para obter assistência.
Conclusão
Em resumo, dominar a programação do ESA S630 pode aumentar significativamente a eficiência da dobra, garantindo precisão e resultados consistentes. As etapas críticas incluem a preparação adequada do ambiente de trabalho, a configuração e calibração precisas da máquina e o cumprimento das diretrizes do fabricante para ferramentas e operação. Ao aderir a essas práticas, sua linha de produção pode alcançar maior eficiência e redução de desperdícios, melhorando, em última análise, a produtividade geral.
Para informações mais detalhadas ou suporte personalizado, entre em contato com nossa equipe na HARSLE. Estamos aqui para ajudar com quaisquer dúvidas e fornecer recursos adicionais para aprimorar ainda mais suas operações de dobra. Não hesite em explorar nossa outra documentação para continuar otimizando o desempenho da sua prensa dobradeira.


