


Jeśli chodzi o maksymalizację wydajności i precyzji obróbki metali, opanowanie trybu ręcznego DELEM DA-58T jest niezbędne. Jeśli szukasz prostego przewodnika po konfiguracji tego panelu sterowania, jesteś we właściwym miejscu.
W tym artykule przedstawię instrukcje krok po kroku, które pomogą Ci pewnie poruszać się po trybie ręcznym prasy krawędziowej DELEM DA-58T i zoptymalizować pracę prasy. Niezależnie od tego, czy jesteś początkującym, który chce zacząć, czy doświadczonym użytkownikiem, który chce udoskonalić swoje techniki, ten przewodnik oferuje praktyczne wskazówki niezbędne do udanej konfiguracji i obsługi. Zanurzmy się w temat i odkryjmy pełen potencjał Twojej prasy krawędziowej DELEM DA-58T.
Wstęp

Po kliknięciu przycisku nawigacyjnego Manual sterowanie zostanie przełączone na ręczny tryb produkcji.
W trybie ręcznym urządzenia DELEM DA-58T parametry programuje się dla jednej operacji gięcia, dzięki czemu urządzenie idealnie nadaje się do testowania, kalibracji i pojedynczych gięcia.

Tryb ten działa niezależnie od trybu automatycznego i można go skonfigurować niezależnie od zapisanych programów.
U góry ekranu trybu ręcznego znajdują się aktualne pozycje osi Y i głównej osi X. Dodatkowe osie i funkcje są wyświetlane w dwóch kolumnach poniżej. Podświetlenie wartości osi Y lub X oznacza, że ich znaczniki odniesienia zostały zlokalizowane i są prawidłowo ustawione zgodnie z zaprogramowanymi wartościami.
Tryb ręczny, wyjaśnienie parametrów
Poniżej znajduje się lista dostępnych parametrów w trybie ręcznym DELEM DA-58T.
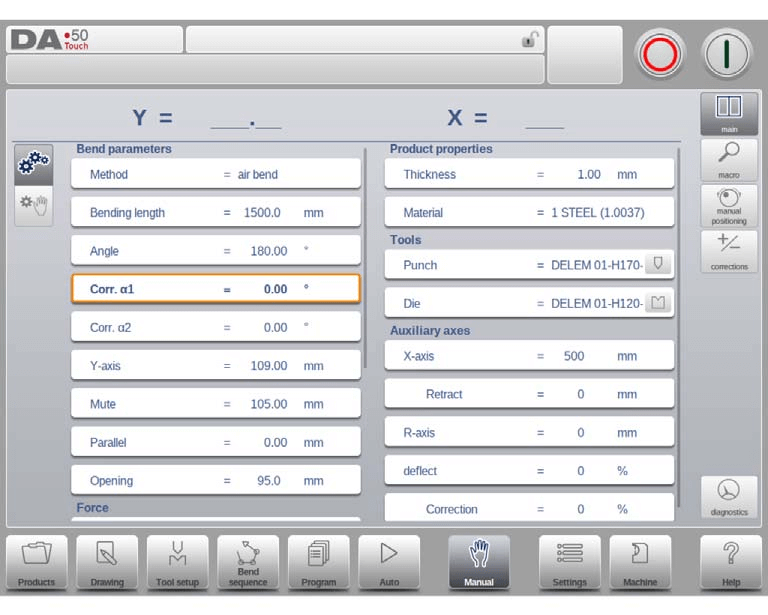
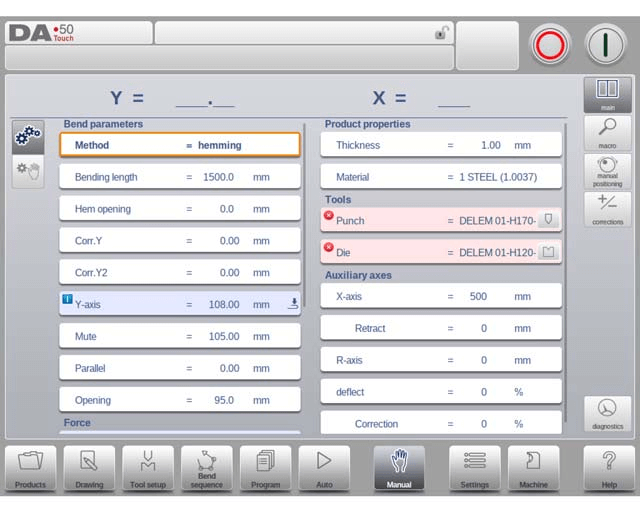
Parametry gięcia
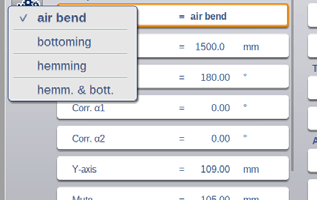
- Metoda: Wybierz żądaną metodę gięcia. Sterowanie obsługuje cztery metody:
- Parametry gięcia
- Zgięcie powietrza
- Dotarcie do dna
- Podwijanie
- Podwijanie i wykańczanie dołu
- Długość gięcia: Zaprogramuj długość gięcia arkusza.
- Kąt:Kąt zgięcia.
- Korekta α 1, Korekta α 2: Korekta kąta gięcia. Wprowadź w następujący sposób:
- Zaprogramowana wartość 90 stopni; zmierzona wartość 92 stopnie -> program Corr.α z wartością -2.
- Zaprogramowana wartość 90 stopni; zmierzona wartość 88 stopni -> program Corr.α z +2.
- Corr.Y:Korekta położenia osi Y, w przypadku wybrania opcji dołka.
- Oś Y:Zaprogramowana lub obliczona wartość osi Y służąca do uzyskania określonego kąta.
- Niemy:Punkt sekwencji, w którym oś Y przełącza się z szybkiej prędkości zamykania na prędkość naciskania.
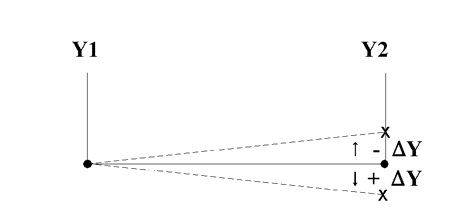
- Równoległy:Różnica między cylindrami po lewej i prawej stronie (Y1 i Y2). Wartości dodatnie oznaczają, że prawa strona jest niższa; wartości ujemne oznaczają, że jest wyższa.
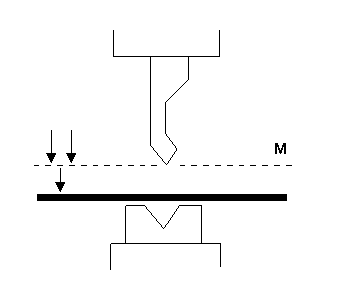
- Otwór: Otwarcie szczeliny między stemplem a matrycą po gięciu. Wartość dodatnia oznacza wartość powyżej wartości „Mute”, a ujemna poniżej.
- Otwarcie dołu: Odległość otwarcia między dwoma kołnierzami w gięciu podwinięcia. Domyślnie ustawiony jest parametr trybu ustawień „Domyślne otwarcie podwinięcia”.
Siła
- Siła:Zaprogramowana siła stosowana podczas naciskania.
- Czas przebywania:Czas utrzymania stempla w punkcie gięcia.
- Dekompresja:Odległość dekompresyjna w celu uwolnienia ciśnienia roboczego po zgięciu.
Prędkość
- Prędkość:Prędkość nacisku osi Y podczas gięcia.
- Prędkość rozkładu: Programowalna prędkość podczas suwu dekompresyjnego.
Funkcje
- Poczekaj na wycofanie: Zdecyduj, czy oś Y ma czekać na zakończenie wycofywania. Wybierz Tak lub Nie.
Właściwości produktu
- Grubość: Zaprogramuj grubość blachy.
- Tworzywo: Wybierz jeden z zaprogramowanych materiałów do obliczenia głębokości gięcia. Można zaprogramować do 99 materiałów.

Narzędzia
- Dziurkacz: Wybrany identyfikator stempla. Dotknij, aby zmodyfikować lub wybrać z biblioteki stempli.
- Umierać: Wybrany identyfikator matrycy. Modyfikuj lub wybierz z biblioteki matryc.
Wybierz narzędzia bezpośrednio lub skorzystaj z funkcji filtrowania klawiatury, aby szybko je wybrać. W razie potrzeby możesz również obrócić dziurkacz.

Wskaźniki
- Oś pomocnicza:Parametry dla dowolnych osi pomocniczych, takich jak X, R lub Z.
- Wycofać: Odległość cofnięcia osi podczas gięcia. „Cofanie zderzaka tylnego” rozpoczyna się w punkcie zacisku.
- Prędkość:Prędkość osi w aktualnym zakręcie, programowalna jako procent maksymalnej prędkości.
Powyższe parametry można programować i modyfikować w razie potrzeby. Po naciśnięciu przycisku Start zaprogramowane parametry stają się aktywne.
Parametry programowania i widoki
W trybie ręcznym DELEM DA-58T można programować parametry indywidualnie. Wpływ jednego parametru na pozostałe można obliczyć automatycznie lub ręcznie, w zależności od wyboru po lewej stronie ekranu. Przełącznik automatycznego obliczania pozwala wybrać pomiędzy:

Automatyczny:Efekty parametrów są obliczane automatycznie.

Podręcznik:Efekty parametrów są dostosowywane poprzez nadpisywanie i akceptowanie proponowanych wartości.
Relacje między parametrami są oznaczone symbolem i kolorem tła.
Jeśli parametry ulegną zmianie ze względu na niedawną korektę danych wejściowych, pojawi się symbol informacyjny.

Symbol gwiazdki oznacza wartość parametru, która różni się od obliczonej wartości kontrolki. Jest to przydatne, gdy wartość jest celowo inna lub ograniczona przez parametry.

Symbol błędu wskazuje nieprawidłową wartość w oparciu o bieżące programowanie, na przykład programowanie zagięcia krawędziowego bez użycia narzędzi do zaginania krawędzi.

Pogląd
Po prawej stronie ekranu przyciski poleceń zapewniają dostęp do różnych widoków, w tym głównego, makro, ręcznego pozycjonowania, korekt i diagnostyki.

Makro
Dzięki makro sterowanie przełącza się na nowy widok, w którym na ekranie wyświetlane są tylko duże wartości osi. Widok ten można wykorzystać, pracując w pewnej odległości od sterowania, wciąż mając możliwość odczytu wartości osi.

Ręczny ruch osi
Procedura ruchu
Aby ręcznie przesunąć oś do określonej pozycji w trybie ręcznym DELEM DA-58T, można skorzystać z suwaka u dołu ekranu. Klikając „Manual Pos” na ekranie głównym trybu ręcznego, uzyskasz dostęp do odpowiedniego interfejsu.

W tym trybie możesz przesuwać dowolną wyświetlaną oś, przesuwając suwak od jej środka. Dokładna procedura przesuwania osi zależy od tego, na którą oś celujesz, a suwak automatycznie się wyśrodkuje po zwolnieniu.
W przypadku osi pomocniczych, przed kontynuacją upewnij się, że sterowanie jest zatrzymane. Najpierw wybierz żądaną oś tylnego zderzaka, a kursor ją podświetli. Następnie możesz ją przesunąć za pomocą suwaka.
Aby ręcznie ustawić oś Y, należy wykonać podobne czynności jak w przypadku osi pomocniczych, jednak muszą zostać spełnione pewne warunki: sterowanie musi być uruchomione, funkcja „regulacji” musi być aktywna (jeśli nie jest, pojawi się stosowny komunikat), oś Y musi znajdować się poniżej punktu wyciszenia, a do CNC musi zostać wydane polecenie naciśnięcia.
Uczyć
Aby zaprogramować sterowanie i przechwycić pozycję znalezioną poprzez ręczne przesunięcie osi w trybie ręcznym DELEM DA-58T, można zastosować prostą procedurę. Po ręcznym przesunięciu osi do żądanej pozycji można ją zapisać, dotykając nazwy osi w kolumnie „Zaprogramowane”. Ta czynność spowoduje przeniesienie rzeczywistej wartości osi z lewej strony do pola zaprogramowanej osi po prawej stronie.

Po powrocie do ekranu standardowego trybu ręcznego parametr osi będzie odzwierciedlał ostatnio wczytaną wartość.
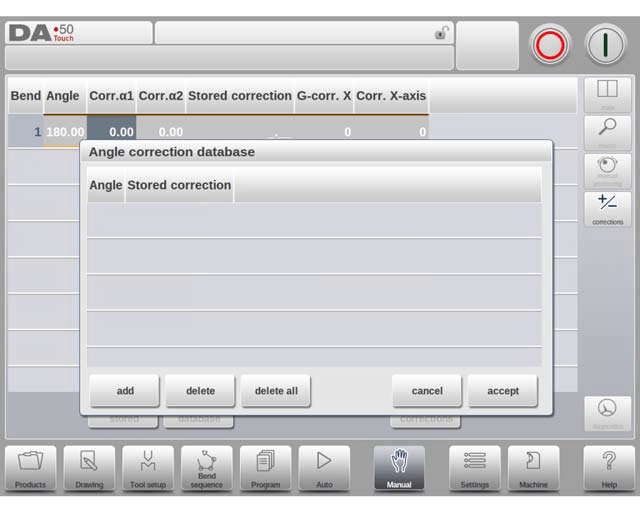
Poprawki
W trybie ręcznym DELEM DA-58T można przeglądać korekty zaprogramowanego gięcia, wyświetlane jako pojedyncza linia, ponieważ zawsze jest to pojedyncze gięcie.

Podobnie jak w trybie automatycznym, tutaj można zweryfikować zaprogramowane poprawki. Ekran ten umożliwia monitorowanie wpisów w bazie danych poprawek oraz korekt początkowych, które znacząco wpływają na wyniki gięcia. Uzyskując dostęp do bazy danych, można modyfikować poprawki, co jest pomocne podczas próbnego gięcia, umożliwiając znalezienie i zapisanie odpowiednich poprawek.
Naddatek na zginanie
Funkcja „Dodatek na gięcie” pomaga użytkownikom w dodawaniu wpisów do tabeli dodatków na gięcie, gdy jest aktywna. Wystarczy wprowadzić korekty dodatków na gięcie na podstawie aktywnych parametrów gięcia przed ich dodaniem. Po podaniu wartości zmierzonej, funkcja oblicza dodatek na gięcie na podstawie różnicy między wartościami zaprogramowanymi a zmierzonymi. Aby aktywować tabelę dodatków na gięcie, przejdź do trybu ustawień.
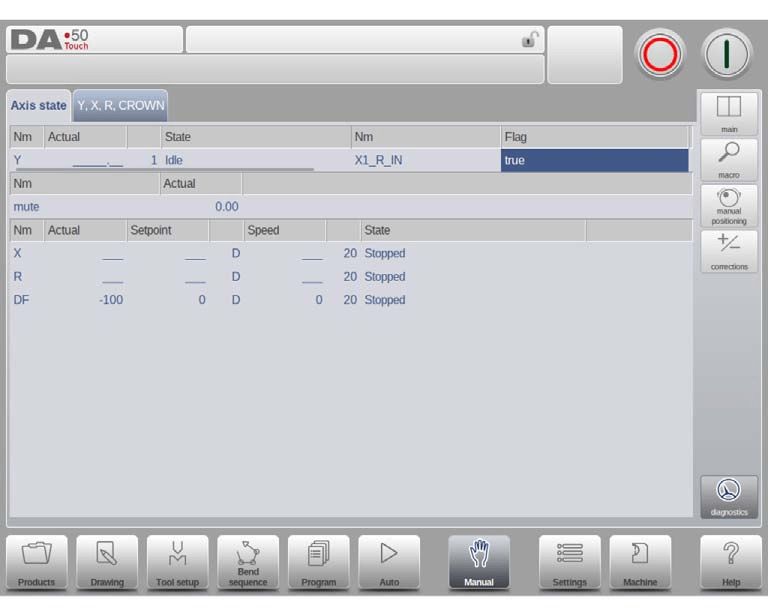
Diagnostyka
Po kliknięciu opcji Diagnostyka sterowanie przełącza się na widok pokazujący stany osi. W tym oknie można obserwować aktualny stan dostępnych osi. Ekran ten może również pozostać aktywny podczas uruchamiania sterowania, umożliwiając monitorowanie jego zachowania podczas cyklu gięcia.
Status wejścia/wyjścia
Po kliknięciu zakładki I/O w obszarze Diagnostyka, tryb ręczny DELEM DA-58T przełącza się na wyświetlanie stanu wejść i wyjść. W tym oknie można obserwować aktualny stan wejść i wyjść, nawet gdy sterowanie jest aktywne. Ta funkcja umożliwia monitorowanie zachowania sterowania podczas cyklu gięcia.

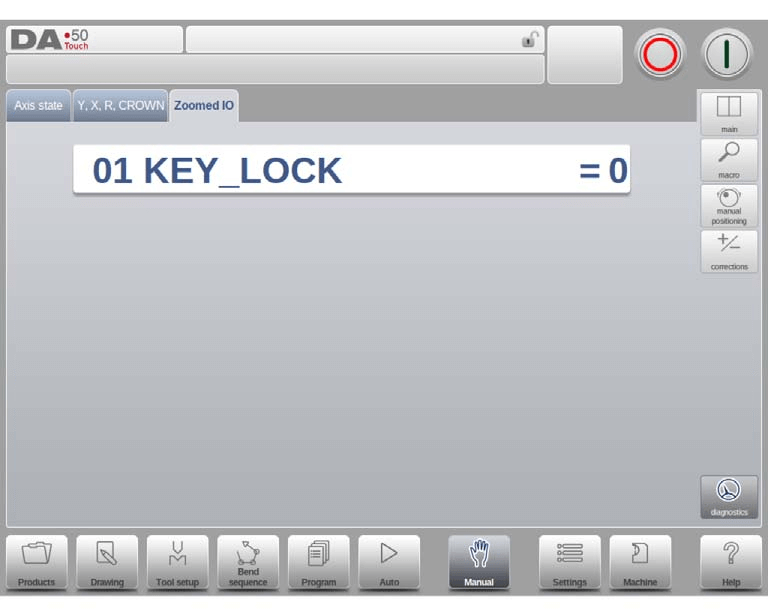
Powiększone IO
Wybierając jeden lub więcej pinów (maksymalnie 8), tworzona jest dodatkowa strona Zoomed IO z powiększonym widokiem wybranego IO, umożliwiając łatwe zdalne monitorowanie wybranych pinów.
Często zadawane pytania (FAQ)
Jak uruchomić tryb ręczny DELEM DA-58T?
Aby uruchomić tryb ręczny DELEM DA-58T, należy włączyć jednostkę sterującą i przejść do ekranu wyboru trybu. Z listy należy wybrać opcję „Tryb ręczny”, upewniając się, że urządzenie jest prawidłowo skonfigurowane do obsługi ręcznej, zgodnie z instrukcją obsługi.
Co powinienem zrobić, jeśli ustawienia trybu ręcznego urządzenia DELEM DA-58T nie reagują?
Jeśli ustawienia trybu ręcznego DELEM DA-58T nie reagują, sprawdź połączenia systemowe i upewnij się, że wszystkie kable są prawidłowo podłączone. Uruchom ponownie jednostkę sterującą i sprawdź, czy na ekranie wyświetlają się komunikaty o błędach. Zapoznaj się z sekcją rozwiązywania problemów w instrukcji obsługi lub skontaktuj się z działem obsługi klienta, aby uzyskać dalszą pomoc.
Czy istnieje możliwość zapisania ustawień niestandardowych w trybie ręcznym urządzenia DELEM DA-58T?
Tak, możesz zapisać swoje ustawienia niestandardowe w trybie ręcznym DELEM DA-58T, wchodząc do menu ustawień i wybierając opcję „Zapisz bieżące ustawienia”. Ta funkcja umożliwia szybkie wczytanie preferowanych konfiguracji dla powtarzających się zadań, zwiększając wydajność.
Wniosek
Konfigurowanie DELEM DA-58T Tryb ręczny Skuteczność ma kluczowe znaczenie dla optymalizacji pracy prasy krawędziowej. Starannie przestrzegając każdego kroku, w tym konfiguracji systemu, doboru narzędzi i wprowadzania parametrów materiału, można osiągnąć precyzyjne i wydajne procesy produkcyjne. Regularne przeglądanie instrukcji i pozostawanie na bieżąco z funkcjami systemu dodatkowo zwiększy wydajność maszyny.
Prawidłowa konfiguracja i konserwacja są niezbędne dla zapewnienia trwałości i wydajności prasy krawędziowej. Przestrzegając tych wytycznych i regularnie przeprowadzając kontrole, możesz zminimalizować przestoje i zwiększyć wydajność produkcji. Aby uzyskać bardziej szczegółowe wsparcie lub zadać pytania, skontaktuj się z naszym zespołem. Dodatkowo, zapoznaj się z naszą ofertą zasobów i dokumentacji, aby uzyskać więcej informacji na temat maksymalizacji możliwości swojej maszyny.


