


Jeśli chodzi o precyzję i wydajność produkcji, wykorzystanie korekt ESA S860 może być przełomem. Jeśli szukasz sposobów na usprawnienie swoich operacji i maksymalne wykorzystanie tych korekt, jesteś we właściwym miejscu.
W tym dokumencie przeprowadzę Cię przez niezbędne kroki i techniki efektywnego wdrażania korekt ESA S860 do Twojego procesu roboczego. Po przeczytaniu tego przewodnika będziesz w pełni rozumieć, jak wykorzystać te korekty do usprawnienia procesów produkcyjnych, zapewniając większą dokładność i spójność wyników. Niezależnie od tego, czy dopiero zaczynasz korzystać z ESA S860, czy chcesz udoskonalić swoje obecne metody, ta dokumentacja dostarczy Ci niezbędnych informacji.
Konfiguracja Współczynnik klinczowania/biciaS
Aby usprawnić stosowanie poprawek ESA S860, należy zrozumieć konfigurację współczynników klinczowania i bicia.
Wprowadzanie maski współczynników korekcyjnych
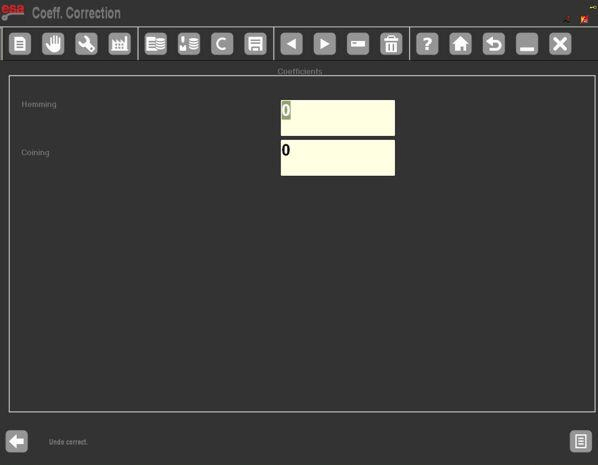
Zacznij od uzyskania dostępu do maski korekcji. W tym celu nawiguj po interfejsie ESA S860, naciskając odpowiednie klawisze, które wyświetlają współczynniki korekcji.
Po wejściu do środka znajdź i wybierz [Współczynnik korekcji] klawisz. Spowoduje to otwarcie odpowiedniej maski:
Wykorzystanie współczynnika klinczowania/wybijania
Wprowadź współczynniki klinczowania i bicia w masce współczynników korekcyjnych. Po wprowadzeniu danych konieczne jest ponowne uruchomienie systemu, aby te parametry zaczęły obowiązywać.
Współczynniki te modyfikują wartości PMI (Preliminary Manifold Instructions) dla wszystkich operacji zaciskania i bicia monet, dodając wartości algebraicznie do standardowych obliczeń.
Zapisywanie i usuwanie współczynników
Współczynniki są zapisywane przy każdym wyjściu z maski, co zapewnia spójność między sesjami. Jeśli zmiany trzeba cofnąć, użyj [Ignoruj Popraw.] klawisz aby powrócić do ustawień pierwotnych.
Stosowanie korekt w trybie półautomatycznym
Wprowadzenie korekt w trybie półautomatycznym może dodatkowo zwiększyć dokładność działania maszyny ESA S860.
Wprowadzanie korekt w masce półautomatycznej
Możliwe jest bezpośrednie wprowadzanie korekt kątów i zatrzymań w masce półautomatycznej z możliwością zastosowania wprowadzonej korekty do wszystkich kątów, które są takie same jak konkretny fragment danej sekcji lub tylko do konkretnego zagięcia.
W trybie STOP korekty kątów i zatrzymań można wprowadzać bezpośrednio w masce półautomatycznej.
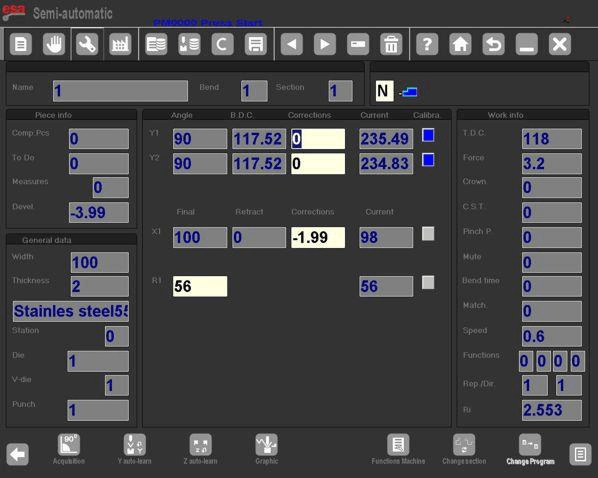
Edytuj poprawki osi Y1, Y2, i X, i wysokość Osie R.
Kiedy START jest włączona, edycja wymieniona powyżej będzie dostępna tylko w formacie „tylko do odczytu”, dlatego maska półautomatyczna będzie wyglądać następująco:

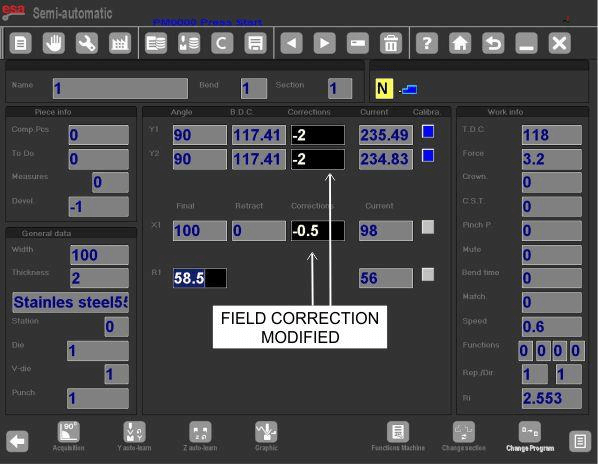
Jeśli korekty zostaną wprowadzone na masce półautomatycznej, zostaną one wprowadzone bezpośrednio do bieżącego gięcia. Po zmianie korekty, odpowiadająca jej edycja jest wyświetlana z odwróconymi kolorami; w ten sposób operator jest informowany o wprowadzonych zmianach.
Aby skutecznie zastosować poprawki ESA S860 do wszystkich zagięć o tym samym kącie co bieżące zagięcie, należy wykonać następujące czynności w celu usprawnienia operacji:
- Wprowadź niezbędne poprawki.
- Naciśnij klawisz , aby uzyskać dostęp do menu podrzędnego.
- Użyj klawisza funkcyjnego [Konf. Ta sama Sekcja Ang.] w celu rozszerzenia poprawek w ramach tej samej sekcji lub [Konf. Pr. Same Ang.] dla wszystkich zakrętów o tym samym kącie.
Korekty promienia wewnętrznego
W przypadku korekt dotyczących promienia wewnętrznego, promień wewnętrzny można wyświetlić i dostosować w menu ustawień. Promień ten jest obliczany automatycznie i może wpływać na obliczenia rozciągania, jeśli program jest numeryczny. Należy pamiętać, że zmiany promienia wewnętrznego nie wpłyną na rozciąganie w trybie graficznym. Zawsze należy zapoznać się z instrukcją obsługi parametrów maszyny, aby uzyskać szczegółowe informacje na temat różnych trybów zastosowania promienia wewnętrznego.
Wdrożenie tych kroków gwarantuje efektywne wykorzystanie poprawek ESA S860, optymalizację procesów gięcia i zachowanie precyzji w całym projekcie.
Wybór wzoru DIN do obliczenia rozciągania
Można wybrać standardowy wzór DIN, jeśli jest potrzebny (do obliczenia rozciągania). Aby wybrać standardowy wzór, należy ustawić parametr „Formuła rozciągania” na 1. Operator może również zmienić to pole z poziomu Parametry użytkownika (4) maska.
Zapoznaj się z instrukcją obsługi parametrów maszyny, aby uzyskać informacje na temat różnych metod nakładania promienia wewnętrznego.
Sprawdzanie programu

Po wprowadzeniu zmian naciśnij ten przycisk, aby ustawić osie we właściwej pozycji.
Kontrola programu będzie przeprowadzana automatycznie, a w przypadku wykrycia błędów zostanie wysłana wiadomość, która pozostanie w trybie półautomatycznym. ZATRZYMYWAĆ SIĘ status.
Cykl samouczenia się
Istnieją sytuacje szczególne, w których nie jest możliwe wykorzystanie wysokości gięcia obliczonej przez sterowanie numeryczne do wykonania gięcia (dziurkowanie zaokrąglone, gięcia do formy, gięcia poza wnęką itp.).
W takich okolicznościach pomocne jest wykorzystanie cyklu samouczenia wysokości gięcia, którą chcesz wykonać na masce PÓŁAUTOMATYCZNEJ.
Jeśli ta procedura jest aktywowana, na końcu gięcia nie zostanie wprowadzona żadna zmiana. Zamiast tego cykl pozostanie na bieżącym gięciu, aby umożliwić operatorowi przeprowadzenie samodzielnego uczenia się pożądanej wysokości zakończenia gięcia.
Aby efektywnie wykorzystać poprawki ESA S860 w celu uzyskania dokładnej wysokości gięcia, należy wykonać następujące czynności:
- Dla wysokości większych niż obliczone:Użyj pedału, aby ustawić odpowiednią wysokość.
- Dla wysokości mniejszych niż obliczone:
- Włącz opcję Podnieś do PMS za zgodą.
- Zwolnij pedał na żądanej wysokości.
- Wyreguluj za pomocą pokrętła na przednim panelu w odstępach co 0,1 mm.
- W trybie PÓŁAUTOMATYCZNYM:
-naciskać

– naciśnij ten klawisz, aby ustawić osie ogranicznika.

– naciśnij pedał opuszczania aby zrobić zakręt;
– wyszukaj punkt pożądanego końca gięcia, korzystając z procedury opisanej powyżej;
– naciskać [samouczka. Y];
– naciśnij pedał podnoszenia;
– powtórz procedurę dla wszystkich zakrętów programu; aby przechodzić między poszczególnymi zakrętami użyj tych dwóch klawiszy.


Po zakończeniu samodzielnego uczenia się wszystkich zakrętów:
– naciśnij go i wykonaj program od pierwszego zakrętu
Często zadawane pytania (FAQ)
Jakie kroki powinienem podjąć, jeśli muszę usunąć zmiany wprowadzone w korektach ESA S860?
Aby usunąć zmiany wprowadzone w poprawkach, wystarczy nacisnąć klawisz [Ignoruj poprawione]. Ta czynność przywraca wartości obecne w momencie pierwszego otwarcia maski korekcyjnej, cofając wszelkie wprowadzone modyfikacje.
Jak mogę zastosować korekty do wszystkich zagięć o tym samym kącie w trybie półautomatycznym?
Gdy maszyna pracuje w trybie półautomatycznym, można rozszerzyć korekty na wszystkie zagięcia o tym samym kącie, wywołując menu podrzędne i naciskając klawisz funkcyjny [Konf. Ten sam. Kąt. Sekcji]. Gwarantuje to równomierne zastosowanie korekt do podobnych zagięć.
Czy mogę automatycznie zapisać poprawki ESA S860?
Tak, po wyjściu z maski współczynników korekcyjnych, współczynniki są automatycznie zapisywane. Pozostają one powiązane z maszyną, ale nie są przechowywane w bieżącym programie roboczym, co pozwala na spójne stosowanie ich w różnych sesjach.
Wniosek
Podsumowując, efektywne wykorzystanie korekt ESA S860 może znacząco zwiększyć precyzję i wydajność operacji produkcyjnych. Postępując zgodnie ze szczegółowymi instrukcjami dotyczącymi ustawiania współczynników klinczowania i bicia oraz skutecznego stosowania korekt w trybie półautomatycznym, zapewnisz optymalną pracę maszyny. Wybór odpowiednich formuł obliczeniowych, takich jak formuła DIN, dodatkowo zwiększa dokładność operacji.
Aby nadal optymalizować wykorzystanie korekt ESA S860, rozważ zapoznanie się z dodatkowymi materiałami lub naszymi szczegółowymi instrukcjami, aby uzyskać głębsze informacje. W razie dodatkowych pytań lub potrzeby spersonalizowanej pomocy, prosimy o kontakt z naszym zespołem wsparcia. Jesteśmy tu po to, aby pomóc Ci osiągnąć najwyższą wydajność Twoich maszyn. Aby uzyskać bardziej szczegółowe poradniki lub wsparcie techniczne, skontaktuj się z nami lub zapoznaj się z naszą pozostałą dokumentacją.


