


Точность гибки критически важна для производства высококачественных деталей, и гибочный станок HS-15T специально разработан для удовлетворения этой потребности. Если вы хотите повысить точность гибочных операций, вы обратились по адресу. В этом руководстве я расскажу, как гибочный станок HS-15T поможет вам добиться этой точности, предоставив подробные рекомендации и советы. Мы рассмотрим особенности, которые делают гибочный станок HS-15T уникальным, и как их эффективно использовать в ваших проектах. Независимо от того, являетесь ли вы опытным специалистом или новичком в металлообработке, эта статья предоставит вам ценные знания для совершенствования ваших методов гибки и повышения общей производительности.
Настройка гибочного приложения HS-15T
Шаг 1: Подготовка машины и рабочей зоны
Чтобы добиться точности с ХС-15Т Перед началом гибки первым делом необходимо убедиться, что ваш станок и рабочая зона надлежащим образом подготовлены. Для начала включите главный выключатель питания на корпусе и запустите масляный насос; в этот момент станок должен оставаться в режиме ожидания. Убедитесь, что кнопка аварийной остановки не нажата, так как это может помешать работе станка. Перед началом работы убедитесь, что пол ровный, а рабочая зона свободна от мусора, так как эти факторы могут существенно повлиять на точность гибки.
Шаг 2: Выбор и установка подходящего инструмента
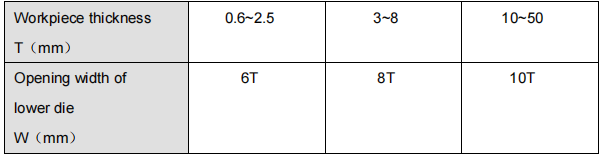
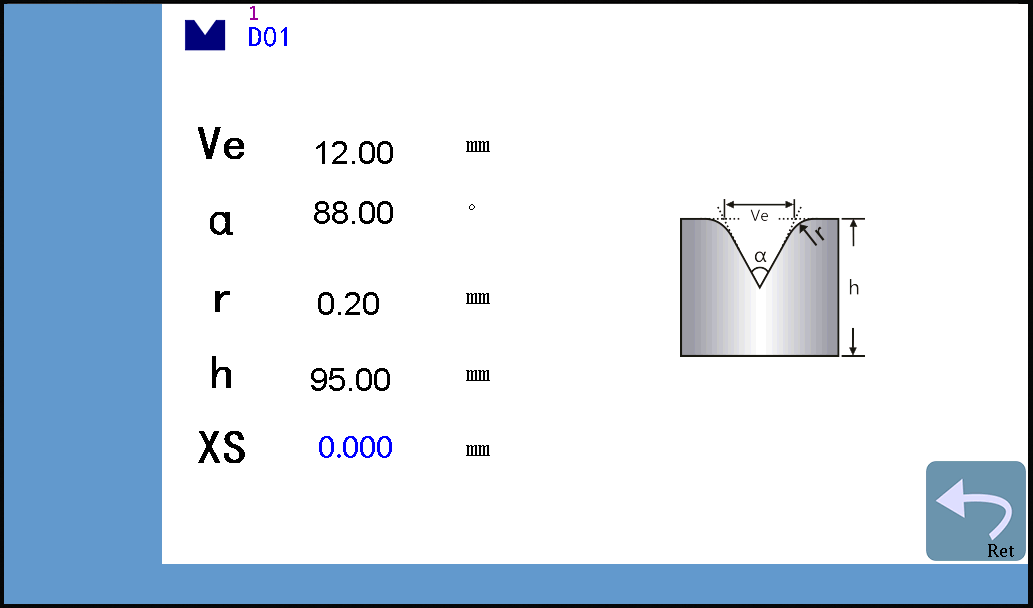
Выбор подходящего штампа имеет решающее значение для точности. Например, если толщина гибочной пластины составляет 2 мм, выберите канавку шириной в шесть раз больше толщины пластины. Таким образом, для толщины 2 мм следует выбрать канавку шириной 12 мм (Ve).
Критерии выбора отверстия нижнего штампа:
Тщательно устанавливайте и отрегулируйте инструмент, следя за тем, чтобы все компоненты были надежно закреплены и выровнены, чтобы избежать отклонений в процессе гибки.
Эксплуатация гибочного станка HS-15T
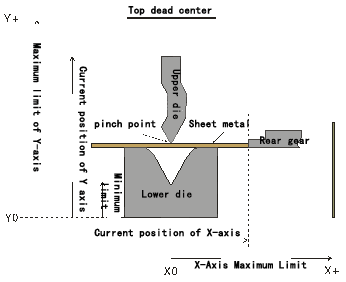
Эскизы положения и направления движения осей X/Y следующие:
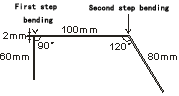
Этот пример проиллюстрирован на примере программирования следующих продуктов:
Замечания:

Если у вас возникла чрезвычайная ситуация или вам необходимо вернуться в ходе операции, вы можете нажать кнопку, чтобы вернуться в верхнюю мертвую точку.
Если установлено расстояние уступки ограничителя обратного хода, уступка ограничителя обратного хода начинается после наступления времени зажима.
Запрограммируйте машину в соответствии с требованиями к гибке, обеспечив точный ввод углов и длины: Шаг 1 включает в себя гиб на 90 градусов с длиной 60 мм, а Шаг 2 требует гиб на 120 градусов с длиной 80 мм.
Шаг 3: Выбор правильного режима работы
Гибочный станок HS-15T предлагает три режима работы: точечный, одиночный и непрерывный. Каждый режим поддерживает автоматическую смену этапов, обеспечивая плавный переход к последующим этапам гибки. Выберите режим, наилучшим образом соответствующий потребностям вашего проекта, для получения эффективных и точных результатов.
Включите электричество
Сначала включите главный выключатель питания на шкафу, а затем запустите масляный насос (машина в это время не работает).
Обратите внимание: Не нажимайте кнопку аварийной остановки, в противном случае машина не сможет работать и масляный насос не запустится.
Базовые настройки панели дисплея

Нажмите на иконку на главной странице программирования и введите толщину платы (2 мм).


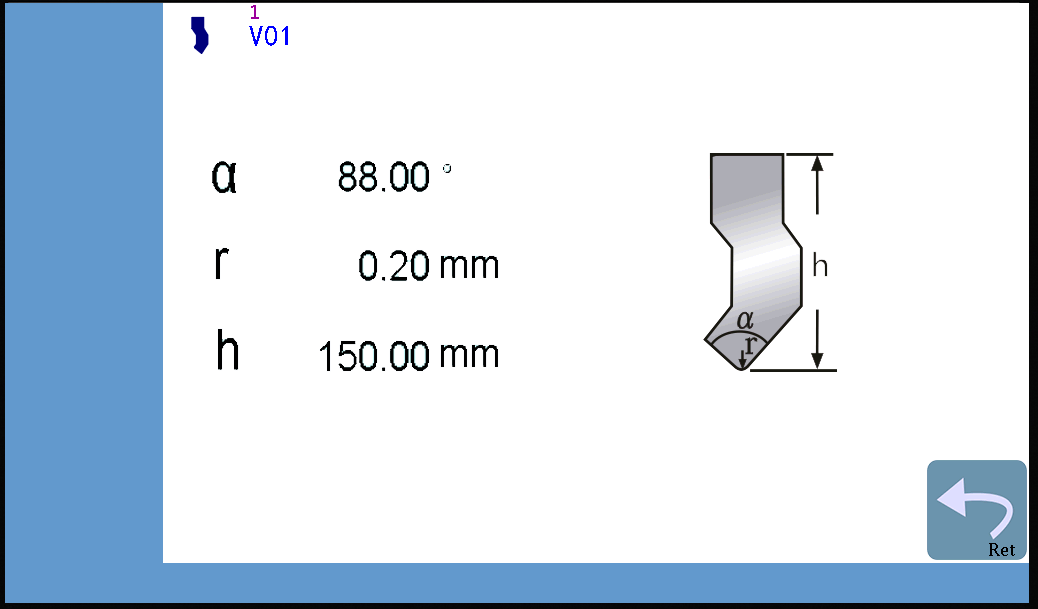
Нажмите на один из этих двух значков, отредактируйте кубик (верхний/нижний) на всплывающей странице.
Верхняя модель редактируется следующим образом:
Следующая модель редактируется следующим образом:

Нажмите на иконку на главной странице программирования, чтобы войти больше данных по изгибу.
Шаг 4: Калибровка в ручном режиме перемещения
Калибровка крайне важна для точной гибки. В гибочном станке HS-15T можно вручную перемещать ось Y (ползунок), ось X (задний щиток) и ось R (штифт щитка) для калибровки положения.
- На странице программирования нажмите на значок меню и выберите «Ручное перемещение» во всплывающем меню, чтобы открыть страницу руководства.
- Щелкните – /++ 'или 'Более' Кнопка для перемещения выбранной оси Y (ползунок)/оси X (задний щиток)/оси R (палец щитка). При перемещении каждой оси текущее значение координат оси изменяется соответствующим образом, и перемещение может быть остановлено до достижения нужного положения.
Установка контрольной точки для оси X:
Для обеспечения точности гибки HS-15T используйте измерительный инструмент для определения длины контрольной точки от точки зажима до заднего щитка. Запишите измеренное значение в настройках над значком заднего щитка. При перемещении оси X поместите листовой материал между верхним и нижним штампами. Нажмите на лист, чтобы зафиксировать упор, затем плавно опустите его вниз, чтобы верхний штамп прижал лист, не деформируя его. Наступите на ногу, чтобы вернуть верхний штамп в верхнюю мертвую точку, и измерьте отпечатки и малую пластину. Это вертикальное расстояние представляет собой длину от точки зажима до заднего щитка, что крайне важно для достижения точности гибки HS-15T.
Установка точки отсчета оси Y:
Для оси Y гибочного станка HS-15T используйте измерительный инструмент для измерения расстояния от нижней части нижнего штампа до верхней части верхнего штампа. Введите это значение в настройки над значком заднего блока. Чтобы найти это расстояние, верните верхний штамп в верхнюю мёртвую точку, наступив на ногу, переместите ползунок оси Y в определённое положение, а затем опустите его, чтобы предотвратить дальнейшее движение вниз. Измерьте вертикальное расстояние от нижней части нижнего штампа до верхней части верхнего штампа. Эта точная калибровка обеспечивает точность гибочного станка HS-15T.
Часто задаваемые вопросы (FAQ)
Как обеспечить точность при использовании гибочного станка HS-15T?
Чтобы добиться точности при работе с гибочным станком HS-15T, убедитесь, что рабочее место чистое, а станок правильно откалиброван. Точно отрегулируйте оси Y и X в ручном режиме и выберите подходящий инструмент для конкретной толщины материала. Регулярно проверяйте и обслуживайте станок для обеспечения его оптимальной производительности.
Какие шаги необходимо выполнить для правильной настройки гибочного приложения HS-15T?
Начните с включения главного выключателя питания и запуска масляного насоса, убедившись, что станок готов к работе. Выберите матрицу, соответствующую толщине материала, и запрограммируйте станок на заданные углы и длину гибки. Используйте режим ручного перемещения для точной калибровки осей станка.
Какое техническое обслуживание необходимо для гибочного станка HS-15T, чтобы сохранить его точность?
Выполняйте плановое техническое обслуживание каждые 500 часов работы. Это включает в себя проверку машины на износ, обеспечение надлежащей смазки движущихся частей и очистку для предотвращения скопления мусора. Выполнение этих действий поможет сохранить точность и продлить срок службы вашего гибочного станка HS-15T.
Заключение
Подводя итог, можно сказать, что достижение точности при работе с гибочным станком HS-15T требует тщательной настройки и регулярного технического обслуживания. Выбор подходящего инструмента, точная калибровка станка и выбор правильных режимов работы гарантируют высочайшее качество результатов гибки. Регулярные осмотры, смазка и очистка имеют решающее значение для поддержания эффективности работы и продления срока службы станка.
Если вам нужна дополнительная помощь или вы хотите узнать больше об оптимизации процессов гибки металла, обращайтесь к нашей команде экспертов за рекомендациями и поддержкой.


