


Struggling with your first welding project? Discover this beginner-friendly handheld welding machine guide to master the basics and avoid common mistakes quickly and effectively.
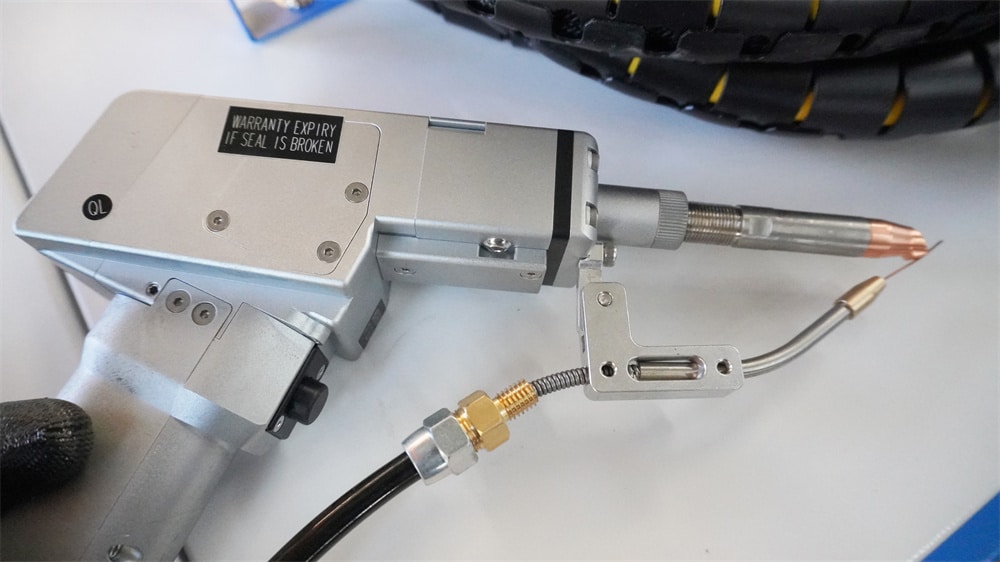
To use a handheld welding machine effectively, start by understanding its components, adjusting settings for your material, and practicing on scrap pieces. Safety gear is essential. For consistent results, maintain proper angles, speed, and steady movements. Following these steps ensures a safe and precise welding experience.
Welcome to our guide on using a handheld welding machine. Proper parameter adjustments are crucial for achieving high-quality welds. This article will provide essential welding principles, a detailed process example, and tips for fine-tuning your machine.
Welding Principles
1.Plate Thickness and Wire Thickness:
●Thicker plates require thicker wires.
●Thicker plates and wires need higher power settings.
●Wire feeding should be slower for thicker materials.
2. Power Settings:
●Lower power settings result in a whiter weld surface.
●Higher power settings can change the weld color from color to black, indicating one-sided forming.
3. Wire Thickness:
●The wire thickness should not exceed the plate thickness.
●Thicker wires can affect the fullness of the weld seam.
●Thinner wires result in a lower scanning width.
4. Laser Brand Variations:
●Different brands of lasers may require fine-tuning.
●Aluminum processes need higher power settings (20%-30% more) compared to stainless steel.
●Focus adjustments might be necessary depending on the machine.
| Material | Thickness(mm) | Scanning speed | Scanning width (mm) | Peak Power (W) | Duty cycle | Pulse frequency | Wire feeding speed (cm/S) | Welding wire |
| Carbon steel | 1 | 300 | 3 | 350 | 100 | 2000 | 60 | 1 |
| 2 | 300 | 3 | 700 | 100 | 2000 | 60 | 1.2 | |
| 3 | 300 | 3 | 1100 | 100 | 2000 | 60 | 1.2 | |
| 4 | 300 | 3 | 1500 | 100 | 2000 | 60 | 1.6 | |
| 5 | 220 | 3 | 1800 | 100 | 2000 | 50 | 1.6 | |
| 6 | 220 | 3 | 2200 | 100 | 2000 | 50 | 1.6 | |
| 8 | 220 | 3 | 3000 | 100 | 2000 | 40 | 2 | |
| Aluminum | 1 | 300 | 3 | 500 | 100 | 2000 | 60 | ER5356 1.0 |
| 2 | 300 | 3 | 800 | 100 | 2000 | 60 | ER5356 1.2 | |
| 3 | 300 | 3 | 1400 | 100 | 2000 | 60 | ER5356 1.2 | |
| 4 | 300 | 3 | 1800 | 100 | 2000 | 60 | ER5356 1.6 | |
| 5 | 220 | 3 | 2000 | 100 | 2000 | 50 | ER5356 1.6 | |
| 6 | ||||||||
| 8 | ||||||||
| Stainless steel | 0.5 | 300 | 2 | 260 | 100 | 2000 | 80 | ER304 0.8 |
| 0.8 | 300 | 2 | 300 | 100 | 2000 | 80 | ER304 0.8 | |
| 1 | 300 | 2 | 350 | 100 | 2000 | 60 | ER304 1.0 | |
| 2 | 300 | 3 | 700 | 100 | 2000 | 60 | ER304 1.0 | |
| 3 | 300 | 3 | 1100 | 100 | 2000 | 60 | ER304 1.2 | |
| 4 | 300 | 3 | 1500 | 100 | 2000 | 60 | ER304 1.2 | |
| 5 | 220 | 3 | 1800 | 100 | 2000 | 50 | ER304 1.6 | |
| 6 | 220 | 3 | 2200 | 100 | 2000 | 50 | ER304 1.6 | |
| 8 | 220 | 3 | 3000 | 100 | 2000 | 40 | ER304 2.0 |
NOTE: This data is a reference value and is subject to actual welding.
Process Example: 0.5mm Stainless Steel Shaded Corner Welding
Initial Settings:
●Welding Wire: 0.8mm Stainless Steel
●Scanning Speed: 350
●Scanning Width: 2
●Peak Power: 350
●Duty Cycle: 100
●Frequency: 2000
●Result: The outgoing light penetrated the plate and caused significant distortion.

First Adjustment:
●Peak Power: Reduced to 260
●Result: Reduced distortion, but it was still easy to burn through at the beginning of the light out.
Second Adjustment:
●Peak Power: Reduced to 200
●Result: Reduced distortion significantly. Increasing the width to 3 improved the welding effect further.

Visual Results
●Figure 1: Initial welding effect
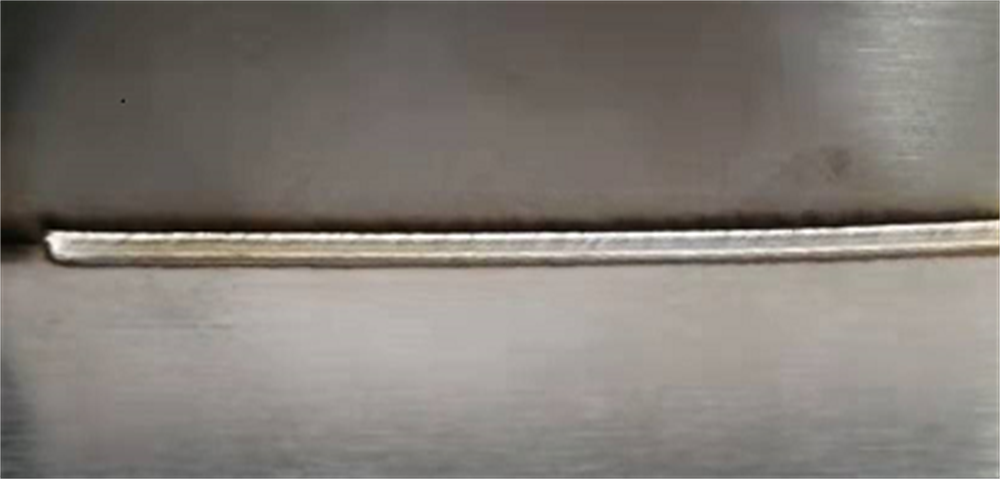
●Figure 2: Effect after increasing the width to 3.

Conclusion
Fine-tuning your welding parameters is key to achieving optimal results. Use these guidelines as a reference and adjust as needed based on your specific welding tasks. Happy welding!


