


O ajuste de desvio de ângulo pode ajudá-lo a superar desafios com desvios de ângulo em seu DELEM controlado Dobradeira. O ajuste adequado garante curvas precisas e reduz o desperdício de material.
Desvios de ângulo podem afetar a precisão da sua dobra. Aprenda a ajustar as configurações do controlador DELEM para garantir uma dobra precisa e consistente, resultando em melhor qualidade de saída e menos erros. A seguir, vamos explicar passo a passo como corrigir desvios de ângulo no controlador DELEM.
No uso do HARSLE máquina de prensa dobradeiraAlguns clientes contatam nossa equipe de pós-venda informando que há um desvio no ângulo de curvatura na mesma peça. Essa situação pode ocorrer em diversas situações. Caso seja excluída a possibilidade de desgaste do molde e a incrustação tenha se soltado, podemos ajustar os pontos de referência Y1 e Y2 para resolver o problema. Os detalhes a seguir mostram como ajustar os pontos de referência Y1 e Y2 no sistema DELEM.
Clique no ícone de cadeado no sistema
Clicando no ícone de cadeado no sistema é uma etapa crucial para proteger as configurações e impedir alterações não autorizadas. Este ícone normalmente aparece em configurações de segurança, painéis administrativos ou recursos de controle de acesso. Ao ser clicado, ele bloqueia determinadas funcionalidades, garantindo que apenas usuários autorizados possam modificar as configurações. Isso é particularmente útil em máquinas industriais, interfaces de software e controladores CNC, onde alterações acidentais podem levar a erros operacionais. Para desbloquear, os usuários podem precisar de um senha de administrador ou permissões de acesso especiais. Sempre verifique se a trava está ativada após fazer ajustes para manter integridade e segurança do sistema.
Digite a senha -25789
Quando solicitado, digite a senha -25789 para obter acesso ao sistema. Certifique-se de inseri-la exatamente como mostrado, incluindo quaisquer caracteres especiais ou formatação. Se encontrar um erro, verifique novamente se há erros de digitação ou espaços indesejados. Caso a senha não funcione, verifique se você está usando o sistema correto ou entre em contato com o administrador para obter assistência. Por motivos de segurança, nunca compartilhe a senha com pessoas não autorizadas. Se necessário, considere atualizá-la periodicamente para manter a integridade do sistema. Após a digitação correta, você receberá acesso para continuar sua tarefa sem problemas.

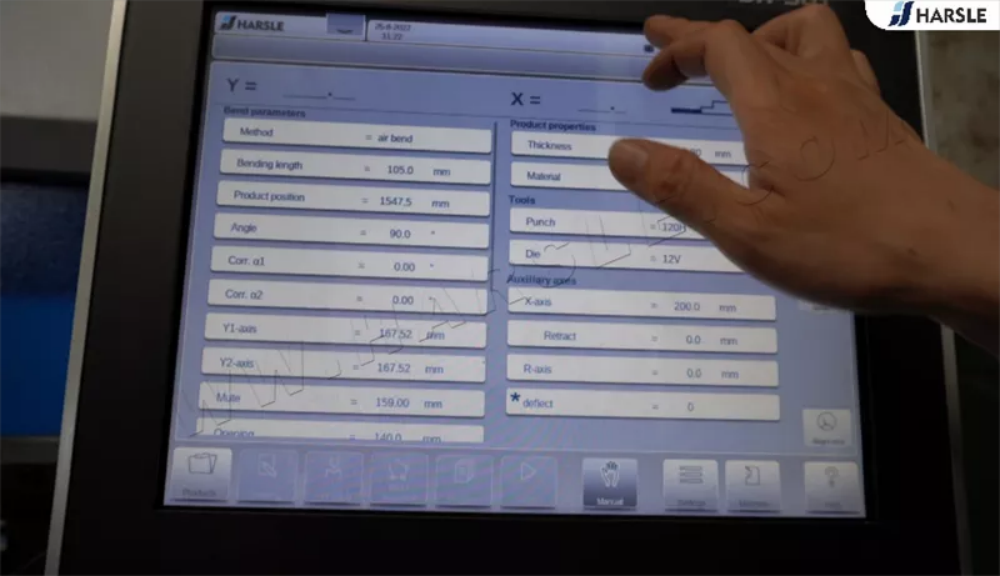
Toque no item do meio do ícone flutuante
Ao usar uma interface com um ícone flutuante, tocar no item do meio permite que os usuários acessem rapidamente as principais funções. Essa opção central normalmente é projetada para o recurso usado com mais frequência, garantindo eficiência e facilidade de navegação. Seja em um aplicativo móvel ou em uma interface de software, o item do meio geralmente serve como um atalho para ferramentas essenciais, como opções de menu, ações rápidas ou controles de navegação. Ao tocá-lo, os usuários podem otimizar seu fluxo de trabalho e aprimorar a usabilidade. Entender essa funcionalidade ajuda a melhorar a interação com plataformas digitais, tornando as tarefas mais fluidas e intuitivas. Experimente tocar no item do meio para explorar seus recursos!

Toque nos parâmetros do eixo Y
Para modificar os parâmetros do eixo Y, navegue até o painel de controle e selecione as configurações do eixo Y. Esse ajuste é essencial para garantir posicionamento e movimento precisos durante as operações. Comece acessando o menu de parâmetros e localizando a seção do eixo Y. Ajuste os valores com base na espessura do material e nos requisitos de dobra. A calibração adequada do eixo Y ajuda a evitar desalinhamentos, aumenta a precisão e melhora a eficiência geral da máquina. Após fazer os ajustes, teste o movimento para confirmar a precisão. A verificação e o refinamento regulares dessas configurações manterão o desempenho consistente e prolongarão a vida útil da máquina. Consulte sempre as diretrizes do fabricante para obter os ajustes ideais dos parâmetros.

Clique em Feedback para exibir os pontos de referência Y1 e Y2
Quando você clique no botão Feedback, o sistema recupera e exibe instantaneamente o Pontos de referência Y1 e Y2 na interface. Esses pontos de referência representam a posição em tempo real do cilindro da prensa dobradeira, ajudando os operadores a monitorar a precisão e o alinhamento durante as operações de dobra. O feedback garante que movimento e posicionamento do carneiro estão dentro das tolerâncias exigidas, reduzindo erros e melhorando a precisão. Ao referenciar os valores Y1 e Y2, os usuários podem fazer as medições necessárias ajustes para resultados de flexão ideais. Esta característica é crucial para alcançar ângulos consistentes e curvas de alta qualidade, garantindo eficiência e confiabilidade nas operações de dobradeiras CNC.

Precisamos ajustar os pontos de referência Y1 e Y2 de acordo com o uso real. Y1 indica o lado esquerdo e Y2 indica o lado direito. O número aumenta e o ângulo de curvatura também aumenta, e o número diminui e o ângulo de curvatura diminui, cerca de 0,07 mm para 1 grau.
Por exemplo, a peça de trabalho está definida para 90 graus, mas o resultado real é 90 graus no lado esquerdo e 91 graus no lado direito, então o ângulo reto precisa ser reduzido em 1 grau. Em seguida, precisamos ajustar a referência Y2, e o valor correto deve ser o valor antigo menos 0,07 mm. Realize o teste de flexão novamente para ajustar até que o resultado final atenda aos requisitos.
É isso por hoje. Se tiver mais perguntas ou estiver interessado em nossas máquinas, entre em contato conosco.


