


Ao procurar otimizar o desempenho da sua máquina, é essencial entender o Modo de Produto DELEM DA-66S.
Este guia foi elaborado para ajudá-lo a dominar rapidamente esse recurso, garantindo que você possa configurar e gerenciar seus processos de dobra com eficiência e precisão. Ao utilizar o Modo Produto DELEM DA-66S, você não apenas aprimorará seu fluxo de trabalho, mas também maximizará a produtividade e garantirá qualidade consistente em suas operações.
À medida que nos aprofundamos neste tópico, mostrarei como esse modo poderoso, juntamente com o programa e a biblioteca do produto, pode transformar sua abordagem ao controle da máquina, permitindo que você fique à frente em um cenário de manufatura competitivo.
Introdução
No Modo Produto DELEM DA-66S, você pode selecionar produtos existentes e produzidos anteriormente para iniciar a produção ou fazer modificações para criar um produto similar. Essa flexibilidade permite fluxos de trabalho de produção eficientes quando você precisa replicar ou alterar levemente itens sem começar do zero.
Se você deseja criar algo totalmente novo, o Modo Produto também permite iniciar um novo projeto escolhendo "Novo Produto" ou "Novo Programa". Esse recurso agiliza o processo de lançamento de novas linhas ou programas de produção, garantindo que você possa se adaptar rapidamente às mudanças nas demandas de fabricação e manter a eficiência. Ao aproveitar todo o potencial do Modo Produto DELEM DA-66S, você pode aprimorar suas capacidades operacionais e manter um ambiente de fabricação ágil e responsivo.
A vista principal

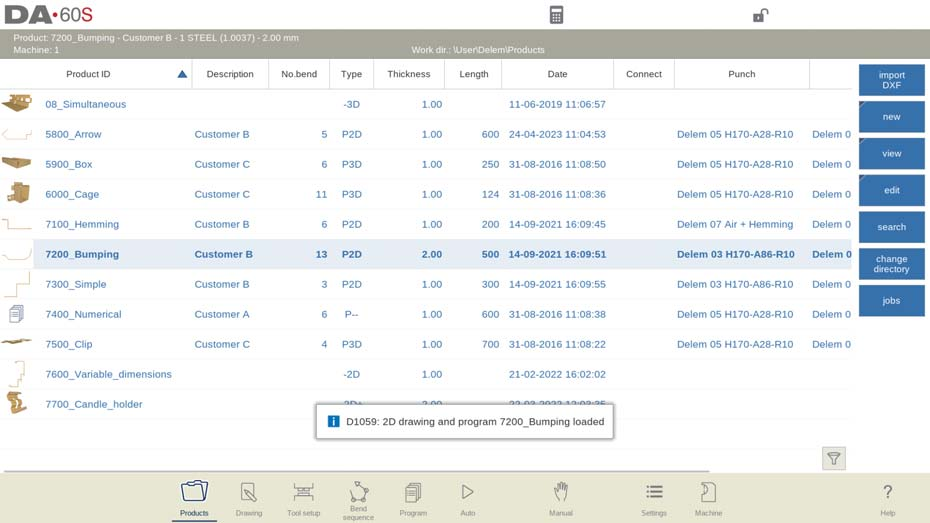
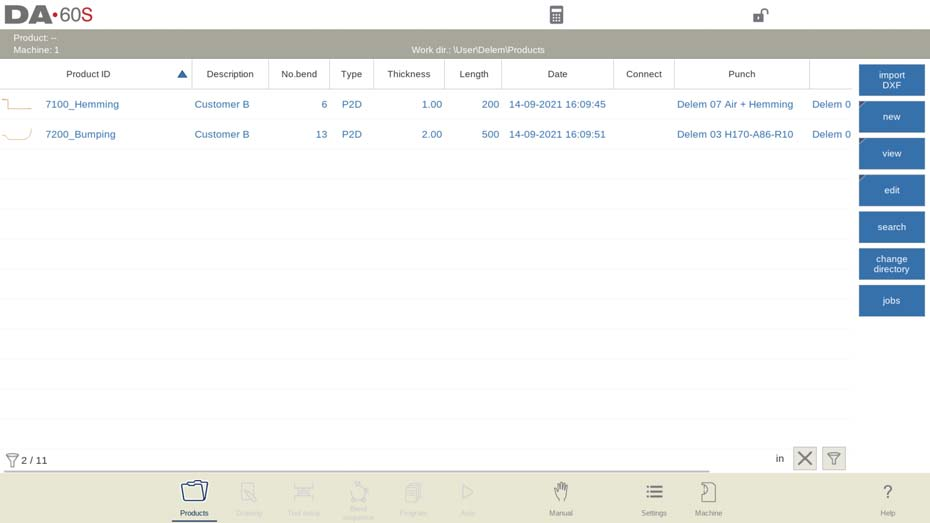
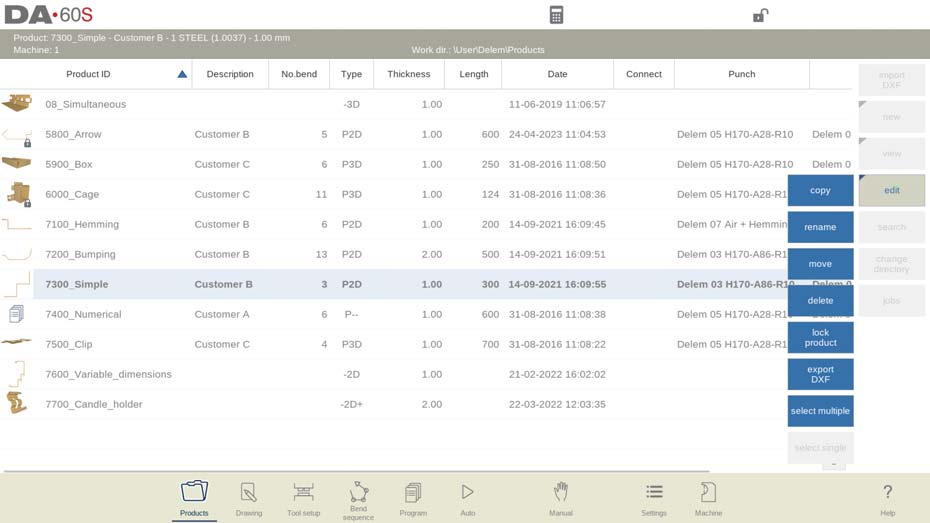
No Modo de Produto DELEM DA-66S, os usuários têm uma visão geral detalhada da biblioteca de programas na interface de controle. Este modo permite a fácil seleção e carregamento de um programa de produto, destacando a flexibilidade e a eficiência do Modo de Produto DELEM DA-66S no gerenciamento de fluxos de trabalho de produção. Cada item da lista é exibido com uma miniatura do produto gráfico — fornecendo uma indicação visual — ou um símbolo para programas numéricos, juntamente com detalhes essenciais como ID do Produto, Descrição do Produto, Número de dobras, Tipo de Produto e a Data da última modificação ou utilização. A indicação de Tipo do produto mostra os seguintes tipos de produtos:
P– o produto possui programa CNC, não há desenho
-2D o produto consiste em um desenho 2D, não há programa CNC
P2D o produto possui um desenho 2D e um programa CNC
-3D o produto consiste em um desenho 3D, não há programa CNC
P3D o produto possui um desenho 3D e um programa CNC
A indicação do Tipo de Produto fornece um contexto valioso sobre a natureza de cada programa, aprimorando os processos de navegação e seleção. Se um programa de produto ativo já estiver em execução, seu ID será exibido em destaque na parte superior da tela. Carregar um programa é simples: os usuários podem simplesmente tocar no ID do Produto ou em qualquer parte da linha de produtos.
Em situações em que há mais programas do que cabem em uma tela, os recursos de navegação intuitivos permitem que os usuários arrastem a lista para cima até que o produto desejado esteja visível. Um único toque seleciona e ativa o programa no controle, exibindo o design intuitivo do Modo de Produto DELEM DA-66S, que visa otimizar a fabricação e a eficiência da produção.
Essa interação e acessibilidade de dados integradas no Modo de Produto DELEM DA-66S não apenas aumentam a produtividade, mas também garantem que os operadores possam gerenciar e modificar programas de produtos com eficiência, conforme necessário. Portanto, dominar o Modo de Produto DELEM DA-66S é vital para aprimorar o sucesso operacional e a adaptabilidade em ambientes de manufatura competitivos.
Seleção de produtos
Para selecionar um produto, basta um único toque. O produto será selecionado e carregado no
memória. A partir daqui, a produção pode ser iniciada tocando em Automático. A navegação também pode ser iniciada
através do Desenho do Produto (se existente), sua Configuração de Ferramenta, a Sequência de Dobra e a
Programa numérico do produto.
Configurando o Modo de Produto
Novo Produto, iniciando um novo produto gráfico
No Modo Produto do DELEM DA-66S, iniciar um novo produto gráfico é simples. Para começar, basta tocar em "Novo" e depois em "Produto". Isso inicia a programação do seu novo produto.
O processo começa com a inserção de detalhes gerais essenciais. Comece com o ID do produto e, em seguida, especifique a espessura e o material do seu produto. Essas etapas iniciais são cruciais para estabelecer a base do seu novo produto no Modo de Produto DELEM DA-66S, garantindo gerenciamento e controle precisos durante todo o processo de produção. Seguindo essas etapas simples, você dominará com eficiência a criação de novos produtos.

Novo Programa, iniciando um programa numérico
No Modo de Produto DELEM DA-66S, iniciar um novo programa numérico é fácil.
Para criar rapidamente um novo programa numérico no Modo de Produto DELEM DA-66S, siga estas etapas: Toque em “Novo” e selecione “Programa”. Isso inicia o processo de configuração.
Em seguida, insira os detalhes essenciais: ID do produto, espessura e material. Essas informações garantem uma configuração precisa do programa, aumentando a eficiência da produção. Ao dominar essas etapas, você poderá aproveitar todo o potencial do Modo Produto do DELEM DA-66S.

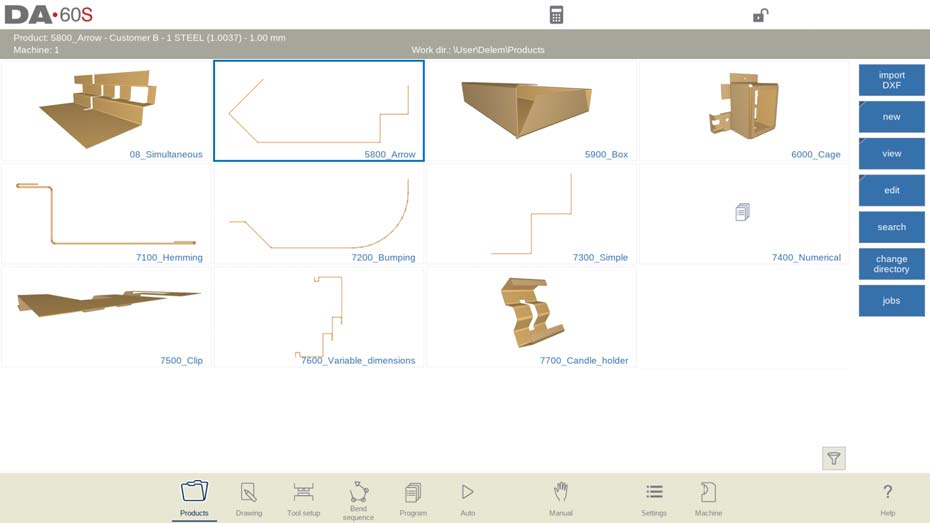
Visualizações
Para visualizar os produtos como uma lista simples ou completamente gráfica, a função Exibir pode ser usada.
Ao tocar em Exibir, um dos dois modos de visualização pode ser selecionado.


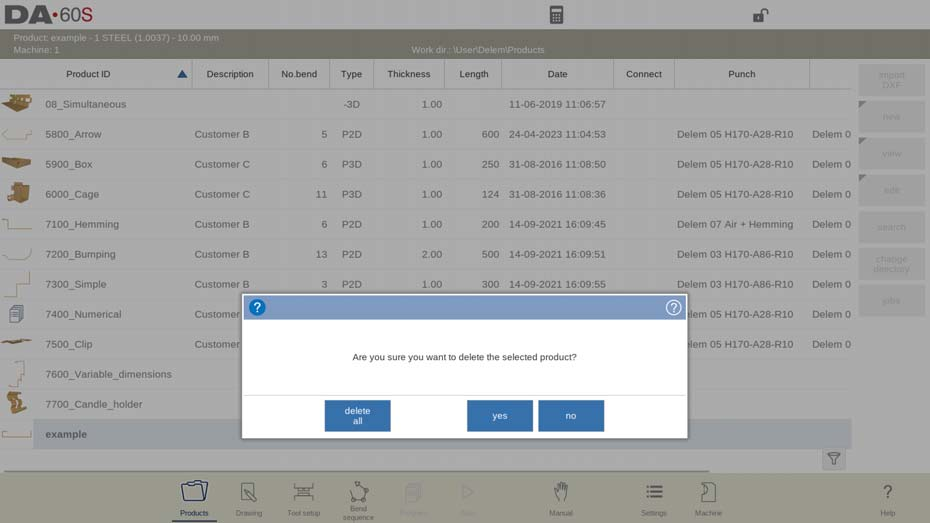
Copiar e excluir produto
No Modo de Produto DELEM DA-66S, gerenciar seus produtos é simples.
Para excluir um produto, toque para selecioná-lo, escolha "Editar" e pressione "Excluir". Confirme para finalizar. Para remover todos os produtos e programas simultaneamente, use a opção "Excluir tudo".
Para copiar um produto, selecione o item desejado, toque em "Editar" e escolha "Copiar". Você pode então renomear o produto. O item copiado, incluindo a configuração da ferramenta e a sequência de dobra, aparecerá no mesmo diretório.

Estas etapas eficientes ajudam você a dominar o Modo de Produto DELEM DA-66S rapidamente.
Renomear e mover produto
No Modo Produto DELEM DA-66S, renomear e mover produtos é simples. Para começar, selecione um produto ou programa. Toque em "Editar" e escolha "Mover" para realocá-lo em um novo diretório ou "Renomear" para dar um novo nome dentro do mesmo diretório.
Ao renomear, insira o novo nome e o produto permanecerá no local atual. Para mover, selecione o diretório desejado. Essas ações simplificadas ajudam você a gerenciar produtos com eficiência, dominando o Modo de Produto DELEM DA-66S com facilidade.
Bloqueio/desbloqueio do produto
No Modo Produto DELEM DA-66S, a função Bloquear/Desbloquear é essencial para proteger seus programas finalizados. Este recurso evita modificações acidentais em produtos refinados.
Para bloquear ou desbloquear um produto, selecione-o e toque em "Editar". Aqui, escolha "Bloquear Produto" ou "Desbloquear Produto", conforme necessário. Isso garante que as alterações só possam ser feitas quando um produto estiver explicitamente desbloqueado, ajudando você a manter a integridade dos seus programas.

Seleção de vários produtos
Para selecionar vários produtos, toque em Editar e escolha Selecionar vários. Agora, vários produtos podem ser
selecionado. Esta seleção múltipla pode ser copiada, movida, excluída, bloqueada ou desbloqueada.
Para selecionar um único produto novamente, toque em Editar e escolha Selecionar único.
Utilizando a Biblioteca de Produtos
Função de pesquisa
No Modo Produto do DELEM DA-66S, a função de busca simplifica a busca por produtos específicos. Para pesquisar, toque em "Pesquisar" para abrir a tela de busca. Digite sua consulta, separada por espaços, se necessário, para uma busca em tempo real.
Você pode optar por pesquisar em todos os diretórios, dentro da árvore atual, ou limitar a pesquisa ao diretório atual. Além disso, você pode escolher entre pesquisar por ID do Produto ou Descrição do Produto. Insira um nome ou número completo ou parcial e os resultados mostrarão todos os produtos que correspondem aos seus critérios. Esta função de pesquisa simplificada aprimora a navegação no Modo de Produto DELEM DA-66S.

Função de filtro
No Modo Produto DELEM DA-66S, a função de filtro ajuda a refinar os produtos visíveis. Para ativá-la, toque no ícone de filtro no canto inferior direito e insira seu filtro de texto.
Uma vez ativo, o ícone de filtro no canto inferior esquerdo indica o status do filtro, exibindo o número de itens filtrados e a contagem total. Esse recurso garante uma visualização mais focada da sua lista de produtos, aumentando a eficiência no gerenciamento dos seus programas.
Este filtro pode ser desativado tocando no ícone de cruz no canto inferior direito ao lado do
ícone de filtro.
Alterar diretório
No Modo Produto DELEM DA-66S, o gerenciamento de diretórios é simples. Para alterar ou adicionar um diretório, toque em "Alterar Diretório". Para remover diretórios obsoletos, selecione o diretório e toque em "Remover Diretório". Após escolher o diretório desejado, toque em "Selecionar" para visualizar seus produtos na tela Produtos. O nome do diretório atual aparece no cabeçalho.

Você também pode criar ou remover subdiretórios vazios aqui. Toque em "Criar Subdiretório" para adicionar um novo; observe que os subdiretórios residem em "DELEM\PRODUCTS" e seus nomes não podem ser alterados. A cópia de produtos entre subdiretórios é feita nos modos Desenho ou Programa, não aqui. O sistema mantém o diretório ativo e a seleção de produtos até que uma nova escolha seja feita.
Seleção de produtos de rede
No Modo de Produto DELEM DA-66S, o gerenciamento de diretórios de rede é simples.
- Diretório de rede de acesso: Quando um diretório de rede estiver montado, acesse-o selecionando “Alterar diretório” e tocando em “Rede”, que aparece ao lado do diretório “Produto”.
- Navegação de diretório: Use o navegador de diretórios para navegar. Selecione, adicione ou remova diretórios. Escolha um diretório e toque em "Selecionar" para exibir seus produtos na tela Produtos.
- Ativar Diretório: O diretório de rede escolhido se torna ativo, com seu nome exibido no cabeçalho da tela.
- Lembrar subdiretório: O sistema mantém seu subdiretório ativo e as opções de produtos até que uma alteração seja feita.
- Lidar com “somente leitura” ou desconexões: Se ocorrerem problemas de rede, os produtos serão salvos em um subdiretório “Recuperados” em Produtos.
- Atualizar biblioteca de produtos: Toque em “Atualizar” no modo Produtos para atualizar a biblioteca de produtos, útil para trabalhar com locais de rede.
Controle de chão de fábrica, função de lista de tarefas
- Ativar lista de tarefas: Use o botão “Trabalhos” para acessar o recurso Lista de Trabalhos, permitindo que você gerencie pedidos na máquina.
- Ver detalhes do trabalho: Na tela Tarefas, veja as tarefas preparadas com ID da tarefa, Data necessária, Data de conclusão e Status. Você também pode adicionar comentários.
- Gerenciar trabalhos: Adicione novos trabalhos com “Novo trabalho” ou importe/exporte arquivos de trabalho, incluindo produtos, do software offline Profile-T para transferência perfeita entre máquinas.
- Editar trabalhos: Selecione “Editar trabalho” para modificar trabalhos existentes e adicionar produtos conforme necessário.

Indicação de status da lista de tarefas:
• Novo: nenhum produto foi produzido ainda;
• Incompleto: a quantidade desejada de produtos ainda não foi produzida;
• Em andamento: este trabalho está atualmente carregado na máquina e em produção,
• Finalizado: todos os lotes de produtos foram confirmados como finalizados.
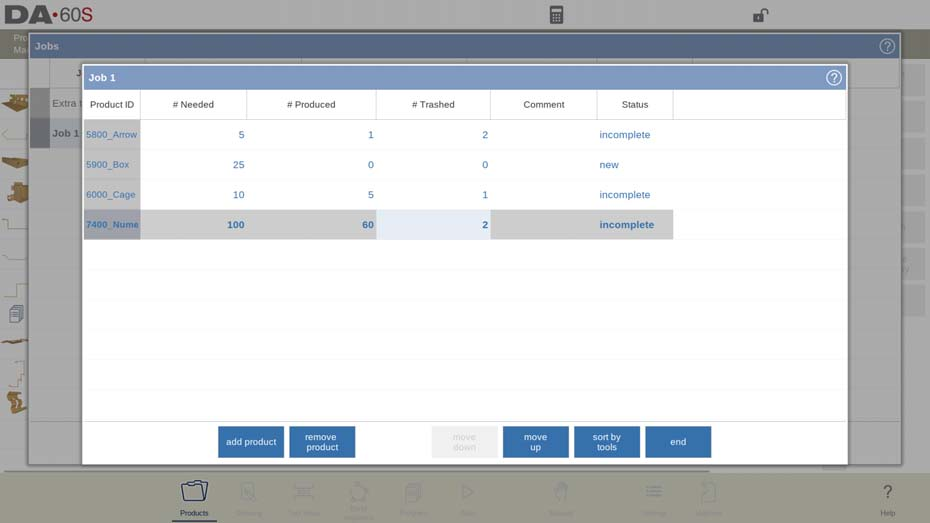
Para cada produto no trabalho, o número necessário de produtos, o número produzido de
produtos e o número de produtos descartados são mostrados. Os dois últimos, é claro, estão vindo
como resultado da execução do trabalho em produção. Assim, através desta tela também é possível acompanhar o andamento
monitorado.
Na tela Jobs, a tecla de função Activate pode ser usada para iniciar a produção do item selecionado.
trabalho. O controle mudará para o modo Automático automaticamente, e o primeiro produto a ser
Os dados produzidos a partir do trabalho serão carregados. O botão Iniciar pode ser usado para realmente começar a dobrar.
A função de importação DXF (disponível somente quando a opção DXF foi instalado)
- Simplifique a importação de design: Importar gerado por CAD Arquivos DXF diretamente no controle para economizar tempo de desenho.
- Iniciar importação DXF: Clique em “Importar DXF” para abrir o navegador de seleção de arquivos. Navegue e selecione arquivos DXF de um pendrive ou diretório de rede.
- Garanta a precisão do desenho: Para otimizar a importação, certifique-se de que o desenho CAD original esteja preciso. Conecte linhas de dobra às linhas de contorno para maior precisão. O Conversor DXF pode corrigir pequenos erros.
- Exibir arquivos importados: Após selecionar um arquivo DXF, a janela de importação de DXF é aberta. Com a seleção de camadas ativada, as linhas não atribuídas aparecem tracejadas. Sem a seleção de camadas, o arquivo é exibido nas cores de linha originais.


Seguindo essas etapas, você pode utilizar com eficiência a função de importação DXF do DELEM DA-66S para aprimorar seu fluxo de trabalho de produção.
Dimensões do desenho do produto
O arquivo de desenho pode ser organizado de duas maneiras:
• dimensões de projeção
• dimensões de corte (padrão)
Essas formas são descritas nos subparágrafos seguintes.
Durante a operação no conversor DXF, é possível alternar entre dimensões de corte e
dimensões de projeção. Isso pode ser feito nas configurações de conversão DXF.
Dimensões de projeção
- Visualizar layout do produto:Os desenhos DXF descrevem as dimensões do produto acabado, mostrando arranjos de curvatura e superfície, não os tamanhos reais das folhas.
- Conversão exata:Na importação, o conversor DXF replica as dimensões originais com precisão, garantindo precisão no layout do produto.
- Aprimore com detalhes adicionais: Após a conversão, incorpore o tipo de material, a espessura da chapa e as especificações de dimensão para concluir o projeto.
- Automatizar a geração CNC: O sistema de controle utiliza essas dimensões para criar programas CNC precisos, garantindo que o produto final esteja alinhado com as especificações do projeto original.

Neste exemplo, o comprimento no desenho DXF original pode ser simplesmente 100, separado por um
linha de curvatura. O produto resultante consistirá em dois lados, cada um com comprimento de 50. As dimensões são definidas como dimensões externas.
Ao utilizar essas etapas, a função de importação DXF simplifica significativamente o design e a fabricação do produto.
Dimensões de corte
- Representação precisa:O desenho DXF descreve as dimensões exatas da folha necessárias para a dobra do produto.
- Configurações de conversão: Configure o conversor DXF para processar de acordo com o material e a espessura da folha, garantindo que as dimensões de corte sejam representadas com precisão.
- Necessidade de tolerância de curvatura: Insira dados de tolerância de dobra durante a conversão; o sistema avisa se estiverem faltando, garantindo a precisão dimensional.
- Criação de Desenho 3D: O conversor emprega dimensões e uma tabela de tolerância de dobra para gerar um desenho preciso do produto em 3D.
- Programação CNC consistente: Use a mesma tabela de tolerância de dobra no controle para criar programas CNC que espelhem as especificações DXF originais.
Essa abordagem aumenta a precisão do design à produção, simplificando as operações de forma eficiente.
Linhas de curvatura e seleção de camadas com atribuição de linha
Aprimorando os modos de produto DELEM DA-66S com a função de importação DXF
Para uma conversão DXF eficaz, atribua com precisão as propriedades do produto a linhas específicas dentro do arquivo DXF. Dependendo do conteúdo do arquivo, você pode categorizar linhas de dobra, contornos e informações de texto por camadas. Se a seleção de camadas estiver desabilitada, o sistema detectará automaticamente as linhas de dobra. Essa abordagem organizada do modo de produto DELEM DA-66S garante uma interpretação precisa dos dados e aumenta a eficiência geral da produção.
Informações da linha de curvatura
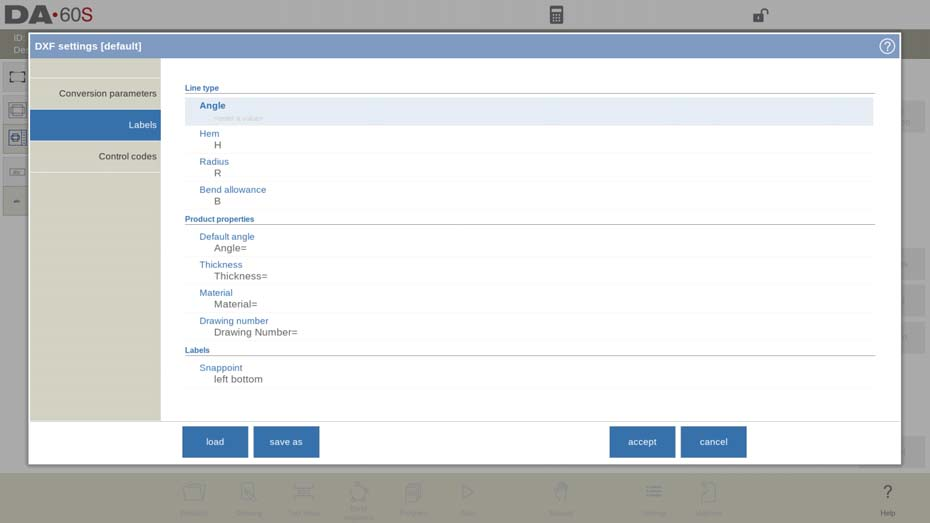
Com as linhas de curvatura, as informações do ângulo podem ser definidas por meio de texto próximo à linha. Os rótulos de texto,
para ser configurado em Settings::Labels, pode ser usado da seguinte forma:
• Padrão: curvatura de ar normal com um valor de ângulo positivo ou negativo.
• Bainha: um H seguido por um valor positivo ou negativo do ângulo de pré-curvatura.
• Raio: um R seguido do valor do raio.
• Tolerância de curvatura: um B seguido do valor da tolerância de curvatura.
Definição:
• valor positivo: o flange dobra para cima,
• valor negativo: o flange dobra para baixo.
Informações do produto
O desenho DXF pode incluir informações adicionais do produto, como detalhes do fabricante, linhas de dimensão e descrições. Para agilizar o processo de conversão, organize essas informações em camadas separadas do desenho do produto. Isso permite uma conversão seletiva de camadas, filtrando detalhes desnecessários. Como alternativa, remova o excesso de informações usando o programa conversor antes de iniciar a conversão. Isso garante uma transição limpa e eficiente do projeto para a produção.
Seleção de camadas
Otimize a importação de DXF ajustando as configurações diretamente na tela principal. Você pode ativar ou desativar a seleção de camadas usando os botões localizados no canto superior esquerdo para facilitar o acesso. Com a seleção de camadas ativada, visualize e gerencie a lista de propriedades das camadas para um controle preciso. Essa flexibilidade permite processos de importação personalizados, aumentando a produtividade e reduzindo erros de conversão.
Seleção de camadas ativada
- Habilitar seleção de camadas: Exiba as camadas DXF disponíveis ativando a seleção de camadas. Símbolos para atribuições de camadas de ângulo, contorno e guia de texto.
- Atribuir camadas: Use caixas de seleção para designar camadas como linhas de curvatura ou contorno e atribua textos para informações especiais por meio de Configurações::Rótulos.
- Gerenciar visualização: Ativa ou desativa camadas inteiras para visualização sem afetar a conversão. Camadas não selecionadas não são incluídas na conversão.
- Navegar pelas camadas: Toque no nome de uma camada para destacar suas linhas. Linhas não atribuídas aparecem tracejadas até serem atribuídas.
- Entenda os códigos de cores: Após a atribuição, reconheça os tipos de linha pela cor: Azul para linhas de contorno, Vermelho para linhas de dobra, Preto para textos.
- Atribuir textos às linhas de curvatura: Vincule linhas e textos para mostrar detalhes de ângulo, raio ou bainha. As linhas de contorno não acomodam informações de texto.
- Propriedades do produto de importação: Use as configurações de conversão DXF para importar atributos como espessura da folha e material como texto.
Essas etapas aumentam a eficiência da importação de DXF, garantindo uma transição suave do design para a produção no DELEM DA-66S.

Seleção de camadas desativada
Se a seleção de camadas estiver desativada, o controle atribuirá automaticamente as propriedades da linha. As propriedades da linha podem
somente será visualizado (comprimento) não alterado. Após selecionar uma linha, o botão de comando de propriedade irá
aparecer. As cores mostradas são as cores do DXF original.

Seleção de linha
- Selecionar linhas: Na janela do conversor DXF, toque em linhas individuais para selecionar ou inverter seleções facilmente.
- Seleção de caixa: Arraste uma caixa de seleção para escolher várias linhas.
- Arraste do canto superior esquerdo para o canto inferior direito para selecionar linhas totalmente fechadas.
- Arraste do canto inferior direito para o canto superior esquerdo para selecionar todas as linhas interceptadas pela caixa.
- Modificar seleções: Após selecionar as linhas, exclua-as ou ajuste suas propriedades se a seleção de camadas estiver ativa. Por exemplo, atribua as linhas selecionadas como contornos.
- Polilinhas divididas: Use a função Dividir para dividir polilinhas em linhas separadas para edição detalhada.
Essas etapas simplificadas garantem controle preciso sobre a seleção e manipulação de linhas, aprimorando seu domínio dos modos do produto DELEM DA-66S.
Seleção de linha com seleção de camada desativada:

Seleção de linha com seleção de camada ativada:

Conversão
Para iniciar a conversão dos seus arquivos DXF no modo de produto DELEM DA-66S, certifique-se de que todas as atribuições estejam definidas corretamente. Toque no botão "Converter" para iniciar o processo.
- Conversão de visualização: Se houver avisos ou erros, uma prévia da conversão será exibida. O desenho DXF será representado por linhas coloridas, cada cor representando propriedades diferentes:
- Azul: Linha de contorno, indicando o limite externo do produto.
- Vermelho: Linha de curvatura, que significa um ponto de curvatura.
- Verde: Contorno interno, marcando limites internos.
- Preto: Texto detalhando informações específicas.
- Identificar problemas: Avisos e erros aparecem como quadrados vermelhos na pré-visualização, com informações detalhadas exibidas na parte inferior da tela.
- Finalizar ou Ajustar: Toque em “Aceitar” para confirmar e concluir a conversão. Se forem necessários ajustes, use o botão “Voltar” para retornar à tela anterior e fazer modificações.
Essas etapas fornecem um caminho claro para gerenciar efetivamente o processo de conversão, garantindo precisão e exatidão nas configurações do seu produto com o modo de produto DELEM DA-66S.

Propriedades do produto
Após aceitar a visualização, as Propriedades do Produto convertidas serão exibidas e poderão ser modificadas.

Ao aceitar e fechar esta janela, a conversão efetiva ocorrerá. O resultado da
A conversão é mostrada no Desenho. É possível prosseguir com a configuração da ferramenta e a determinação da sequência de dobra como em um produto desenhado à mão.
Conversão de dimensões de corte, com informações sobre tolerância de dobra
Ao converter arquivos DXF com dimensões de corte no modo de produto DELEM DA-66S, a integração da margem de curvatura é crucial para a precisão.
- Tolerância de curvatura de reutilização: Certifique-se de que a margem de curvatura utilizada durante o desdobramento seja reaplicada corretamente durante a conversão. Isso garante que as dimensões de corte permaneçam precisas e confiáveis.
- Verificar dados de subsídio: O sistema de controle consultará sua tabela de tolerância de dobra, verificando a disponibilidade de dados para cada dobra. Isso garante que todas as dobras sejam acomodadas com precisão.
- Selecione as configurações apropriadas: Se houver várias tolerâncias de dobra disponíveis, selecione a entrada apropriada. O pop-up de tolerância de dobra exibirá os ângulos juntamente com suas tolerâncias correspondentes, auxiliando na seleção correta. Os raios preferenciais e calculados servem como pontos de referência adicionais.
A adesão a essas etapas garante a conversão precisa das dimensões de corte DXF por meio do gerenciamento meticuloso das tolerâncias de dobra no DELEM DA-66S.

Se nenhuma entrada de tolerância de dobra estiver disponível, a tabela de tolerância de dobra pode ser editada diretamente de
este pop-up tocando no botão de edição da tabela. A seguinte janela aparecerá e a curva
informações sobre subsídios podem ser adicionadas à tabela.

Adicionando informações de tolerância de curvatura manualmente
Se o seu arquivo DXF incluir informações de tolerância de dobra, você poderá inseri-las manualmente para uma conversão precisa no modo de produto DELEM DA-66S.
- Importação e Entrada: Ao importar um DXF, se forem fornecidos valores de tolerância de dobra, insira-os diretamente. Esta entrada manual tem precedência sobre os cálculos automáticos do sistema ou pesquisas em tabelas, garantindo a precisão.
- Entrada manual: Se a margem de dobra não estiver incluída no DXF ou na tabela de controle, você poderá adicioná-la manualmente antes do início da conversão. Esta etapa garante que todas as dobras sejam contabilizadas corretamente.
- Avisos automáticos: Caso a tolerância de dobra não seja especificada, o sistema solicitará que você selecione na tabela existente ou insira novos valores especificamente para essa conversão.
- Habilitar propriedade de curvatura: Certifique-se de que a função "propriedade de dobra" esteja ativa nas propriedades do produto para utilizar a entrada manual de tolerância de dobra. Isso normalmente é ativado durante a importação.
Seguir essas etapas permite um controle meticuloso sobre as tolerâncias de curvatura, aumentando a precisão nas operações do DELEM DA-66S.
Configurações DXF
Nas configurações do conversor DXF, os parâmetros de conversão podem ser configurados. É possível
Armazene vários arquivos de configurações para tipos de desenho específicos. As funções "Salvar como" e "Carregar" estão disponíveis.

Ângulo padrão
Linhas de curvatura que não forem indicadas com um valor de ângulo de curvatura serão convertidas com esse ângulo padrão.
Tolerância
A tolerância de linhas não conectadas em relação aos limites pode ser definida. Linhas dentro da tolerância serão conectadas para evitar falhas durante a conversão.
Diâmetro mínimo do círculo
O diâmetro mínimo de um círculo a ser convertido, caso contrário, será ignorado.
Fator de escala
Se o DXF for dimensionado, esse fator pode ser definido como não dimensionado para as dimensões reais.
Definição de ângulo
É possível escolher a definição de ângulo normal ou ângulos complementares (180-alfa).
Tipo de dimensão
Podem ser escolhidas dimensões de projeção ou corte.
Seleção de polegadas/mm
A conversão do DXF usará mm ou polegadas como padrão; quando definido como automático, a configuração do controle será usada.
Seleção de camadas
Seleção de camadas ativada/desativada para permitir a atribuição de propriedades de conversão por camada.
Etiquetas
Os tipos de linha e as propriedades do produto podem ser rotulados dentro do DXF para serem automaticamente
atribuí-los. Com essas configurações, os rótulos podem ser configurados.
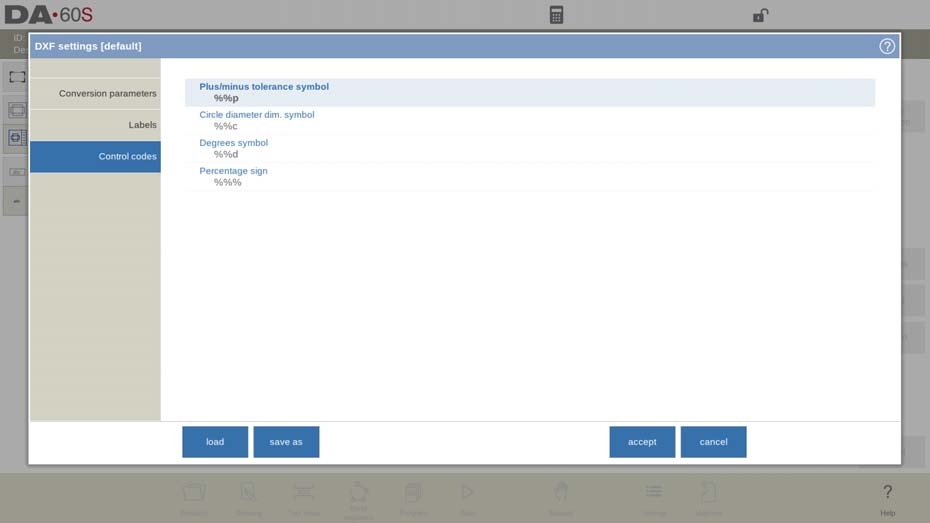
Códigos de controle
Se códigos de controle específicos forem usados no texto DXF, nesta janela de configurações esses códigos podem ser
configurado.
O arquivo DXF
O conversor DXF lê as entidades que conhece do arquivo DXF. As entidades são: Texto, TextoM,
Linha, SPLine, 3D, Linha, Polilinha, LWPolyline, Arco, Círculo, Face 3D, Sólido, Traço e Inserir.
Além disso:
- O conversor pode manipular coordenadas ECS. Nota: ECS é usado em desenhos 3D,
então o conversor interpreta os valores do ECS para 2D. - O desenho deve estar no plano XY.
Função de exportação de contorno DXF (disponível somente quando a opção DXF estiver instalada)
Como parte da opção DXF, a função Exportar DXF, no modo Editar em Produtos e na Transferência
(Perfil-T), permite a exportação de qualquer produto, incluindo as deduções de dobra, como um contorno. Isso
O contorno é armazenado como DXF e contém as dimensões de corte.
Perguntas frequentes (PERGUNTAS FREQUENTES)
Como adiciono manualmente uma margem de curvatura no Modo de Produto DELEM DA-66S?
Para adicionar manualmente a margem de curvatura, insira os valores diretamente após importar o arquivo DXF. Isso garante que os dados manuais tenham precedência sobre os cálculos automáticos do sistema, aumentando a precisão.
O que devo fazer se o arquivo DXF não incluir informações de tolerância de dobra?
Se o arquivo DXF não tiver dados de tolerância de dobra, você poderá inseri-los manualmente antes da conversão. O sistema solicitará que você insira valores ou selecione entre as entradas da tabela existentes para garantir uma dobra precisa.
Como posso ativar a função de propriedade de curvatura no Modo de Produto DELEM DA-66S?
A função de propriedade de dobra normalmente é habilitada ao importar arquivos. Se precisar garantir que ela esteja ativa, verifique as configurações de propriedades do produto para confirmar se está ativada para uma aplicação precisa da margem de dobra.
Quais etapas devo seguir para uma conversão DXF ideal no DELEM DA-66S?
Primeiro, certifique-se de que os valores de tolerância de dobra estejam definidos, manualmente ou a partir da tabela. Use a função de pré-visualização para verificar se há erros e confirme todas as configurações antes de finalizar a conversão para obter melhores resultados.
Conclusão
Operar o Modo Produto DELEM DA-66S e utilizar a Biblioteca de Produtos envolve dominar algumas etapas essenciais para otimizar a eficiência. Importar arquivos DXF com precisão, usar entradas manuais de tolerância de dobra quando necessário e garantir que todas as configurações do sistema estejam configuradas corretamente são práticas essenciais. Além disso, manter uma Biblioteca de Produtos organizada aprimora o gerenciamento do fluxo de trabalho e a precisão da produção.
Seguindo estas diretrizes, você pode otimizar suas operações e alcançar resultados precisos. Para aprofundar seu conhecimento ou esclarecer dúvidas específicas, não hesite em entrar em contato com nossa equipe. Estamos aqui para ajudar você com recursos adicionais e suporte especializado para dominar o Modo Produto DELEM DA-66S.


