


Quando se trata de otimizar operações CNC, o gerenciamento eficaz de ferramentas é essencial. Se você busca insights sobre o Gerenciamento de Ferramentas do CYBELEC CybTouch 12, está no lugar certo. Neste artigo, darei dicas práticas sobre o gerenciamento de ferramentas no sistema CybTouch 12, ajudando você a aumentar a eficiência e a precisão em seus processos de usinagem. Seja você iniciante no sistema ou buscando aprimorar suas habilidades, este guia fornecerá o conhecimento necessário para maximizar suas capacidades de gerenciamento de ferramentas.
Introdução
CYBELEC CybTouch 12 O Gerenciamento de Ferramentas permite a criação e a configuração de máquinas-ferramentas, cruciais para cálculos precisos de dobra. Após a configuração e a escolha do punção e da matriz, você pode especificar o ângulo de dobra desejado e o comprimento do flange (L). O sistema CybTouch 12 calcula então as posições dos eixos X e Y necessárias para a dobra, garantindo precisão em suas operações.
Socos
Instruções de configuração:
Para selecionar um punção, basta navegar pelos punções existentes em sua biblioteca usando os botões de setas e, em seguida, retornar para Página numérica de curvatura.
Como criar ou modificar um soco?
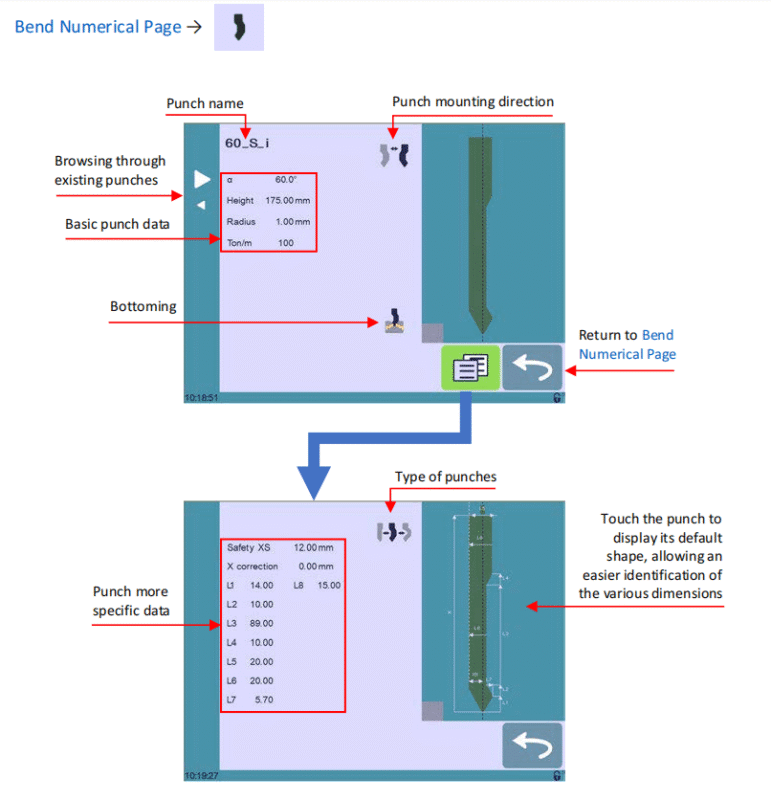
Se ainda não houver um punção criado, o punção não terá nome (??? é exibido). Se já existir um punção, o último punção usado será selecionado, neste caso, 60_S_i (as modificações não alterarão o punção existente, pois serão salvas com outro nome).
1. Toque no ícone de perfuração para acessar os detalhes da perfuração.
2. Insira as características básicas (α (ângulo de soco), Altura, Raio e Tonelada/m) para que o novo soco seja criado.
3. Toque no Direção de montagem do punção botão para inverter o soco, se necessário.
4. Selecione o Fundo ícone para definir a ferramenta como resistente para fundo.
5. Toque no Menu botão para exibir a página Mais.
6. Selecione o tipo de punção (reto, normal ou pescoço de ganso) com Tipo de socos ícone.
7. Insira as dimensões mais específicas de L1 a Lx, consultando a representação gráfica à direita da tela. Ao tocar nesta imagem, a representação padrão da ferramenta será exibida, facilitando a identificação das diversas dimensões.
As dimensões de L1 a Lx são as mesmas usadas no PC 1200, DNC 880S e ModEva. Se você usar as mesmas ferramentas, imprima-as do PC 1200 para programá-las facilmente no CybTouch. É claro que você pode considerar dar o mesmo nome às mesmas ferramentas.
8. Insira os seguintes valores:
• Segurança XS: Distância de segurança entre a ferramenta e o batente traseiro para o eixo X.
• Correção X:Se o soco não estiver perfeitamente alinhado.
9. Voltar à página anterior

Para poder salvar uma ferramenta, é necessária uma senha de nível 2.
10. Toque no nome do soco (aqui 60_S_i).
11. Toque Economize soco para substituir a ferramenta existente ou Salvar soco como se você quiser salvar sua ferramenta com outro nome.
12. Digite o nome do novo soco usando o teclado alfanumérico.
Recomendamos que você siga as convenções de nomenclatura explicadas em Ferramentas de Nomenclatura.
13. Tocando o
O botão leva você de volta à página do programa, com o soco que você acabou de salvar selecionado e pronto para ser usado.
Dies
Instruções de configuração:
Selecionar um dado é o mesmo que selecionar um punção; basta navegar pelos dados existentes em sua biblioteca usando os botões de setas e, em seguida, retornar para Página numérica de curvatura.
Como criar ou modificar um dado?
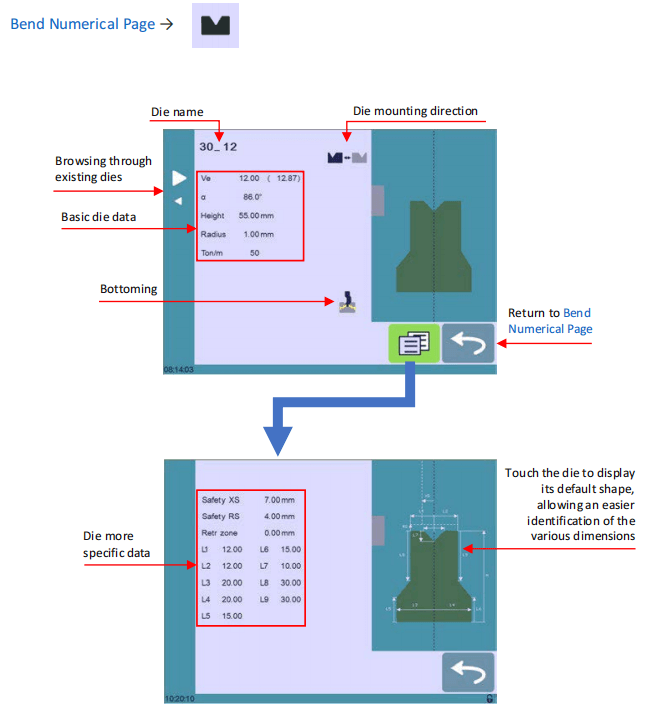
Se nenhum dado foi criado ainda, o dado não terá nome (??? é exibido). Se um dado já existir, o último usado será selecionado, aqui 30_12 (as modificações não alterarão o dado existente, pois serão salvas com outro nome).
1. Toque no ícone do dado

para acessar os detalhes do dado.
2. Insira as características básicas (Vê (largura da matriz), α, Altura, Raio e Tonelada/m) para que o novo dado seja criado.
3. Toque no Direção de montagem da matriz botão para inverter o dado, se necessário.
4. Selecione o Fundo ícone para definir a ferramenta como resistente para fundo.
5. Toque no MENU botão para exibir o Mais páginas.
6. Insira as dimensões mais específicas de L1 a Lx, consultando a representação gráfica à direita da tela. Ao tocar nesta imagem, a representação padrão da ferramenta será exibida, facilitando a identificação das diversas dimensões.
As dimensões de L1 a Lx são as mesmas usadas no PC 1200, DNC 880S e ModEva. Se você usar as mesmas ferramentas, imprima-as do PC 1200 para programá-las facilmente no CybTouch. É claro que você pode considerar dar o mesmo nome às mesmas ferramentas.
7. Insira os seguintes valores:
• Segurança XS: Distância de segurança entre a ferramenta e o batente traseiro para o eixo X.
• Segurança RS: Distância de segurança entre a ferramenta e o batente traseiro para o eixo R.
• Zona de retorno: Zona de retração.
8. Voltar à página anterior
Para poder salvar uma ferramenta, é necessária uma senha de nível 2.
9. Toque no nome do dado (aqui 30_12).
10. Toque Salvar morrer para substituir a ferramenta existente ou Salvar dado como se você quiser salvar sua ferramenta com outro nome.
11. Digite o nome do novo dado usando o teclado alfanumérico.
Recomendamos que você siga as convenções de nomenclatura explicadas em Ferramentas de Nomenclatura.
12. Tocando o
O botão leva você de volta à página do programa, com o dado que você acabou de salvar selecionado e pronto para ser usado.
Ferramentas de Nomenclatura
Para um gerenciamento eficaz das ferramentas CYBELEC CybTouch 12, recomenda-se o uso de convenções de nomenclatura para suas ferramentas. Uma convenção de nomenclatura simples pode ajudar a identificar com precisão cada punção ou matriz pelo seu nome. Dependendo das suas necessidades específicas, você pode estabelecer regras adicionais para a nomenclatura de punções e matrizes para aprimorar ainda mais a organização e a eficiência.
Socos
O nome do punção deve ser construído da seguinte maneira: primeiro seu ângulo, seguido de seu tipo e, em seguida, se ele é invertido ou não.

Seguindo essas regras, aqui estão alguns exemplos de nomes de socos: 90_N_i, 60_G, 30_S, e assim por diante.
Morre
O nome do dado deve ser construído praticamente da mesma maneira: primeiro sua largura (dimensão Ve), seguido por seu ângulo e, então, se ele está invertido ou não.

Seguindo essas regras, aqui estão alguns exemplos de nomes de dados: 12_86_i, 16_86, 20_30, e assim por diante.
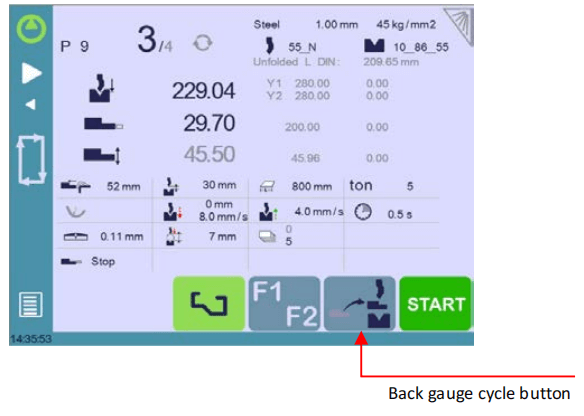
Medidores traseiros
Se você estiver gerenciando ferramentas com o CYBELEC CybTouch 12 e precisar trabalhar nos batentes traseiros da máquina, a função de ciclo do batente traseiro pode ser um recurso útil. Esta função permite que você leve os batentes traseiros totalmente para a frente, permitindo que você faça ajustes com segurança sem colocar as mãos e os braços entre as ferramentas.
No entanto, observe que essa função pode nem sempre estar disponível, pois sua visibilidade depende da configuração da máquina e do status de indexação.
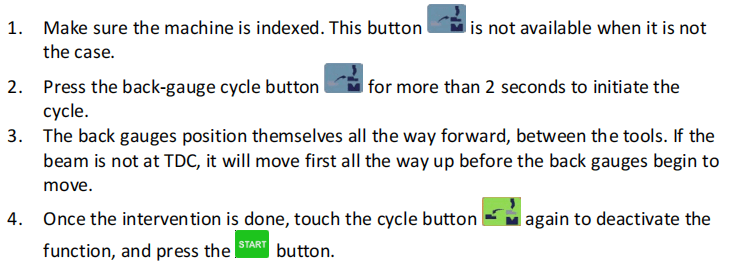
Instruções de configuração:
Perguntas Frequentes (FAQ)
Como configuro o CYBELEC CybTouch 12 Tools Management para obter desempenho ideal?
Para configurar o Gerenciamento de Ferramentas CYBELEC CybTouch 12 de forma eficaz, certifique-se de que todas as ferramentas estejam corretamente identificadas e parametrizadas no sistema. Atualize regularmente os dados das ferramentas e verifique a compatibilidade com a configuração da máquina para um desempenho perfeito.
O que devo fazer se meu sistema CYBELEC CybTouch 12 não reconhecer uma ferramenta?
Se o seu sistema CYBELEC CybTouch 12 não reconhecer uma ferramenta, verifique primeiro se ela está inserida e alinhada corretamente. Verifique as configurações da ferramenta na interface de gerenciamento e insira os dados novamente, se necessário. Certifique-se de que o software esteja atualizado para a versão mais recente para evitar problemas de compatibilidade.
Existe uma maneira de personalizar as configurações de ferramentas no CYBELEC CybTouch 12 Tools Management?
Sim, você pode personalizar as configurações da ferramenta no CYBELEC CybTouch 12 acessando a interface de gerenciamento de ferramentas. Ajuste parâmetros como dimensões do punção e da matriz, tipo de material e valores de compensação para atender às necessidades operacionais específicas. Certifique-se de que essas configurações sejam salvas corretamente para obter resultados consistentes.
Conclusão
Eficaz CYBELEC CybTouch 12 O Gerenciamento de Ferramentas envolve a compreensão das funcionalidades do sistema, a organização da sua biblioteca de ferramentas e a manutenção e atualização consistente das configurações para um desempenho ideal. Ao implementar essas dicas, você pode aprimorar seu fluxo de trabalho e reduzir erros nas suas operações CNC.
Para saber mais sobre como maximizar o potencial da sua máquina ou para obter assistência personalizada, entre em contato com nossa equipe. Além disso, convidamos você a explorar outros documentos relacionados em nosso site para ampliar seu conhecimento e domínio deste poderoso sistema de gerenciamento de ferramentas.


