


Configurar a ferramenta DELEM DA-69T é essencial para otimizar o desempenho da sua máquina de dobra. Se você busca entender como configurar ferramentas de forma eficiente para operações de dobra precisas, você veio ao lugar certo.
Neste guia, explicarei as etapas necessárias para configurar a ferramenta DELEM DA-69T, garantindo que você obtenha os melhores resultados em seus processos de usinagem. Seja você iniciante neste equipamento ou buscando otimizar sua produção, este artigo fornecerá as informações necessárias para configurar suas ferramentas com eficácia e aumentar sua eficiência operacional.
Introdução
Para editar ou modificar uma configuração de ferramenta para o produto, selecione o produto na biblioteca e use Configuração de ferramenta.
Procedimento padrão
No processo de Configuração de Ferramentas do DELEM DA-69T, após a ativação da função Configuração de Ferramentas, a tela é dividida em duas seções distintas. A metade superior exibe uma vista frontal da configuração da máquina, enquanto a metade inferior apresenta os dados da ferramenta. Essa interface permite a programação precisa do posicionamento da ferramenta na máquina.
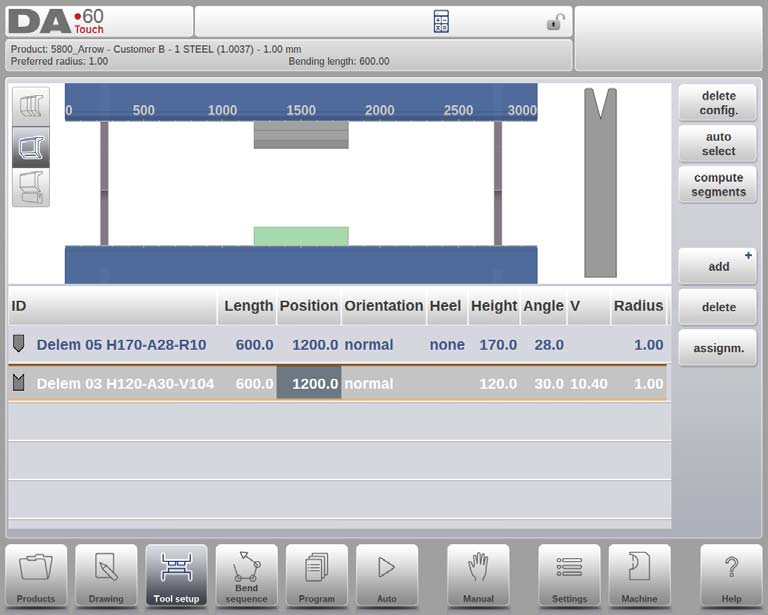
A vista frontal ilustra os elementos essenciais da máquina na seguinte ordem, de cima para baixo: a parte superior da máquina (viga de prensagem), o adaptador de punção (se programado), o punção, a matriz e a parte inferior da máquina (mesa). Esses componentes da máquina são normalmente pré-selecionados no modo Máquina e geralmente permanecem inalterados.
A disponibilidade de programação de um adaptador depende do parâmetro “Habilitar Adaptadores” dentro do mesmo modo Máquina, garantindo uma configuração de ferramenta DELEM DA-69T perfeita.
Seleção de ferramentas
Ao iniciar uma nova configuração de ferramenta, a abertura da máquina fica vazia.

Selecione Adicionar para adicionar uma ferramenta à configuração; punção, matriz ou adaptador (se habilitado).

Quando uma ferramenta é escolhida (por exemplo, um punção), ela é colocada na máquina com o comprimento máximo disponível.

Após uma ferramenta ser posicionada, a ID da ferramenta pode ser alterada selecionando a ID do punção na tela e tocando na visualização de lista.

Se apenas parte do ID da ferramenta for digitada, o controle oferecerá automaticamente uma lista de ferramentas com os caracteres digitados. Esta é uma função de filtragem.
Ao tocar em "Aconselhar" na tela de Seleção de Ferramentas, você pode acessar uma seleção limitada de ferramentas que melhor atendem às especificações do seu projeto atual. Ao fazer uma seleção, vários critérios-chave são considerados para garantir que as ferramentas atendam às demandas da sua tarefa:
- Raio do produto: A ferramenta escolhida deve produzir um raio que se alinhe perfeitamente com o raio do seu produto preferido, dentro de uma tolerância de +/- 50%.
- Força de flexão: É essencial que a força de flexão necessária não exceda a capacidade de resistência das ferramentas para garantir segurança e precisão.
- Ângulo da ferramenta: O ângulo das ferramentas selecionadas deve ser igual ou menor que o ângulo necessário para o produto, a fim de garantir o encaixe e a funcionalidade adequados.
- Método de curvatura: Para produtos que incluem bainhas curvas, ferramentas de bainha devem ser selecionadas para atender a esse requisito.
Para uma visão completa de todas as opções de ferramentas disponíveis, basta tocar em "Mostrar tudo" na tela. Isso garante que as ferramentas corretas sejam selecionadas para se alinharem à Configuração de Ferramentas DELEM DA-69T, aumentando a eficiência e a precisão da sua configuração de dobra.
Seleção automática
A função Seleção Automática na tela Configuração de Ferramentas do DELEM DA-69T simplifica as operações de dobra ao escolher o punção e a matriz mais adequados na biblioteca de ferramentas com base na dobra programada e no tamanho máximo da linha de dobra.
Embora selecione as ferramentas mais adequadas para uma única dobra, não fornece uma configuração completa da ferramenta, pois a sequência de dobra desempenha um papel crucial. Para obter informações detalhadas sobre a sequência de dobra, consulte o capítulo específico. Ativar a Seleção Automática substituirá qualquer configuração de ferramenta existente pela configuração ideal para a tarefa.
Multi-V, pré-seleção de recurso de matriz
Na configuração da ferramenta DELEM DA-69T, o Matriz multi-V O recurso permite flexibilidade ao trabalhar com matrizes com múltiplas aberturas em V ou U. Os usuários podem selecionar uma abertura em V ou U específica dentro da matriz Multi-V ou escolher a própria matriz Multi-V (com V = *). Quando uma abertura específica for escolhida, ela será usada em todo o cálculo da sequência de dobra.

Por outro lado, se a matriz Multi-V (com V = *) for selecionada, o sistema escolhe automaticamente a abertura que resulta em um raio de produto mais próximo da especificação programada. Caso seja necessária outra abertura em V ou U durante o cálculo da sequência de dobras, a Configuração de Ferramentas DELEM DA-69T se ajustará para usar essa nova abertura para quaisquer dobras subsequentes ainda não calculadas na sequência.
Vario-V, seleção e configuração
Na configuração de ferramentas DELEM DA-69T, o sistema de matriz Vario-V oferece aberturas variáveis em V ou U. Ao selecionar uma matriz Vario-V, o processo espelha qualquer escolha de matriz padrão, embora o valor V não seja predefinido. Você pode criar uma sequência de dobra onde o sistema seleciona o valor V mais adequado entre as posições disponíveis.

Se você inserir um valor V específico, o controle o utilizará para calcular a sequência de dobra. Para sistemas com posições discretas, apenas valores predefinidos são usados, sendo escolhido o valor mais próximo disponível caso a entrada seja diferente.
No modo de sequência de dobra, ajuste a abertura em V selecionada usando a função Modificar, Deslocar Matriz tocando no valor em V exibido. Uma funcionalidade semelhante está disponível no modo Programa para configuração precisa da ferramenta DELEM DA-69T.
Posicionamento ou reposicionamento
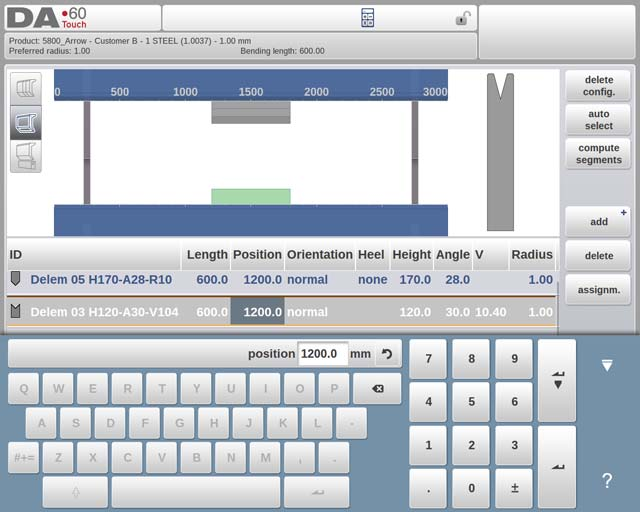
No processo de configuração de ferramentas do DELEM DA-69T, alterar o comprimento e a posição de uma ferramenta é simples. Basta mover o cursor para o campo designado, inserir o novo valor e pressionar ENTER para aplicar as alterações. As ferramentas podem ser selecionadas com um toque e reposicionadas arrastando-as para o local desejado.
O recurso de reposicionamento foi aprimorado para maior precisão; ao arrastar uma ferramenta, mover o dedo para baixo reduzirá a velocidade, permitindo ajustes mais precisos.

Além disso, a função de encaixe desempenha um papel crucial, alinhando as ferramentas superiores e inferiores ou estações de ferramentas na posição correta — seja à esquerda, à direita ou centralizadas na máquina. Conforme as ferramentas entram na zona de encaixe, uma linha vermelha aparece para guiá-lo em direção ao alinhamento preciso.
Depois que um punção é definido, uma matriz com uma ID padrão, correspondente ao comprimento e à posição do punção, é automaticamente colocada abaixo dele.
Modifique a configuração usando as funções disponíveis ou ajustando os valores na visualização em lista. Isso permite adicionar ou remover punções e matrizes, reposicionar ferramentas existentes, ajustar seus comprimentos, alterar orientações e modificar os tipos de talão — tudo isso crucial para otimizar a configuração da ferramenta DELEM DA-69T.
- Excluir configuração: Remova a configuração atual para iniciar uma nova configuração de ferramenta.
- Adicionar: Adicione facilmente uma nova ferramenta selecionando opções como adaptador superior, punção, matriz ou adaptador inferior.
- Excluir: Remova uma ferramenta selecionada para refinar sua configuração de ferramenta DELEM DA-69T.
Segmentação de ferramentas
Na Configuração de Ferramentas DELEM DA-69T, ferramentas segmentadas podem ser compostas a partir dos tamanhos desejados, com o suporte do sistema de controle para gerar a segmentação apropriada. A tela de Configuração de Ferramentas oferece três modos de visualização, acessíveis por meio de botões no lado esquerdo da vista frontal da máquina:

Visualização de segmentação: Mostra detalhes da segmentação e permite o manuseio de segmentos individuais.

Exibição de configuração da ferramenta: Exibe ferramentas necessárias para produção e permite sua configuração.

Vista da estação de ferramentas: Permite a visualização, seleção e gerenciamento de estações de ferramentas.
Os recursos de segmentação dependem de segmentos programados para cada ferramenta, o que pode ser feito no modo Máquina, nas bibliotecas Punções e Matrizes de Fundo. Detalhes adicionais de programação estão disponíveis na biblioteca de Ferramentas. Essa capacidade de segmentação de ferramentas aumenta a flexibilidade e a eficiência da Configuração de Ferramentas DELEM DA-69T.
Segmentação de ferramentas individuais
Na Configuração de Ferramentas DELEM DA-69T, após configurar as ferramentas desejadas, o modo Sequência de Dobra ajuda a otimizar a sequência de dobra com eficiência. As ferramentas podem ser segmentadas para selecionar o comprimento correto da ferramenta.
O sistema calcula automaticamente a segmentação necessária usando a "distância máxima entre ferramentas" e, se necessário, a "tolerância do comprimento da ferramenta" para encontrar a melhor solução. Isso aumenta a precisão e a eficiência na configuração da sua ferramenta.

Visualização de ferramentas
Na seção Visualização de Ferramentas da configuração da ferramenta DELEM DA-69T, os usuários podem utilizar a função de segmentação de ferramentas para otimizar a configuração da ferramenta. Quando esta função é ativada, o sistema calcula a segmentação necessária com base nos comprimentos de segmentos programados e no número disponível. Este processo considera todas as estações que utilizam a mesma ferramenta, desde que os segmentos de ferramenta tenham sido programados especificamente.
Uma vez iniciado, o sistema exibe os resultados, permitindo que os usuários acompanhem o processo de otimização. Uma correspondência exata resultará em um indicador verde, e o símbolo da ferramenta refletirá esse sucesso com uma mudança de cor semelhante. Se um comprimento não exato, mas válido, for alcançado, indicado por uma luz amarela, isso pode sugerir dependência da distância entre ferramentas ou da tolerância do comprimento da ferramenta, talvez indicando que a ferramenta é mais longa do que o necessário para um produto 2D. Essa informação é comunicada por meio de mensagens.
Se nenhuma segmentação válida for possível, o indicador ficará vermelho e nenhuma segmentação ocorrerá. Os usuários podem interromper o processo de cálculo com um comando Cancelar ou Parar, preservando o estado de otimização atual. Para mesclar, o botão Mesclar Segmentos permite que ferramentas segmentadas se tornem não segmentadas. Quaisquer alterações nas propriedades de uma ferramenta segmentada, como comprimento, a revertem automaticamente para um estado não segmentado.
Tarefas
As atribuições utilizadas durante o cálculo de segmentação para a Configuração da Ferramenta DELEM DA-69T podem ser acessadas através do botão Atribuições. As atribuições disponíveis incluem:
- Distância máxima entre segmentos: O espaço permitido entre segmentos.
- Use a tolerância do comprimento da ferramenta: Habilite isso para desvio de segmentação permitido.

Visão de segmentação
Na visualização de Segmentação da Configuração da Ferramenta DELEM DA-69T, você pode ver os segmentos da ferramenta selecionada visualmente e em uma lista. Esta visualização permite mover e modificar segmentos, mostrando apenas aqueles da ferramenta escolhida.

Você pode ajustar segmentos sem verificar a disponibilidade atual do estoque, mas precisará verificar isso com uma nova segmentação posteriormente. Lembre-se de que alterar o comprimento ou o tipo da ferramenta redefinirá a segmentação, exigindo regeneração. O gerenciamento eficiente da segmentação é crucial para a configuração ideal da ferramenta DELEM DA-69T.
Segmentos na biblioteca de ferramentas
Para configurar a ferramenta DELEM DA-69T com eficiência, é essencial utilizar corretamente os segmentos da biblioteca de ferramentas. Os segmentos permitem cálculos precisos com base nos componentes disponíveis, aumentando a eficiência geral do sistema DELEM DA-69T. Para preencher a biblioteca com segmentos, você precisará acessar o recurso de programação de ferramentas, localizado no modo Máquina, em Punções ou Matrizes de fundo, nas propriedades da ferramenta.
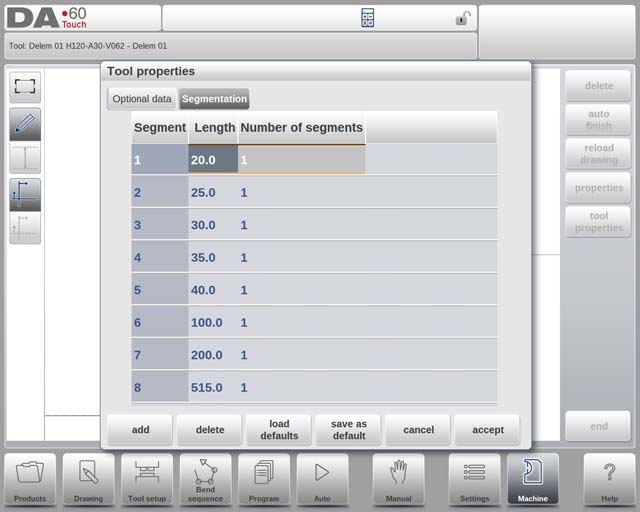
Para cada ferramenta, você pode especificar detalhes na guia Segmentação, incluindo:
- O comprimento do segmento
- O formato do salto opcional
- A quantidade disponível de segmentos
Ao garantir que esses detalhes sejam inseridos com precisão, a configuração da ferramenta DELEM DA-69T se torna mais robusta, permitindo que a máquina tenha um desempenho ideal com as configurações definidas.
Seleção e reposicionamento de estações
No processo de Configuração de Ferramentas do DELEM DA-69T, a terceira etapa de configuração envolve a visualização da Estação, onde estações de ferramentas completas podem ser selecionadas e reposicionadas. Cada estação de ferramentas é destacada quando selecionada, facilitando ajustes simples, seja programando uma posição alternativa ou arrastando-as para o local desejado na máquina. Uma estação de ferramentas é definida automaticamente em cenários onde há sobreposição entre punções e matrizes. Por exemplo:
- Uma estação de ferramentas é reconhecida quando um punção e uma matriz são posicionados diretamente opostos um ao outro.
- Mesmo quando punções e matrizes têm uma posição deslocada, mas sobreposta, ela ainda se qualifica como uma estação de ferramentas.
- Configurações complexas, como dois punções opostos a uma única matriz para dobrar dobras restritas, também formam uma estação de ferramentas.
Essas estações podem ser reposicionadas sem alterar sua configuração relativa, proporcionando flexibilidade nas operações. É importante observar que a visualização da estação não modifica os detalhes fundamentais da ferramenta, mantendo assim a integridade da configuração da ferramenta DELEM DA-69T.
Perguntas Frequentes (FAQ)
Que ação imediata devo tomar se houver um erro na configuração da ferramenta no meu DELEM DA-69T?
Se detectar um erro, interrompa a produção imediatamente, redefina a configuração da ferramenta para os padrões e repita o processo de configuração. Certifique-se de verificar cada etapa, especialmente a entrada de dados e a calibração, para corrigir o erro.
Quais etapas devo seguir para uma configuração precisa da ferramenta DELEM DA-69T?
Comece redefinindo todos os parâmetros e certifique-se de que os dados da ferramenta estejam inseridos corretamente. A calibração com um medidor digital é crucial para obter um alinhamento preciso da ferramenta. Ajuste as configurações com base nas suas necessidades de produção e salve a configuração para conveniência futura.
Conclusão
A configuração correta da ferramenta DELEM DA-69T é essencial para maximizar o desempenho e a longevidade da sua máquina dobradeira. Seguindo estas diretrizes, você pode garantir operações precisas e reduzir o potencial tempo de inatividade. As principais etapas incluem a seleção dos parâmetros corretos da ferramenta, o ajuste preciso do alinhamento e a realização de um teste para validar as configurações.
Para um sucesso contínuo, recomenda-se a manutenção regular e revisões periódicas das configurações das ferramentas. Caso tenha alguma dúvida ou precise de mais assistência, entre em contato com nossa equipe. Estamos aqui para fornecer suporte detalhado e ajudá-lo a atingir a eficiência ideal de produção. Além disso, explore mais recursos ou documentação relacionada disponíveis em nosso site para aprimorar sua compreensão e capacidades operacionais.


