


Se você já se perguntou como otimizar seu fluxo de trabalho com a Configuração da Máquina ESA S630, você está no lugar certo. Neste artigo, explorarei como a Configuração da Máquina ESA S630 pode aumentar significativamente sua eficiência operacional. Ao compreender o processo de configuração, você pode explorar todo o potencial dessa tecnologia para otimizar tarefas e aumentar a produtividade em seu ambiente industrial. Seja você um novato no uso da ESA S630 ou um operador experiente em busca de aprimorar suas habilidades, este guia fornecerá insights valiosos para aprimorar seu fluxo de trabalho. Vamos analisar os principais benefícios e as etapas práticas envolvidas no domínio da Configuração da Máquina ESA S630.
Introdução

Quando se trata de melhorar seu fluxo de trabalho, é importante entender o ESA S630 A máquina e suas capacidades são cruciais. O ESA S630 é um equipamento sofisticado para ambientes industriais, projetado para oferecer precisão e eficiência em diversas operações. Uma configuração otimizada da máquina ESA S630 impacta diretamente a produtividade e a eficácia de suas operações, garantindo que as tarefas sejam concluídas com mais rapidez e precisão.
Ao se familiarizar com o processo de configuração e adaptá-lo às suas necessidades específicas, você libera todo o potencial da máquina, resultando em redução de desperdício e aumento da produtividade. À medida que as indústrias se esforçam para se manter competitivas, otimizar a eficiência das máquinas não é mais apenas uma opção, mas uma necessidade para manter uma vantagem competitiva.
Seleção de menu
Para selecionar o menu contextual da página você deve pressionar [Menu]uma vez. Esta etapa é crucial no processo geral de configuração da máquina ESA S630, pois permite acessar diversas ferramentas de configuração e diagnóstico essenciais para otimizar o desempenho da máquina. Pressionando [Menu] duas vezes esta lista de seleção aparecerá:
0>> Editor
1>> Parâmetros do Eixo
2>> Configuração
3>> Diagnosticar
4>> Parâmetros do Usuário
5>> Desligar
6>> Versão
7>> Logotipo
Cada uma dessas opções desempenha um papel vital na configuração da máquina ESA S630, permitindo que você personalize os recursos da máquina para atender às suas necessidades específicas de fluxo de trabalho. Seja ajustando parâmetros de eixo ou verificando diagnósticos do sistema, navegar por este menu com eficiência é essencial para aumentar a eficiência operacional.
Insights sobre o ambiente de toque
A configuração da máquina ESA S630 foi projetada para melhorar significativamente a eficiência operacional e a produtividade. Com sua interface moderna e fácil de usar, a configuração da máquina ESA S630 simplifica tarefas complexas, garantindo uma operação suave e tempo de inatividade mínimo. A nova interface da NC Kvara S630 Touch conta com novos gráficos interativos, nos quais todas as funções são acessadas com o toque do seu dedo. Isso não apenas porque a Esautomotion Srl se alinha perfeitamente aos recursos do ambiente de PC mais atual, mas também porque busca agilizar e facilitar o trabalho do usuário final.
Teclado virtual
Sempre que você precisar definir alguns dados nos campos de entrada, basta digitar na tela para editar os dados diretamente com o dedo e imediatamente você verá o teclado virtual, conforme mostrado na figura.
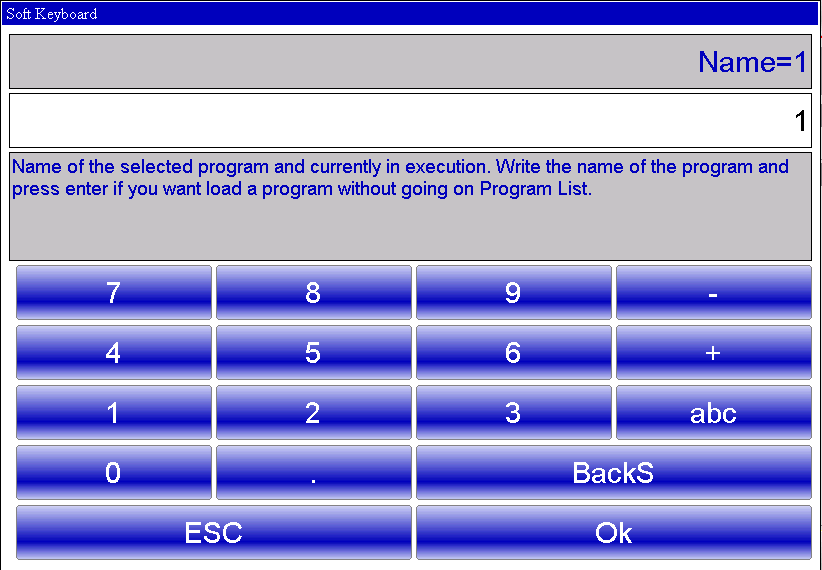
Quando você confirma um dado inserido, o Teclado Virtual fecha.
Ao pressionar “abc” aparecerão os caracteres literários para nomear programas, ferramentas ou definir dados:
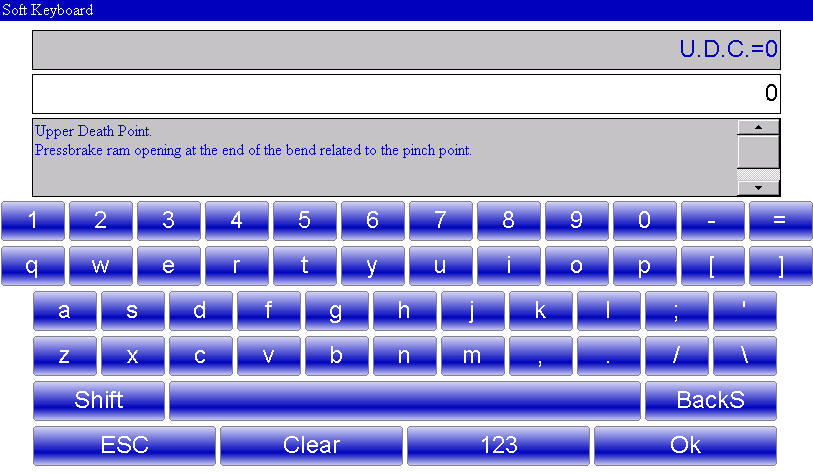
O Soft Keyboard é um teclado virtual e interativo que possui todas as funcionalidades de um teclado de PC, mas com a vantagem de ser um ambiente touchscreen. Isso garante que os usuários tenham acesso direto ao teclado na tela, permitindo o monitoramento visual ininterrupto das alterações e entradas feitas em seu fluxo de trabalho. Essa abordagem não apenas aprimora a interação do usuário, mas também agiliza significativamente todas as operações necessárias, tornando a configuração da máquina ESA S630 um recurso indispensável para otimizar fluxos de trabalho industriais.
Configuração da máquina para desempenho ideal
Operações a serem executadas após a energização
Para aproveitar ao máximo a Configuração da Máquina ESA S630, é obrigatório referenciar o carneiro para acessar a fase automática e executar um programa de trabalho com eficiência. Uma Configuração da Máquina ESA S630 otimizada impacta diretamente a produtividade e a eficácia das suas operações, garantindo que as tarefas sejam concluídas com mais rapidez e precisão. A referência dos eixos dos batentes traseiros é opcional.
No entanto, é aconselhável consultá-los caso haja dúvidas sobre a exatidão dos eixos dos batentes traseiros atuais. Isso se torna particularmente importante quando um eixo pode ter sido movido manualmente enquanto o controle numérico estava desligado.
Procedimento detalhado de referência de RAM
Ao configurar o ESA S630, referenciar corretamente a RAM é essencial para uma operação perfeita e um desempenho ideal. Uma referência precisa da RAM garante que você possa executar programas com precisão no modo automático. Veja como você pode seguir o procedimento para referenciar a RAM na configuração da sua máquina ESA S630:
-Comece pressionando

-Se o carneiro estiver posicionado para cima, pressione o pedal para baixo para manobrá-lo abaixo da marca zero. Esta etapa é crucial para definir a posição da linha de base.
-Em seguida, pressione o pedal para cima. Esta ação ativa a subida manual, especialmente se a máquina tiver sido reinicializada. Durante esta fase, o carneiro subirá até se alinhar com as marcas zero das escalas lineares ópticas localizadas nos dois cilindros, marcando o ponto de referência.
Após a conclusão desta configuração, o seu ESA S630 estará pronto para executar um programa em modo automático com eficiência. Se precisar repetir o procedimento de referência sem reiniciar o NC:
-Imprensa [Repetir referência] no painel de controle.
-Em seguida, pressione o pedal de reascensão.
Ao aderir a este procedimento de referência de RAM, você garante que seu ESA S630 opere com eficiência máxima, melhorando o fluxo de trabalho e mantendo altos padrões de produtividade em suas operações.
Eixos de referência de medidores traseiros
Para executar corretamente a configuração da máquina ESA S630, referenciar os eixos dos batentes traseiros é uma etapa fundamental para garantir a precisão das suas operações. Siga estas etapas para referenciar com precisão os eixos dos batentes traseiros:
-Imprensa
-Imprensa

Durante esse processo, os eixos dos batentes traseiros se moverão em direção à chave fim de curso de referência. Ao tocar na chave fim de curso, eles inverterão a direção. Após soltar a chave fim de curso, os eixos se referenciarão à primeira marca zero do encoder. Ao otimizar essa configuração, você maximiza o potencial operacional do seu ESA S630, resultando em melhor fluxo de trabalho e produtividade.
Perguntas Frequentes (FAQ)
Os ajustes de configuração da máquina ESA S630 podem afetar a qualidade geral da produção?
Sim, ao ajustar a Configuração da Máquina ESA S630, você garante que todos os parâmetros da máquina sejam otimizados, resultando em resultados consistentes e de alta qualidade. A configuração adequada minimiza erros e aumenta a precisão do produto.
Como posso garantir a longevidade do ESA S630 por meio de ajustes de configuração?
A configuração consistente e precisa da máquina ESA S630, aliada à manutenção regular, pode prolongar significativamente a vida útil da máquina. Resolver desalinhamentos de configuração rapidamente ajuda a prevenir desgastes e garante uma operação confiável.
Conclusão
A implementação eficaz da Configuração da Máquina ESA S630 pode aprimorar significativamente seu fluxo de trabalho, garantindo operações precisas e otimizando a eficiência da máquina. Seguindo cuidadosamente as etapas descritas neste guia, você poderá referenciar com sucesso os eixos dos batentes traseiros e maximizar o potencial da ESA S630. Essa atenção cuidadosa à configuração não apenas melhora a precisão, mas também minimiza o tempo de inatividade, resultando em um processo de produção mais otimizado.
Para aqueles que buscam dar o próximo passo na otimização de suas operações de usinagem, recomendamos que entrem em contato com nossa equipe para obter suporte detalhado ou esclarecer dúvidas. Além disso, explore nossos amplos recursos e documentação para obter mais insights sobre como maximizar a eficiência da configuração da sua máquina ESA S630. Ao se manter informado e proativo, você garante que suas operações sejam eficazes e competitivas.


