


Se você busca dominar os meandros do Gerenciamento de Produtos DELEM DA-69S, veio ao lugar certo. Neste artigo, apresentarei os recursos e funcionalidades essenciais do sistema DELEM DA-69S, cruciais para o gerenciamento eficiente de produtos em um ambiente CNC.
Seja você um profissional experiente ou esteja apenas começando a se aprofundar na programação de máquinas CNC, entender como navegar e utilizar a Biblioteca de Produtos DELEM DA-69S pode aumentar significativamente a eficiência do seu fluxo de trabalho. Este guia fornecerá soluções práticas e insights, ajudando você a otimizar suas operações e alcançar resultados ideais. Vamos explorar como o Gerenciamento de Produtos DELEM DA-69S pode transformar suas operações CNC.
Introdução a Produto DELEM DA-69S Biblioteca
A biblioteca de produtos DELEM DA-69S é um hub centralizado para gerenciar a variedade de itens executados e projetados em sua máquina CNC.
No modo Produtos, produtos existentes e previamente produzidos podem ser selecionados para iniciar a produção ou modificação, a fim de criar um produto similar. Para iniciar a produção de um novo produto ou programa, é possível usar Novo Produto ou Novo Programa neste modo.
A vista principal

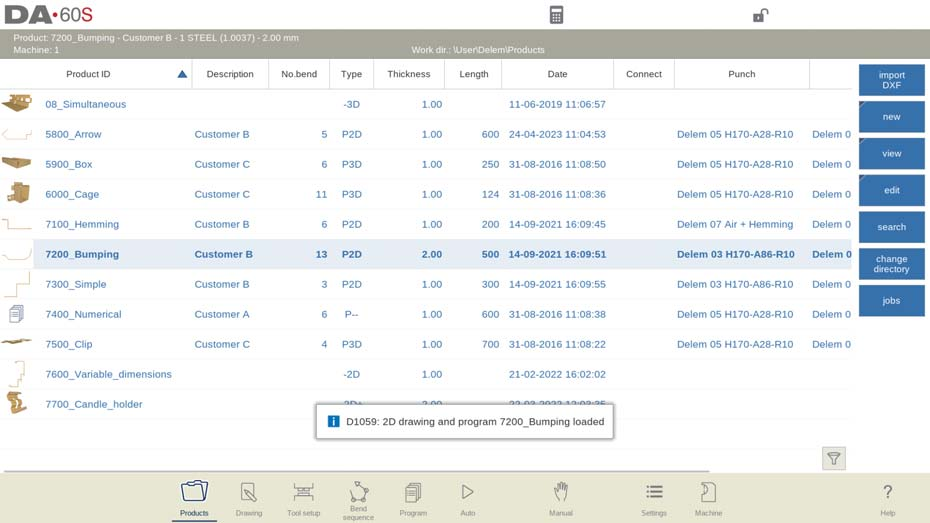
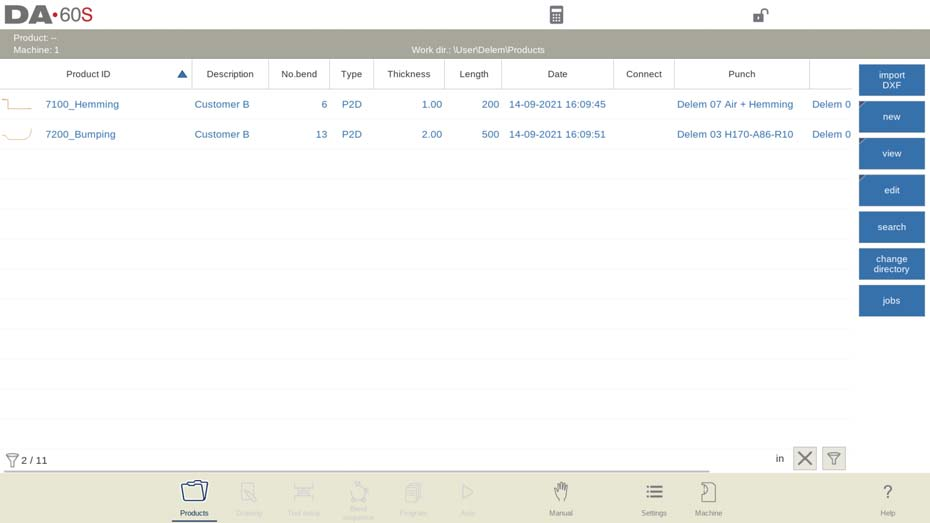
Este modo permite que os usuários selecionem, modifiquem e executem programas de produtos perfeitamente. Cada entrada de produto é detalhada com uma miniatura gráfica ou símbolo para programas numéricos, um ID do produto, uma descrição do produto, o número de dobras, o tipo de produto e a data da última utilização ou modificação — essencial para otimizar o fluxo de trabalho e garantir o uso atualizado. A indicação do tipo do produto mostra os seguintes tipos de produtos:
- P– o produto possui programa CNC, não há desenho
- -2D o produto consiste em um desenho 2D, não há programa CNC
- P2D o produto possui um desenho 2D e um programa CNC
- -3D o produto consiste em um desenho 3D, não há programa CNC
- P3D o produto possui um desenho 3D e um programa CNC
Para ativar um programa de produto, basta tocar no ID do produto ou em qualquer parte da linha de produtos. Se a lista exceder o limite da tela, deslize para cima para revelar produtos adicionais, garantindo que você possa selecionar e ativar qualquer programa rapidamente. Essa abordagem não apenas agiliza as operações, mas também minimiza erros, otimizando todo o processo de gerenciamento CNC.
Navegando na Biblioteca de Produtos
Para começar a dominar o gerenciamento de produtos DELEM DA-69S, acesse a visualização principal da biblioteca de produtos. Basta navegar até o menu e selecionar a seção da biblioteca. Isso fornece uma exibição abrangente de todos os programas e produtos gráficos armazenados, oferecendo uma interface intuitiva para fácil navegação e gerenciamento.
Métodos para Seleção de Produtos
Para selecionar um produto, basta um único toque. O produto será selecionado e carregado na memória. A partir daí, a produção pode ser iniciada tocando em Automático. A navegação também pode ser iniciada pelo Desenho do Produto (se existente), sua Configuração de Ferramenta, a Sequência de Dobra e o Programa numérico do produto.
Isso permite que os operadores trabalhem rapidamente com vários produtos simultaneamente, economizando tempo e reduzindo erros.
Iniciando um novo produto gráfico
A criação de novos produtos é uma parte fundamental do gerenciamento de produtos do DELEM DA-69S. Para iniciar um novo produto gráfico, clique em "Novo Produto" na visualização da biblioteca. Siga as instruções na tela para inserir os parâmetros necessários.

Esta etapa é essencial para personalizar e adicionar produtos exclusivos, adaptados às necessidades de produção.
Iniciando um Programa Numérico
Ao lidar com operações padronizadas, frequentemente é necessário iniciar um programa numérico. Na biblioteca de produtos DELEM DA-69S, selecione "Novo Programa Numérico" e defina seus parâmetros com base em modelos existentes ou em suas especificações.

Isso facilita o processamento estruturado e repetível, essencial para manter a qualidade consistente da saída.
Gerenciando produtos com facilidade
Visualizações e suas funções no gerenciamento de produtos
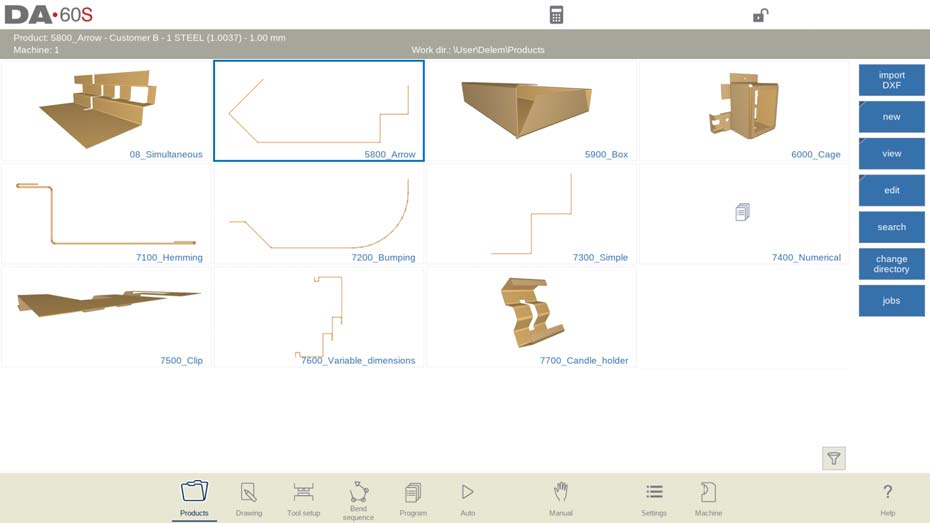
O gerenciamento de produtos DELEM DA-69S oferece diversas visualizações — lista e grade — para gerenciar produtos. Essas visualizações desempenham funções distintas: visualização em lista para informações detalhadas e visualização em grade para facilitar o reconhecimento visual.


Escolher a visualização correta pode simplificar o processo de gerenciamento, permitindo que os operadores se concentrem nos principais atributos do produto.
Etapas para copiar, excluir, renomear e mover produtos
Tarefas de gerenciamento de rotina, como copiar, excluir ou renomear produtos, são necessárias para a organização.
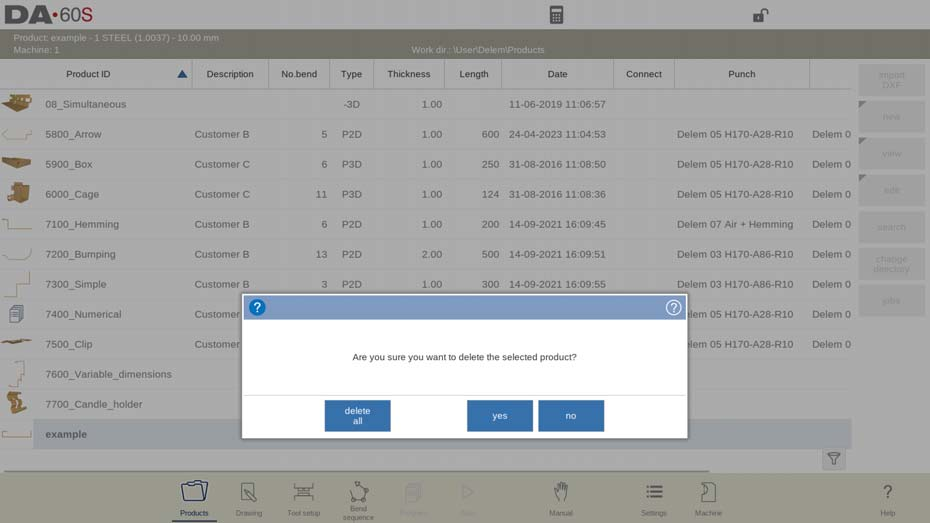
- Excluindo um produto: Para remover um produto, primeiro selecione-o tocando nele no modo Produtos. Após selecionar, toque em "Editar" e depois em "Excluir". Confirme a ação quando solicitado para concluir a exclusão. Se precisar excluir todos os produtos e programas simultaneamente, basta escolher a opção "Excluir tudo". Esta etapa garante um diretório de produtos limpo e organizado.
- Copiando um produto: Para duplicar um produto, selecione o produto ou programa desejado. Toque em "Editar" e depois em "Copiar". Você pode então atribuir um novo nome ao produto copiado, que aparecerá no mesmo diretório. A duplicata manterá todas as configurações, incluindo a configuração da ferramenta e os ajustes da sequência de dobra, proporcionando uma réplica exata.

- Renomeando e movendo um produto: Os produtos podem ser movidos ou renomeados para melhor organizar seus diretórios. Após selecionar o produto ou programa, toque em "Editar" e escolha "Mover" ou "Renomear" entre as opções. Mover realoca o produto para um diretório diferente, enquanto renomear permite atribuir um novo nome dentro do mesmo diretório, garantindo melhor organização e gerenciamento das suas operações CNC.
No sistema de gerenciamento de produtos DELEM DA-69S, operações simples de clique com o botão direito fornecem acesso a essas opções, permitindo duplicação, remoção ou renomeação eficiente de produtos sem interromper o fluxo de trabalho.
Produtos de bloqueio e desbloqueio para segurança
Proteja suas operações CNC utilizando o recurso de bloqueio/desbloqueio no gerenciamento de produtos DELEM DA-69S. Esta função evita modificações ou exclusões acidentais de produtos cruciais. Utilize-a selecionando o produto e escolhendo "Bloquear" ou "Desbloquear", garantindo que apenas alterações autorizadas sejam feitas.

Técnicas Avançadas de Seleção de Produtos
Selecionando vários produtos simultaneamente
Selecionar produtos com eficiência é vital para otimizar as operações CNC. O gerenciamento de produtos DELEM DA-69S oferece métodos simples: seleção com um único clique para itens individuais e controle-clique para selecionar vários produtos.
- Para selecionar um único produto novamente, toque em Editar e escolha Selecionar único.
- Para selecionar vários produtos, toque em Editar e escolha Selecionar vários. Agora, vários produtos podem ser selecionados. Essa seleção múltipla pode ser copiada, movida, excluída, bloqueada ou desbloqueada.
Essa técnica é particularmente benéfica durante o processamento em lote ou ao fazer alterações coletivas nas configurações.
Utilizando a função de pesquisa para acesso rápido
A função de busca é uma ferramenta poderosa no gerenciamento de produtos DELEM DA-69S para encontrar produtos específicos rapidamente. Aqui está um guia passo a passo para ajudar você a utilizar esse recurso de forma eficaz:
- Ativando a tela de pesquisa: Comece tocando no botão "Pesquisar". Essa ação abrirá a tela de pesquisa imediatamente, permitindo que você inicie sua consulta imediatamente.
- Inserindo critérios de filtro: Digite a sequência de filtros desejada, que pode ser dividida por espaços para maior precisão. O sistema iniciará uma busca em tempo real com base nas suas informações, agilizando o processo de localização de itens específicos.
- Selecionando Diretórios de Pesquisa: Selecione seu diretório de busca preferido para refinar seus resultados. Você tem a flexibilidade de pesquisar em todos os diretórios, dentro da árvore atual, ou limitar a busca ao diretório atual. Isso garante que você explore apenas as áreas relevantes.
- Definindo parâmetros de pesquisa: Utilize a opção "Seleção" para realizar pesquisas por ID do produto ou Descrição do produto.
- Usando entradas parciais: Você pode inserir nomes ou números completos, ou apenas parte deles. Se a entrada parcial corresponder a vários produtos, todos os nomes de produtos relevantes serão exibidos.

Insira palavras-chave relacionadas ao nome ou tipo do produto e a biblioteca filtrará os resultados relevantes. Isso economiza tempo e ajuda a manter o foco nas tarefas de produção.
Como usar filtros para restringir as opções de produtos
Refine sua seleção de produtos usando o recurso de filtro. O DELEM DA-69S permite a filtragem por tipo, data ou status. Aqui está um guia passo a passo para usar filtros:
- Iniciar o filtro: Toque no ícone de filtro no canto inferior direito para acessar o recurso de filtro.
- Insira os critérios de filtro: Use o teclado para inserir texto específico para filtrar produtos.
- Verificar status do filtro: Procure o ícone de filtro no canto inferior esquerdo, que mostra o número de itens filtrados em relação ao total.
- Remova o filtro: Toque no ícone de cruz ao lado do ícone de filtro para ver todos os produtos novamente.
A aplicação de filtros pode reduzir drasticamente o tempo gasto na pesquisa, ajudando os operadores a identificar rapidamente os produtos necessários.
Alterando Diretórios para Melhor Organização
Uma biblioteca organizada é crucial para uma gestão eficiente do produto DELEM DA-69S. Aprimore a gestão do seu produto DELEM DA-69S organizando diretórios de forma eficiente:

- Alterar diretório: Toque em "Alterar diretório" para alternar ou adicionar novos diretórios, mantendo os produtos bem categorizados.
- Remover diretório: Selecione e toque em "Remover diretório" para excluir os obsoletos, confirmando a ação conforme necessário.
- Selecione o diretório: Use "Selecionar" para visualizar os produtos no diretório escolhido. O nome do diretório ativo é exibido no cabeçalho.
- Criar subdiretório: Toque em "Criar Subdiretório" para criar um subdiretório, usando até 24 caracteres alfanuméricos. Evite barras ('/').
- Remover subdiretório: Exclua subdiretórios vazios após a confirmação. O diretório padrão "PRODUCTS" não pode ser removido.
- Notas importantes: A cópia de produtos entre subdiretórios é feita no modo Desenho ou Programa. O sistema lembra o último subdiretório ativo e a seleção de produto para maior conveniência.
Aproveitando a seleção de produtos de rede para colaboração
Os ambientes colaborativos se beneficiam dos recursos de seleção de produtos de rede do DELEM DA-69S.

Para aprimorar a colaboração e otimizar o gerenciamento de produtos DELEM DA-69S, siga estas etapas simplificadas para usar a seleção de produtos de rede:
- Acessando diretórios de rede: Após montar um diretório de rede, encontre-o em "Rede", ao lado do diretório "Produto". O nome da unidade indica que ela está pronta para uso.
- Navegando por diretórios: Use o navegador de diretórios para selecionar, adicionar ou remover diretórios e produtos. Toque em "Selecionar" para visualizar os produtos no diretório ativo, exibido no cabeçalho da tela.
- Mantendo a Seleção Ativa: O controle lembra seu subdiretório ativo e a seleção de produto, mantendo o fluxo de trabalho até que você escolha outro.
- Lidando com problemas de rede: Para redes 'somente leitura' ou interrupções, os produtos são salvos em um subdiretório 'Recuperados' para evitar perda de dados.
- Atualizando listagens de produtos: Toque em "Atualizar" no modo Produtos para atualizar a biblioteca de produtos, garantindo que você tenha os dados mais recentes armazenados na rede.
Esse recurso permite o compartilhamento de produtos entre redes, promovendo o trabalho em equipe e a integração perfeita entre diferentes usuários e máquinas. Essa colaboração otimiza as operações e aumenta a produtividade.
Controle de chão de fábrica, função de lista de tarefas
O DELEM DA-69S agiliza a gestão do chão de fábrica com sua função Lista de Tarefas, permitindo que os operadores gerem e enviem ordens de serviço para as máquinas com eficiência. Ao acessar a tela de Tarefas por meio do botão de comando "Tarefas", os usuários podem visualizar as tarefas preparadas, cada uma com um ID de Tarefa, datas de necessidade e conclusão, além de comentários opcionais.

Os indicadores de status da Lista de Tarefas fornecem atualizações em tempo real sobre o andamento de cada tarefa. Os status incluem:
- Novo: Nenhum produto foi produzido ainda.
- Incompleto: O número desejado de produtos não foi totalmente produzido.
- Em andamento: O trabalho está ativamente carregado e em produção.
- Finalizado: Todos os lotes de produtos foram confirmados como concluídos com sucesso.
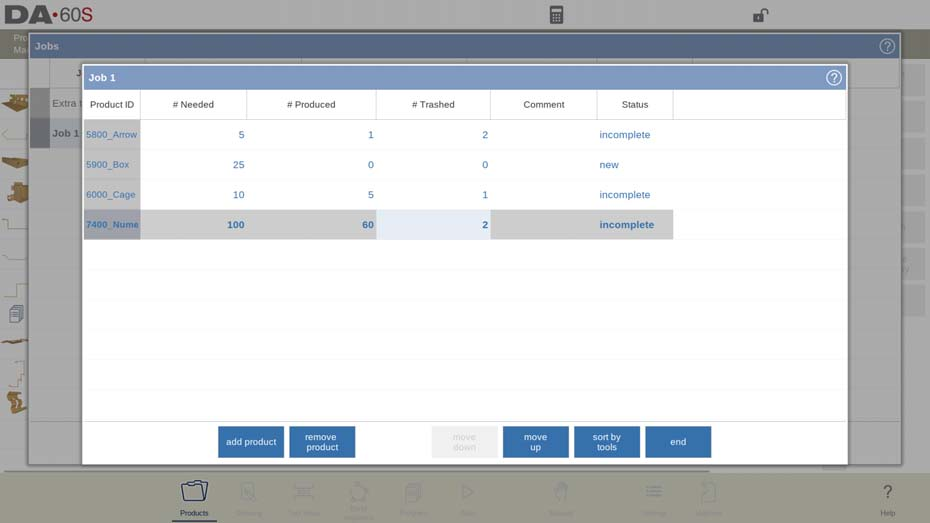
A tecla Editar Tarefa permite modificações, exibindo contagens de produtos necessários, produzidos e descartados para monitorar o progresso. Iniciar a produção é simples: selecione uma tarefa, ative-a no modo automático e pressione Iniciar para iniciar o processo de dobra, aumentando a eficiência geral.
Perguntas Frequentes (FAQ)
Quais etapas devem ser seguidas para copiar um produto dentro da biblioteca de produtos DELEM DA-69S?
Navegue até o produto desejado, selecione a opção de cópia no menu e designe o diretório de destino para o produto copiado. Certifique-se de verificar a consistência dos parâmetros copiados.
Como posso bloquear efetivamente um produto para evitar alterações não autorizadas?
Acesse as configurações do produto no DELEM DA-69S e selecione a opção de bloqueio. Isso restringe modificações e protege os dados do seu produto contra acesso não autorizado.
Posso automatizar os processos de seleção de produtos no DELEM DA-69S?
Automatizar a seleção de produtos no DELEM DA-69S envolve configurar categorias de produtos e usar a função de filtro para agilizar o acesso aos produtos usados com frequência.
Conclusão
Dominar o Gerenciamento de Produtos DELEM DA-69S envolve a compreensão e o uso eficaz de uma variedade de recursos-chave. Ao navegar com eficiência pela biblioteca de produtos, utilizar técnicas avançadas de seleção e gerenciar produtos com facilidade, os operadores podem aprimorar significativamente seu fluxo de trabalho e produtividade. As principais etapas incluem iniciar novos programas gráficos e numéricos, usar as funções de copiar, excluir e renomear com eficiência e aproveitar os recursos de pesquisa e filtro para otimizar as operações. O bloqueio/desbloqueio e o gerenciamento de diretórios garantem ainda mais o manuseio organizado e seguro dos produtos.
Para aprimorar ainda mais suas habilidades e compreensão do Gerenciamento de Produtos DELEM DA-69S, considere entrar em contato com nossa equipe para obter orientação e suporte mais detalhados. Oferecemos recursos abrangentes e consultoria especializada para responder a quaisquer dúvidas ou necessidades específicas que você possa ter. Além disso, recomendamos que você explore outras documentações relacionadas disponíveis em nosso site para enriquecer seu conhecimento e eficiência operacional. Para assistência imediata ou para agendar uma consultoria, entre em contato conosco diretamente.


