


When it comes to achieving precision and consistency in metal bending, understanding the ESA S860 machine functions is crucial. If you’ve been searching for ways to enhance the accuracy of your bends, you’re in the right place.
In this article, I’ll delve into the essential functions of the ESA S860 machine and explain how they contribute to producing perfect bends. Whether you’re a seasoned professional or new to metalworking, this guide will provide you with the insights needed to optimize your machine’s performance and achieve impeccable results in your projects.
Exploring the “Metal-working Machine” Function
The ESA S860 machine functions streamline metal fabrication with precision and efficiency. Key features include:
- Soft Keyboard Environment – An intuitive interface for easy programming.
- New Bend Function – Quickly set up and save new bending programs.
- Bend Clinching Function – Ensures secure and accurate bends for consistent results.
These ESA S860 machine functions enhance productivity, reduce setup time, and improve bending accuracy—making it an essential tool for modern metalworking.
How to enable the “Metal-working Machine” function
To activate the “Metal-working machine” function on your ESA S860 machine, follow these steps:
- Open the Settings Menu: From the main screen, press the Settings key.
- Access Configuration: Select Configure (2) to enter the configuration menu.
- Navigate to General Parameters: Choose 7) General Parameters and press [Next].
- Enter Password: Input the required password and confirm with [OK].
- Enable Metal-Working Mode: Set the Metal-working machine field to 1 and press ENTER (for ESA S860 Touch & S660W models).
Once activated, the ESA S860 machine functions will include:
- “New Bend” programming
- “Forced bend clinching” capability
The “New Bend” function in ESA S860 Machine Functions simplifies programming by allowing operators to quickly duplicate bend data. This feature is accessible in the Settings and Bend Summary menu and ensures efficiency in repetitive bending tasks.
How It Works:
- Next Function: Pressing the ▶ key on the last bend in a section adds a new bend below with identical data.
- Enter Step Function: Selecting Enter Step from the menu inserts a new bend at the current position, copying the previous bend’s settings.
The Forced Bend Clinching feature (found in Settings and Bend Summary) allows operators to set a bend as Clinching by entering 0 in the Y1 Angle Field. This ensures precise control over bend termination, improving consistency in complex forming operations.
Last Bend
The Last Bend feature in the ESA S860 Machine Functions is represented by an icon at the top-right corner of the screen. This indicator confirms that the current bend is the final one in the programmed sequence, preventing accidental additional bends when pressing the control button.

“Machine Functions” Mask
Explore specialized ESA S860 Machine Functions tailored for each bend. Access these features by pressing the key from the data settings menu, then selecting Machine Functions (7). A detailed window will guide you through the available options.
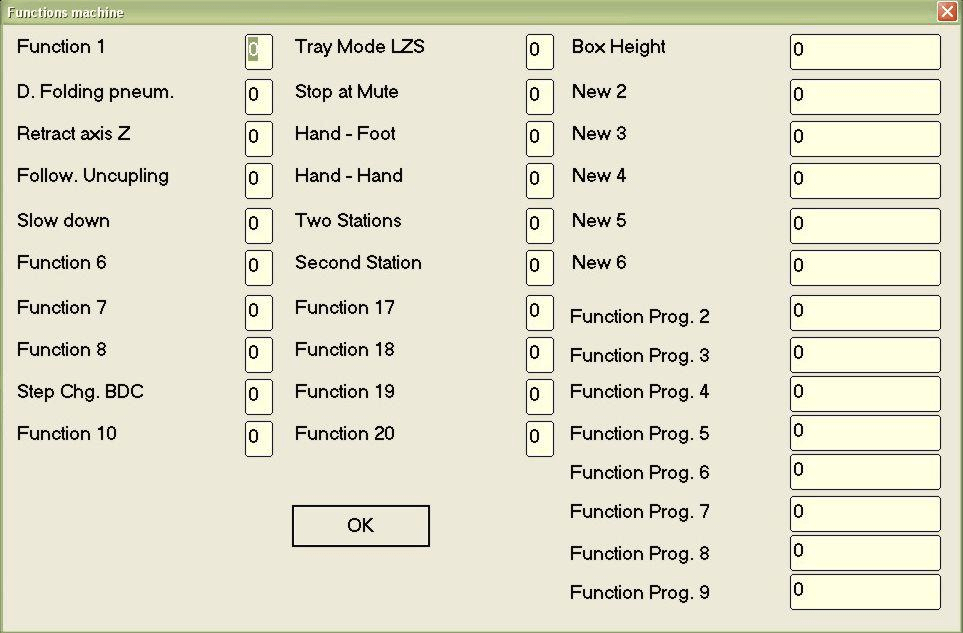
The PCSS Machine functions are as follows:
- Pneumatic Squash Functio: If this function is set to 1 in the bend with a stop, the pneumatic bend squash die will be raised.
- Z axes recoil Function: If this function is set to 1, the Z1 and Z2 axes will carry out a recoil set in the general parameter “Deviation value of Z” during the movement cycle.
- Function to enable unhooking of accompaniment: If this function is set to 1, during its movement cycle, the accompaniment will also carry out the unhooking cycle. To learn about the functioning of the guiding axes, consult the relative use manual.
- Slow descent function: If this function is set to 1, during the Semiautomatic and Automatic cycle, the ram will always be descend at slow speed.
- Pitch change to the PMI Function: If this function is set to 1, the pitch change will be made once the ram reaches the Lower dead point (that is, the end of the bend).
- LZS Mode Tray Function: This function is only used with the ‘laser safe’ safety system, that is, when the value of the parameter is 1.
- End of height function: This function is only used with the ‘laser safe’ safety system. It indicates the height of the fin to be entered in mm, to be specified in case of using the LZS Tray Mode (boxed-structure pieces).
- Stop at Mute Function: This function is only used with the ‘laser safe’ safety system. By setting the parameter to 1 you are able to stop at the speed change point. It is possible to start the bending of the piece again by pressing the lowering pedal.
- Hands-Feet Function: This function is only used with the ‘laser safe’ safety system. By setting the parameter to 1 you are able to stop at the speed change point with the manual control (if installed), and then continue again by pressing the lowering pedal.
- Hands-hands Function: This function is only used with the ‘laser safe’ safety system. By setting the parameter to 1 you are able to stop at the speed change point with the manual control (if installed), and then continue with the same.
- Double pedal Function: This function is only used with the ‘laser safe’ safety system. By setting the parameter to 1 you are able to use both pedals (if installed).
Saving the Programmes
With the ESA S860 Machine Functions, saving programs has evolved since version 10.1, allowing up to 20 functions. While these newer versions can read older programs, they aren’t backward compatible. However, you can still save programs in formats compatible with versions 5.0 to 9.1.
Version Saving Mask Features:
- View a list of numeric programs in the directory.
- Identify the current program version selected.
- Choose the version to save programs with a radio button.
- Use the [Save As…] function key to save the selected file in the chosen version.
- Use [Save ALL As…] to save all files on a disk in the selected version.
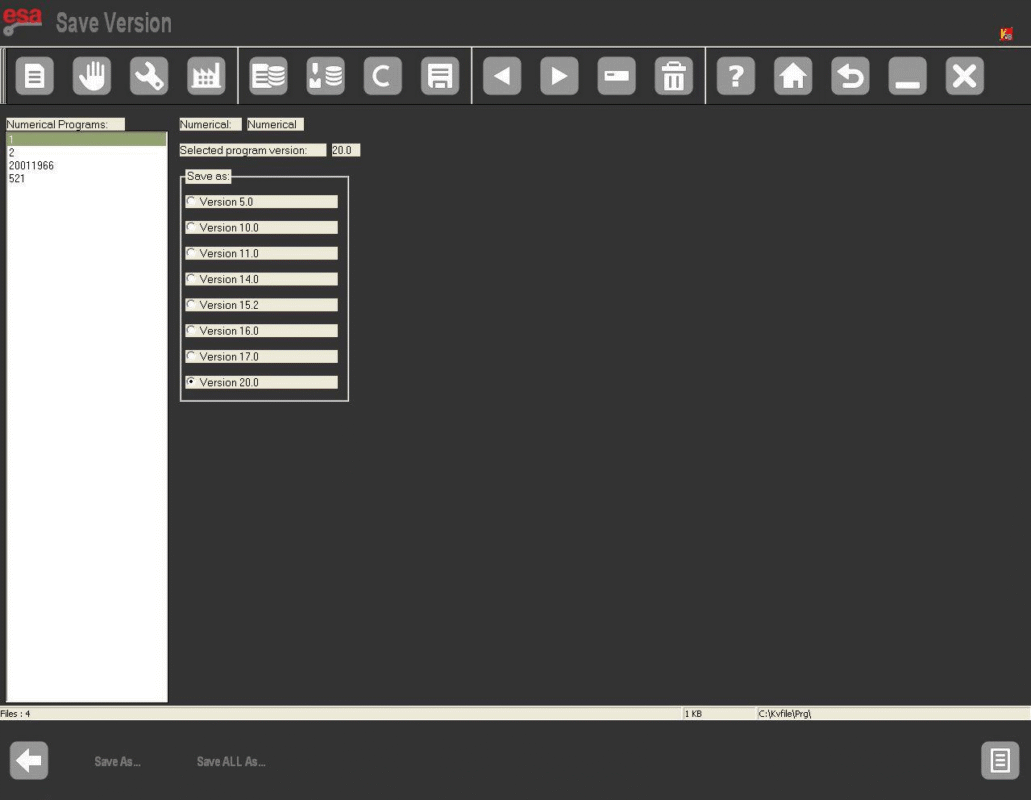
How to Save a Numeric Program in an Older Version:
- Access the program list mask.
- Press [Save version] to enter the saving mask.
- Choose the program to convert using the touch function and select the desired format (e.g., Version 20.0).
- Press [ENTER], then [Save As…].
- Enter a program name, move to [Confirm], and press [ENTER] to save it.

How to Save All Programs in an Older Version:
- Access the program list mask.
- Press [Save version] to enter the saving mask.
- Use the touch function to select the desired format (e.g., Version 10.0).
- Press [ENTER] and insert a formatted device with enough space into the USB port.
- Press [Save all As…] to save all programs in the desired format.
By following these steps, you can seamlessly manage your program versions with the advanced capabilities of ESA S860 Machine Functions.
“Tools” Mask
The “Tools” mask in the ESA S860 Machine Functions is crucial for managing work stations and automatically calculating the Z axes. Here’s a simplified guide to access and utilize this feature:
- Access the menu by pressing the key from the data settings mask.
- Select Tools (9) to open the mask.
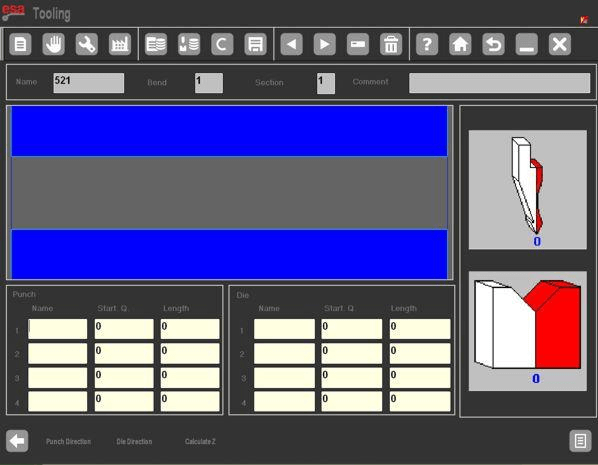
In the mask, you’ll find:
- A top window displaying a front view of the machine.
- “Teeth” icons inside the machine representing the tools.
- Two right-side windows showing the tool directions.
- Bottom windows containing tool data for up to four work stations, including:
- Work station numbers to be programmed (1 to 4).
- Punch and die names used at each station, matching the list of available dies and punches.
- Tool measurements starting from either point 0 or the internal shoulder, as per the General parameter 2 setting.
- Tool lengths for each station.
This streamlined understanding of the “Tools” mask helps optimize the setup and operation of your ESA S860 Machine Functions.
Other Menu Pages
Explore the other menu pages of the ESA S860 to maximize its functions:
- Turning Off the NC
Easily power down your NC machine. Access the menu, then select Turn Off (5). - Viewing the Software Version
Check software details including version, enabled axes, and installed options. Open the menu and choose Version (7). - Viewing the Logo
Display the Esautomotion logo or customize it with your company logo. Go to the menu and pick Logo (8). - Viewing the Memory Monitor
Monitor essential memory data to optimize your work. Navigate to the menu and select Memory Monitor (9).
Harnessing these ESA S860 Machine Functions ensures better control and customization of your operations.
Frequently Asked Questions(FAQ)
How do I utilize the ESA S860 Machine Functions to achieve perfect bends?
To utilize the ESA S860 Machine Functions for perfect bends, start by understanding the machine’s interface and control settings. Adjust the parameters according to the material type and thickness, and always follow the user manual for specific guidelines.
How can I troubleshoot issues with ESA S860 Machine Functions?
If you encounter issues with ESA S860 Machine Functions, first refer to the troubleshooting section of the manual. Common fixes include recalibrating the controls, checking electrical connections, and verifying software updates. If problems persist, contact customer support.
Conclusion
Mastering the ESA S860 Machine Functions requires a thorough understanding of its features and proper application techniques. By following the key steps outlined in this article, you can achieve precise and perfect bends with consistency and confidence.
Proper setup, regular maintenance, and adherence to best practices are crucial for optimizing the performance of your bending operations. By implementing these strategies, you can enhance production efficiency and minimize operational disruptions.
For personalized assistance or to learn more about maximizing the capabilities of the ESA S860 Machine, feel free to contact our team. Additionally, explore our website for further resources and related documentation that can support your journey to mastering the ESA S860.


