


Facing trouble with DELEM DA66T tooling installation? Incorrect setup can cause operational delays. This guide will walk you through the process to ensure a smooth, precise setup.
In this guide, learn how to install and set up toolings for the DELEM DA66T press brake. Step-by-step instructions will help you avoid common mistakes, optimize tool selection, and ensure precise bending operations. Perfect for operators new to the DELEM DA66T system or those looking to refine their setup process. Let’s dive into the installation steps to ensure your DELEM DA66T tooling setup is accurate and efficient.
DELEM DA66T Tooling Installation
Introduction
The DELEM DA66T controller offers advanced functionalities that simplify the process of adding molds to your press brake. Whether you’re replacing old molds, setting up new tools, or fine-tuning your machine’s capabilities, the process involves several key steps to ensure the molds are added accurately. adding molds. This tutorial covers the entire process, from configuring the punches and dies to finalizing the settings in the system.
Understanding the importance of precise mold setup can significantly improve your press brake’s efficiency, reduce downtime, and ensure high-quality bending results. adding molds. Let’s dive into the process of adding molds to your DELEM DA66T system.
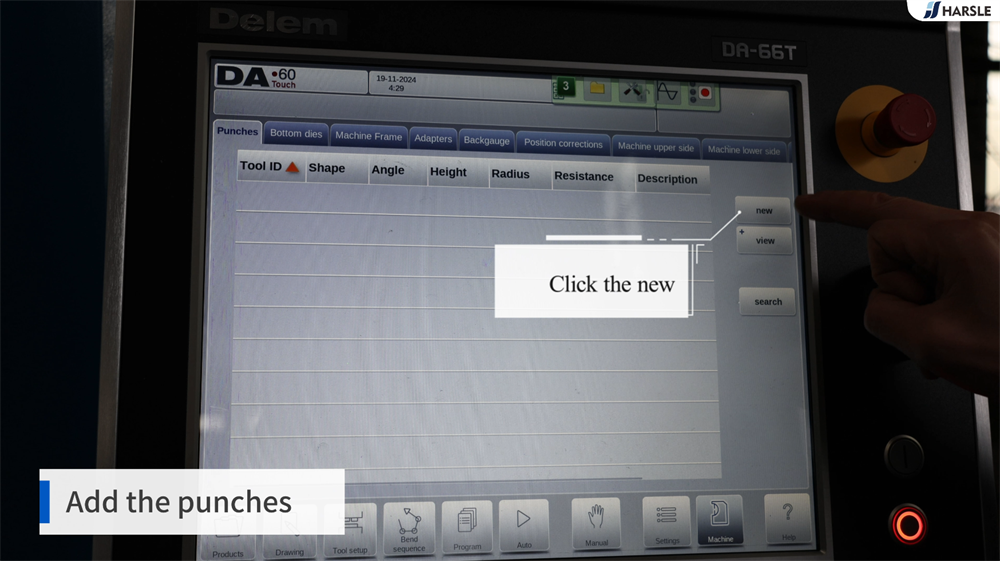
Step 1: Add the Punches
The first step in adding a mold is configuring the punches or the upper mold. This tool plays a key role in the bending process, so accurate setup is essential. Follow these steps to add the upper mold to your system:
1.Select “Add New” Option
On the DELEM DA66T controller, begin by navigating to the Tool Setup menu from the main interface. Once inside, locate the section for punch setup and select the “Add New” option. This function allows you to manually input new punch specifications, including angle, radius, and length, ensuring precise bending performance. Use the on-screen keyboard to enter the required dimensions or select from predefined templates if available. After entering the details, confirm the settings to save the new punch. Properly configuring the punch tooling ensures accurate bends, minimizes errors, and optimizes the overall efficiency of the press brake operation.
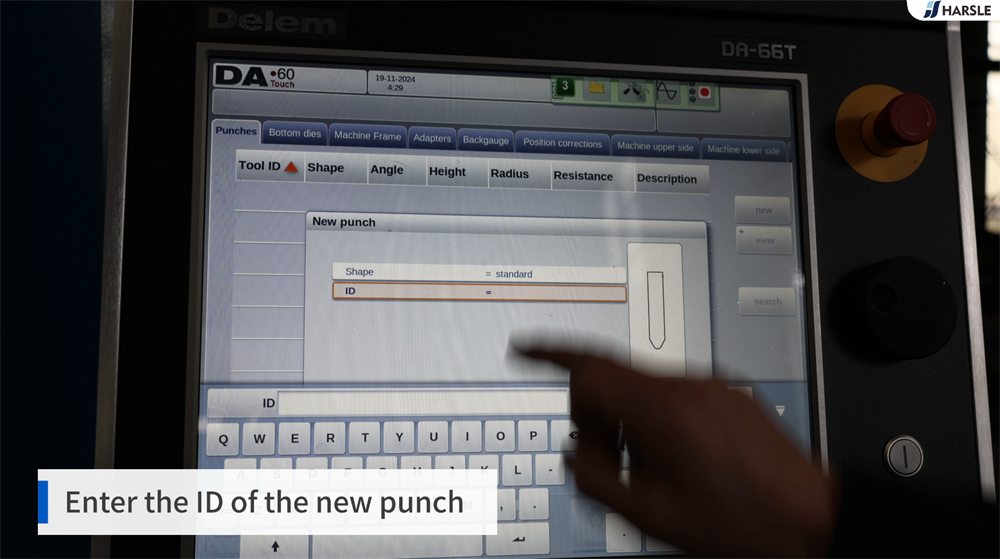
2. Enter Punch Nam
Enter the ID or name of the new punch in the DELEM DA66T controller. This identification is essential, as it allows the system to recognize and manage the punch correctly during bending operations. The name you assign should be clear and descriptive, making it easy to locate and select when setting up tooling configurations. Ensure consistency in naming conventions to avoid confusion when handling multiple punches. Once entered, the system will store this information, enabling seamless integration with bending programs and ensuring accurate tool selection for precise metal forming. Proper punch identification enhances efficiency and minimizes setup errors.
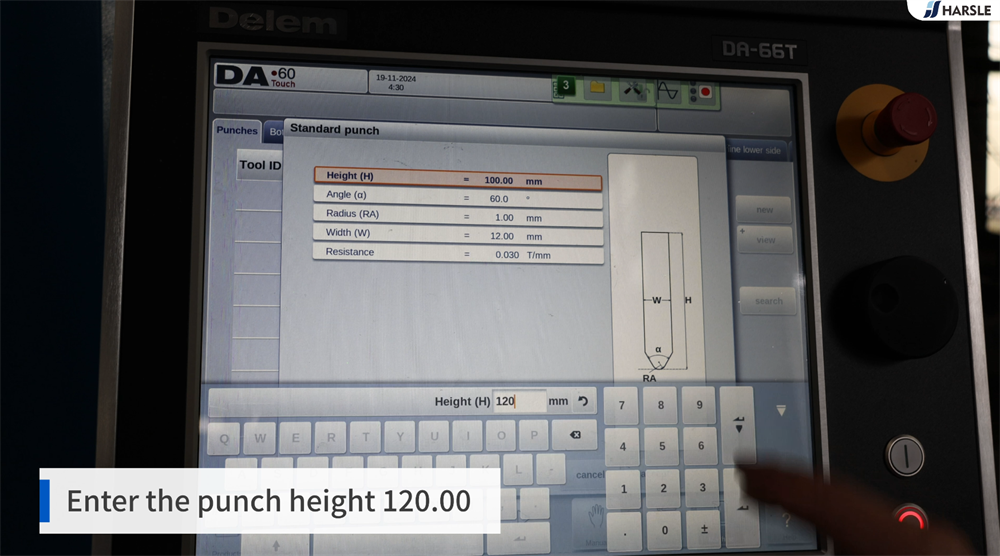
3. Measure Punch Height
To ensure precise tooling installation, start by accurately measuring the height of the punch using a caliper or micrometer. These measuring tools provide high accuracy, allowing you to verify the exact dimensions of the punch before setup. Place the caliper or micrometer firmly against the base and tip of the punch, ensuring proper alignment to avoid errors. For this example, the measured height is 120.00 mm, which must be recorded for reference during tooling configuration. Proper measurement helps maintain bending accuracy and ensures compatibility with the press brake system, reducing errors in setup and operation.

4. Enter Punch Height
Enter the measured height of 120.00 mm into the DELEM DA66T system to ensure the accurate alignment and proper function of the punch. This step is crucial for achieving precision bending and preventing misalignment issues that could affect the final workpiece quality. By correctly inputting the tooling height, the system can automatically adjust the ram position and compensate for any deviations. This ensures consistent bending angles, minimizes errors, and enhances operational efficiency. Always verify the input data before proceeding with the bending operation to maintain optimal machine performance and extend the tool’s lifespan.
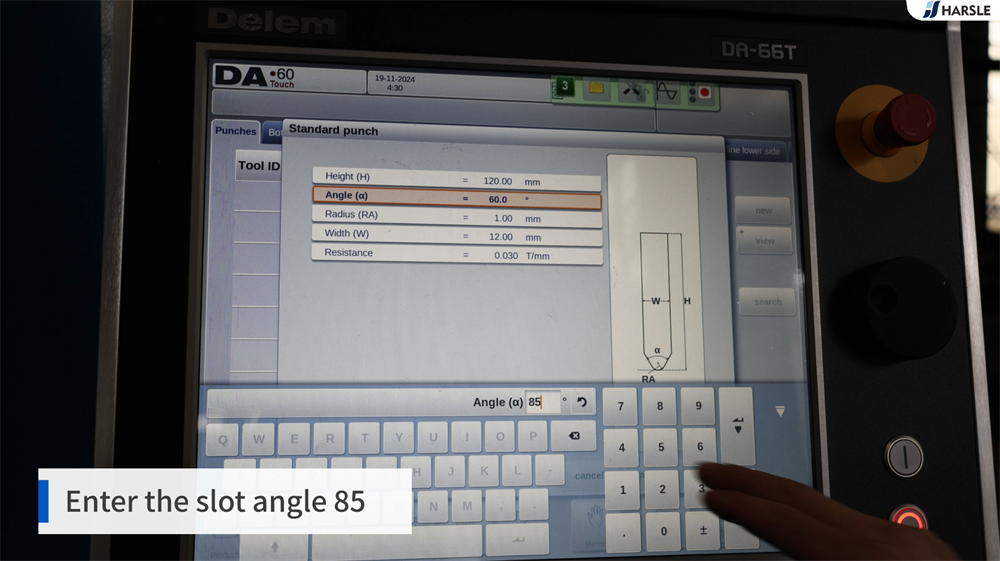
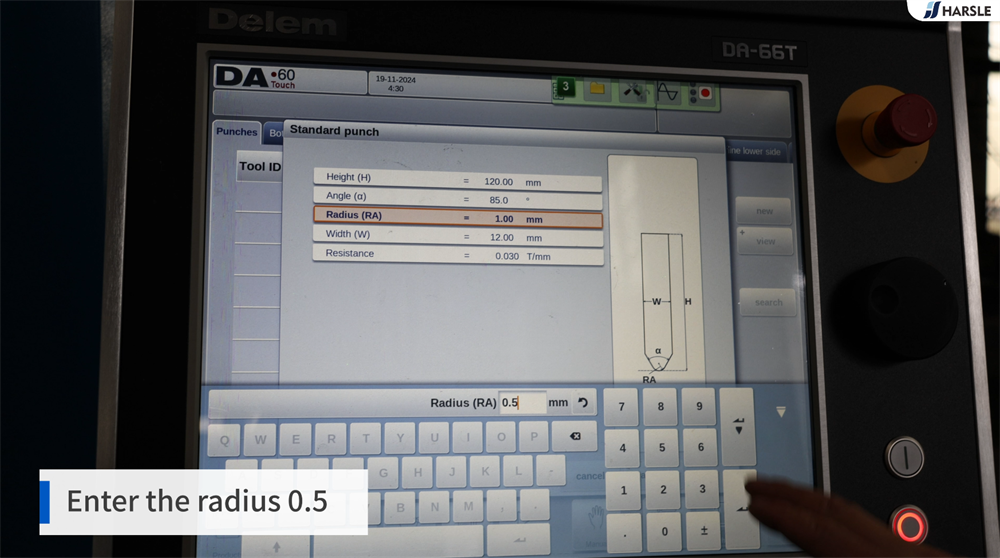
5. Measure and Enter Slot Angle and Radius
To ensure precise bending results, it is essential to measure the slot angle and radius of the punch before installation. These measurements determine the bending accuracy and compatibility with the press brake setup. Using a protractor or angle gauge, check the slot angle of the punch. For this specific mold, the slot angle is 85 degrees, ensuring an optimal bending angle for sheet metal processing. Additionally, measure the punch radius, which affects the bend’s inner curvature and material flow. In this case, the radius is 0.5 mm, providing a smooth and consistent bend while minimizing material stress.
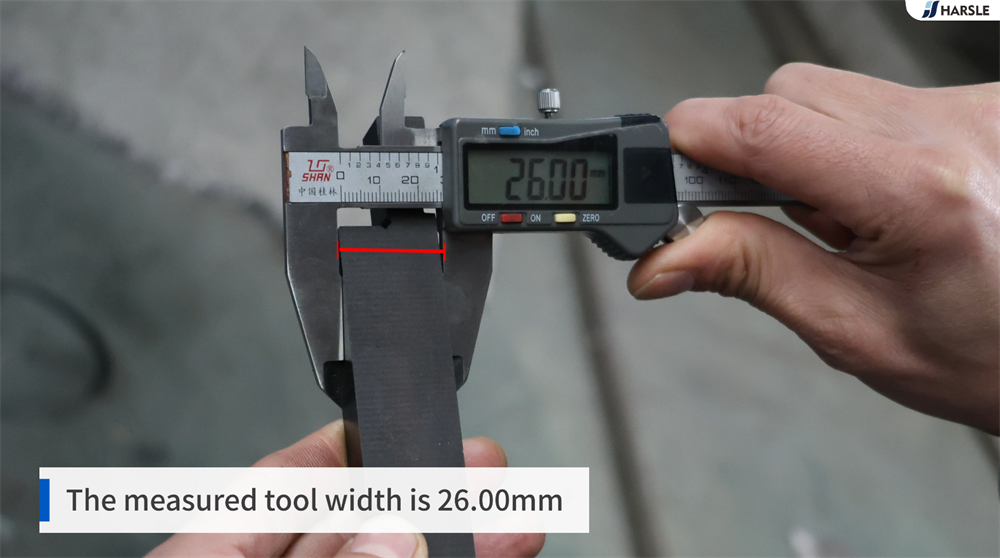
6. Measure Punch Width
To ensure accurate bending results, start by measuring the punch width using a precision caliper or measuring tool. In this case, the punch width is 26.00 mm. Once you have the exact measurement, carefully input 26.00 mm into the DELEM DA66T control system. This step is crucial for ensuring that the tooling setup is correctly aligned with the system’s calculations. Proper data entry prevents errors in bending angles and ensures optimal performance. Always double-check the measurement before confirming the input, as even small discrepancies can impact the final bending accuracy and overall production quality.

7. Enter Punch Resistance
The punch resistance value is a crucial parameter in press brake tooling setup, as it determines the force required to bend the sheet metal accurately. This value ensures that the machine applies the correct pressure, preventing tool damage and ensuring precise bending results. For this specific mold, you need to enter a punch resistance value of 8 in the DELEM DA66T controller. Inputting the correct value helps maintain tool longevity, enhances bending accuracy, and prevents excessive wear on both the punch and die. Always refer to the tooling specifications provided by the manufacturer to ensure optimal settings.

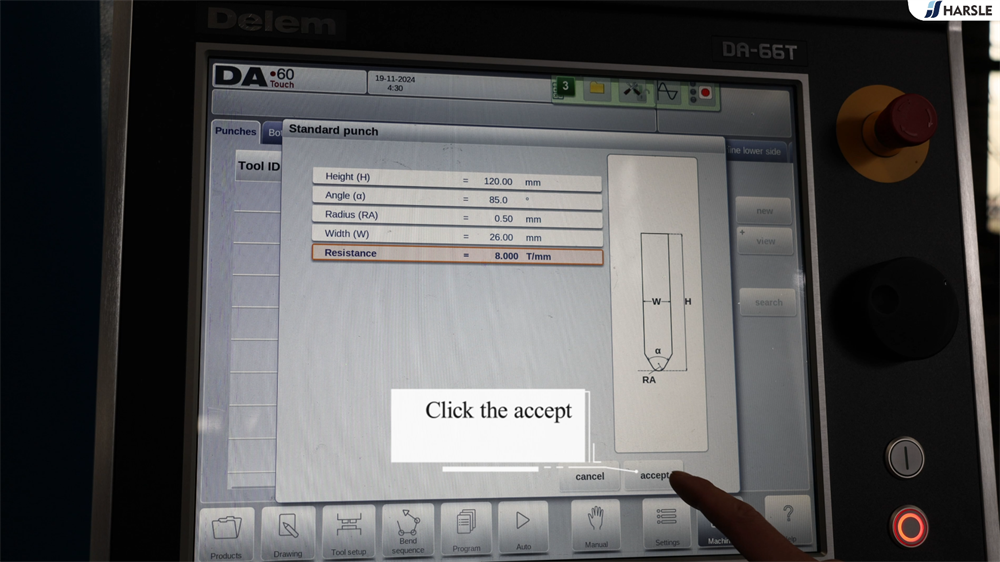
8. Accept and Save
After you have entered all the required information for the tooling setup in the DELEM DA66T controller, carefully review each parameter to ensure accuracy. Double-check details such as tool dimensions, punch and die specifications, and any relevant offset values. Once everything is correctly configured, click the “Accept” button to confirm the settings. This action will automatically save your changes and apply them to the system. After saving, the press brake will recognize the new tooling configuration, allowing for precise and efficient bending operations. If needed, you can always revisit the settings for adjustments or modifications before starting production.
Step 2: Finalizing Tool Setup
Once both the punch has been added, it’s time to finalize the mold setup. This involves reviewing all the entered data to ensure accuracy and completing any necessary adjustments.
1. Measure All Lengths
Accurately measuring all components is a critical step in ensuring proper alignment during the DELEM DA66T tooling installation. Begin by measuring the tool width, height, and any additional dimensions required for precise positioning. Use a calibrated measuring tool such as a digital caliper or tape measure to verify each measurement. Pay close attention to punch and die dimensions, ensuring they match the machine’s specifications. Additionally, check for any deviations or wear on the tools that may affect performance. Proper measurement helps prevent misalignment, reduces setup errors, and ensures consistent bending accuracy throughout the press brake operation.
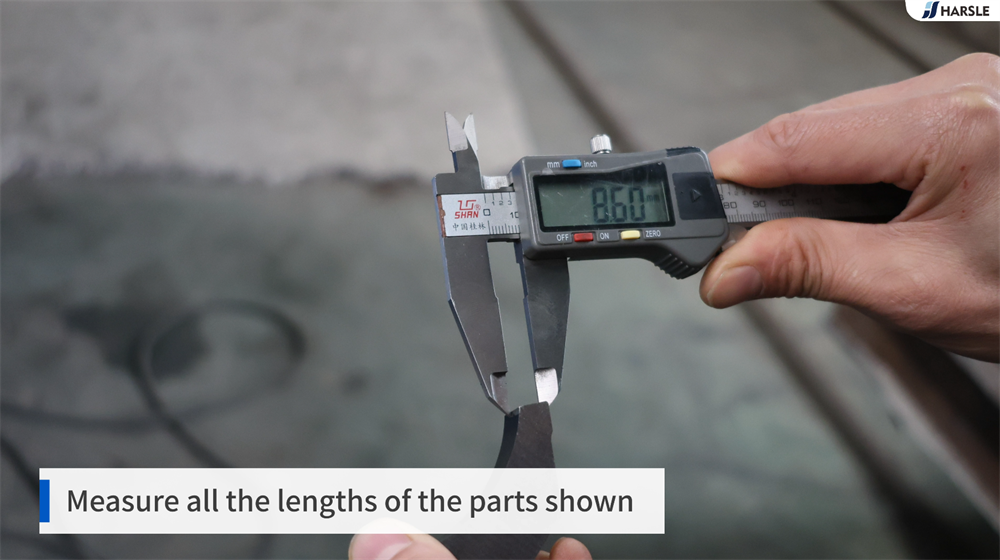
2. Start Drawing the Tool
Based on the entered data, begin drawing the tool in the system. The measured lengths are as follows:
- The measured length is 8.6 mm

- The measured length is 30 mm


- The measured length is 46 mm

3. Set Radius
To ensure precise bending results, it is essential to adjust the radius according to the required specifications. This step helps achieve accurate sheet metal forming and prevents defects caused by incorrect tooling settings. In this case, the radius is set to -40 mm, ensuring optimal performance for the selected tool. Proper radius adjustment directly impacts bending accuracy, material springback, and overall workpiece quality. Always refer to the press brake tooling manual and input the correct parameters in the DELEM DA66T controller. Double-checking the radius setting before operation ensures consistency and minimizes errors during the bending process.

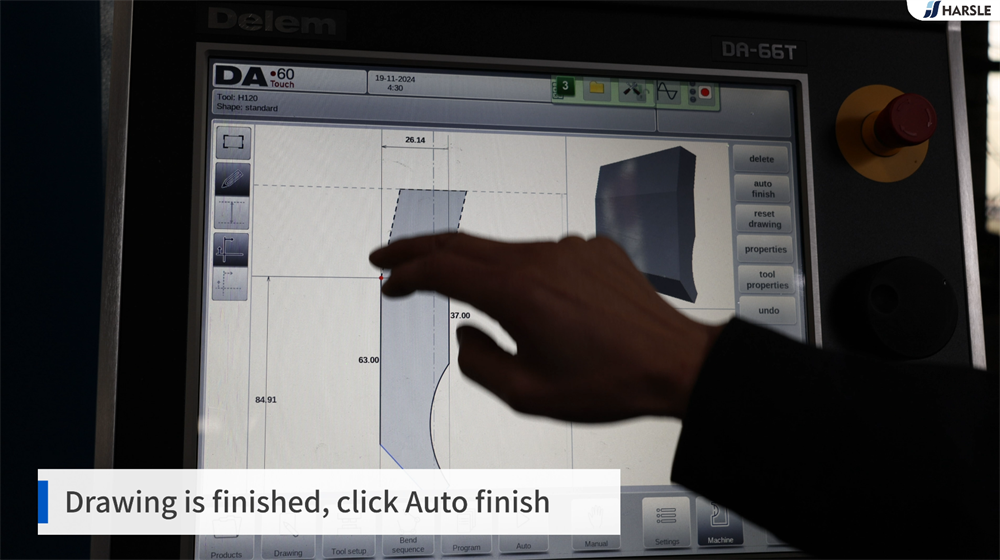
4. End Drawing and Save
Once the drawing process is complete, click the “Auto Finish” button to finalize the mold configuration. This function automatically processes and verifies the tooling setup, ensuring accuracy and alignment with the machine’s bending parameters. After clicking, the system will confirm the configuration and apply the necessary adjustments. It is crucial to double-check the tool dimensions and positions before saving to prevent errors during operation. Once satisfied, save your settings to ensure the tooling data is stored correctly for future use. Proper tooling installation enhances bending precision and machine efficiency, minimizing errors and improving overall workflow.
5. Delete Redundant Points
If there are any redundant points in the drawing, it is crucial to identify and remove them before proceeding with the tooling configuration. Extra points or unnecessary elements in the drawing can cause misalignment, interfere with the tooling setup, and lead to incorrect bending operations. These redundancies may also affect the CNC system’s ability to interpret the tooling data accurately, potentially resulting in errors during the bending process. To ensure smooth operation, carefully review the drawing, eliminate any unwanted elements, and verify that the tooling design is clean and precise. A properly optimized drawing helps achieve accurate and efficient bending results.

Once the punch has been successfully added to the DELEM DA66T controller, the system will automatically save the new tooling configuration. This ensures that the punch parameters, including dimensions and positioning, are stored within the system for future operations. The updated mold configuration will then be displayed on the screen, allowing the operator to verify and adjust settings if necessary. This feature enhances efficiency by eliminating the need for repeated manual entries and ensures consistency in bending operations. Additionally, the system’s intuitive interface allows users to easily modify or replace tooling as needed, streamlining the overall setup process.


Step 3: Add the Die (Lower Mold)
The next step involves configuring the lower mold, also known as the die. This part is equally critical to the bending process. Follow these steps to properly add a die to your system:
1.Select the “Add New” Option for Dies
To begin configuring the bottom die in the DELEM DA66T controller, navigate to the “Bottom Dies” section within the tooling setup menu. Once there, select the “Add New” option to initiate the die configuration process. This allows you to input essential parameters such as die width, V-opening, angle, and material type. Ensuring accurate input of these values is crucial for achieving precise bending results. After entering the necessary specifications, confirm the settings and save the die profile. This newly configured bottom die will then be available for selection during the bending process, optimizing accuracy and efficiency in metal forming.

2. Enter Die Name
Just like the punch, you need to input the ID or name of the die into the DELEM DA66T controller. This step is crucial for accurately identifying and selecting the correct die during the bending process. By assigning a unique ID or name, the system can quickly retrieve die specifications, reducing errors and improving efficiency. Proper identification also allows for seamless tool changes and ensures that bending parameters are correctly applied. Additionally, storing the die information in the system helps operators save time when setting up new jobs, especially in high-precision or batch production environments.

3. Measure Die Dimensions
Measure the width and height of the die. For this tutorial, both the width and height are 60 mm.

4. Input Die Dimensions
Enter the die width and height values (60 mm) into the DELEM DA66T system to ensure proper fitting within the press brake. Accurate input of these parameters is crucial for precise bending operations, as it allows the system to recognize the exact dimensions of the die, preventing misalignment or operational errors. To enter these values, navigate to the tooling setup menu, locate the die settings, and input the width and height accordingly. Confirm the entries and verify that the system has registered the correct dimensions before proceeding with the bending process. Proper setup enhances accuracy and extends tooling lifespan.

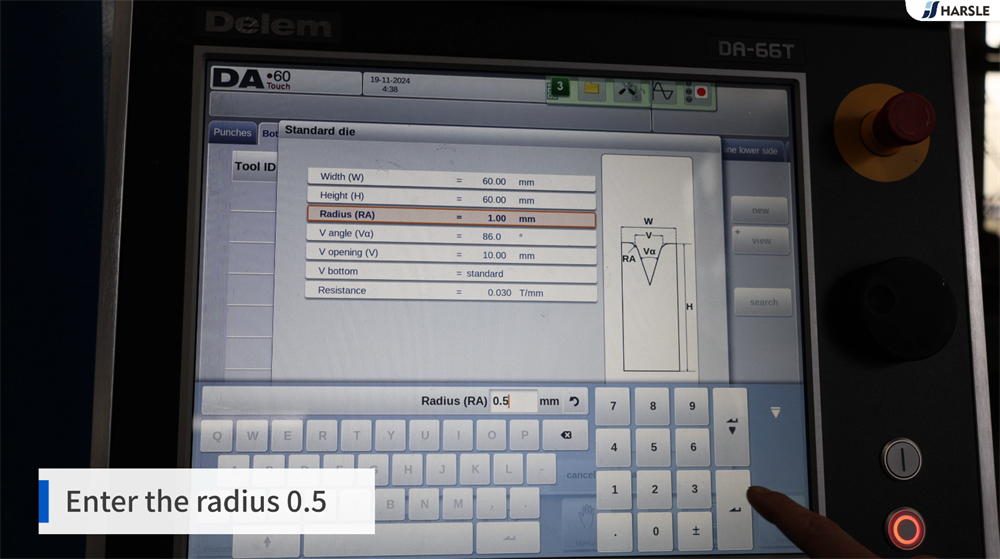
5. Enter Slot Angle and Radius
Just like the punch, the slot angle and radius of the die must be accurately input into the DELEM DA66T controller to ensure precise bending results. These parameters are essential for achieving optimal bending accuracy and preventing deformation or material inconsistencies. In this case, the slot angle is set to 86 degrees, while the die radius is 0.5 mm. Properly entering these values allows the controller to calculate the correct bending force and positioning, ensuring smooth operation. Failing to input the correct data may lead to bending errors, affecting the final product’s quality and consistency. Always double-check these settings before proceeding.
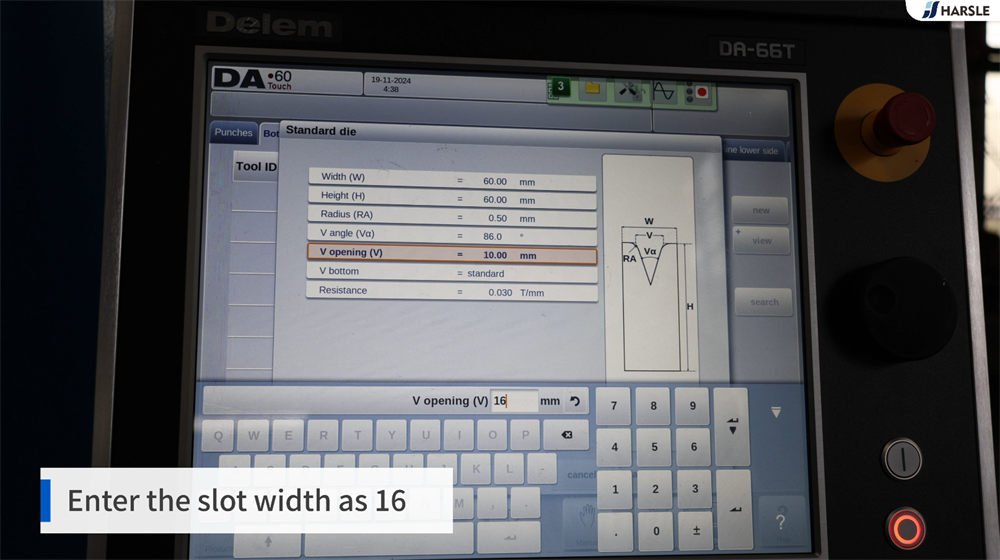
6. Measure and Enter Slot Width
The slot width of the die is 16 mm, and it is crucial to measure this dimension accurately to ensure precise bending operations. Use a caliper or micrometer to verify the exact width, as even minor deviations can affect the bending angle and final product quality. Once measured, enter the 16 mm slot width into the DELEM DA66T control system under the tooling setup section. Proper data entry ensures the CNC press brake recognizes the correct die dimensions, optimizing bending accuracy and machine performance. Double-check the input before saving to prevent errors that may lead to incorrect bending results.

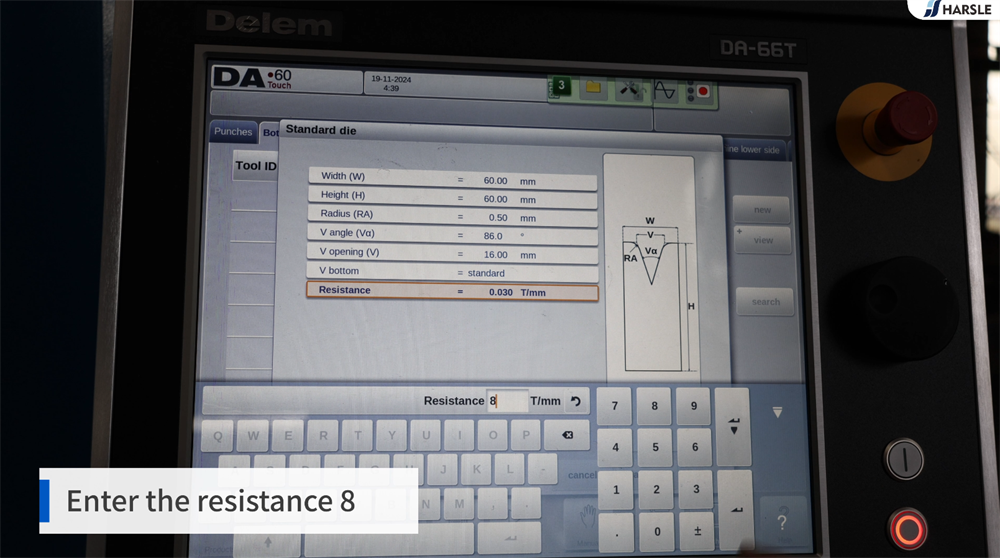
7. Input Die Resistance
Enter the resistance value for the die, which is also 8 in this case. This value represents the die’s ability to withstand force during the bending process and is crucial for ensuring accurate and consistent bends. The resistance value is typically determined based on the material type, thickness, and tooling specifications. Inputting the correct value helps optimize bending performance, prevents excessive stress on the die, and extends its lifespan. Incorrect values may lead to bending errors, increased tool wear, or even machine damage. Always refer to the tooling specifications or machine manual for the correct resistance value before proceeding.
8. Save and Finalize
Enter the resistance value for the die, which is also 8 in this case. This value represents the die’s ability to withstand force during the bending process and is crucial for ensuring accurate and consistent bends. The resistance value is typically determined based on the material type, thickness, and tooling specifications. Inputting the correct value helps optimize bending performance, prevents excessive stress on the die, and extends its lifespan. Incorrect values may lead to bending errors, increased tool wear, or even machine damage. Always refer to the tooling specifications or machine manual for the correct resistance value before proceeding.


Conclusion
By following these steps, you can successfully configure new molds on your DELEM DA66T system, improving the overall performance and efficiency of your press brake. Proper mold setup is essential to achieving high-quality bending results and minimizing downtime in your operations. Remember to double-check all measurements and settings to ensure everything is accurate.
With this tutorial on adding molds, you now have a clear understanding of the process and can confidently configure punches and dies for any press brake project. For further assistance, be sure to consult the machine’s manual or contact customer support for expert advice.


