


ESA S840 program editing is a core skill that allows you to modify bending sequences, replace tools, adjust product features, and optimize every aspect of your press brake programs. If you’ve ever needed to change a bending step, swap a tool, or save a modified program without losing the original, you’re in the right place. In this article, I’ll show you how to quickly master ESA S840 program editing, including step-by-step editing, tool replacement, product feature adjustments, program saving, default bending settings, program updates, and bumping functions. Whether you’re fine-tuning an existing program or creating variations for similar parts, this guide will help you edit with speed and confidence.
How to Edit Procedure Steps in ESA S840 Program Editing
The menu key in the bottom left corner of the interface contains all the functions for step editing. Some functions not displayed can be accessed by moving the right slider. Within ESA S840 program editing, you can modify all bending parameters, add steps, delete steps, and rearrange the bending sequence.
Step 1: Understanding the Editor Interface
The editor displays each bending step (Bnd 1, Bnd 2, etc.) with key parameters including Y1/Y2 angles, B.D.C. positions, X1/R1 values, and corrections. You can modify any of these values directly.
Step 2: Adding a New Bending Step
ESA S840 program editing offers four methods to add a bending step:
| Method | Operation | Result |
|---|---|---|
| A | Program at last step → click right shift check button → confirm “Yes” | Adds a new step after current step (copies current step) |
| B | Program at any step → menu button → select “Insert Step Sequence” | Adds a new step after current step (copies current step) |
| C | Program at any step → menu → “Copy Step Sequence” → select target step → menu → “Paste Step Sequence” | Overwrites selected step with copied data |
| D | Program at any step → menu → “Copy Step to End of Program” | Adds a copy of current step at the end |
Pro tip: Method A is the fastest for quickly appending a new bend at the end of your program. Use Method C when you need to replace an existing step with data from another step.
Step 3: Moving a Bending Step
To change the order of bending steps within ESA S840 program editing:
- Method A: Stay on any step → click menu button → select “Move Left” (or Move Right) → click once to move one step. Repeat as needed.
- Method B: Stay on any step → menu → “Cut Step Sequence” → select target step → menu → “Paste Step Sequence” → the selected step data is overwritten (effectively moving the cut data).
Step 4: Deleting a Bending Step
To delete a single step:
- Stay on the step you wish to delete → click the delete button on the navigation bar → confirm “Yes” when prompted.
To delete all steps:
- Stay on any step → click menu button → select “Delete Section” (or similar) → all steps in the program will be deleted.
Warning: Deleting all steps cannot be undone unless you have saved a backup. Use this function with caution.
How to Replace a Tool in ESA S840 Program Editing
Within ESA S840 program editing, you can easily change the punch or die for a bend. Click on the punch or die name in the basic data box to open the tool list.
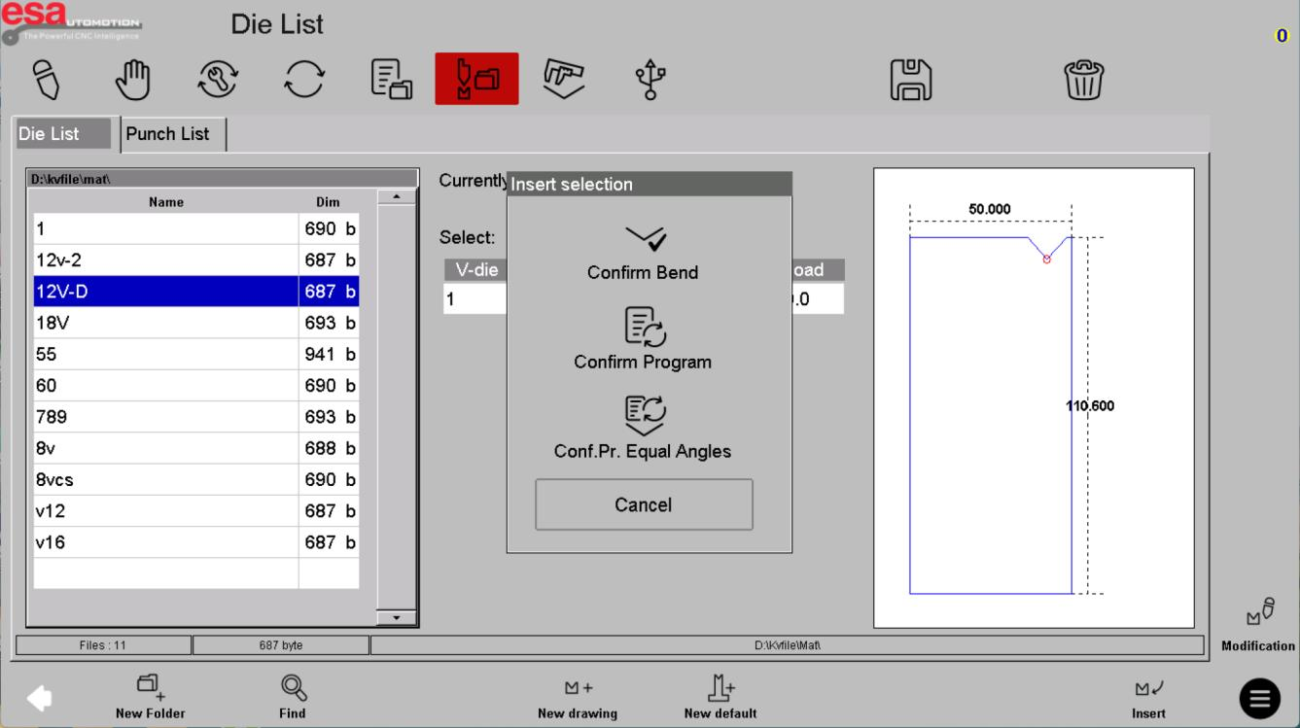
Step-by-Step Tool Replacement
- From the basic data box, click on the Punch or Die field
- The tool list appears, showing all available tools with names and IDs
- Select the desired tool by clicking on it
- The system will ask you to confirm the modification scope:
| Option | Description |
|---|---|
| Current bend only | Changes tool only for the selected bend |
| Entire program | Applies the new tool to all bends in the program |
| Program at same angle | Applies to bends with the same angle value |
- Make your selection and confirm
Pro tip: If you’re changing a tool for consistency across a whole part, choose “Entire program” to save time. The system will automatically update all bend calculations.
How to Edit Product Features in ESA S840 Program Editing
You can modify board width, board thickness, and material directly from the basic data box. Within ESA S840 program editing, these changes can be applied to the entire program or only to bends with the same angle.

Step-by-Step Product Feature Editing
- Click on the field you want to change (Width, Thickness, or Material)
- A dialog box appears with options:
- Confirm Program: Applies changes to the entire program
- Conf. Pr. Equal Angles: Applies only to bends with the same angle
- For material selection, browse the material list (e.g., Aluminum, Steel, Stainless steel with various grades)
- Select the new material and click OK
Example: If you have multiple 90° bends but one 45° bend, and you change the material thickness, selecting “Conf. Pr. Equal Angles” will only update the 90° bends, leaving the 45° bend unchanged.
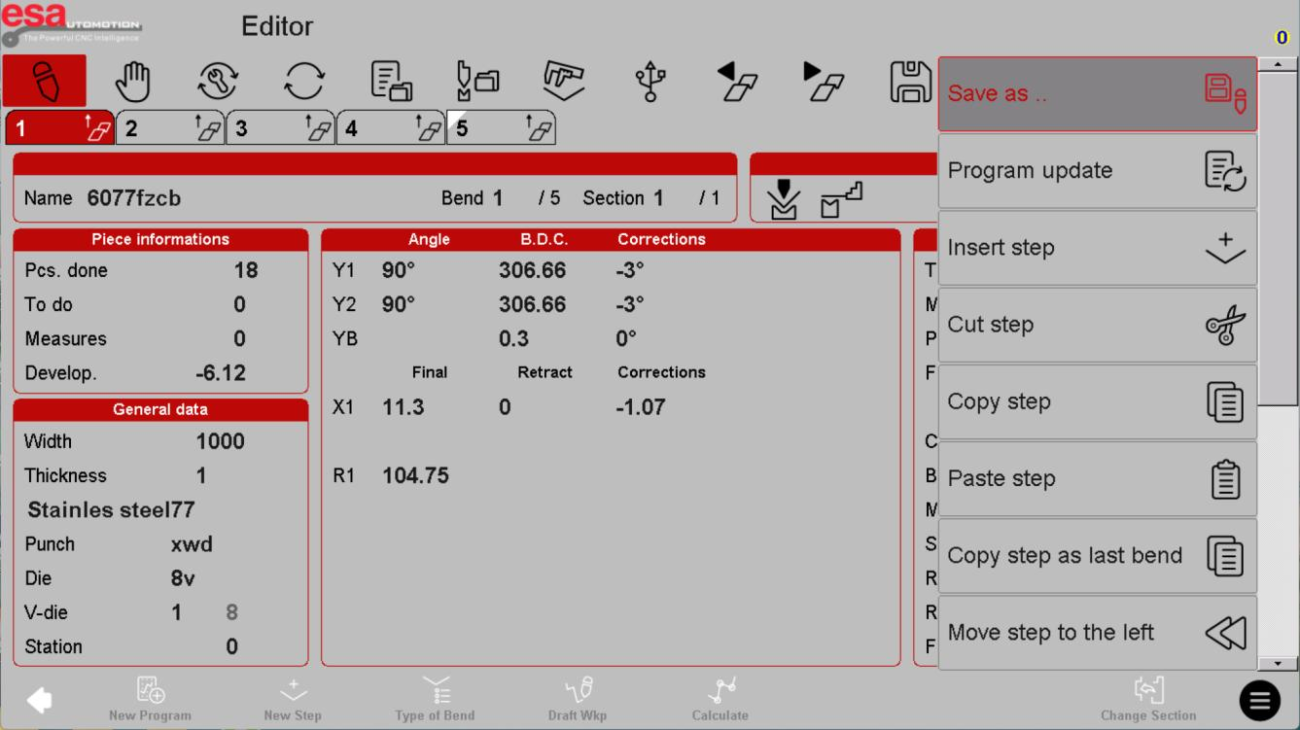
How to Save a Program as Other in ESA S840 Program Editing
The “Save As” function within ESA S840 program editing allows you to create a copy of your current program with a new name, preserving the original.
Steps to Save a Program as Other
- Click the menu button in the interface
- Select “Save As” from the menu
- The system displays a product name dialog box
- Enter the new name for the program
- Click OK
The program is now saved to the program list library with the new name. This is ideal for creating variations of a part without starting from scratch.
How to Use Default Bending in ESA S840 Program Editing
Default bending allows you to create a default step that includes commonly used parameters such as tool material information, and preset finger stops. This reduces repetitive input during program creation.
Understanding the Default Interface
The default page within ESA S840 program editing:

How to use: Set your most common values in the default template. When you create a new program, these values will pre-populate, saving you significant setup time.
How to Perform a Program Update in ESA S840 Program Editing
To ensure the accuracy of data generated by the system, ESA S840 program editing includes a Program Update function that recalculates all program data.
Steps to Update a Program
- Click the menu button
- Select “Program Update” from the menu
- A dialog box appears with option: “Do not miss corrections” (checkbox)
- Click OK
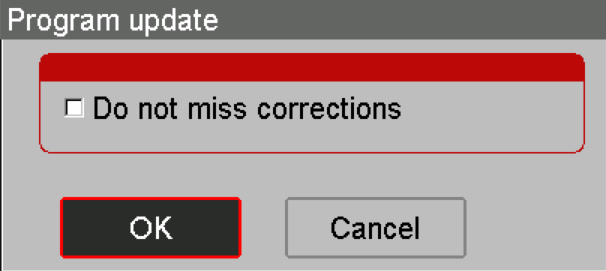
The system will recalculate all program data. If necessary, save the program after the update.
When to use: After making significant changes to material, thickness, tooling, or bend angles, run Program Update to ensure all dependent values (like unfolding length and force calculations) are correct.
How to Create Bumping (Arc Bends) in ESA S840 Program Editing
From a numerical program, ESA S840 program editing allows you to easily create and modify arc bends using the Bumping function. Bumping converts a single bend into multiple small steps to form a large radius.
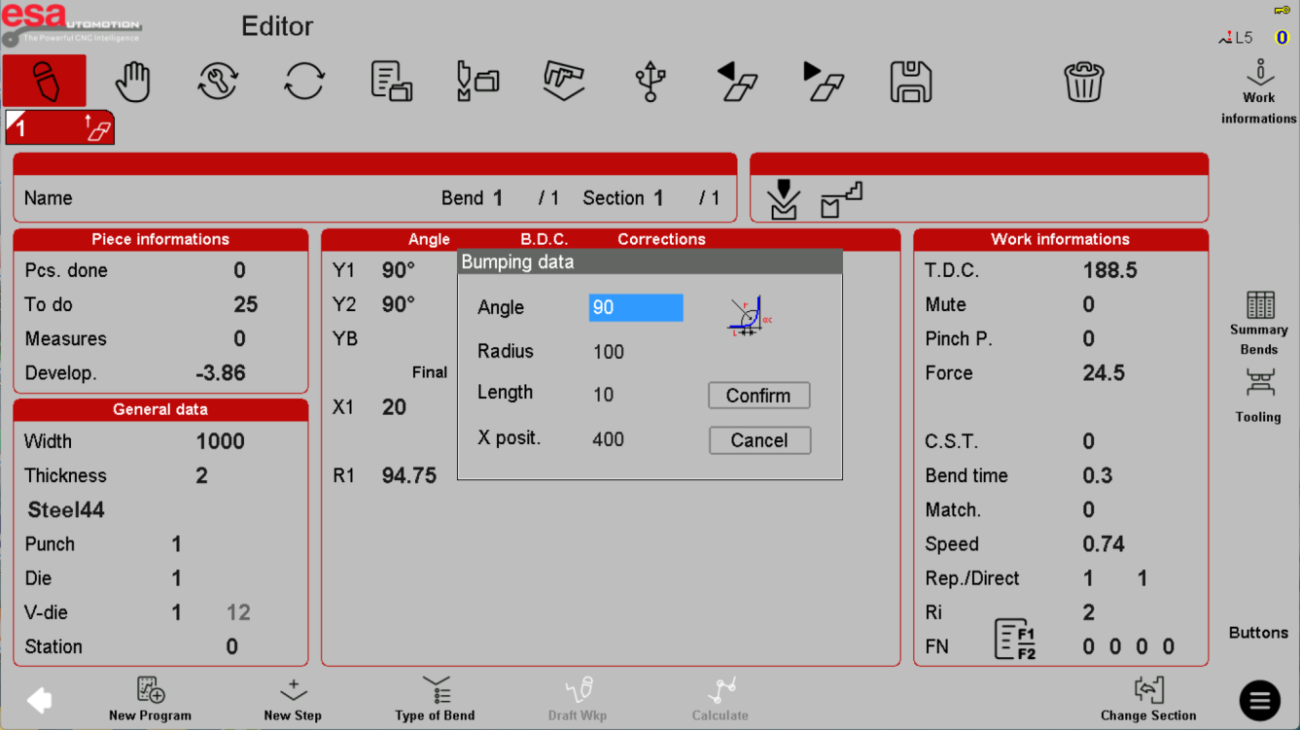
Step-by-Step Bumping Creation
- On the main interface, select the bend you want to convert
- Click on “Edit” in the menu, then select “Bump” (or “Bumping”)
- A pop-up window displays the parameters required for editing:
| Parameter | Description |
|---|---|
| Angle | The final bending angle of the arc |
| Radius | The expected bending radius |
| Length | Repeat bending spacing. Smaller spacing gives smaller error but requires a die with smaller V-opening |
| X-positioning | Starting positioning value of X; during repeated bending, X-axis moves forward according to relative value |
- Enter your desired values
- Click OK
The system automatically calculates the bending angle and the fixed position of the X-axis for each small step, creating a smooth arc bend.
Pro tip: For large radius arcs, use a smaller “Length” value to improve accuracy, but ensure your die’s V-opening can accommodate the required spacing.
Frequently Asked Questions(FAQ)
Can I replace a tool for only one bend without affecting the whole program?
Yes. When replacing a tool in ESA S840 program editing, the system prompts you to choose the scope: “Current bend only,” “Entire program,” or “Program at same angle.” Select “Current bend only” to change the tool for just that specific bending step.
How do I create a large radius arc bend using Bumping?
Select the bend you want to convert, click “Edit” then “Bump.” Enter the desired angle, radius, bending spacing (length), and X-axis starting position. The system automatically calculates the multiple small steps needed to form the arc. Use smaller spacing for higher accuracy.
Conclusion
Mastering ESA S840 program editing is essential for efficiently creating and modifying bending programs on your HARSLE press brake. By learning how to add, move, and delete steps, replace tools, edit product features, save program variants, use default bending templates, run program updates, and create arc bends with Bumping, you can significantly reduce programming time and minimize errors. Remember to use “Save As” when creating variations, run Program Update after major changes, and leverage default bending to streamline repetitive tasks.
For more detailed support on ESA S840 program editing or any other questions about your HARSLE press brake, don’t hesitate to contact our technical support team. We’re here to help you get the most from your equipment and keep your production running smoothly.


