


If you’re seeking to understand how the ESA S640 executes programs automatically, you’ve come to the right place. The ESA S640 Automatic Program Execution system is designed to streamline operations by minimizing manual intervention. In this article, I’ll delve into how the ESA S640 simplifies the process of running programs automatically, ensuring precision and efficiency in your projects. Whether you’re aiming to improve productivity or reduce errors, this guide will provide the insights you need to harness the full potential of your ESA S640.
Introduction to ESA S640 Automatic Program Execution
The ESA S640 boasts an advanced automatic program execution feature that streamlines manufacturing processes. By enabling automatic mode, operators enhance precision and efficiency, resulting in consistent and high-quality output. This article explores how to fully utilize this feature.
Setting Up Your Program for Automatic Execution
Setting a Numeric or Graphic Program
To begin using the ESA S640 Automatic Program, operators must first select an appropriate program. Depending on your requirements, you can either set a numeric program or input a graphic one, particularly if leveraging optional features that visualize the bending sequence.
Enabling Automatic Mode

Automatic mode can be enabled by pressing this button.
Once your program is set, press the designated button to initiate automatic functionalities, allowing the system to perform tasks with minimal intervention.
Navigating the Automatic Graphic Page
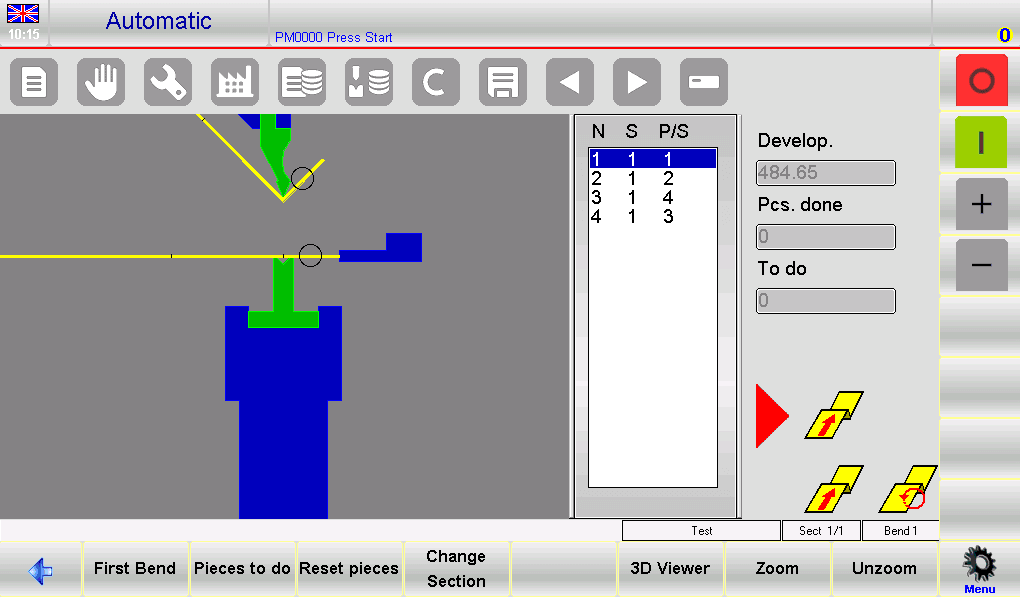
Within the automatic graphic page, the main window provides a comprehensive visual of the upper and lower parts of your machine setup, including the punch and die configurations and details of the workpiece before and after the bend. This assists in ensuring accuracy.
The second window on the graphic page offers insights on piece orientation, crucial for ensuring each bend meets the required specifications. Additionally, you can view current bend progress and related metrics.
Navigating the Automatic Numeric Page
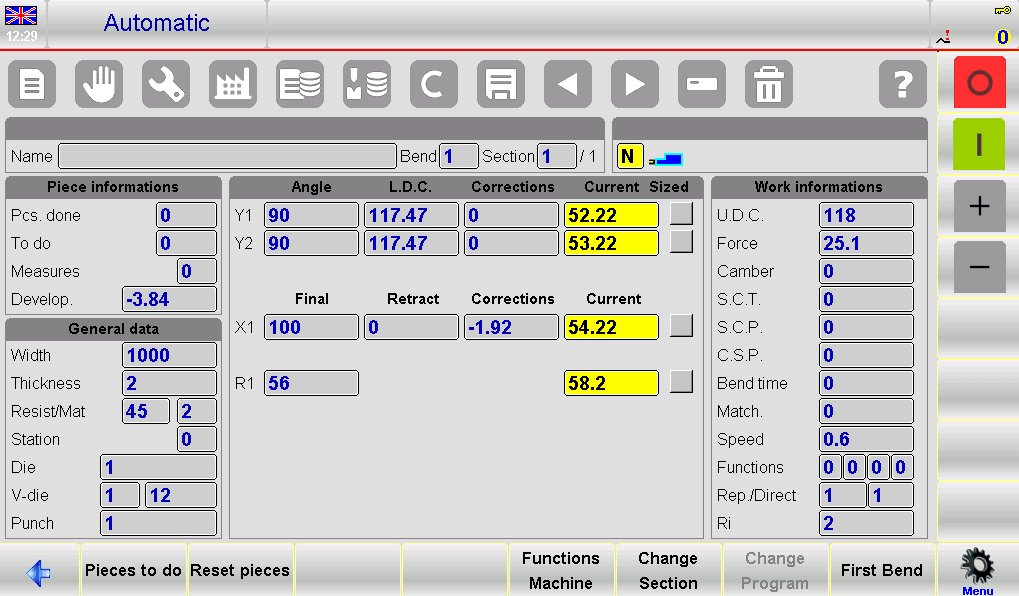
In numeric programs, additional data shows axis positions, crucial for adjustments. Operators can double character sizes for clarity, ensuring all detail is visible and legible.

For enhanced visibility, the option to enlarge display characters helps operators maintain accuracy during complex operations.
Executing an Automatic Cycle
To initiate the ESA S640 Automatic Program, simply press the START button. This action initiates the precise positioning of the back gauge axes, crucial for accurate bending operations.
Once the axes are correctly positioned, press the down pedal to engage the ram and execute the bend. The ESA S640 Automatic Program then smoothly progresses through each programmed step, automatically resetting and positioning the gauges for the next bend in the sequence.
After completing the final bend, the system automatically resets to the first bend, ensuring continuous operation without manual intervention. This seamless process highlights the ESA S640’s efficiency and precision, making it a vital tool in modern manufacturing.
Sample Piece Execution and Corrections
In the ESA S640 Automatic Program, executing a sample piece is essential to address discrepancies due to sheet metal imperfections. Transitioning to the SEMIAUTOMATIC page allows operators to manually adjust each bend, ensuring the final product meets exact specifications.
In SEMIAUTOMATIC mode, the cycle pauses at the end of a bend, enabling step-by-step corrections of angles and lengths. These adjustments are seamlessly updated in the ESA S640 Automatic Program, ensuring accuracy.
The correction process can also be initiated from the AUTOMATIC page. Begin by positioning the back gauge axes, and execute the bend by pressing the down pedal. Measure the bend’s length and angle to verify accuracy. If corrections are needed, access the correction data and input changes in the “Piece“, “Section“, or “Bend” columns as needed.

This streamlined approach to corrections in the ESA S640 Automatic Program enhances precision and efficiency, optimizing your manufacturing results.
Implementing Correction Data
Effective correction inputs are essential for achieving precision in the ESA S640 Automatic Program. These inputs refine axis and angle adjustments, using millimeters for back gauge positions and degrees for bend angles.
In the ESA S640 Automatic Program, adjust correction data by adding the required values to existing program settings. If a bend is too closed by 2°, input a +2.0° correction. Conversely, a -2.0° correction compensates for bends that open too wide. To adjust bend length, enter positive or negative values in the Corr. X1 Field based on the variance from desired specifications.
Each correction is cumulative, enhancing precision. For instance, a 3° closure corrected by +3.0° that still opens by 1° requires an additional 1.0° adjustment. You can individually adjust angles for Y1 and Y2 cylinders or apply general corrections for both.
Finalizing Corrections
After inputting corrections, reposition the back gauges and reattempt the bend. Verify accuracy and apply the process across all bends in the ESA S640 Automatic Program. Utilize navigation buttons for easy movement between different bends. If corrections are consistently precise, restart the automatic cycle from the updated position.
By precisely implementing correction data, the ESA S640 Automatic Program ensures optimal accuracy and efficiency in automatic execution, key to achieving high-quality bending outcomes.
Frequently Asked Questions(FAQ)
What steps should I follow to start an automatic cycle in the ESA S640?
To begin an automatic cycle, load your program into the ESA S640 and press the START button. The machine will automatically position the back gauge axes and proceed with the bending cycle based on the program’s sequence.
Can I adjust the display settings for better readability during automatic mode?
Yes, you can adjust the display settings on the ESA S640 Automatic Program by increasing the character size on the numeric display page for better visibility and accuracy during operation.
Is it possible to apply different corrections to multiple cylinders in the ESA S640 Automatic Program?
Yes, the ESA S640 allows for individual corrections to be applied to cylinders Y1 and Y2. This flexibility helps in achieving the exact bend angles needed for complex operations.
Conclusion
In conclusion, the ESA S640 Automatic Program offers enhanced efficiency and precision for your bending processes. By following the outlined steps for setting up automatic mode, navigating the graphic and numeric pages, executing automatic cycles, and implementing correction data, you can maximize the capabilities of this sophisticated system. The ESA S640 ensures consistent, high-quality output through careful adjustments and monitoring.
To further explore the ESA S640’s functionalities or for personalized guidance, we encourage you to contact our team. Whether you need assistance with setup or a deeper understanding of specific features, our experts are ready to support you. Don’t hesitate to reach out or access additional resources for more comprehensive insights into optimizing your operations with the ESA S640.


