


When configuring ESA S929 Punches, many operators want to know how to create, edit, save, rename, and manage punch and die data correctly on the CNC system. If you are looking for a clear and practical guide, you are in the right place. In this article, I will explain how to configure ESA S929 Punches step by step, including tool creation, tool saving, USB backup, tool import, and tool management functions. Whether you are new to the ESA controller or want to improve your daily operation efficiency, this guide will help you understand the complete tooling configuration process more easily and accurately.
How to Access the ESA S929 Tool List
Before configuring ESA S929 Punches, you first need to open the Tools List page on the controller. This page allows operators to view all available punches and dies stored in the CNC system.
To access the tooling list, press the Tools List icon on the ESA S929 controller screen.

After opening the page, you will see the punch list on the left side and the die list below it. The center section displays the selected punch or die name, while the right side shows detailed tooling parameters such as height, radius, angle, and V width.
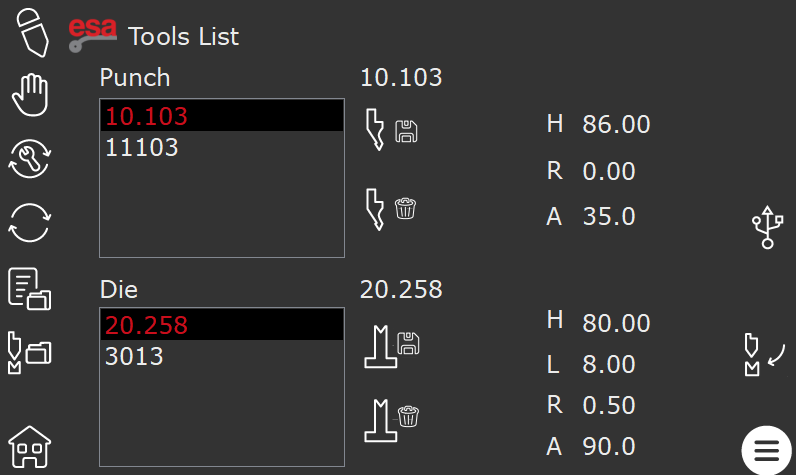
This interface helps operators quickly manage press brake tooling data and select the correct tools for different bending programs.
How to Select Punches in ESA S929
Inside the ESA S929 Punches tool list, you can scroll through available tools by sliding the list with your finger on the touchscreen. Once a punch is selected, the tooling parameters will automatically appear on the right side of the screen.
To insert the selected punch into the current bending program, press the insert function key.

This operation allows the CNC system to apply the tooling data directly to the selected bending step.
Proper tool selection is important because incorrect punch parameters may affect bending angle accuracy and bending quality.
How to Create New ESA S929 Punches
Creating new tooling data is one of the most important functions when configuring ESA S929 Punches. This allows operators to store customized punch information for different bending applications. Pressing the button below we can do the actions described at screen:

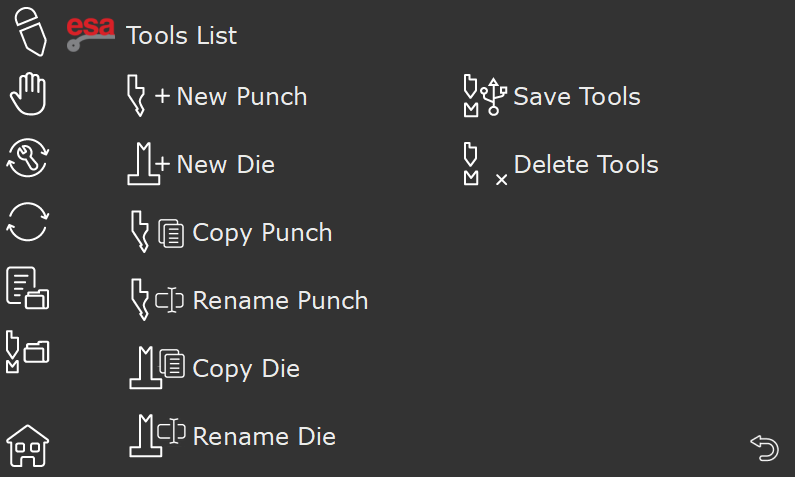
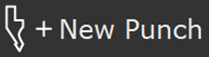
Step 1: Open the New Punch Function
From the Tool List actions page, press the “+ New Punch” button. A tool data window will appear on the screen.
Step 2: Enter Punch Parameters
In the punch setup window, enter the required tooling information carefully. The controller normally requires the following parameters:
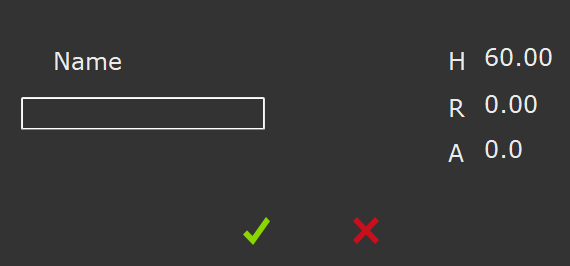
- Punch Name
- H value (tool height)
- R value (tip radius)
- A value (tip angle)
These parameters help the ESA S929 controller calculate the bending process correctly during program execution.
Step 3: Save the New Punch
After entering all tooling data, press the confirmation button to save the new punch into the ESA S929 controller database.

It is recommended to use clear and organized punch names so operators can easily identify the correct tooling later.
How to Edit and Save ESA S929 Punches Data
During daily production, operators may need to modify tooling parameters because of tooling replacement, wear, or different bending requirements.
Modifying Existing Punch Data
Select the tool that needs to be edited from the tool list. After selecting it, adjust the parameter values shown on the right side of the screen.
You can modify dimensions, angles, radii, or other tooling information according to the actual tooling specifications.
Saving Modified Tooling Data
After changing the parameters, select another tool or press another function key.
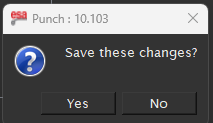
The ESA S929 controller will display a confirmation message asking whether to save the changes.
Press “Yes” to save the updated tooling information.
Saving correct tooling parameters helps maintain stable bending results and reduces production errors.
How to Rename ESA S929 Punches
Organized tooling names make program management easier, especially when many punches are stored inside the CNC system.
Step 1: Select the Tool to Rename
From the tool list, select the punch that needs a new name.
Step 2: Open the Rename Function
Press the Menu button and select either “Rename Punch”.

Step 3: Enter the New Tool Name
Input the updated tool name and confirm the modification.
Using standardized naming methods can improve production efficiency and reduce tooling selection mistakes.
How to Delete ESA S929 Punches Safely
Unused or incorrect tooling data can create confusion during production. The ESA S929 controller allows operators to remove unnecessary punch and die information easily.
Select the punch to be removed and press the delete punch button.
How to Backup ESA S929 Punches to USB
Backing up tooling data is highly recommended for data security and machine maintenance.
Step 1: Insert a USB Drive
Insert a USB key into the USB port of the ESA S929 controller.
Step 2: Open the Tool List Actions Page
Press the Menu button to access additional tooling functions.
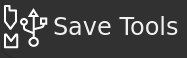
Step 3: Save All Tools to USB
Select the “Save Tools” function. The controller will export all punches to the USB device.
This backup process allows operators to restore tooling information later or transfer tooling data to another ESA controller.
How to Import ESA S929 لكمةes from USB
The ESA S929 controller also supports importing tooling data from external USB storage devices.
Step 1: Insert the USB Key
Connect the USB device containing the tooling backup files.
Step 2: Open the USB Tool List
Press the USB icon on the controller screen. The list of punches stored on the USB drive will appear.

Step 3: Save Tools to the CNC System
Press the Menu button and select “Save Tools”. The controller will import all punches and dies from the USB key into the CNC database.
This feature is useful for restoring machine data after maintenance or copying tooling libraries between machines.
Best Practices for ESA S929 Punches Configuration
Correct ESA S929 Punches configuration helps improve bending precision, reduce programming errors, and simplify tooling management.
To achieve better performance, operators should regularly check tooling dimensions, keep tooling names organized, and create USB backups frequently. It is also recommended to verify tooling parameters carefully before starting production.
By following these steps, users can manage ESA S929 Punches more efficiently and maintain stable press brake bending quality during daily operation.
الأسئلة الشائعة
How do I create new ESA S929 Punches on the controller?
To create new ESA S929 Punches, open the Tool List actions page and press the “+ New Punch” button. Then enter the punch name, tool height, tip radius, and punch angle. After completing the data entry, press the confirmation button to save the punch into the CNC system.
Why should I regularly backup ESA S929 Punches data?
Regular backups help prevent data loss caused by system resets, maintenance operations, or accidental deletion. USB backups also make it easier to restore tooling libraries quickly when needed.
خاتمة
Proper ESA S929 Punches configuration is essential for improving bending accuracy, simplifying tooling management, and maintaining stable production quality. By learning how to create, edit, rename, delete, backup, and import punch data correctly, operators can reduce programming errors and improve daily working efficiency on the press brake machine.
Regularly checking tooling parameters and creating USB backups can also help protect important machine data and ensure smoother production operation. With the correct setup methods, the ESA S929 controller can provide more reliable and efficient tooling management for different bending applications.
If you need additional support for ESA S929 Punches configuration, press brake operation, or ESA controller functions, feel free to contact the HARSLE technical team. You can also explore more HARSLE documentation and tutorial resources for advanced press brake programming and maintenance guidance.


