


When it comes to maximizing the efficiency of your metalworking processes, understanding the ESTUN E21 Operation Guide is crucial. If you’re searching for expert tips on how to optimize your use of this controller, you’re in the right place.
In this article, I will highlight key insights from the ESTUN E21 Operation Guide, offering practical advice to enhance your operational workflow. Whether you are a seasoned operator or new to using this system, these tips will provide you with the essential knowledge to improve precision and productivity in your tasks. Let’s dive into the guide and unlock the potential of the ESTUN E21 for your machinery.
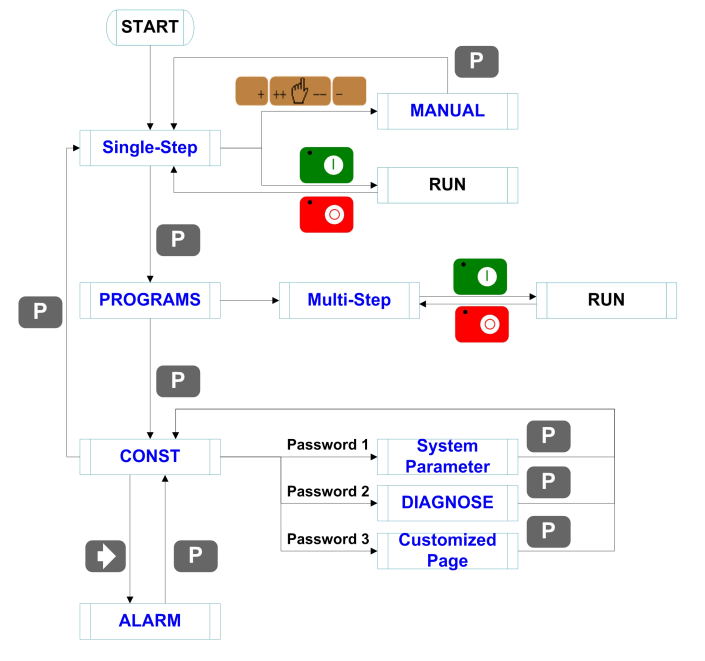
Basic Operation Procedure
To begin using the ESTUN E21 controller efficiently, it’s essential to familiarize yourself with its basic operation procedure. Start by ensuring that the controller is connected and powered up correctly. Once the machine is on, the initial step involves inputting the necessary operational details on the controller display. This includes selecting the operation mode — whether manual or automatic — based on the task requirements. Following these initial steps ensures that you are set up for precise operation, aligning with the guidance in the ESTUN E21 Operation Guide.
Basic switch over and operation procedure of the device is shown in Figure.
Programming the ESTUN E21 Controller
Programming your press brake with the ESTUN E21 is straightforward yet powerful. To program a job, first access the programming menu on your controller. This involves navigating the interface to input commands such as bend angles, material type, and thickness. By following these steps, you can ensure that your machine operates with the precision required for complex tasks, as per the specifications detailed in the ESTUN E21 Operation Guide. Adjust and store multiple programs, allowing for flexibility and efficiency in operation.
The device has two programming methods, which are single-step programming and multi-step programming. User can set up programming according to actual demand.
Single-step Programming
Single-step programming is generally used for processing single step to finish work piece processing. When controller is power on, it will automatically enter single-step program page.
Operation Steps
- Step 1: After starting up, the device will enter setting up page of single-step program automatically.

- Step 2:
Press

Select parameter which needs to be set up, press numerical key to input program value, press

to complete input.
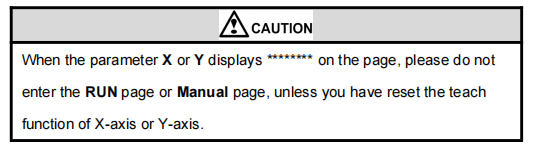
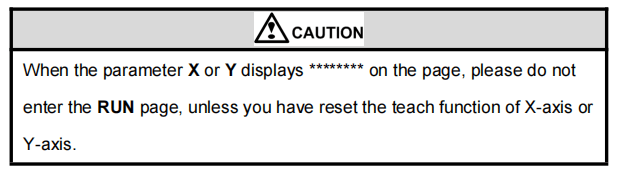
[Note] Parameter can only be set when Stop indicator is on.
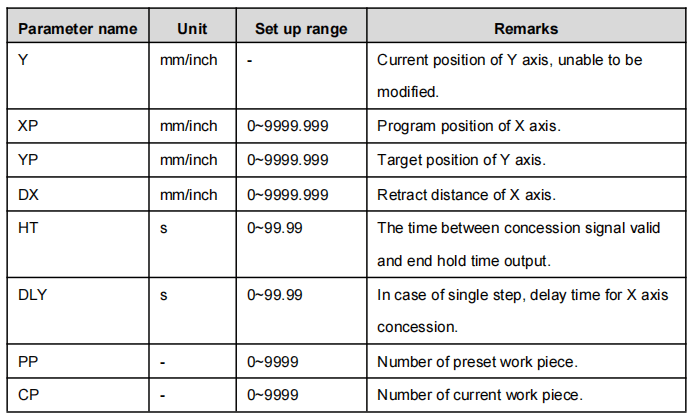
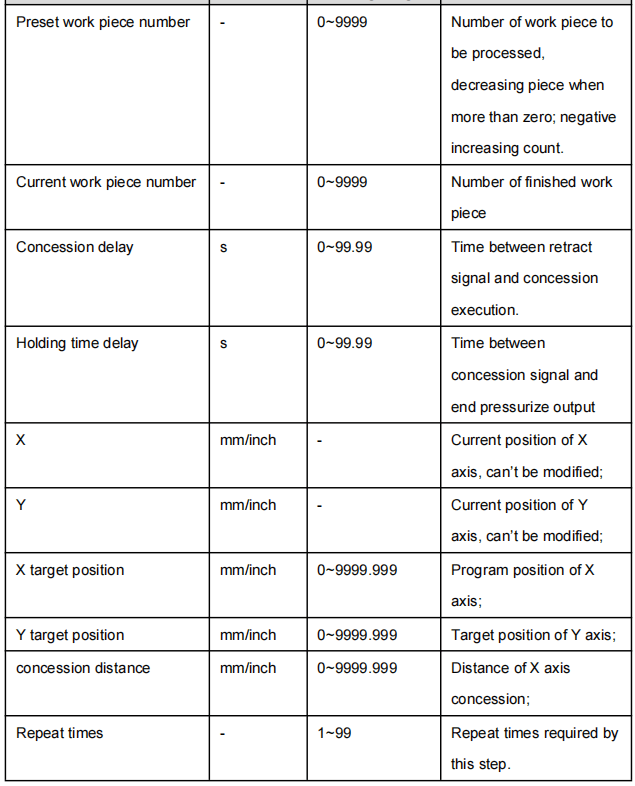
Setting range of singe step parameter is shown in Table.

- Step 3:
Press

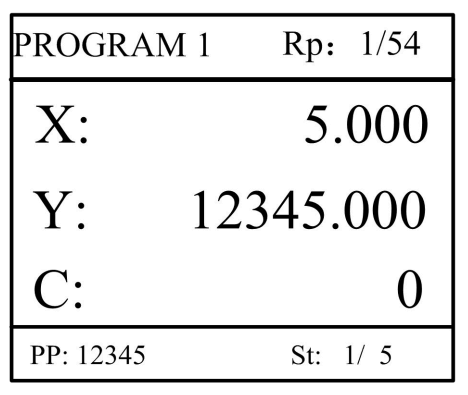
System will execute according to this program, as shown in Figure.

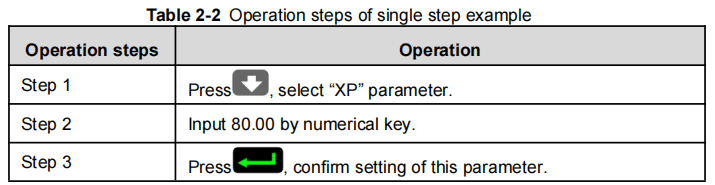
Operation Example
In the ESTUN E21 Operation Guide, optimize your single-step program by setting the bending depth to 100.0mm and the back gauge to 80.00mm. Configure the retract distance to 50mm, with a concession waiting time of 2 seconds and a holding time of 3 seconds. Set the workpiece number to 10, ensuring precise operation steps as detailed in the guide’s table. Following these configurations ensures efficient and accurate metalworking outcomes.

Multi-step Programming
Multi-step program is used for processing single work piece of different processing steps, realize consecutive implementation of multi-steps, and improve processing efficiency.
Operation Step
- Step 1:
Power on, the device displays the single-step parameter page automatically.
- Step 2:
Press

Switch to program manage page, as shown in Figure.

- Step 3:
Press

Select program serial number, or input program number directly, such as input “1”.
- Step 4
Press
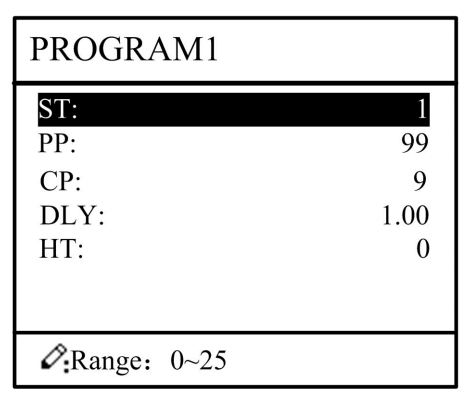
Enter multi-step program setting page, as shown in Figure.
- Step 5:
Press the Down arrow key, select multi-step programming parameter which requires set up, input setting up value, press the Enter key, and the set up takes effect.
- Step 6:
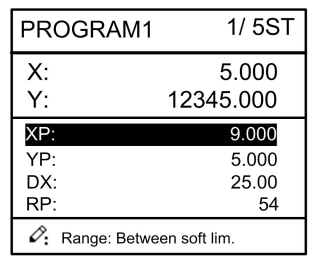
In completion of set up, press the Right arrow key , enter step parameter set page, as shown in Figure.
- Step 7
Press the Down arrow key, select step parameter that needs to be set up, input program value, press the Enter key, and the setup takes effect.
- Step 8:
Press Left and right arrow keys to switch over between steps. If the current step is the first step,
Press the Left arrow key to enter the last page of step parameter setting; if the current step is the last one, press the Right arrow key to enter the first page of step parameter setting.
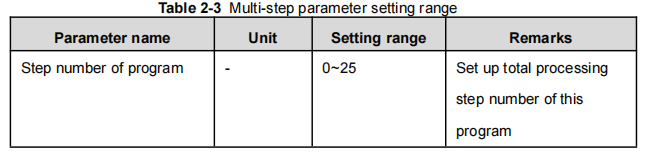
Multi-step parameter setting range is shown in Table.
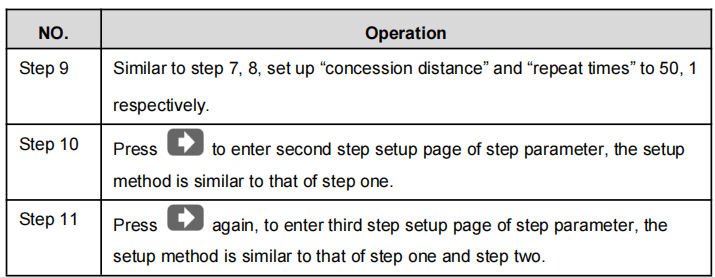
- Step 9:
Press
System will operate according to this program, as shown in Figure.
Operation Example
[Background] One work piece requires processing 50 as shown below;
- First bend: 50mm;
- Second bend: 100mm;
- Third bend: the other direction 300mm;
[Analysis] according to work piece and technological conditions of machine tool:
- First bend: X axis position is 50.0mm; Y axis position is 85.00mm, concession 50mm;
- The second bend: X axis position is 100.0mm; Y axis position is 85.00mm, concession 50mm;
- The third bend: X axis position is 300.0mm; Y axis position is 85.00mm, concession 50mm;
Edit processing program of this work piece on No. 2 program.
Operation procedure is shown in Table.

When working with the ESTUN E21 Operation Guide, efficient multi-step programming is key:
- Return to Start Step: Always return to the initial step after completing multi-step programming to ensure the program processes in the correct sequence.
- Parameter Navigation: Use the left and right direction keys to browse and modify all step parameters effectively.
- Program Adjustments: Programs can be edited and revised as necessary for flexibility and adaptability.
- Automated Processing: After completing a batch (e.g., 50 workpieces), the system stops automatically. Restart to process the next batch seamlessly.
Leveraging these steps guided by the ESTUN E21 Operation Guide ensures optimal machine performance and productivity.
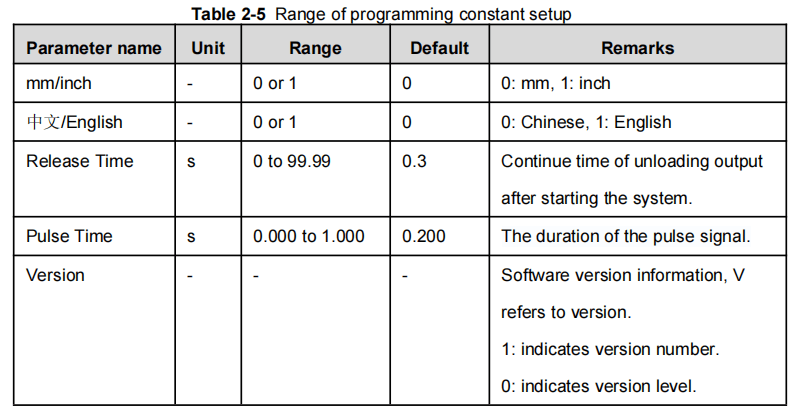
Parameter Setting
User can setup all parameters required for normal operation of the system, including system parameter, X axis parameter and Y axis parameter.
- Step 1:
On program management page, press P to enter programming constant page, as shown in Figure. On this page, programming constant can be set.
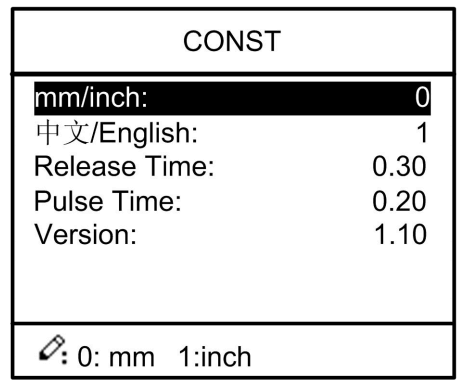
Range of programming constant setup is shown in Table.
- Step 2:
Input password “1212”, press the Enter key to enter the Teach Page, as shown in Figure.

Step up parameter, parameter setup range is shown in Table.
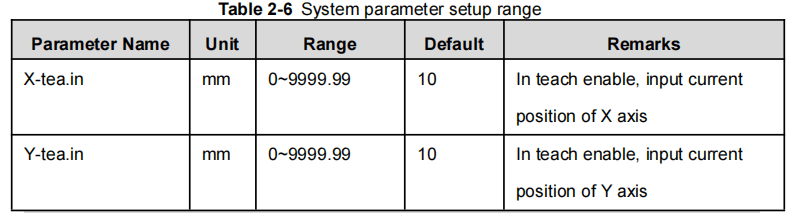
<How to Teach>:
The ESTUN E21 Operation Guide advises on measuring slider and back gauge positions for precision. If direct measurement is difficult, program a process and measure the resulting workpiece. This approach ensures accuracy and aligns with the guide’s strategies for optimal machine performance.
- Step 3:
Press P, return to programming constant page.
Manual Adjustment
In single-step mode, axis movement can be controlled by pressing key manually. This method helps user to adjust machine tool and work piece.
- Step 1:
On single step parameter setup page, press Plus or Minus to enter manual page, as shown in Figure.
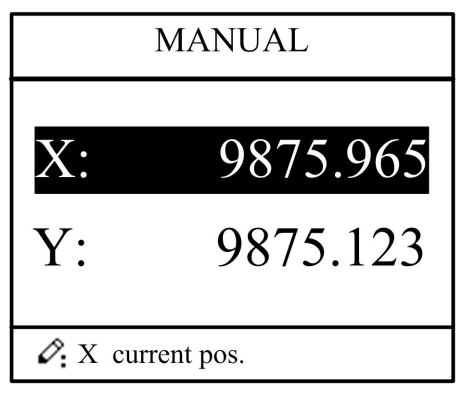
- Step 2:
According to your actual requirement, following the above table to adjust the position of the axis.
-If the drive mode of the corresponding axis is common motor:

<Note>: When the system is on run status, the operation of manual adjustment is just valid for the X-axis.
-If the drive mode of the corresponding axis is frequency:

- Step 3:
Press P return to single step parameter setting page.
Frequently Asked Questions(FAQ)
How does the ESTUN E21 Operation Guide help in improving machine precision?
The guide provides detailed instructions on calibration and alignment procedures, which are crucial for achieving precise operations. Regularly following these instructions can significantly enhance the machine’s precision and performance.
What troubleshooting steps are outlined in the ESTUN E21 Operation Guide?
The ESTUN E21 Operation Guide suggests several troubleshooting steps, including checking electrical connections, examining error codes on the display, and consulting the manual for specific error resolutions.
Conclusion
In summary, the ESTUN E21 Operation Guide provides essential insights into the efficient use of your equipment. Key takeaways include mastering the basic operation procedure, understanding single-step programming, and effectively managing multi-step programming. This guide ensures operators have the foundational knowledge to enhance performance and productivity.
Proper setup and maintenance are essential to ensure the longevity and performance of your press brake machine. By following these guidelines and performing regular maintenance, you can minimize downtime and improve production efficiency. For more detailed support or questions, don’t hesitate to contact our team. Additionally, explore other related documents in our documentation section for further information.


