


Navigating the ESTUN E300P Operation Control can seem daunting at first, but with its intuitive design, it offers a seamless experience for controlling your bending processes. If you’re searching for an efficient way to manage machine operations, you’re in the right place. In this article, I’ll provide clear guidance on how to effectively use the ESTUN E300P Operation Control, ensuring you can integrate it smoothly into your production line. Whether you’re aiming to enhance productivity or achieve precise bending results, this guide will equip you with the necessary insights and steps.
Operation Panel
The ESTUN E300P‘s operation panel stands out for its user-friendly design, allowing operators to take full command of the bending process with ease. Designed with both novice and experienced users in mind, the intuitive interface simplifies complex operations.
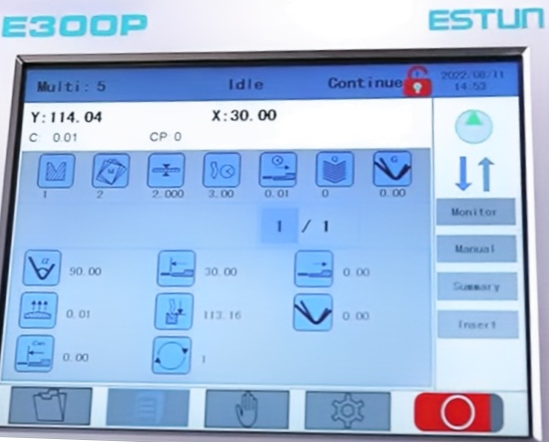
Through the operation panel, you can effortlessly adjust parameters, monitor real-time data, and execute commands that ensure precision and consistency. The panel is equipped with easy-to-navigate menus and a clear display, reducing the learning curve significantly. This level of control not only enhances operational efficiency but also boosts confidence in achieving the desired bending outcomes.
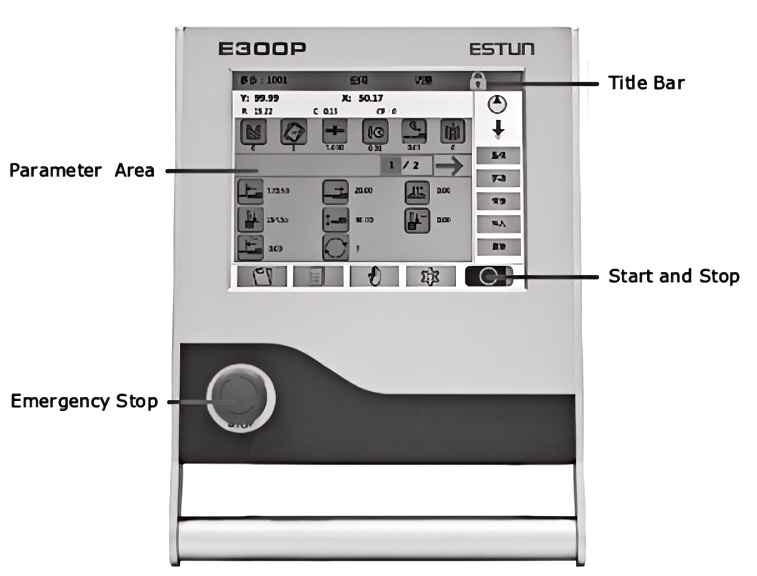
- Title Bar: Interface Name, System State, and Working Mode from left to right.
- Parameter Area: Parameter information would change with the different interface.
- Emergency Stop: In the case of emergency stop use the EMERGENCY STOP controller.
- Start and Stop: After the single-step/multi-step programming is finished,Clicking the “Start and Stop” button position each axis,clicking it again will stop working.
Operation Flow
Mastering the operation flow of the ESTUN E300P is crucial for maintaining a smooth and productive workflow. The step-by-step process begins with setting up your machine parameters based on the specifications of your bending project. Next, you’ll initiate the machine operation, where the ESTUN E300P’s advanced programming capabilities come into play.
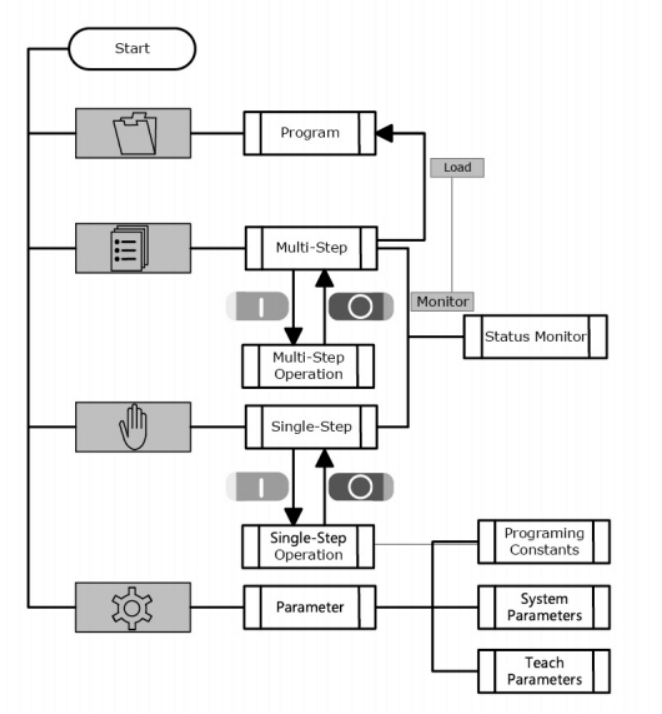
The system guides you through each phase, offering prompts and assistance to ensure no step is overlooked. This functionality allows seamless integration into existing production lines, helping to minimize downtime and maximize throughput. By understanding and following these steps, you can significantly enhance your operational efficiency and product quality.
Manual Movement
For those situations that demand a hands-on approach, the ESTUN E300P offers a Manual Movement feature that greatly enhances customization possibilities. This feature empowers users to manually maneuver the machine with precision, catering to intricate bending needs that automated processes might not adequately address.
The servo axes, which are controlled by servo motor, can be moved manuallywith the arrow keys in Manual page. You can perform this operation withoutstarting the device. Perform this operation can help you adjust or commissionthe machine.
To enter the Manual page, power up the device and wait for the device displaysthe default page, and then click “manual”.
- Click “Y” “X” or “R” to select the desired servo-axis.
- Click Left arrow or Right arrow to adjust selected servo-axis with low speed
With manual movement, you can make fine adjustments on-the-fly, ensuring each bend meets exact specifications. Whether you’re dealing with experimental designs or small batch runs, this flexibility enables you to achieve the highest level of detail and accuracy. By mastering manual movement, operators can unlock new levels of craftsmanship and quality in their bending operations.
Device Operation
Operating the ESTUN E300P through its advanced operation control system is designed to be straightforward yet thoroughly effective. At the core of the ESTUN E300P Operation Control is its ability to streamline device operation, making it accessible even to those new to the machinery. Begin by powering up the device and setting the initial parameters through the ESTUN E300P Operation Control interface. This intuitive system allows you to input precise measurements, select predefined bending profiles, and even store custom settings for repeat projects.
Start
How to start: Click “Start” to startup the machine when you complete the program onSingle-Step page or ultiStep page, the servo-axis can start to positioning.Vhen the machine is ready, it can be produced.
Start state
System State show Running in the middle of the Title bar.
Stop
How to stop
There are 3 different ways to stop :
- Stop by a fault: lf any fault occurred during the operation, the machinecan stop automatically.
- Normally Stop: It also includes the following case:
- Manual stop: Click “Stop“, the running machine can stop.
- Count is finished: In subtractive counting mode, the device stopsautoratically when the Current count is 0.
- Emergency Stop: Press down Emergency Stop button, the powersupply of the system can be cut off immediately.
Stop state
System State show ldle or Alarm in the middle of the Title bar.
Alarm and Reset
The ESTUN E300P Operation Control ensures that every aspect of the device operation is optimized for peak performance. During active operation, the system provides real-time feedback, alerting users to any anomalies and allowing for immediate adjustments. This feedback loop is integral to maintaining the quality and precision that the ESTUN E300P is known for.
Alarm information
In the “Single-Step” page click “Monitoring”, and click “Alarm Record’ inthe “Parameter area” to view the alarm record table.
- lD: Numbering for the alarm list, descending sort by Alarm Date, i.e. iD 1 is the latest fault message.
- Alarm Num.: To show the code of the fault. For detail aboutsolving the faults, see the section Alarm List.
- Alarm Reason: To show summary record of the fault.
- Alarm Date: To show when this fault occurred.
How to reset
There are 2 different levels of alamm, ” tip and warning’. The warninglevel, device will stop; however, the tip level will not.
Please refer to the “Alarm information” for alarm reset. When running again, the device will automatically detect whether thefault has been removed, lf the fault still exists, the alarm information willbe displayed again.
Valve State
In the “Single-Step” page click “Monitoring“, and click “Valve State” inthe “Parameter area” to view the output state of the valve port. Greenbackground m indicates the port is turned ON, while Blank indicates theport is turned OFF.
You can view the current valve status on Curr. row, and the other rowsshows the allocation in corresponding process. For example, you have allocated the process Press as YV1 and YV3.when the machine is in Press process, the Curr. Row displays on YV1 and YV3.
l/O State
In the “Single-Step” page click “Monitoring“, and click “lO State” in the”Parameter area” to view lO port state, Green background indicates the port is turned ON, while Blank indicates the port is turned OFF.
By leveraging the full capabilities of this control system, operators can experience a blend of power and safety, making it an indispensable part of modern bending operations.
Frequently Asked Questions(FAQ)
What should I do if the ESTUN E300P Operation Control is unresponsive?
If the ESTUN E300P Operation Control becomes unresponsive, first check all cable connections and power supply. Ensure that the emergency stop button is not engaged. If issues persist, consult the troubleshooting section in the manual or contact ESTUN support for assistance.
How can I perform manual movements using the ESTUN E300P?
To manually maneuver the ESTUN E300P, use the manual control mode on the operation panel. This mode allows for precise adjustments and custom bending operations. Follow the specific instructions detailed in the user manual for accurate manual operation.
How often should I update the software for ESTUN E300P Operation Control?
It is recommended to check for software updates for the ESTUN E300P Operation Control every six months. Updates can include important features and security patches. Refer to your operation manual or ESTUN’s website for update instructions and support.
Conclusion
Mastering the ESTUN E300P Operation Control provides users with a seamless and intuitive experience, enhancing efficiency and precision in the bending process. By understanding key steps such as navigating the operation panel, following the operation flow, and executing manual movements, you can fully utilize the capabilities of this advanced machine. For additional support or to dive deeper into the functionalities of the ESTUN E300P, we encourage you to reach out to our team or explore our extensive documentation online.


