


Effectively using the ESA S650 database can save you hours of repetitive data entry and ensure consistent bending results across different jobs. If you’ve ever wondered how to store and recall material properties, tooling parameters, or bend coefficients without re-entering them every time, you’re in the right place. In this guide, I’ll show you how to access, populate, and manage the ESA S650 database – an optional feature available on all models. Whether you want to create a library of common materials or quickly apply proven correction factors, these steps will help you work smarter and faster.
Understanding Database Structure
A solid understanding of the database structure is essential for effective use.
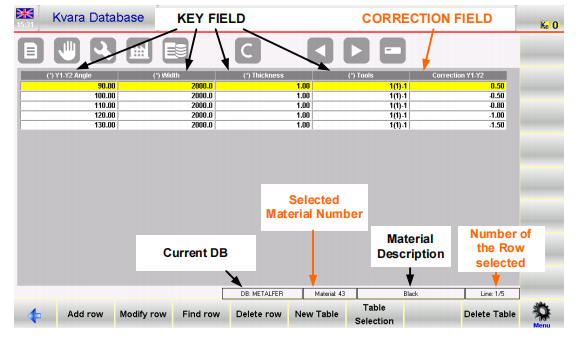
Databases, Tables, Key Fields, and Correction Fields
- Database – A collection of tables. You can have multiple databases (e.g., “FERRO”, “INOX”, “ALUM”), but only one is active at a time.
- Tisch – Each table corresponds to a material number (1 to 99) and optional description.
- Schlüsselfelder – Identify a record uniquely. Examples: bend angle, sheet width, thickness, tools. Keys can have interpolation properties.
- Korrekturfelder – The actual correction values (e.g., Y1‑Y2 correction) associated with the keys.
Each database has a fixed structure (which fields are keys, which are corrections) that you define once at creation and cannot change later.
Properties of Key Fields
When creating a database, you assign each key field these properties:
- Sorting – Numeric index that determines the order of columns and rows.
- Interpolation – Yes/No; if enabled, the system will interpolate correction values when an exact key match is not found.
- Interpolation Range – Maximum allowed difference between the two nearest key values (lower and upper) for interpolation to be applied.
How to Create and Configure an ESA S650 Database
Follow these steps to set up your own database from scratch.
Creating a New Database
- From the Corrections page (press C), press the function key [Kvara-Datenbank].
- In the Kvara Database page, open the sub‑menu and select 0>> Create New Database.
- Enter a name for the database (e.g., “MY_MATERIALS”).
- Select which fields will be keys and which will be corrections: angle, width, thickness, section, resistance, tools, V‑die width, V‑die angle, V‑die radius, punch angle, punch radius, etc.
- For each key, set the sorting index (order), interpolation (Yes/No), and interpolation range (if Yes).
- Drücken [OK] to create the database.
Setting the Active Database
Verwenden 4>> Database Selection from the sub‑menu to choose the database you want to be active. Only one database is enabled at a time.
Modifying Database Settings
After creation, you cannot change the structure (which fields are keys). However, you can change the sorting and interpolation settings of the keys using 2>> Modify DB Settings.
Working with Tables and Records
Each material (material number) gets its own table inside the database.
Selecting and Managing Tables
- To switch between material tables, use the arrow buttons (previous/next table).
- To delete the current table, press the delete table button and confirm.
- To see a list of all tables, use [Tabellenauswahl] – choose a material by touching the screen.
Adding, Modifying, and Deleting Rows
- [Zeile hinzufügen] – Inserts a new correction record. You will be prompted to enter key values (angle, width, thickness, tools) and the associated correction.
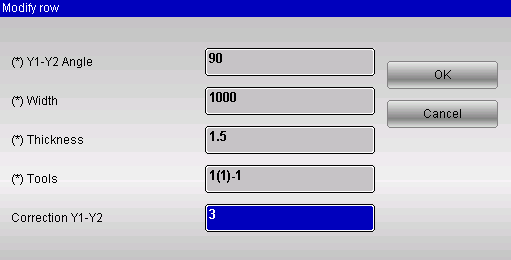
- [Zeile ändern] – Edit the selected record. A window opens where you can change any key or correction value.
- [Zeile löschen] – Removes the currently selected record.
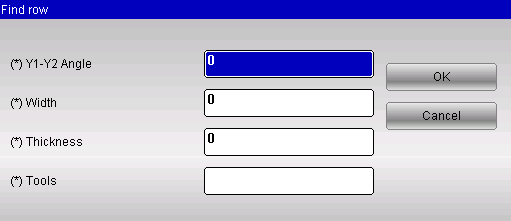
- [Zeile suchen] – Search for a record matching specific key values.
Enabling and Using the Database in Daily Work
Once your database is populated, you must enable it to start automatic correction retrieval.
Enabling the Database
- From the Corrections page, press the function key [KvaraDB aktivieren].
- The icon in the top right corner confirms that the database is active.
Automatic Correction Search
Whenever you fill a numeric or graphic program, the system constantly monitors the key fields (angle, width, thickness, Werkzeuge). If a matching record exists in the active material table, the corresponding correction (e.g., Y1‑Y2) is automatically inserted into the program’s correction fields. If no exact match exists but interpolation is enabled, the system calculates a linear average between the nearest upper and lower records.
Using Interpolation for Unknown Bends
Interpolation is a standout feature. Suppose you have corrections for bend angles 90° and 100°, but you are bending at 95°. If interpolation is enabled, the database calculates a correction value by averaging the two known corrections. The interpolation range limits how far apart the two records can be – if the distance is larger than the range, interpolation is not performed. Setting interpolation range to 0 forces it to always interpolate.
Dickentoleranz
The database also includes a thickness tolerance parameter. If your program has a thickness of 2.1 mm, but only a record for 2.0 mm exists, the system will still use the 2.0 mm corrections provided the difference is within the set tolerance (e.g., 0.2 mm). This greatly expands the usability of your data.
Acquiring Corrections – Manual and Self‑Learning Modes
The database is most valuable when it is continuously updated with real‑world corrections.
Manual Acquisition
After making a correction in the Editor, Corrections, or Semiautomatic page, press the function key [In KvaraDB einfügen]. The current correction values will be saved into the table corresponding to the active material. If that material table does not exist yet, the system asks you to enter a description and then creates it automatically.
If you try to insert a record that already exists (same key values), the system will ask whether you want to replace it.
Self‑Learning Mode
For the initial phase when the database is empty, enable Self‑Learning Mode:
- From the Corrections page, press [Enable self‑teach. KDB].
- In this mode, every time you change a correction in the Editor or Corrections page, it is automatically acquired – you do not need to press [In KvaraDB einfügen].
- The icon changes to “Kba” in the top corner to indicate self‑learning is active.
This mode simplifies building your first database.
Database Management – Backup, Restore, and Deletion
Protect your hard‑earned data with USB backups.
Saving and Loading Databases
From the Kvara Database sub‑menu:
- 5>> Save current DB – Saves the active database to a USB device.
- 6>> Save all DB – Saves every database present on the system to USB.
- 7>> Load all DB – Uploads all databases from USB back to the control.
Deleting a Database
Wählen 3>> Delete Database, then choose the database from the list and confirm.
Disabling Specific Corrections
Verwenden 1>> Disable corrections to temporarily exclude one or more correction fields from being used in new programs – useful when testing different strategies.
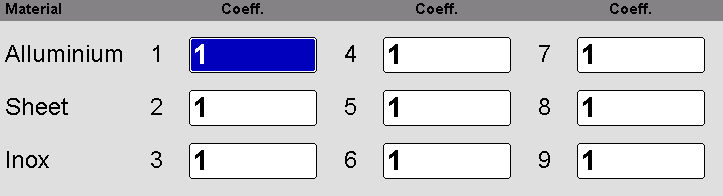
Using the Materials Table and Material Coefficients
Beyond the key‑correction database, the ESA S650 also provides a Materialtabelle where you can set coefficients that multiply the stretch calculation (based on DIN 6935).
How to Access the Materials Table
- Go to the Corrections page (press C).
- Drücken [Materialliste].
Setting Coefficient Values
- Each material (Aluminium, Sheet, Inox, etc.) can have up to three coefficients.
- Default value is 1 (normal stretch). Set to 2 for double stretch, 0.5 for half stretch.
- Range: 0 to 9 with up to 4 decimal places.
- Setting all coefficients to 0 disables stretch calculation entirely – the graphic program development becomes the exact sum of segments.
Saving and Loading Coefficients
- Save to USB using the save button on this page.
- Load from USB using [Von Festplatte laden].
- Coefficients are also included in the global Save ALL / Load ALL from the configuration page.
Häufig gestellte Fragen (FAQ)
Can I change the structure (fields) of a database after it has been created?
No. Once a database is created, the set of key fields and correction fields is fixed. Plan carefully before creation. You can, however, modify sorting and interpolation settings via 2>> Modify DB Settings.
How does the database handle multiple V‑dies on the same die?
The “Tools” key field includes the die name, V‑die number (in brackets), and punch name – for example, “B(1)-1”. This allows separate corrections for different V‑die selections.
Abschluss
Effectively using the ESA S650 database transforms the way you set up bending programs. By creating a well‑structured database, populating it with real corrections (manually or via self‑learning), and enabling interpolation and thickness tolerance, you reduce manual entry and eliminate guesswork. The ability to save, load, and manage multiple databases on USB ensures your data is always safe and portable. The additional Materials Table coefficients give you fine control over stretch calculations.
Now that you know how to effectively use the ESA S650 database, I encourage you to start by enabling self‑learning mode on a simple material (e.g., 2 mm mild steel). Run a few test bends, insert the corrections, and then watch how the database automatically applies them to your next program. For advanced setups, experiment with interpolation ranges and thickness tolerances. If you need further help, our technische Unterstützung team is ready to assist you.


