


Implementing an Automated Tool Change on Dobradeira can significantly improve production efficiency and reduce downtime. However, ensuring safety and proper functioning during the process is essential. This article will guide you through the key steps to safely implement automated tool changes on your Dobradeira, highlighting the precautions you should take to avoid machine damage and ensure smooth operations. Whether you are upgrading your current system or adding automation for the first time, this guide will help you set it up effectively.
Step 1: Understand the Automation System
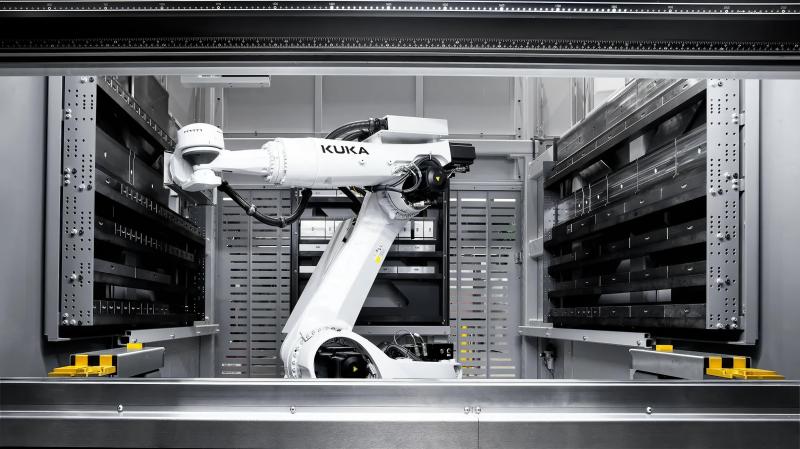
Before implementing an automated tool change system, it’s essential to understand the mechanics and capabilities of your press brake. Automated systems typically require a sophisticated control interface, such as a CNC controller, that communicates with the robotic arms or actuators designed to handle tooling.
Choosing the Right Automated Tool Change System
Choose an automated system that is compatible with your press brake model. Some systems require specific adapter tools or custom tooling designs to fit seamlessly into your existing setup. Make sure to consult with your equipment supplier for compatibility recommendations.
Step 2: Ensure Proper Tooling Setup
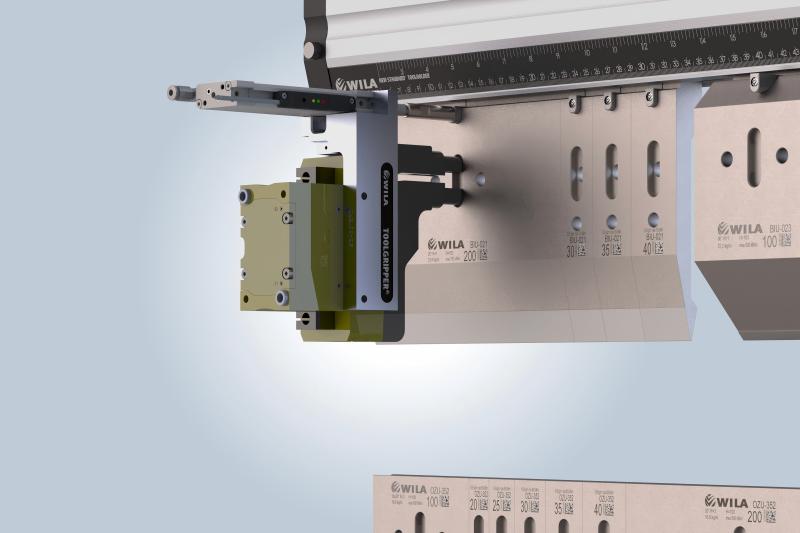
For the system to function correctly, all tools must be appropriately aligned and mounted. Incorrectly set tools can lead to misalignment, safety hazards, or inaccurate bends.
Verify Tool Types and Sizes
Confirm that the tooling used is suitable for automated changes. It’s critical to verify that all tool types (dies, punches, etc.) are compatible with the automated system. Measure and adjust as necessary.
Mounting Tool Holders
Ensure that tool holders are securely mounted and positioned according to the manufacturer’s specifications. Automatic systems rely on precise placement, so any misalignment can result in operational failure.
Step 3: Implement Safety Measures
Safety is paramount during the implementation and operation of any automated system, especially when dealing with large, high-force machinery like press brakes.
Emergency Stop Functionality
Ensure that the system includes an emergency stop feature, which immediately halts operation in the event of a malfunction. Test this feature regularly to ensure reliability.
Regular Safety Checks

Schedule regular safety audits to inspect the automated system, hydraulic components, and tool alignment. Pay special attention to moving parts that may experience wear over time, such as the robotic arms or actuators.
Step 4: Program the CNC Controller
Programming your CNC controller correctly is essential for the automated tool change process. The controller must communicate effectively with the automation system, ensuring that the right tools are engaged and disengaged at the proper times.
Load Tooling Settings

Program the CNC to recognize different tool types and configurations. Set up tool presets so the system can automatically adjust settings based on the tool being used.
Sequence Programming
Create a tool change sequence that coordinates with the press brake’s operational cycles. This includes instructions for stopping the machine, changing tools, and re-engaging the press brake to continue operation.
Step 5: Test the System
Before fully implementing the automated tool change system, it is essential to run thorough tests to ensure everything operates as expected.
Dry Run Testing
Perform a dry run of the automated tool change process without any material to ensure that the tools are being correctly handled. Monitor for any signs of malfunction or misalignment.
Production Testing

Once the dry run is successful, test the system under normal production conditions. Monitor for issues such as slow tool changes, misalignment, or errors in the system’s timing.
Perguntas frequentes
How often should I perform maintenance on the automated tool change system?
Maintenance should be performed regularly, ideally after every 500 operating hours, or at least once per month, to ensure all components are functioning optimally.
What are the common issues that might occur with automated tool changes?
Common issues include tool misalignment, programming errors, hydraulic leaks, or wear on mechanical components such as robotic arms.
How can I ensure the longevity of my automated tool change system?
Regular inspections, maintaining proper fluid levels, calibrating the CNC system, and ensuring all mechanical components are well-lubricated can extend the life of the system.
Q: How often should I perform maintenance on the automated tool change system?
A: Maintenance should be performed regularly, ideally after every 500 operating hours, or at least once per month, to ensure all components are functioning optimally.
Q: What are the common issues that might occur with automated tool changes?
A: Common issues include tool misalignment, programming errors, hydraulic leaks, or wear on mechanical components such as robotic arms.
Q: How can I ensure the longevity of my automated tool change system?
A: Regular inspections, maintaining proper fluid levels, calibrating the CNC system, and ensuring all mechanical components are well-lubricated can extend the life of the system.
Conclusão
Implementing an Automated Tool Change on Press Brake can dramatically improve your operational efficiency and reduce downtime. By following the correct installation, programming, and safety procedures, you can ensure smooth operation and long-term reliability of the system. If you need assistance with setup or troubleshooting, don’t hesitate to contact our expert team for guidance.


