


ESA S840 semi-automatic mode is a powerful pre-production tool that allows you to execute one bending step at a time, verify results, and make real-time corrections before committing to full automatic production. If you need to ensure first-part accuracy, calibrate angles, or safely test a new program, this mode gives you complete control. In this article, I’ll show you how to safely run ESA S840 semi-automatic mode, including how to enter the mode, understand correction rules, apply angle and backgauge corrections, use the acquisition function, and manually find the correct bending position. Whether you’re a setup technician or an operator, this guide will help you run semi-automatic mode with confidence and safety.
How to Enter ESA S840 Semi-Automatic Mode
Switching to ESA S840 semi-automatic mode is simple. Click on the navigation bar icon to switch to semi-automatic pre-production mode. The interface will display the current bending step, and the system will be ready to execute one step at a time.
When you press the start button, the system executes the current work step of the product. Once the step is completed, the machine will not automatically switch to the next process. Instead, it stays on the current step, allowing you to correct parameters and perform verification. This process lets you correct angle and length parameters for all bending steps one by one. The correction values are automatically synchronized to the program.
Understanding the Semi-Automatic Mode Interface
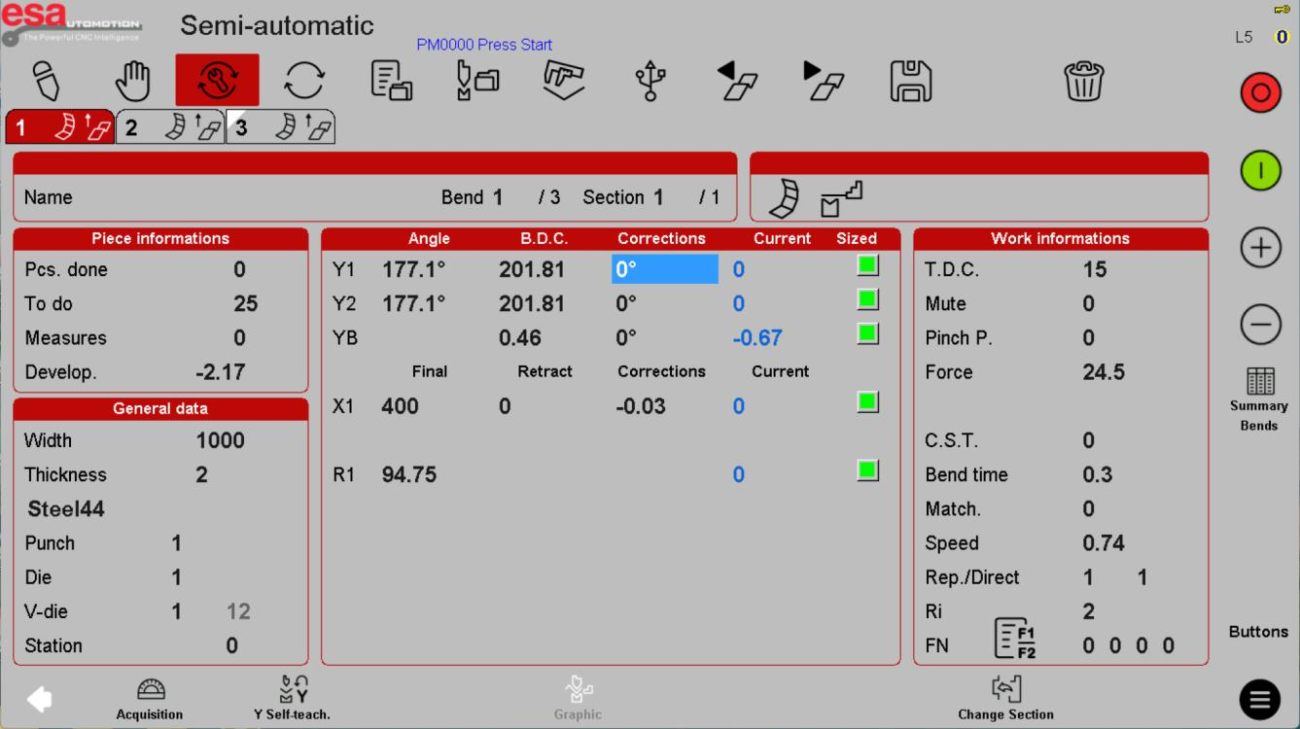
In ESA S840 semi-automatic mode, the main screen shows:
- Bend step number (e.g., Bend 1 of 3)
- Angle values for Y1 and Y2 (programmed and actual)
- B.D.C. (Bottom Dead Center) positions
- Correction fields for Y1, Y2, YB, and backgauge axes (X1, R1)
- Dados gerais (width, thickness, material, tooling)
- Informações sobre o trabalho
The “Current” and “Sized” columns help you compare the programmed angle with the corrected value in real time.
How to Apply Corrections in Semi-Automatic Mode
Correction Rules for Angles
Within ESA S840 semi-automatic mode, you can calibrate both sides of the slider (Y1 and Y2). When you input a value on the Y1 correction field, it is automatically copied to Y2.
Example – Over-bend (too much angle):
- Programmed value: 90°
- Actual processed angle: 92°
- Correction needed: -2° (enter -2)
Example – Under-bend (not enough angle):
- Programmed value: 90°
- Actual processed angle: 88°
- Correction needed: +2° (enter +2)
Correction for YB (Deflection Compensation)
If your machine has a deflection compensation device, you can also calibrate YB. Enter the correction value following the same logic: positive to increase, negative to decrease.
Correction for Backgauge Shaft (X, R)
Example – X-axis overshoot:
- Programmed X value: 100 mm
- Actual measured position: 102 mm
- Correction needed: -2 mm
Example – X-axis undershoot:
- Programmed X value: 100 mm
- Actual measured position: 98 mm
- Correction needed: +2 mm
How to Use the Calibration Main Page
Click on the correction value on the main page of ESA S840 semi-automatic mode. The system will pop up a correction dialog box where you can enter the correction value and select the correction type.

Correction Types
| Tipo | Descrição |
|---|---|
| Programa completo | Copies the correction value to all steps of the program |
| Program from the same angle | Copies only to steps that have the same programmed angle |
| Current step only | Correction applies only to the current bending step (default if no other type selected) |
Best practice: For first-part verification, start with “Current step only.” Once you confirm the correction works, you can apply it to “Same angle” or “Entire program” to save time.
How to Use the Calibration Page (Separate Window)
Click on the calibration page icon in the navigation bar. This opens a separate window where you can measure the angle, obtain deviation values, and edit corrections.
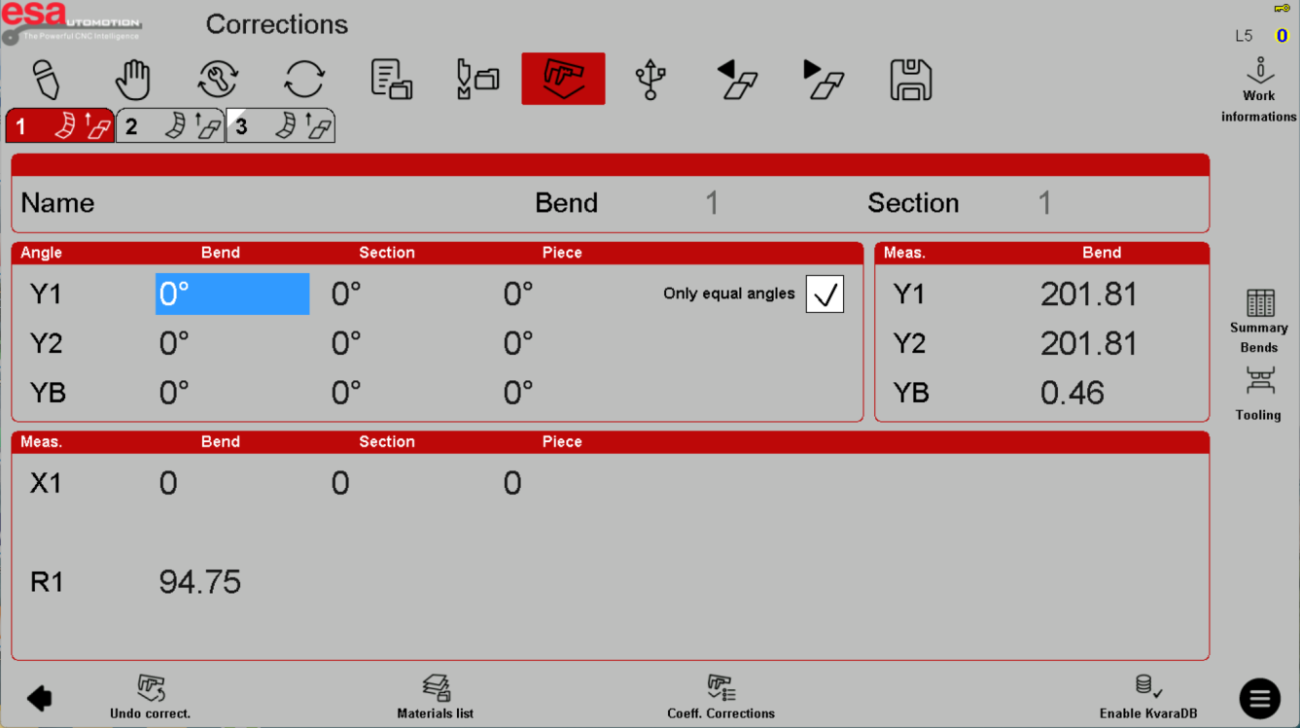
In this window, you can select:
- Bending: Correct the selected bending step sequence
- Section: When there are multiple sections, correct the angle of the selected section
- Sheet metal: Calibrate all bending steps of the program
- Only for the same angle: Only steps with the same angle will be affected
The current programming value of the Y-axis is displayed on the right side of the window for reference.
How to Obtain Actual Angle Measurements (Acquisition Function)
One of the most powerful features of ESA S840 semi-automatic mode is the Acquisition function. By clicking the icon at the bottom of the interface, you can obtain the actual measured angle values, and the system automatically generates calibration values for Y1, Y2, and YB.

Step-by-Step Acquisition
- Run a bend in semi-automatic mode
- Measure the actual angle of the bent part using an external protractor or angle measurement device
- On the acquisition page, enter the measured angle in the “Acquisition” field
- Clique Confirmar
- The system automatically calculates the required correction value and adds it to the existing correction
The automatically generated correction values accumulate based on existing corrections. Steps with the same angle will be corrected simultaneously.
Obtaining the Middle Angle (YB)
When the machine is equipped with a deflection compensation device, the YB value affects the angle in the middle of the product. To correct YB:
- Clique include/exclude compensation to activate deflection correction
- Enter the actual measured middle angle
- Clique Confirmar – the system automatically generates the YB correction value
- Steps with the same angle will also have their deflection corrected
How to Manually Find the Correct Y Position (Y Position Reading)
In special cases where the system cannot calculate the appropriate bending position – such as Batendo (large arc bends), edge pressing, ou formando – you can use the Y position reading function on the semi-automatic page.
Propósito
Manually find the actual required L.D.C. (bending bottom dead center) when the angle-based calculation is not suitable.
Procedimento
- Run the slider down to a position near the desired bend depth
- Use o pedal ou jog buttons to fine-tune
- When you find the correct position, press Parar and release the foot pedal
- The current Y position value will be written into the programmed value
- The system automatically switches from angle bending mode (programmed value = angle, e.g., 90°) to position bending mode (programmed value = 0, meaning absolute position)
Fine Adjustment Controls
| Ação | Controlar |
|---|---|
| Move down in 0.01mm steps | Botão Iniciar |
| Move up/down in 0.1mm steps | +/- buttons |
| Return to higher position | Use the return foot pedal |
| Move below current position | Activate foot pedal return signal, hold down foot pedal, and click start button (1+2 movement) |
Safety note: Always release the foot pedal before making adjustments. Never reach into the bending area while the slider is moving.
Safety Tips for Running Semi-Automatic Mode
Ao usar ESA S840 semi-automatic mode, follow these safety guidelines:
After making corrections, run the same step again to verify the correction worked before moving to the next step
Always verify the step number before pressing start – you may be on a different step than you think
Use single-hand or foot pedal control deliberately – avoid accidental double-taps
Keep hands clear of the bending zone during slider movement
Stop immediately if you see or hear anything unusual
Never disable light curtains or safety interlocks – semi-auto mode is not a shortcut for unsafe operation
Perguntas Frequentes (FAQ)
Is semi-automatic mode safer than full automatic mode?
ESA S840 semi-automatic mode is safer for program verification because it stops after each bend, giving you time to inspect. However, the ram still moves with full force. Never become complacent – keep hands clear and use safety devices.
What should I do if the correction value I entered makes the bend worse?
Immediately stop. Note the incorrect correction, then revert it to the previous value or zero. Test again with a smaller correction. Never continue with a bad correction – it can damage tooling or the part.
Conclusão
Running ESA S840 semi-automatic mode safely requires respect for the machine’s power, clear understanding of correction rules, and disciplined operating habits. By following the pre-operation checklist, applying corrections cautiously, using the Y position reading function with small steps, and always keeping hands clear of the bending area, you can verify programs and produce quality parts without incidents. Remember: safety is not optional. Train your team, use machine guards, and never bypass safety interlocks.
For more detailed support on safely running ESA S840 semi-automatic mode or any other questions about your HARSLE press brake, don’t hesitate to contact our technical support team. We’re here to help you work safely and productively.


