


Correct ESTUN E315P Teach Parameters are essential for establishing accurate servo-axis positions before machining. The teaching process allows the controller to match programmed positions with the actual mechanical positions of the press brake, helping improve positioning and bending accuracy.
The E315P provides teaching functions for the Y-axis, X-axis, R-axis, and clamping point. Each teaching procedure uses actual machine measurements to establish or refine the corresponding reference value. For accurate results, technicians should perform the teaching procedure carefully and verify the machine response through test operation.
This guide explains how to set ESTUN E315P Teach Parameters for the Y-axis and clamping point, X-axis, and R-axis according to the procedures provided in the E315P manual.
What Are ESTUN E315P Teach Parameters?
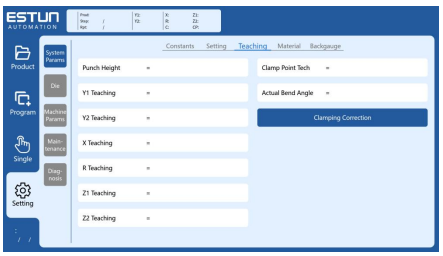
The teaching function is used to acquire accurate servo-axis positions and establish the current machine position before machining.
ال إستون E315P Teach Parameters interface includes several teaching-related items, such as Y-axis Teaching, X-axis Teaching, R-axis Teaching, and Clamping Point Teaching.
Instead of relying only on theoretical position values, the teaching process uses actual machine measurements. These measurements allow the controller to establish a more accurate relationship between the programmed position and the physical machine position.
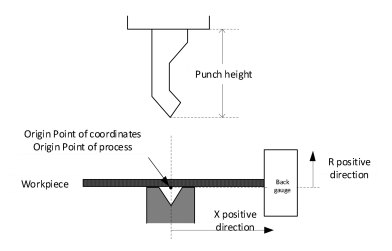
The machine coordinate system provides the reference for this process. For example, the X-axis represents the backgauge positioning direction, while the R-axis represents its vertical direction. Tooling and clamping positions also provide important references for Y-axis calibration.
Why Should Teaching Be Performed Before Machining?
The purpose of teaching is to establish accurate current axis positions before the machine begins normal processing.
Mechanical installation, tooling dimensions, and actual component positions must correspond with the values recognized by the controller. If there is a difference between the theoretical value and the actual machine position, positioning or bending results may also deviate.
The teaching process therefore combines parameter input with physical measurement.
For the Y-axis and clamping point, the procedure uses tooling dimensions and an actual bend-angle test. For the X-axis, an initial measured backgauge distance is refined through test processing. The R-axis uses a direct vertical-distance measurement.
These different methods allow the ESTUN E315P Teach Parameters to reflect the actual machine condition.
How to Teach the Y-Axis and Clamping Point
Y-axis and clamping point teaching is used to calibrate the clamping point position as a relative value.
Before beginning, determine the required measurements. The manual considers the Y-axis position based on cylinder extension, the clamping point as the distance between the upper and lower die surfaces, and the heights of the upper and lower dies.
The example provided in the manual uses a Y-axis position of 50 mm and a clamping point of 150 mm.
Step 1: Enter the Y-Axis Teaching Value
افتح Teaching Parameters interface and set:
Y1-Axis Teaching = 50
This establishes the initial Y-axis teaching value for the calibration procedure.
Step 2: Set the Clamping Point Teaching Value
In the same interface, set:
المشبكing Point Teaching = 150
According to the manual, the die reference distance is calculated automatically, so no separate manual input is required for this value.
Step 3: Create a 90° Test Bend
أدخل خطوة واحدة interface and set the bend angle to 90 درجة. Other parameters can be configured according to the test requirements.
Using 90° makes it easier to verify the clamping point and evaluate the bending accuracy during the teaching process.
Step 4: Run and Measure the Test
Run the machine and measure the actual bending angle during the upper die dwell phase.
Compare the measured angle with the programmed 90° target.
If the actual bend angle matches the target, the current teaching values can be verified. If there is a deviation, further correction is required.
Step 5: Correct the Clamping Point
If the measured angle differs from the programmed value, return to the ESTUN E315P Teach Parameters interface and enter the measured angle into Actual Bend Angle.
ثم حدد Clamping Point Correction.
The E315P automatically recalibrates the clamping point and die reference distance according to the correction procedure.
How to Perform X-Axis Teaching
X-axis teaching is used to calibrate the backgauge position by measuring the linear distance between the reference point and the actual backgauge position.
The reference origin is the center of the die groove or V-groove.
Step 1: Measure the Initial X-Axis Distance
Measure the approximate linear distance from the V-groove center to the backgauge position.
For example, suppose the measured distance is approximately 100 مم.
Step 2: Enter the Teaching Value
Open the Teaching Parameters interface and set:
X-Axis Teaching = 100 mm
This value serves as the preliminary reference for the X-axis.
Step 3: Set the Same Target Position
أدخل خطوة واحدة interface and set:
X Target Position = 100 mm
Using the same value for the teaching position and target position helps synchronize the programmed position with the initial measured reference.
Step 4: Run a Test and Measure the Result
Execute the program and then measure the actual workpiece dimensions after processing.
For example, the actual measured value may be 102.5 mm rather than the programmed 100 mm.
This difference provides the information required to refine the X-axis teaching value.
Step 5: Update X-Axis Teaching
Return to the ESTUN E315P Teach Parameters interface and update the X-Axis Teaching value using the actual measured result.
If necessary, repeat the measurement, test operation, and correction procedure. Iterative adjustment allows the X-axis position to be progressively optimized.
How to Perform R-Axis Teaching
R-axis teaching uses a more direct measurement method.
The R-axis represents the vertical position of the backgauge. To establish its actual position, measure the vertical distance between:
- The top surface of the lower die
- The backgauge position
After obtaining the actual distance, open the Teaching Parameters interface and enter the measured value into R-Axis Teaching.
The manual states that the remaining procedure is identical to X-axis teaching, so no additional calibration sequence is required.
This allows the controller to establish the actual vertical backgauge position using the physical measurement as its teaching reference.
How to Improve Teaching Accuracy
Accurate ESTUN E315P Teach Parameters depend on reliable measurements rather than parameter input alone.
For X-axis teaching, one preliminary measurement may not provide the final result. The manual specifically allows the test and correction process to be repeated for precision optimization.
The same principle applies to other teaching operations: use actual machine conditions to verify whether the controller’s programmed value corresponds with the physical result.
For Y-axis and clamping point teaching, the actual bend angle provides the verification reference. For X-axis teaching, the processed workpiece dimension provides the correction reference. For R-axis teaching, the actual vertical distance establishes the position.
Completing ESTUN E315P Teach Parameters Setup
Setting ESTUN E315P Teach Parameters is fundamentally a process of connecting controller values with actual machine positions.
The Y-axis and clamping point procedure uses tooling dimensions and a 90° test bend to verify and correct the clamping position. X-axis teaching uses the distance between the V-groove center and backgauge, followed by test processing and measurement. R-axis teaching establishes the vertical backgauge position from the lower die surface.
Rather than treating the initial teaching value as automatically final, technicians should use actual measurements to verify the result. Where necessary, repeat the teaching and correction process until the programmed position corresponds accurately with the machine’s physical position.
Frequently Asked Questions(FAQ)
When Should the Teaching Procedure Be Repeated?
Teaching should be checked when the actual machine position no longer corresponds with the programmed value, or after relevant mechanical components, tooling references, or axis-related components have been adjusted or replaced. Repeating the procedure can help re-establish the correct relationship between the controller and the physical machine position.
Why Should the X Target Position Match the Initial Teaching Value?
Using the same value during the initial teaching test provides a clear reference for comparing the programmed position with the actual processed dimension. This makes it easier to identify the positioning deviation and calculate the next correction.
Should I Change the Die Reference Distance Manually?
During the Y-axis and clamping point teaching procedure described in the manual, the die reference distance is calculated automatically. Manual input is therefore not required as part of this procedure.
خاتمة
Correct ESTUN E315P Teach Parameters help establish an accurate relationship between programmed positions and the actual mechanical positions of the press brake. The teaching process relies on physical measurement, test operation, and correction rather than theoretical values alone.
For the Y-axis and clamping point, technicians can use an actual bending-angle test to verify and correct the reference. X-axis teaching can be progressively refined through test processing and workpiece measurement, while R-axis teaching uses the actual vertical distance of the backgauge as its reference.
When setting ESTUN E315P Teach Parameters, use consistent measurement points, record the original values, and repeat the verification process when necessary. This provides a more reliable foundation for accurate axis positioning and subsequent press brake operation.


