


Se você está procurando realizar a configuração da sua máquina ESA S860, está no lugar certo. Vou orientá-lo nas etapas essenciais necessárias para configurar a ESA S860, garantindo que sua máquina funcione sem problemas e com eficiência. Entender o processo de configuração é fundamental para maximizar o desempenho da máquina e minimizar o tempo de inatividade.
Neste artigo, não só abordarei o procedimento passo a passo, como também compartilharei dicas para aprimorar sua experiência com a configuração da máquina ESA S860. Seja você um operador experiente ou iniciante neste equipamento, este guia ajudará você a começar com confiança.
Etapa 1: Preparando a área de trabalho do ESA S860
Antes de começar o ESA S860 Durante a configuração da máquina, certifique-se de que sua área de trabalho esteja limpa e organizada. Remova qualquer resíduo que possa interferir no processo de configuração. Isso ajuda a evitar possíveis danos à máquina e às peças de trabalho. Além disso, verifique se o piso está nivelado, pois qualquer superfície irregular pode comprometer a precisão das suas operações.
Etapa 2: Alimentação NC e configuração inicial
Após preparar a área de trabalho, o próximo passo na configuração da máquina ESA S860 é ligar o sistema NC. A primeira página disponível é a tela inicial.
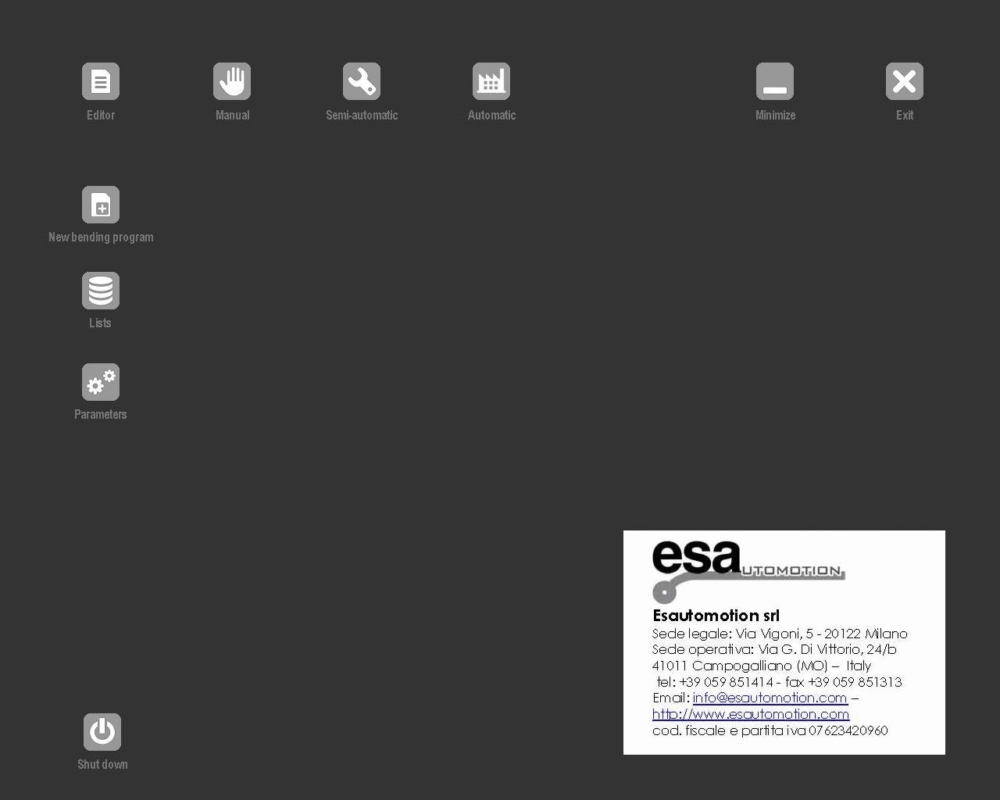

De qualquer outra máscara, pressionando este ícone, você pode entrar na máscara Início.
Veja o que você pode fazer nesta página:
– para entrar em Configurações, pressionando

– para entrar no Manual, pressionando

– para entrar em Semiautomático, pressionando

– para entrar em Automático, pressionando

– para minimizar a aplicação conforme necessário, pressionando

– para sair do aplicativo, pressione

– para realizar um novo programa de dobra, prensagem

– para selecionar uma das listas (Programa, Punções, Matrizes), pressionando

– para selecionar parâmetros de máscara para operações específicas, pressionando

– para garantir que o Controle Numérico seja desligado com segurança quando não estiver em uso, pressione

Etapa 3: toque em Ambiente e Teclado virtual
O Soft Keyboard surge sempre que você precisa inserir dados em campos de entrada, editar dados ou acessar ferramentas de desenho, trazendo a conveniência de um teclado virtual diretamente para a tela. Este teclado interativo e abrangente garante que os usuários não percam de vista suas alterações visuais enquanto realizam operações. Ele mantém todas as funcionalidades de um teclado de PC, otimizando o fluxo de trabalho de forma eficaz.
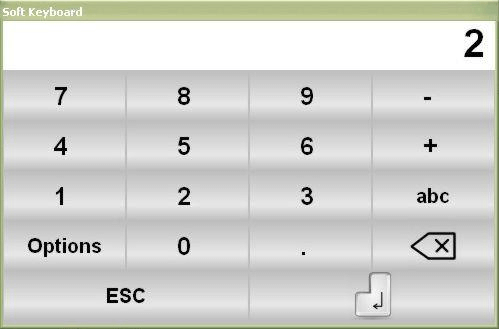

Esta tecla significa Excluir

Esta tecla significa Confirmar – ENTER
Quando você confirma uma inserção, o Soft Keyboard normalmente fecha.
Ao confirmar qualquer entrada de dados, o Soft Keyboard fecha automaticamente, a menos que você opte por mantê-lo na tela pressionando “Opção” e selecionando a função “alfineteiro”, que fixa o teclado em primeiro plano.
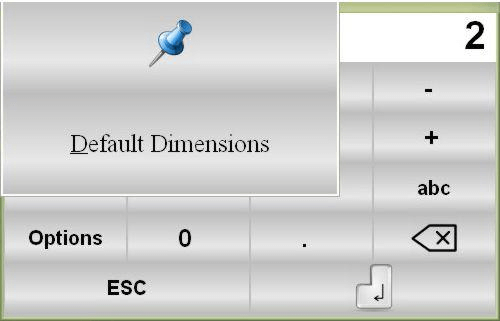
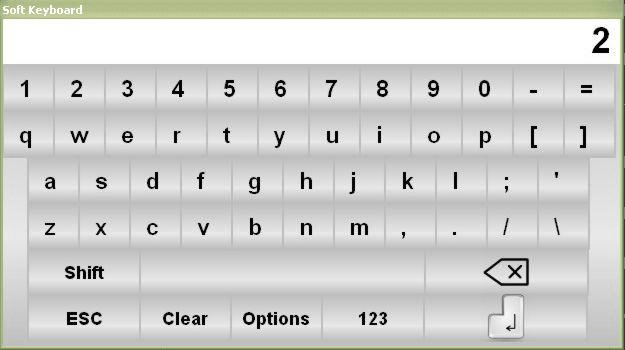
Você também pode redimensioná-lo para dimensões padrão usando “Dimensões padrão” ou alternar para caracteres literários pressionando “abc” para nomear programas e ferramentas.
Etapa 4: Operações essenciais de configuração da máquina
Após a inicialização, as principais operações devem ser concluídas para executar a configuração da máquina ESA S860 com eficiência. O dimensionamento da memória RAM é crucial para entrar na fase automática e executar programas de trabalho com confiabilidade.
É obrigatório dimensionar o carneiro para acessar a fase automática e executar um programa de trabalho. O dimensionamento dos eixos de parada é opcional. É aconselhável dimensioná-los em caso de dúvidas sobre a exatidão dos alvos atuais dos eixos de parada. Os alvos atuais podem não estar corretos se um eixo for movido manualmente com o controle numérico desligado.
Procedimento de dimensionamento de carneiros
Para o ESA S860, siga estas etapas para dimensionar a memória RAM com precisão:
- imprensa
– se o carneiro estiver levantado, pressione o pedal para baixo para movê-lo para baixo das marcas zero
– pressione o pedal para cima; esta operação ativará a subida manual se a máquina tiver sido reiniciada.
O carneiro se moverá para cima até atingir as duas marcas zero das linhas ópticas dos dois cilindros onde ocorre o dimensionamento. Agora será possível executar um programa em modo automático.
Para repetir o procedimento de reinicialização sem desligar o NC:
- imprensa [Repetir dimensionamento];
– pressione o pedal de reascensão.
Dimensionamento dos eixos de parada
A calibração precisa dos eixos de parada é vital para a precisão. Siga estes passos:
- imprensa
- imprensa

Os eixos de parada se movem em direção ao fim de curso de dimensionamento. Assim que o fim de curso for tocado, eles inverterão sua direção e, após soltá-lo, dimensionarão até a primeira marca zero do encoder.
Etapa 5: Dicas de solução de problemas e manutenção
Uma configuração de máquina ESA S860 bem conservada é essencial para eficiência contínua:
- Realize inspeções de rotina para verificar desgaste e danos.
- Garanta lubrificação e limpeza adequadas para manter o desempenho ideal.
- Implemente medidas preventivas para minimizar o tempo de inatividade e prolongar a vida útil do equipamento.
Perguntas Frequentes (FAQ)
Como posso otimizar o ambiente de toque durante a configuração da máquina ESA S860?
O ambiente de toque do ESA S860 é intuitivo. Utilize o teclado virtual para inserir dados, interagindo diretamente com a tela. Aproveite os recursos do teclado virtual, como a função "alfineteiro", para manter o teclado acessível durante o trabalho, otimizando assim a eficiência do fluxo de trabalho.
É necessário dimensionar os eixos de parada toda vez que uso a máquina?
Embora o dimensionamento dos eixos de parada seja opcional durante a configuração da máquina ESA S860, é aconselhável em caso de incerteza quanto aos alvos atuais. Se o controle numérico estiver desativado e um eixo for movido manualmente, o redimensionamento garante a precisão e o alinhamento com a marca zero do codificador.
Com que frequência a manutenção deve ser realizada na máquina ESA S860?
A manutenção regular deve ser realizada a cada 500 horas de operação. Isso inclui inspeções de rotina, limpeza e lubrificação para garantir que a máquina permaneça em ótimas condições de funcionamento e evitar paradas inesperadas.
Conclusão
Em resumo, a configuração da máquina ESA S860 envolve várias etapas cruciais: preparar a área de trabalho, ligar e configurar o sistema NC, utilizar a interface touchscreen e o teclado virtual para facilitar a entrada de dados e dimensionar com precisão o carneiro e os eixos de parada para otimizar o desempenho da máquina. Seguindo este guia meticulosamente, você pode garantir que sua máquina opere de forma suave e eficiente.
A configuração e a manutenção adequadas são essenciais para garantir a longevidade e o desempenho do seu Máquina ESA S860Inspeções regulares, limpeza e manutenção preventiva podem reduzir significativamente o tempo de inatividade e aumentar a produtividade. Caso precise de suporte mais detalhado ou tenha alguma dúvida, entre em contato com nossa equipe. Além disso, explore nosso site para obter mais recursos e documentação sobre tópicos relacionados.


