


When you need to create a bending program quickly and precisely on your ESA S650 control, understanding how to enter an ESA S650 numeric program is the first essential skill. Unlike graphic programming, numeric entry gives you full manual control over each parameter—bend length, angle, material thickness, and tooling. In this guide, I’ll walk you through the exact steps to access the program list, create a new numeric program, and input the necessary values. Whether you’re new to ESA controls or switching from graphic mode, you’ll learn how to set up a complete bending sequence using numeric program entry. By the end, you’ll be ready to run your first program in automatic mode.
Getting Started with ESA S650 Numeric Program Entry
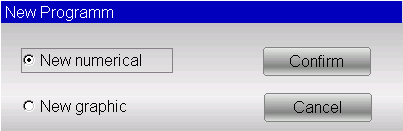
Before you can enter a new ESA S650 numeric program, you need to know where to start. The system provides two ways to create a new numeric program: from the Editor page or directly from the program list.
Creating a New Numeric Program
To enter a new ESA S650 numeric program, press [Nuovo programma] dalla pagina Editor di un programma numerico e selezionare [Nuova cifra]. Alternatively, you can create it from the program list by pressing the menu button and selecting [Nuova cifra].
Once you do this, a window will open for entering the program data. This is the main Editor page where you will set all the piece information and bend parameters.
Setting the Piece Data for Your ESA S650 Numeric Program
The first step in any ESA S650 numeric program is to define the material and tooling. The Editor page contains several fields that you must fill in.
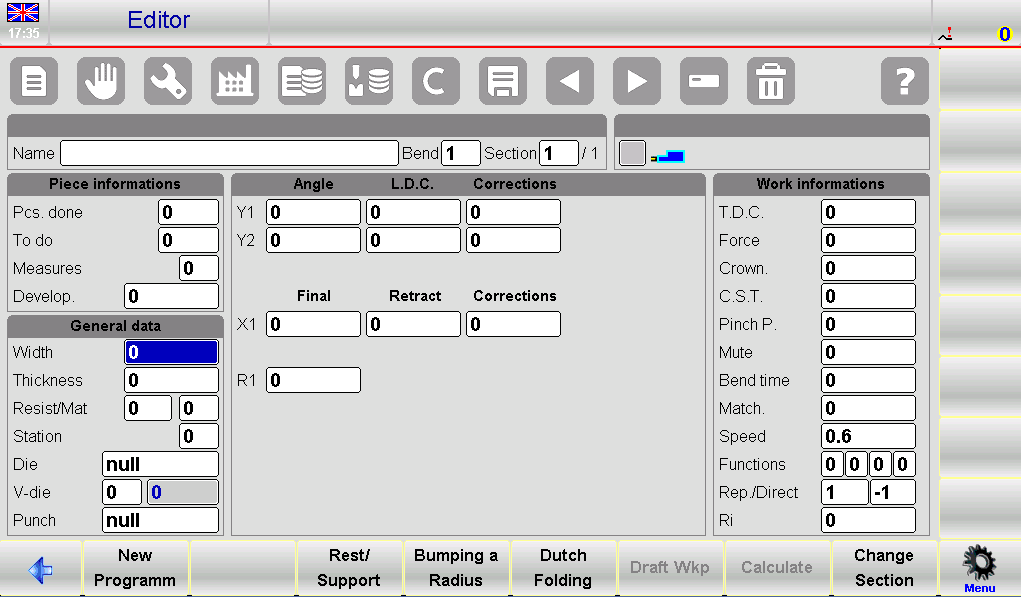
Entering Material Width, Thickness, and Resistance
- Larghezza – Enter the width of the metal sheet to be bent. Tap on the field and select [OK].
- Spessore – Enter the thickness of the metal sheet. Tap the field and select [OK].
- ResistMat (Material Resistance) – This value determines the type of material. The built-in soft keyboard provides help (see Figure 20):
- Set values from 0 to 30 for aluminium.
- Set values from 31 to 50 for iron.
- Set values greater than 50 for acciaio inossidabile.
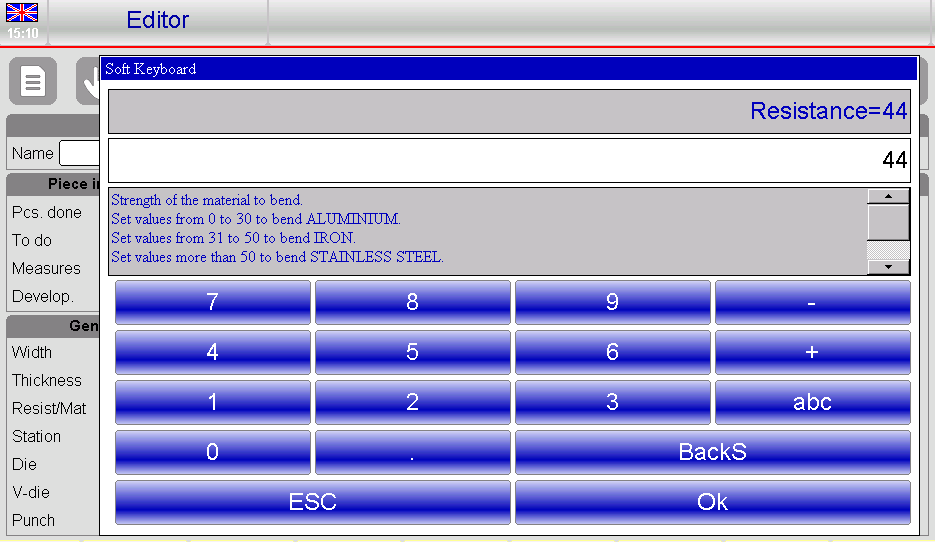
The material calculation is then performed automatically based on the resistance value you enter.
Selecting Station, Die, V-Die, and Punch
After entering the material data, you need to select the tooling:
- Station – Enter the work station number. If only one station is defined or you are unsure, leave it as 0.
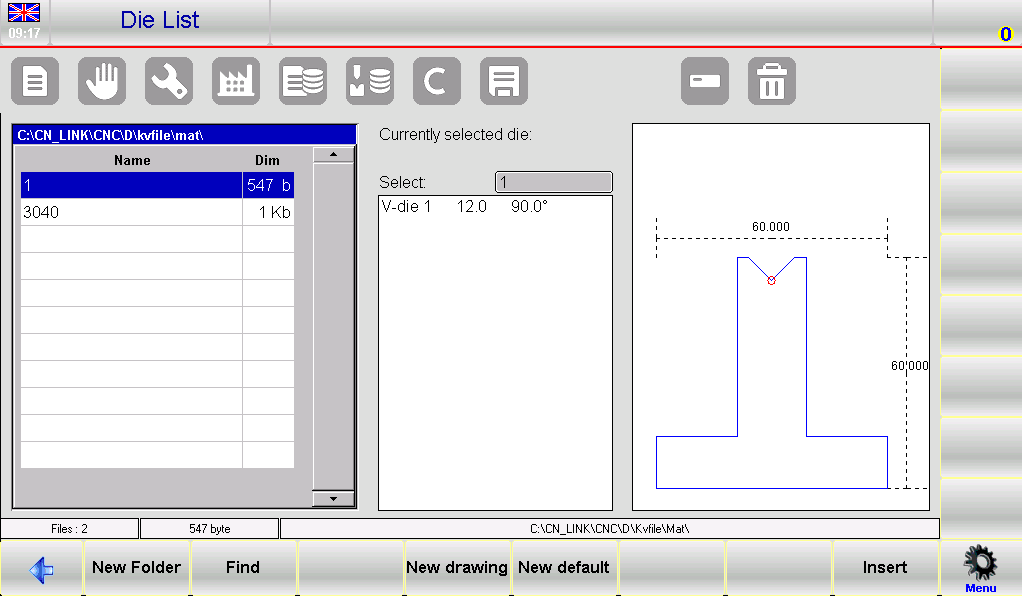
- Morire – Tap on the die field to open the die list (see Figure 21). Scroll through the toolbar, choose the die you need, and press [Inserire]. Note that the die must already have been drawn in the tool library.
- V-die – Enter which V-die of the selected die will be used for the bend. If the die has only one V-die, enter 1. To the right of the field, the width of the selected V-die will be displayed.
- Punch – Tap on the punch field, scroll the toolbar, select the punch, and press [Inserire]. The punch must also already exist in the tool library.
Once these fields are complete, your ESA S650 numeric program is ready for bend definition.
Defining Bends in Your ESA S650 Numeric Program
After setting the piece data, the cursor moves into the bend setting fields. For each bend in your ESA S650 numeric program, you need to specify at least two parameters.
Setting Bend Angle and Length
- Angolo Y1 – Enter the desired bend angle (e.g., 90° for a right angle).
- Finale X1 – Enter the desired bend length (the position of the backgauge).
All other bend data (such as lower dead center, mute point, and pinch point) are calculated automatically by the system. However, you can manually change them if needed.
Viewing Work Data for a Bend
To see detailed work data for a specific bend (absolute T.D.C., mute, and pinch point):
- Move to the desired bend.
- Premere il tasto Menu pulsante per aprire il menu.
- Seleziona l'elemento 7>> Informazioni sul lavoro.
- A window will appear with the work data. Press [OK] to exit.
Copying and Inserting Bends
You can easily duplicate or insert bends within your ESA S650 numeric program.
To copy a bend:
- Move to the bend you wish to copy.
- Premere il tasto Menu pulsante.
- Seleziona l'elemento 5>> Copia passaggio. The bend will be copied to the end of the section.
To insert a new bend:
- Move to the bend after which you want the new bend to appear.
- Premere il tasto Menu pulsante.
- Seleziona l'elemento 4>> Inserisci passaggio. A new bend will be inserted before the selected one.
To enter a copied bend at a specific position:
- Insert a new bend as described above.
- Move to the bend you wish to copy.
- Premere Menu e seleziona Copy step. The copied bend will replace the newly inserted one.
Advanced Bend Types in ESA S650 Numeric Program
The ESA S650 numeric program supports several special bend types beyond standard air bending.
Creating a Radius Bend (Bumping a Radius)
To create a large radius by bumping:
- On the Editor page, press [Bumping di un raggio].
- A window will open. Enter:
- Angolo – the desired rolling angle.
- Raggio – the rolling radius.
- Lunghezza – the rolling pitch length.
- X posit. – the initial position of the stop.
- Premere [Confermare]. The system will automatically calculate and enter the sequence of rolling bends into the editor.
Correcting a radius bend:
Radius bends often require correction. Measure the difference between the achieved radius angle and the desired angle, then divide that difference equally among all bumps. For example, if you need a 90° rolling with 15 bends of 170° each, but the result is 112.5°, calculate: 112.5 – 90 = 22.5° difference. Divide by 15 = 1.5° correction per bend.
Defining a Dutch Folding (Hemming) Bend
To create a hemming bend:
- On the Editor page, press [Piegatura olandese].
- Alternatively, enter 0.0 in the Y1 angle field. The ram arrival value will be calculated based on V-die depth, hemming height, and sheet thickness.
Correcting a Dutch folding:
You cannot change the angle directly. Instead, modify the L.D.C. field of Y1. If the bend is over-hemmed, increase this value. You can also use the Corrections page: press the Corrections button, then [Coeff. corrections], and adjust the Dutch folding value.
Executing a Coining Operation
Coining cannot be entered in graphic mode. To perform coining in your ESA S650 numeric program:
- Enter a normal bend with the same angle as the tools.
- Then change the force and corrections from the Editor page.
- For faster programming, press the secondary button and select the [Coining] function.
Correcting a coining:
Change the lower dead point of Y1 and Y2. If the coining is too open, reduce the lower dead point. If too closed, increase it. Alternatively, use the Corrections page and [Coeff. corrections] to add or subtract from the L.D.C.
Defining a Conical Bend
Conical bending requires a special X2 axis (incremental or absolute) and profiled stops. To set up a conical bend:
- Enter the initial stop position in the X1 field.
- Press the secondary menu button.
- Press [Conic] and enter the desired conical angle (between -45° and +45°).
- Press [Ok]. The X1, X2, Z1, and Z2 data will update automatically.
Note: Once a conical bend is generated, if you want to change the phase displacement angle or sheet width, you must delete the bend and enter a new one.
Making Out-of-V-Die Bends
For bends where the end point is higher than the upper level of the die (out-of-V-die):
- Directly enter the end-of-bend value in the L.D.C Y1 E L.D.C Y2 fields (the angle fields will reset to zero).
- Nel Punto di pizzicamento field (from Work Information), enter a value that makes the theoretical pinch point + pinch point greater than the L.D.C.
- Nel Muto field, enter a value that makes theoretical mute + mute greater than the new pinch point.
- Ensure the T.D.C. is higher than the new mute point.
The system checks that these points are in decreasing order: T.D.C. > Mute > Pinch point > L.D.C. If not, the program will not run.
Saving and Managing Your ESA S650 Numeric Program
After you have entered all bends, you need to save your work.
Saving a New Program
At the end of the settings, press the Salva button. A window will open asking for the program name. Tap the field, enter the name, and select [OK].
Using “Save As” to Create a Variant
If you want to keep the original program but save changes under a new name:
- Premere il tasto Menu pulsante.
- Seleziona l'elemento 2>> Save as….
- Enter the new program name and press [OK].
Updating a Program After Tool Changes
If you change a tool that is already used in a program (e.g., a different die or punch), the calculated heights will no longer match. You must update the program:
- Load the program from the list.
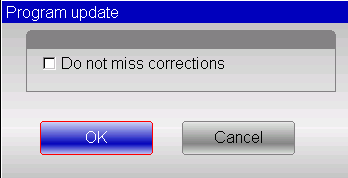
- From the Editor page, press Menu e seleziona 3>> Program update.
- A window appears. Select [OK] (without checking “Do not miss corrections” unless you want to preserve manual corrections).
- All program data will be recalculated.
- Save the program if needed.
Domande frequenti (FAQ)
Can I switch between numeric and graphic programming after starting?
Yes, but numeric and graphic programs are separate. You cannot convert a numeric program to graphic automatically. You would need to recreate it in graphic mode.
What happens if I enter a resistance value outside the suggested ranges?
The system will still accept the value, but the automatic force and depth calculations may not be accurate for your material. Stick to the ranges for aluminium, iron, and stainless steel.
Can I copy bends from one numeric program to another?
You cannot directly copy across programs. However, you can use the “Save as” function to duplicate the entire program and then modify bends as needed.
Conclusione
Entering an ESA S650 numeric program gives you precise control over every bending parameter. By following the steps in this guide—creating a new program, setting material data, selecting tools, defining bends (including advanced types like radius, Dutch folding, coining, conical, and out-of-V-die), and saving your work—you can build reliable bending sequences for a wide range of applications. Regular practice with numeric entry will make you faster and more confident.
Now that you know how to enter an ESA S650 numeric program, I encourage you to try creating a simple program with two or three bends. Experiment with the copy and insert functions, and explore the work data page. If you encounter any issues, refer back to this guide or contact our technical support team for assistance.


