


The ESA S650 Summary Bend page is a powerful feature that allows operators to quickly review and manage all bending data within the current program from a single interface. By understanding how to easily access ESA S650 Summary Bend, users can improve programming efficiency, simplify bend editing, and optimize production workflow.
This guide explains how to enter the Summary Bend page, navigate between bends and sections, modify bend values, and create new bending programs directly from the interface. Proper use of the ESA S650 Summary Bend page helps operators save time, reduce programming errors, and maintain better control over complex bending operations.
What Is the ESA S650 Summary Bend Page?
Understanding the Function of the Summary Bend Interface
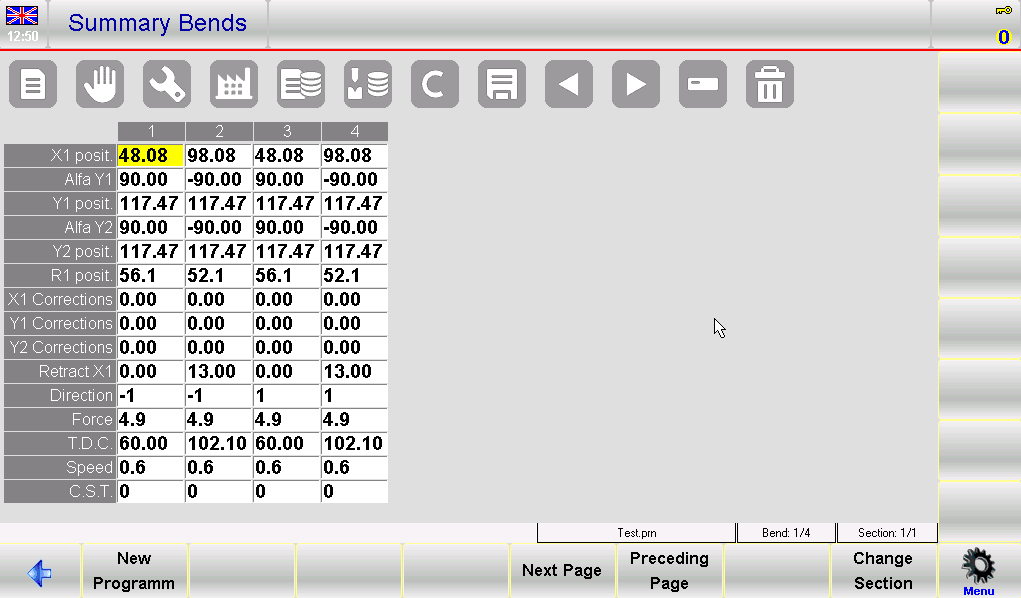
The ESA S650 Summary Bend page provides a table-style overview of all bends in the current program. The interface is similar to the TRIA graphic interface and allows operators to simultaneously view and edit multiple bending parameters.
In this table:
- Ogni colonna represents a bend in the program
- Ogni row represents a specific bend parameter or data type
- The currently selected value is highlighted with a yellow background for easy identification
This layout makes it easier to compare bending data across different bends and sections without switching between multiple pages.
Main Information Displayed on the Summary Bend Page
The ESA S650 Summary Bend page displays several important details, including:
- Bend sequence numbers
- Current program name
- Current bend and section information
- Bend parameter descriptions
- Navigation and editing function keys
The page also includes shortcut functions such as:
- Nuovo programma
- Next Page
- Preceding Page
- Cambia sezione
These functions help operators quickly manage large and complex bending programs.
How to Easily Access ESA S650 Summary Bend
Step 1: Open the Editor Menu
To access the ESA S650 Summary Bend page:
- Entra nel Pagina dell'editor
- Press the menu button to open the function menu
- Use the scroll bar to locate 10 >> Summary Bend
- Select the option to open the Summary Bend page
Once selected, the system will display all bend data for the current program in table format.
Step 2: Understand the Summary Bend Layout
After opening the page, operators should familiarize themselves with the layout and navigation system.
Important interface elements include:
- Bend numbers at the top of each column
- Bend data descriptions on the left side
- Highlighted editable fields
- Program and section status indicators
Understanding the interface structure improves editing speed and reduces mistakes during programming.
How to Use ESA S650 Summary Bend Efficiently
Step 3: Moving Between Bends
Operators can move between bends using the navigation buttons on the interface.
If the selection reaches the final bend and the next navigation button is pressed, the system will automatically create a new bend at the end of the program.
This feature allows quick program expansion without returning to the main editor page.
Step 4: Viewing Additional Bend Pages
For programs containing many curvas, not all data may fit on a single page.
To view additional bends:
- Premere il tasto Next Page pulsante
- Utilizzare il Preceding Page button to return to earlier bends
This paging system helps maintain a clean and organized interface even for large programs.
Step 5: Editing Bend Values
To modify a value within the ESA S650 Summary Bend page:
- Touch the corresponding cell on the screen
- Enter the new value using the soft keyboard
- Premere OK to confirm
After confirmation, the selection automatically moves to the next editable field, improving programming efficiency.
This editing method allows operators to quickly adjust:
- Bend angles
- Back-gauge positions
- Axis values
- Tooling parameters
without leaving the summary interface.
How to Manage Sections in ESA S650 Summary Bend
Step 6: Changing Sections
Programs with multiple sections can be managed directly from the Summary Bend page.
To move to the next section:
- Premere il tasto [Cambia sezione] chiave
If the current selection is already on the final section, pressing the button again will automatically create a new section.
This function is particularly useful when programming complex workpieces requiring multiple bending stages.
Step 7: Organizing Large Programs
The ESA S650 Summary Bend page simplifies the management of long and complex programs by allowing operators to:
- Quickly review all bend steps
- Compare data across sections
- Detect programming inconsistencies
- Apply rapid modifications
This centralized workflow improves production organization and reduces programming time.
How to Create a New Program from ESA S650 Summary Bend
Step 8: Starting a New Program
The Summary Bend page also supports direct creation of new numeric programs.
To create a new program:
- Premere il tasto [Nuovo programma] chiave
- Enter the required general program data
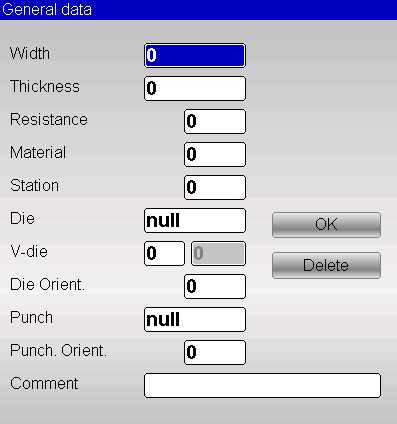
The system will request:
- Larghezza del foglio
- Spessore del materiale
- Resistenza del materiale
- Die selection
- V-die configuration
- Punch selection
- Optional comments
After entering the data, press OK to continue.
Step 9: Entering Bend Data
Once the general setup is completed:
- Entra X1 position valori
- Entra Alfa Y1 angle data
The ESA S650 automatically calculates the remaining bend parameters based on the entered information.
This automation helps operators reduce manual calculations and improve programming accuracy.
Step 10: Saving the Program
After completing the setup:
- Press the save button
- Enter the program name
- Confirm using OK
The new program will then be stored in the system memory and ready for production use.
Best Practices for ESA S650 Summary Bend Usage
Improving Programming Efficiency
To maximize efficiency when using the ESA S650 Summary Bend page:
- Review all bend data before production
- Use section management for complex parts
- Verify tooling selection carefully
- Save programs regularly during editing
These practices help minimize errors and improve workflow consistency.
Reducing Programming Errors
Operators should also:
- Double-check bend sequences
- Confirm material parameters
- Review automatically calculated values
- Use page navigation carefully for large programs
Proper use of the ESA S650 Summary Bend page helps improve bending precision and overall production reliability.
Domande frequenti (FAQ)
What is the ESA S650 Summary Bend page used for?
The ESA S650 Summary Bend page is used to view, edit, and manage all bend data within the current program from a single table-based interface.
Can I edit bend values directly from the Summary Bend page?
Yes, operators can directly modify bend values by selecting a cell and entering new data using the soft keyboard.
Conclusione
The ESA S650 Summary Bend page is an efficient tool for managing bending programs, reviewing bend data, and simplifying program editing. By learning how to access and use the Summary Bend interface, operators can quickly navigate between bends and sections, modify values directly, and create new programs with greater efficiency.
Features such as table-based bend management, automatic calculations, and section organization help reduce programming complexity while improving production accuracy. Proper use of the ESA S650 Summary Bend page can significantly enhance workflow efficiency and minimize setup errors during press brake operations.
For additional technical assistance, programming guidance, or detailed ESA S650 documentation, feel free to contact HARSLE or explore more support resources on our website.


