


Setting up ESA S929 Dies correctly is essential for achieving precise bends and consistent production results on your press brake. If you’re looking for a clear guide to creating, editing, saving, and managing die data on the ESA S929 controller, you’re in the right place. In this article, I’ll walk you through the step-by-step process to configure ESA S929 Dies, including inputting die parameters, renaming tools, backing up data, and importing from USB. Whether you’re a new operator or aiming to improve daily efficiency, this guide will help you master die setup and optimize your press brake performance.
Accessing ESA S929 Dies for Accurate Setup
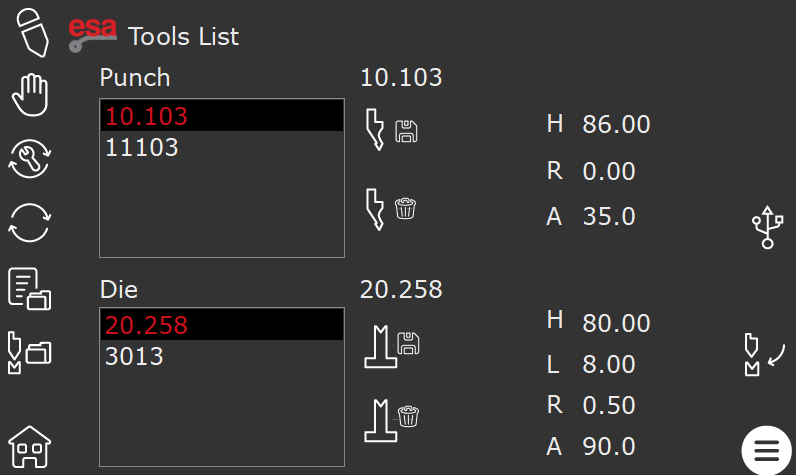
To set up ESA S929 Dies efficiently, begin by opening the die management section on the controller. This section displays all dies currently stored in the CNC system and provides direct access to their parameters.
Press the “Tools List” icon on the ESA S929 touchscreen, then locate the dies section.

Each die entry includes its name, V opening width, height, radius, and angle. Understanding this layout helps you quickly select and prepare the correct die for your bending program.
Selecting the Right Die for Your Bending Program
Scroll through the list to find the die that matches your production requirement. When selected, the controller will automatically display all relevant parameters.
Apply the die to the active program by pressing the insert key. Accurate selection is crucial for maintaining bend precision and minimizing material waste.
Creating and Configuring New ESA S929 Dies
Creating dies in the system allows you to store unique tooling setups for repeated use.
Step 1: Open the New Die Function
From the die management menu, press the “+ New Die” button. This action opens the die creation window.

Step 2: Input Die Parameters
Enter the following values carefully:
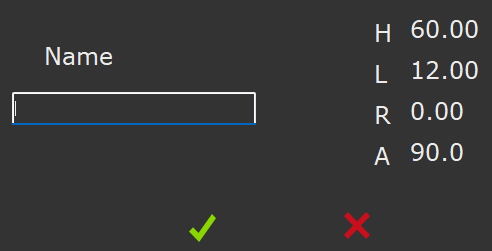
- Die Name for easy identification
- H value (die height)
- L value (V opening width)
- R value (die radius)
- A value (die angle)
Accurate input ensures the ESA S929 calculates bending angles correctly for every step.
Step 3: Save the Die
Press the confirmation button to save your new die in the CNC system. Consistent naming and parameter accuracy simplify future selections and prevent errors during production.
Editing and Updating ESA S929 Dies
Sometimes dies need updates due to wear or process changes.
Modifying Die Data
Select the die to edit from the list. Adjust the parameters displayed on the right panel to reflect the actual tool specifications.
Saving Changes
After modifying the values, exit the parameter page or select another die. Confirm the prompt to save the updated data. This ensures all bending programs use the correct die parameters.
Organizing ESA S929 Dies
Renaming Dies
Select a die, open the Menu, choose “Rename Die”, and enter a clear, descriptive name. Consistent naming improves workflow and reduces selection mistakes.

Deleting Unused Dies
If a die is no longer used, select it and press the delete button. Confirm the deletion to remove it from the CNC database. Always verify that it is not used in active programs before deletion.
Backing Up and Importing ESA S929 Dies
Backup to USB
Insert a USB drive, open the die management menu, and select “Save Tools”. This exports all dies to the USB, providing a safeguard against data loss.
Import from USB
To restore or transfer dies, insert the USB, open the USB tools menu, and select “Save Tools” to import all die data into the ESA S929 controller.
Best Practices for ESA S929 Dies
Regularly check die dimensions, maintain organized naming conventions, and create frequent backups. These steps ensure reliable performance, accurate bends, and reduced production errors.
With careful die setup and management, ESA S929 Dies can significantly improve press brake efficiency and maintain high-quality bending results across all jobs.
Domande frequenti (FAQ)
How can I edit existing ESA S929 Dies parameters?
Select the die from the list and adjust the displayed parameters on the right panel. After completing changes, confirm the save prompt to update the die data in the ESA S929 system.
Can ESA S929 Dies data be backed up?
Yes. Insert a USB drive, open the Tool List menu, and select “Save Tools.” This exports all dies to the USB device, allowing for secure backups or data transfer between machines.
How do I delete unused ESA S929 Dies safely?
Select the die to delete, press the delete button, and confirm the deletion. Ensure the die is not used in any active bending program to prevent errors.
Conclusione
Setting up ESA S929 Dies accurately is key to ensuring consistent bending results, improving production efficiency, and minimizing errors. By following the steps outlined—accessing the die list, creating new dies, editing parameters, renaming, deleting, and backing up or importing dies—you can maintain precise tooling management and optimize your press brake operations.
Regularly checking die dimensions, maintaining organized naming, and keeping USB backups of your ESA S929 Dies will help secure your tooling data and ensure smooth production. For further guidance or assistance with ESA S929 Morires setup, CNC programming, or press brake operation, contact the HARSLE technical support team or explore additional documentation and tutorials available from HARSLE.


