


The ESA S650 Automatic Mode is designed to streamline production by allowing press brake programs to run continuously with minimal manual intervention. Understanding how to run programs in ESA S650 Automatic Mode is essential for improving efficiency, reducing operator workload, and ensuring consistent bending accuracy.
In this guide, you will learn the key steps to execute programs in ESA S650 Automatic Mode, including preparation, program selection, and execution. By following the correct procedures, operators can achieve smooth and reliable production while minimizing errors and downtime.
How to Enable ESA S650 Automatic Mode for Program Execution
Step 1: Preparing the Program for Automatic Mode
Before using ESA S650 Automatic Mode, ensure that a program has been properly created or calculated. The system supports both numeric programs and graphic programs. Once the program is ready, press the automatic mode button to enable execution.
This step is essential because the machine can only run in automatic mode after the program data has been fully defined and verified.
Understanding ESA S650 Automatic Mode Interface
Step 2: Using the Automatic Graphic Page
If the selected program is a graphic program, the system will display the automatic graphic page. This interface includes three main windows:
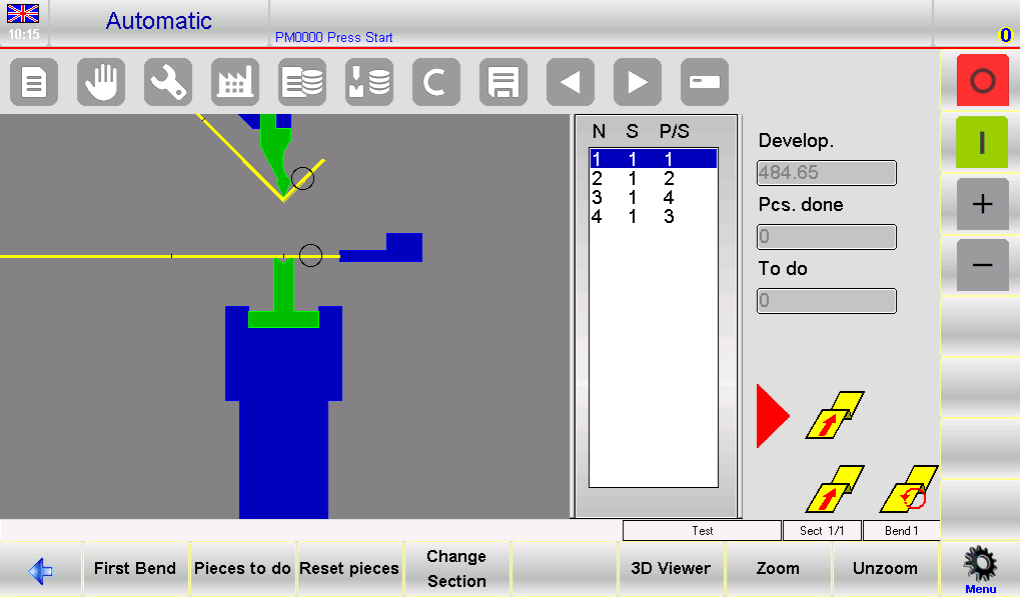
- Finestra principale: Shows the machine structure, punch and die, and the workpiece before and after bending
- Orientation Window: Indicates how to position or rotate the sheet for each bend
- Finestra dati: Displays bending data, piece counter, and sheet development
This visual guidance helps operators clearly understand each bending step and reduces setup errors.
Step 3: Using the Automatic Numeric Page
For numeric programs, the automatic page displays axis positions along with program data. Note that program parameters cannot be modified in ESA S650 Automatic Mode.
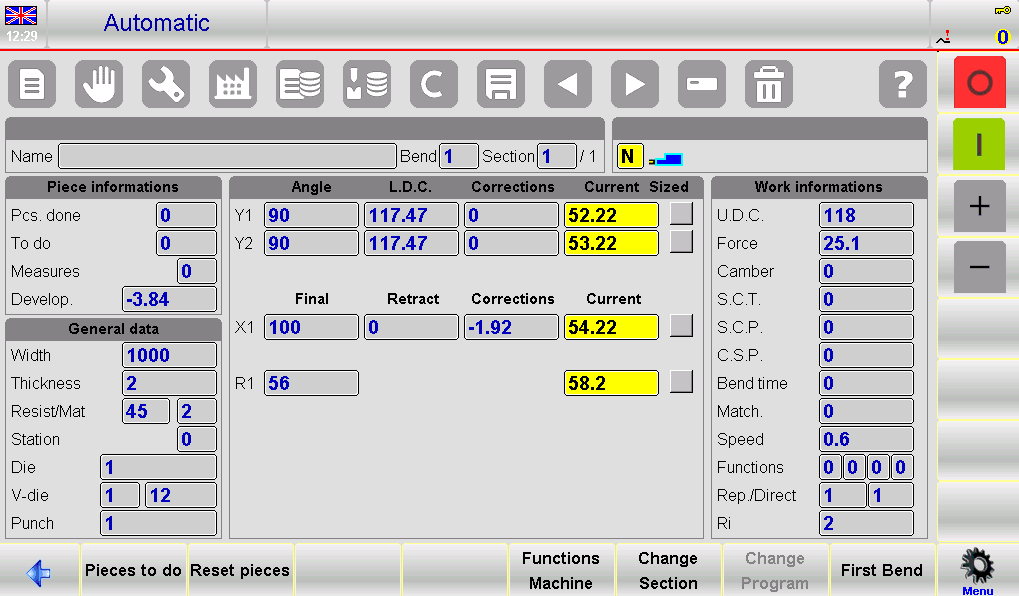
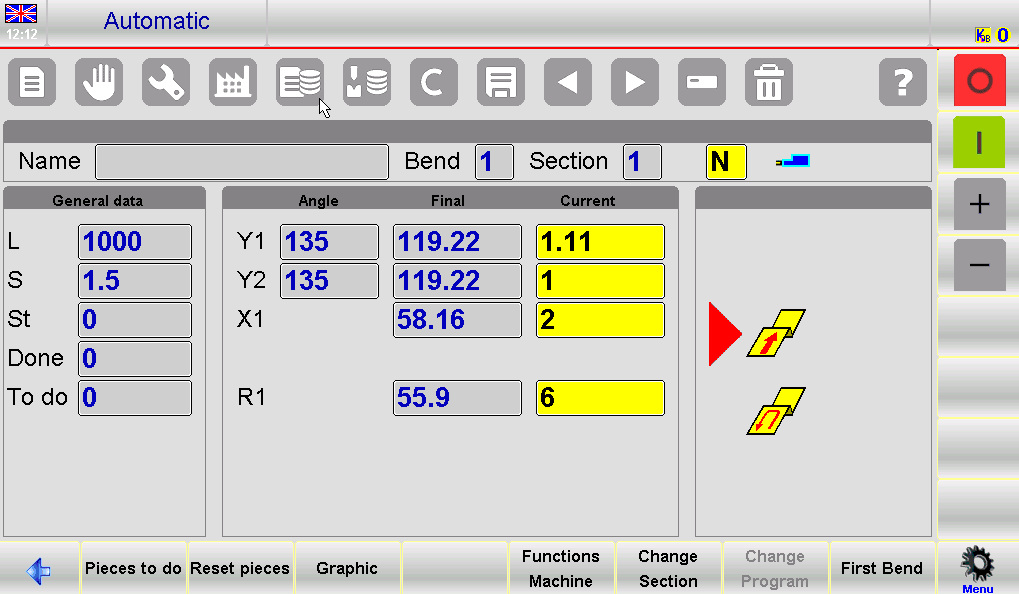
To improve visibility, operators can enlarge the display to show axis values more clearly, which is useful during production monitoring.
Step-by-Step Guide to Running Programs in ESA S650 Automatic Mode
Step 4: Starting the Automatic Cycle
To start execution:
- Premere il tasto INIZIO pulsante
- The system will automatically position the back-gauge axes
- Press the down pedal to move the ram and perform the bend
After each bend, the ram returns automatically, and the system repositions for the next step. This cycle continues until all bends are completed.
Step 5: Continuous Production Cycle
Once the final bend is completed, the ESA S650 Automatic Mode will restart the cycle from the first bend. This allows continuous production without manual intervention, significantly improving efficiency.
Step 6: Viewing the First Bend
Operators can select the Prima curva function to quickly return to the initial step. This is useful for setup verification or restarting production from the beginning.
Optimizing ESA S650 Automatic Mode with Sample Piece Execution
Step 7: Running a Sample Piece for Accuracy
Since CNC calculations are theoretical, it is recommended to produce a sample piece before full production. This can be done using semi-automatic mode, where each bend is executed step by step without advancing automatically.
This method allows operators to verify and adjust bending accuracy before switching to full automatic production.
Step 8: Measuring and Adjusting Bending Results
After performing a bend:
- Measure the angle and length of the bend
- Compare with the required specifications
- If deviations exist, enter correction data in the system
Corrections can be applied at three levels:
- Livello del pezzo (all bends)
- Livello di sezione
- Single bend level
ESA S650 Automatic Mode Correction Settings
Step 9: Entering Correction Data
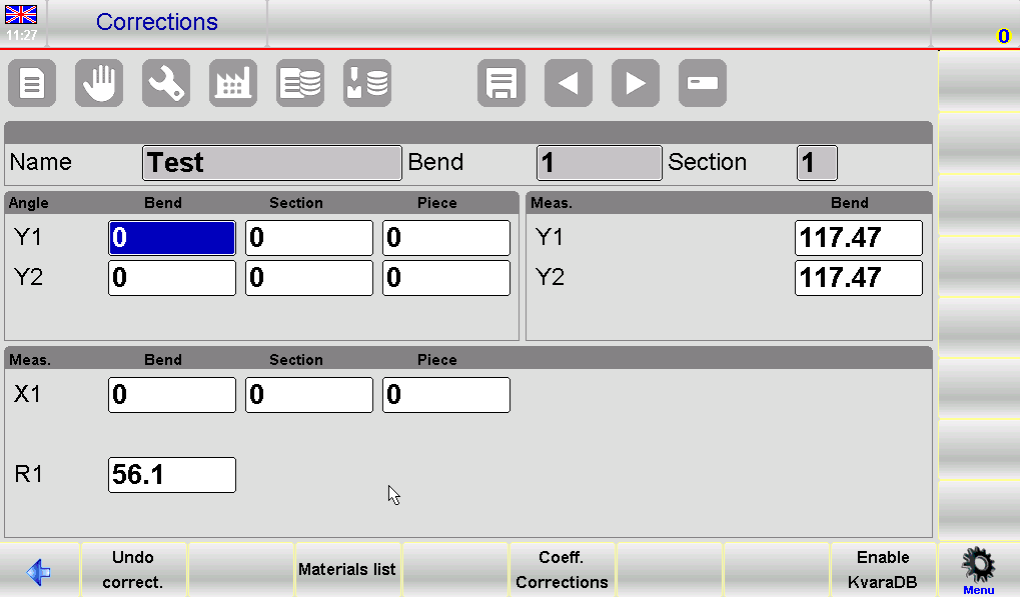
Correction values are entered as:
- Angle corrections in degrees
- Back-gauge position corrections in millimeters
Esempi:
- If the bend angle is too closed, enter a positive correction value
- If the bend is too open, enter a negative value
- If the bend length is too short, increase the X-axis value
- If too long, decrease the X-axis value
These corrections are automatically added to the existing program values.
Step 10: Applying and Verifying Corrections
After entering correction data:
- Confirm the correction
- Reposition the back-gauge axes
- Repeat the bending step
- Check if the result meets requirements
Repeat this process until all bends are accurate. Once completed, the automatic cycle can resume from the selected step.
Step 11: Deleting Correction Data
If needed, correction values can be reset by selecting the Undo Correction function. This restores the original program values, allowing operators to restart adjustments if necessary.
Key Tips for Efficient ESA S650 Automatic Mode Operation
Migliorare l'efficienza produttiva
To maximize efficiency in ESA S650 Automatic Mode, always verify the program before execution and use sample pieces for calibration. This reduces errors during mass production.
Avoiding Common Operational Errors
Follow these best practices:
- Do not attempt to modify program data in automatic mode
- Always check back-gauge positioning before starting
- Apply corrections gradually and verify results step by step
- Use graphic view for better visualization when available
By following these guidelines, operators can ensure smooth operation, reduce downtime, and achieve consistent bending quality.
Domande frequenti (FAQ)
Can I edit program data in ESA S650 Automatic Mode?
No, program data cannot be modified while in ESA S650 Automatic Mode. Any adjustments must be made in editing or semi-automatic mode before running the program automatically.
Why should I run a sample piece before full production?
Running a sample piece helps verify bending accuracy since system calculations are theoretical. It allows you to identify deviations and apply corrections before mass production begins.
How do I correct bending errors in ESA S650 Automatic Mode?
You can measure the bend angle and length, then input correction values into the system. Corrections can be applied to the entire piece, specific sections, or individual bends to improve accuracy.
Conclusione
Using ESA S650 Automatic Mode correctly is key to achieving efficient and consistent press brake production. By following the proper steps—preparing the program, understanding the interface, executing the automatic cycle, and applying corrections when needed—operators can ensure smooth and reliable operation.
Running a sample piece and making precise adjustments before full production helps minimize errors and improves overall bending quality. Consistent monitoring and proper use of correction functions further enhance performance and reduce downtime.
For optimal results, always follow standard operating procedures and verify program accuracy before execution. If you need further assistance, technical guidance, or detailed documentation, feel free to contact HARSLE or explore more resources on our website to improve your production efficiency.


