


If you’re looking to understand how to set up the DELEM DA-66T bend sequence, you’re in the right place. I’ll guide you through the essential steps to configure the bending sequence effectively, so you can enhance precision, reduce material waste, and maximize productivity.
Whether you’re a seasoned professional or new to press brake operations, this article will provide the insights you need to set up the DELEM DA-66T bend sequence with confidence.
Introduction

To generate or modify a bend sequence for the product drawing, select the product from the library and use Bend Sequence.
To setup the DELEM DA-66T bend sequence, first ensure a tool configuration is available. Start the bend simulation by selecting the ‘Bend Sequence’ button.
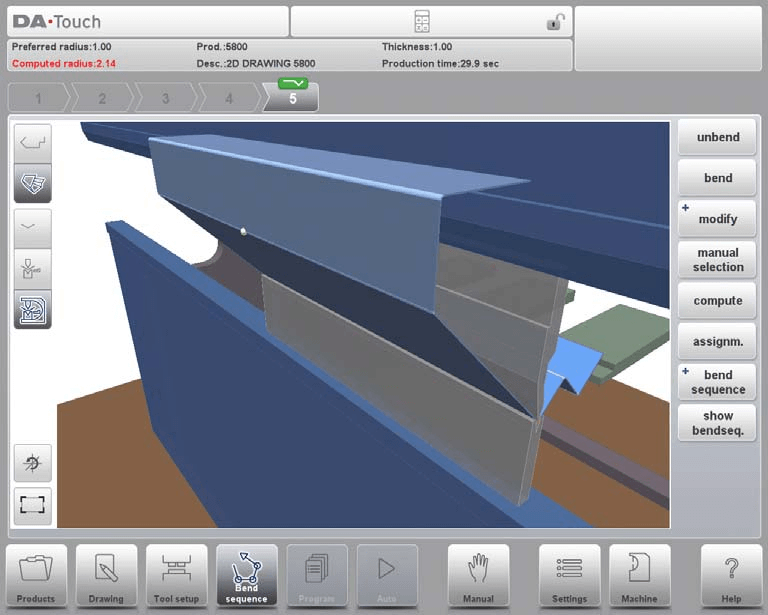
You can automate the bend sequence calculation with the final bent product or manually determine the sequence starting from the flat product. Use the function keys to unfold the product step-by-step. If starting with an unfolded product is preferred, choose this option under the ‘Bend Sequence’ command. The DELEM DA-66T system includes a range of functions to control the bending process.
- Unbend: Unbend the currently shown bend or start searching for the next feasible bend to unfold.
- Bend: Bend the product in the simulation screen or switch to the next bend step.
- Shift Product/ Shift Gauge: Shift the product manually (if product is bent) or shift the gauge manually (if product is unbent).
- Manual Selection: Manual selection of a bend line. Additional possibility to determine the bend sequence.
- Compute: Compute a valid bend sequence. During the computation the bend sequence computation can be canceled or stopped. Cancel is shown when no valid bend sequence has been computed yet. Stop is shown when a valid bend sequence has been computed already. This could be the not optimum in production time.
- Assignments: Open a screen with assignments, parameters for the bend sequence computation.
- Bend Sequence: To start a new bend sequence, to reload the original bend sequence or to save a complete bend sequence. These functions can be found under the bend sequence command button.
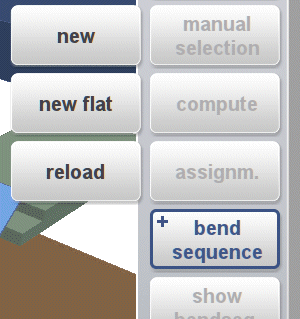
There are also various options like +New, +New Flat, +Reload, +Save, and +Save As.
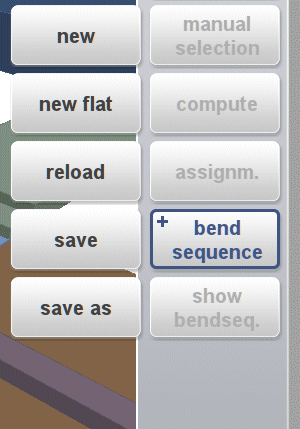
- +New: Start a new, automatically computed bend sequence, removing any existing sequence.
- +New Flat: Begin a manual bend sequence from a flat sheet.
- +Reload: Restore a saved bend sequence without altering any CNC program, including corrections.
- +Save: Save a determined bend sequence with its CNC program, including necessary axis positions and tool numbers.
- +Save as: Save the current product and sequence under a new name for easy differentiation.
- Show Bend sequence: Display a step-by-step graphical overview or 3D view of the bend sequence. This can be achieved via the view mode selection.

View Select
To optimize your DELEM DA-66T bend sequence setup:
- Switch views as needed in the bend sequence screen.
- Access view functions opposite the command buttons on the main screen for better control.

View functions:

The upper command icons give direct access to 2D, 3D view selection.
The visualization of machine, tools and product can be selected with the second set of command icons in the screen.

Toggle between some possible ways of displaying the product/tool configuration: product, product/tools and all.

Reset rotation resets the original rotation view.

Fit-to-view, scale to fit function to scale the product to fit the view.
Bend selector
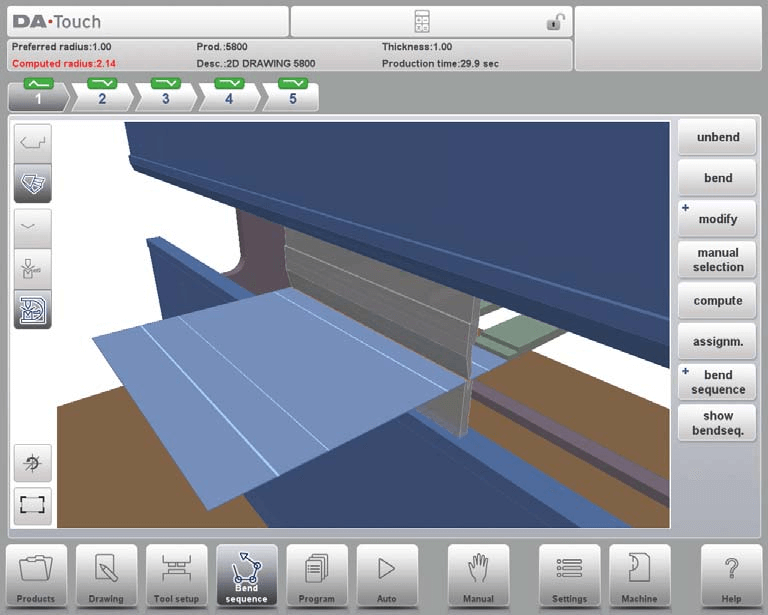
In the DELEM DA-66T Bend Sequence screen, you can use the bend selector to navigate through the bends. The top shows the bend count with color-coded indicators: green, yellow, or red, to display bend sequence compliance. Tapping a bend reveals detailed data, aiding in precise adjustments.


Unbend product
To set up the DELEM DA-66T bend sequence for CNC program generation, you can follow these steps:
- Compute Automatically: Press ‘Compute’ to automatically determine the quickest bend sequence.
- Manual Unbending: Press ‘Unbend’ repeatedly until the product is fully unbent.
Once unbent, use ‘Bend Sequence’ and ‘Save’ to generate and store the CNC program. If no sequence is found, check for:
- Incorrect tool configuration – revisit the tool configuration menu.
- Incorrect assignments – return to the assignments menu.
- Detected collisions – manually adjust the sequence as needed.
Understanding and managing these aspects ensures efficient DELEM DA-66T bend sequence setup.
Manual selection of bends
In setting up the DELEM DA-66T Bend Sequence, the control typically suggests the next bend based on programmed assignments, product shape, and tools. However, you might need to select a different bend line manually. Use the ‘Manual Selection’ function to adjust the DELEM DA-66T Bend Sequence, and a new window will open for customization, allowing precise control as needed.
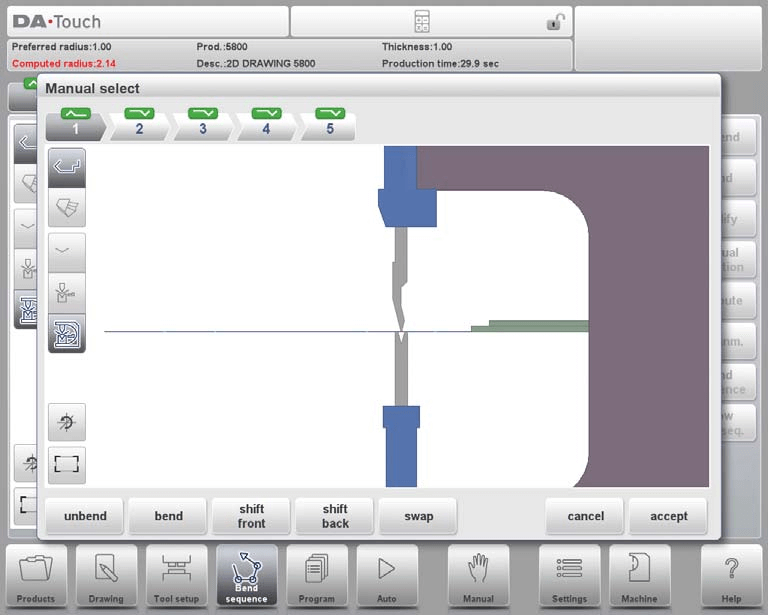
Functions:
- Unbend: Unbend the current or find the next feasible one.
- Bend: Perform or switch to the next bend.
- Shift Front/Back: Move the product accordingly.
- Swap: Rotate the product between tools.
- Cancel: Discard changes.
- Accept: Save changes.
This setup allows you to adjust the DELEM DA-66T Bend Sequence for optimal results.
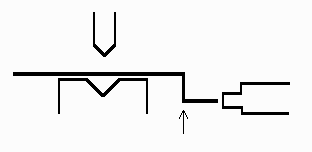
Shift product
In the DELEM DA-66T Bend Sequence setup, the bend simulation menu computes the next possible unbend step. The product is positioned between the tools to avoid any collision. If you need to reposition the product under the mounted toolset, use the ‘Shift product’ function to open a new adjustment window. This ensures precise and safe sequencing during your machining process.
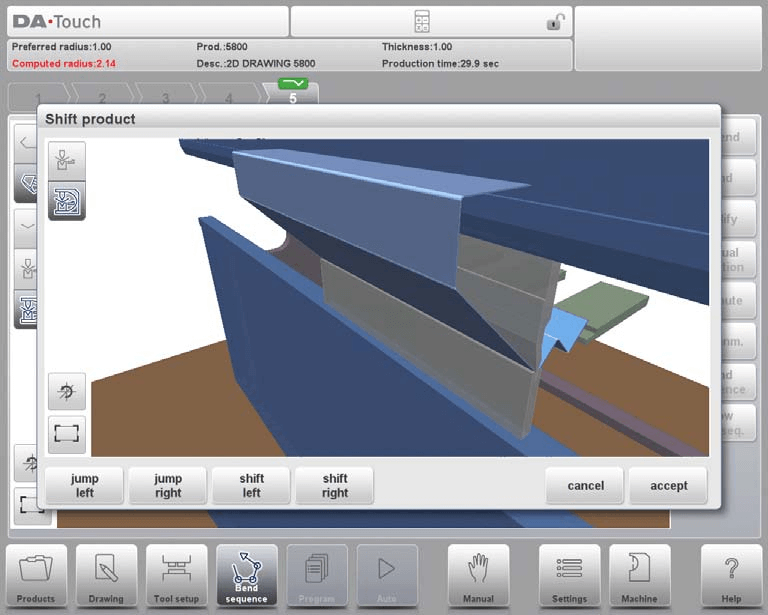
- Jump Left: Move the product to the left to a different toolset combination.
- Jump Right: Move the product to the right to a different toolset combination.
- Shift Left: Shift the product left within the current toolset; adjust the step size as needed.
- Shift Right: Shift the product right within the current toolset; adjust the step size as needed.
- Show Options: Choose views for the simulation:
- Product/Tools view
- All view
- Cancel or Accept: Cancel to exit without saving or accept to save changes and exit.
Incorporating these steps ensures a smooth DELEM DA-66T bend sequence setup for optimal metalworking.
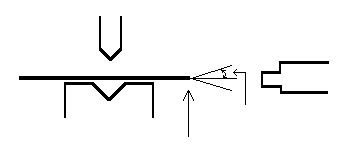
Shift gauge
Setting up the DELEM DA-66T bend sequence is straightforward and user-friendly. For each bend, the system automatically calculates the positions of the X, R, and Z axes while ensuring no collisions occur. If needed, you can manually adjust the backgauge fingers for alternative positioning.
To do this, simply choose ‘Shift Gauge’ when the product is flat. A pop-up will display the backgauge fingers, with one highlighted for easy adjustment. This flexibility helps ensure your DELEM DA-66T bend sequence is both efficient and collision-free.

The fingers can be moved by means of the different available functions.
Functions:
- Select Finger: Choose which finger to move in your DELEM DA-66T bend sequence. Make sure it’s positioned correctly around the corner of the contact surface for proper fixation in both the X and Z directions. This is effective on machines equipped with special pinching fingers and the necessary control options.
- Change Side: You can move the selected finger to another side of the product behind the machine. In the example configuration, two positions are typically available. Ensure the required axes, like X1 and X2, are enabled in your control setup.
- Lay On Finger: Decide whether to lay the product on the selected finger. This option is available if your machine has R-axes, enhancing your DELEM DA-66T bend sequence capabilities.
- Shift Left: Adjust the selected finger to the left. The step size for shifting is displayed at the command line prompt and can be customized to fit your needs.
- Shift Right: Similarly, you can shift the selected finger to the right, modifying the step size as necessary to perfect the DELEM DA-66T bend sequence.
- Cancel: If you need to leave without saving any changes, simply choose the cancel option.
- Accept: Once satisfied, save your changes and exit the screen, completing your DELEM DA-66T bend sequence setup.
This guide should help you navigate the DELEM DA-66T interface with ease while setting up your desired bend sequence.
Assignments
Introduction
To set up the DELEM DA-66T bend sequence effectively, you’ll need to understand the importance of assignments, which are key parameters used to control the bend sequence computation. You can access the assignments screen from the tool configuration by using the ‘Assignm’ function key.
The automatic bend sequence computation balances conditions like minimizing production time and avoiding collisions between the product, machine, and tools.
To achieve optimal results, it’s crucial to program several parameters, taking into account machine capabilities, product accuracy, handling possibilities, and turn times. By doing so, you ensure an efficient and smooth bending process with your DELEM DA-66T.
Functions:
- Load Defaults: Utilize this option to bring up the most optimal assignment settings for your tooling needs. If you’ve previously saved an ideal setup, simply select ‘Load Defaults’ to apply it to new products.
- Save As Default: After configuring your DELEM DA-66T settings to your needs, save them as the default. This ensures quick access to your preferred setup in future sessions.
- Cancel: If you’ve made changes that you don’t wish to keep, use the ‘Cancel’ option to exit without saving.
- Accept: Once satisfied with your settings, choose ‘Accept’ to save your changes and exit the screen.
Implementing these steps will streamline your DELEM DA-66T bend sequence setup, enhancing efficiency and consistency in operation.
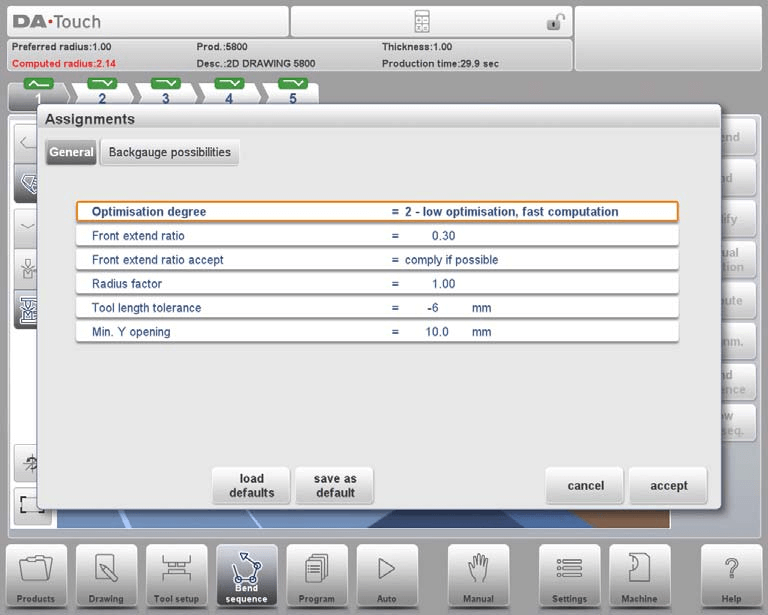
Assignments – general
Setting up the DELEM DA-66T bend sequence involves a few key parameters to optimize your bending process efficiently:
Optimisation Degree (Range 1-5):
- Set the number of bend alternatives to compute; higher values offer more options but take longer to process.
- 1: Fastest computation, minimal optimization.
- 5: Slowest computation, maximum optimization.
Front Extend Ratio (Range 0.01 – 1.0):
- This ratio determines the minimum product length that must extend in front of the press.
- Options:
- Comply If Possible: Tries to meet the ratio unless no solutions are found.
- Comply Always: Always meets the ratio but might result in no solutions.
Radius Factor (Range 0.1 – 2.0):
- Adjusts the computed bend radius for correction.
- Affects the X-axis position and blank length calculation.
Tool Length Tolerance:
- Programs the maximum allowed difference between tool length and bend line.
- Ensures the tool is not shorter than tolerance for acceptance.
Minimum Y Opening:
During postprocessing, set the minimum press beam opening required to handle the product efficiently, above the speed change point (Mute).
By adjusting these parameters on your DELEM DA-66T, you can optimize your bend sequence for precise and efficient metalworking.
Assignments – Backgauge possibilities
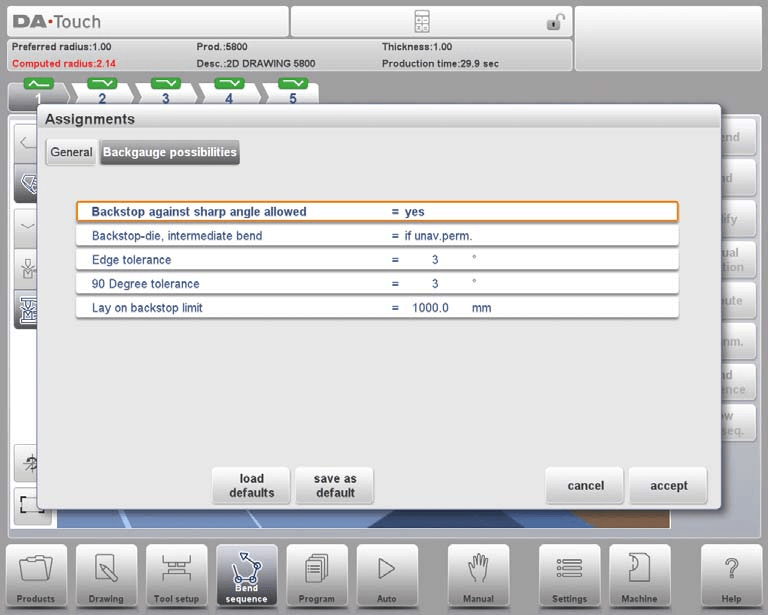
Backstop against sharp angle allowed
Specify if backstop may be placed against an angle smaller than 90°.
• No = not allowed
• Yes = allowed
Backstop-die, intermediate bend
Set to allow if there may be a bend between the die and backstop. Selection possibilities:
• Permitted
• If unavoidable permitted: if it results that no solutions are to be found, than it is permitted.
• Prohibited: never allowed.
Edge tolerance
In case backstop is against flat sheet an angle tolerance is allowed (deviation from horizontal). To be programmed in degrees of tolerance (0 – 90° input).
90 Degree tolerance
The maximum allowed deviation from vertical (90°), when the backgauge is against a bent angle which is not 90°.

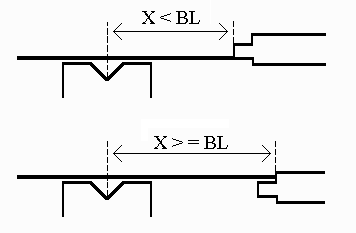
Lay-on backstop limit
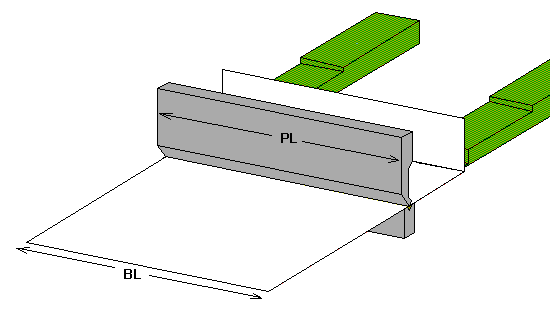
To set up the DELEM DA-66T bend sequence effectively, pay attention to the lay-on backstop limit, especially if your press brake includes backgauge fingers on a moving R-axis. If the sheet length exceeds this limit at the machine’s back, the DELEM DA-66T system will automatically adjust the X-axis and R-axis positions for you. This ensures precision and optimal handling during the bending process.
Show bend sequence
When the function Show Bend Sequence has been pressed, a graphical overview of the bend sequence is shown.

You can adjust the DELEM DA-66T Bend Sequence anytime after making the first unbend. The graphical overview shows both determined and undetermined bends. Use the functions to enlarge, reduce, or rotate each image easily with a finger touch.
Frequently Asked Questions(FAQ)
What should I do if the DELEM DA-66T bend sequence displays undetermined bends?
Review your input data for any inaccuracies. You may need to adjust your tool parameters or material settings to resolve undetermined bends.
Can I modify the DELEM DA-66T bend sequence after starting a project?
Yes, you can adjust the bend sequence at any time. Use the touch interface to make necessary changes and re-run simulations as needed.
How can I ensure accurate results when setting up the DELEM DA-66T bend sequence?
Make sure to enter precise material and tool data, and always validate your settings with a simulation before actual bending.
Conclusion
Setting up the DELEM DA-66T Bend Sequence involves careful attention to detail, from inputting accurate material and tool data to utilizing the graphical interface for precise adjustments. By following these steps, you can optimize your press brake‘s performance and ensure accurate, efficient bending operations.
For further assistance or to delve deeper into the setup process, feel free to reach out to our team or explore additional resources on our website. We’re here to help you maximize your machine’s potential.


