


Are you looking to elevate your programming skills using the ESA S630 Database? You’re in the right place. In this article, I’ll explore how the ESA S630 Database can be a game-changer for your programming projects.
By diving into its features and capabilities, you’ll discover how to utilize this database to its fullest potential, ensuring improved efficiency and outcomes in your development tasks. Whether you’re a seasoned programmer or just starting, understanding the nuances of the ESA S630 Database can provide you with the tools needed to enhance your coding projects.
Understanding Work Data
When using the ESA S630 Database, you can enhance your programming by easily accessing critical work data such as the absolute TDC, Mute, and Pinch Point of a bend.
Simply press the button to open the menu, select item 7 >> Work informations, and a window will display these details. To exit, just press [Ok]. Utilizing these features of the ESA S630 Database ensures precision and efficiency in your projects.
Execution of a Program in Automatic Mode
After setting a numeric program or calculating a graphic program it is possible run it in automatic.
Automatic mode can be enabled by pressing this button

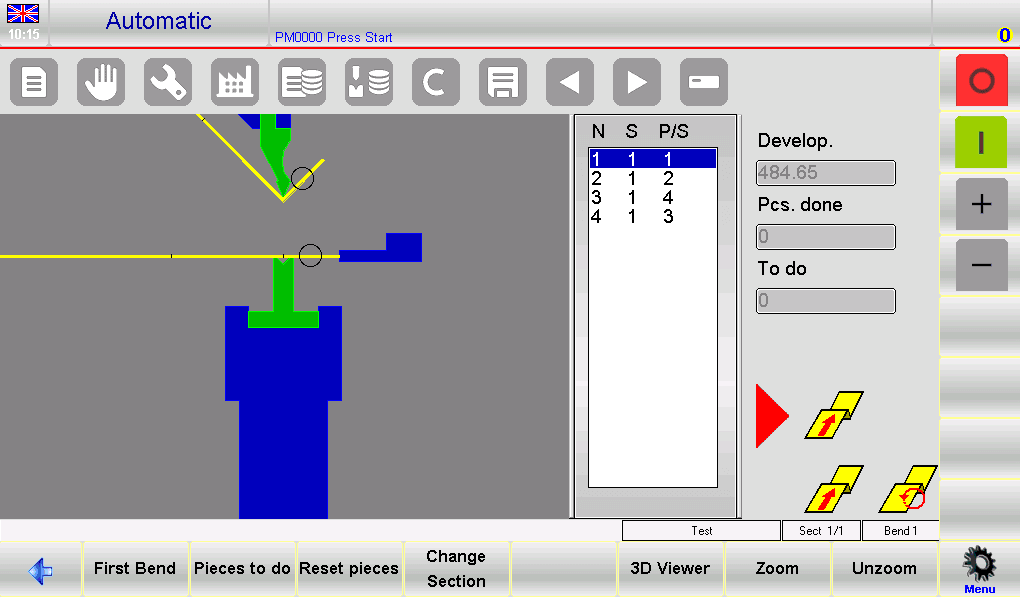
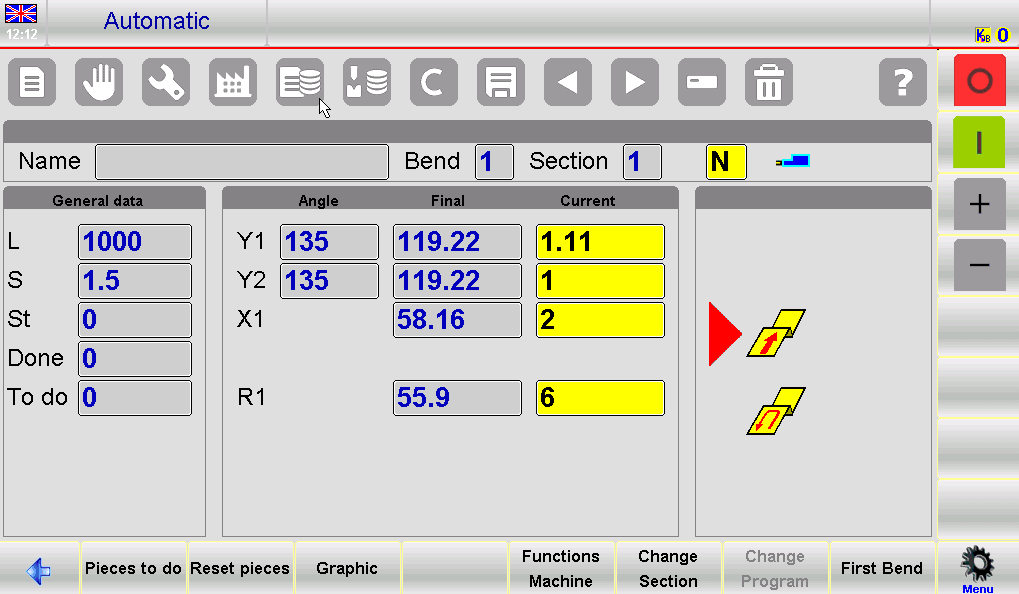
Automatic Graphic Page:
- Access: View the automatic graphic page for calculated graphic programs by pressing [Graphic].
- Main Window: Displays machine parts, punch and die designs, and the piece’s state before and after bending.
- Orientation Window: Guides on piece orientation for each bend, indicating necessary rotations.
- Progress Window: Shows ongoing bend data, piece count, and metal sheet development.
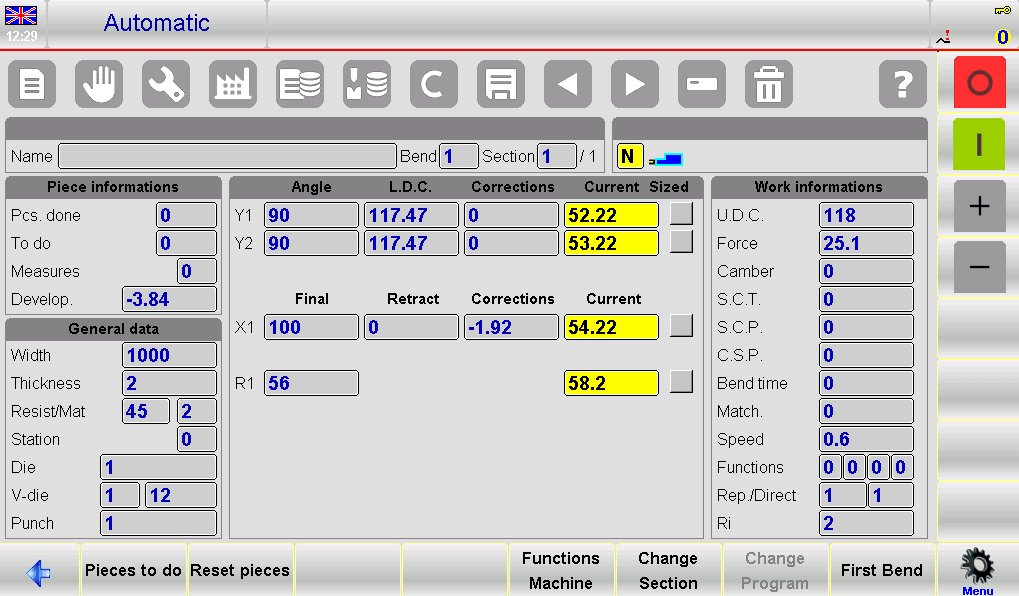
Automatic numeric page:
- Numeric Program Display: Access both numeric settings and current axis quotas. Automatic mode preserves data integrity by preventing changes.
- Enhanced Readability: Easily double the character size for better visibility of axis heights, ideal for managing extensive data.
- Flexible Viewing: Toggle between double and single character sizes with a simple button press for a customized viewing experience.
Carrying out the automatic cycle
Press this button to initiate the automatic cycle, which positions the back gauge axes for the bending process.

Press the down pedal to lower the ram and create the bend, ensuring precise and consistent results. After each bend, the ram automatically returns, and the back gauge axes reposition for the next bend. Once all programmed bends are complete, the cycle restarts seamlessly from the first bend for ongoing operations.
First Bend
Select [First Bend] to establish the benchmark for all subsequent bends within the ESA S630 Database.
Sample Piece Execution
- Adjustments: The ESA S630 Database provides theoretical values. Due to potential sheet metal imperfections, corrections might be necessary.
- Semiautomatic Corrections:
- Use the SEMIAUTOMATIC page for sample pieces.
- Make step-by-step corrections to the bend’s angle or length. Changes are reflected in the program.
- Automatic Procedure:
- Use the AUTOMATIC page for correction procedures.
- Position back gauges and execute the bend.
- Measure and correct bend length and angle as needed.
- Enter corrections in the appropriate column: “Piece“, “Section“,or “Bend“.
Setting Correction Data with ESA S630 Database
Here’s a concise guide on how to efficiently set correction data using the ESA S630 Database, ensuring your projects are executed with precision and accuracy.
- Data Entry for Corrections:
- For back gauge axes, input correction data in millimeters (mm), and for bend angles, use degrees.
- Example: Enter +2.0° for a bend that is closed by 2° or -2.0° if a bend is open by the same amount.
- Adjusting Bend Length:
- If bend length is less than desired, input a positive value in the Corr. X1 Field.
- If greater, input a negative value corresponding to the detected difference.
- Sequential Corrections:
- Consecutive corrections are cumulative; the latest value entered adds to previous ones.
- Example: If initially corrected by +3.0° but still needs adjustments, an additional 1.0° is necessary.
- Individual Cylinder Adjustments:
- Correct angles separately for Y1 and Y2 cylinders.
- General corrections apply the same angle adjustment to both cylinders.
- Benefits of Pitch and Piece Corrections:
- Simultaneously correct pitch and piece data during the same step.
- Example: Combine a step correction of -2.0° with a piece correction of -1.0° for a total of -3.0°.
Steps for Successful Correction:
- Press this button to reposition back gauge axes after correction
2. Execute the bend again and verify its accuracy.
3. If correct, proceed with all bends in the ESA S630 Database program using navigation buttons. If incorrect, adjust current bend data further.
Once corrections for all bends in the ESA S630 Database are finalized:
- Initiate the automatic cycle for the selected bend by pressing .
- Explore new methods for setting corrections as documented.
Harness the power of the ESA S630 Database to ensure your programming tasks are performed precisely, reducing errors and improving overall project quality.
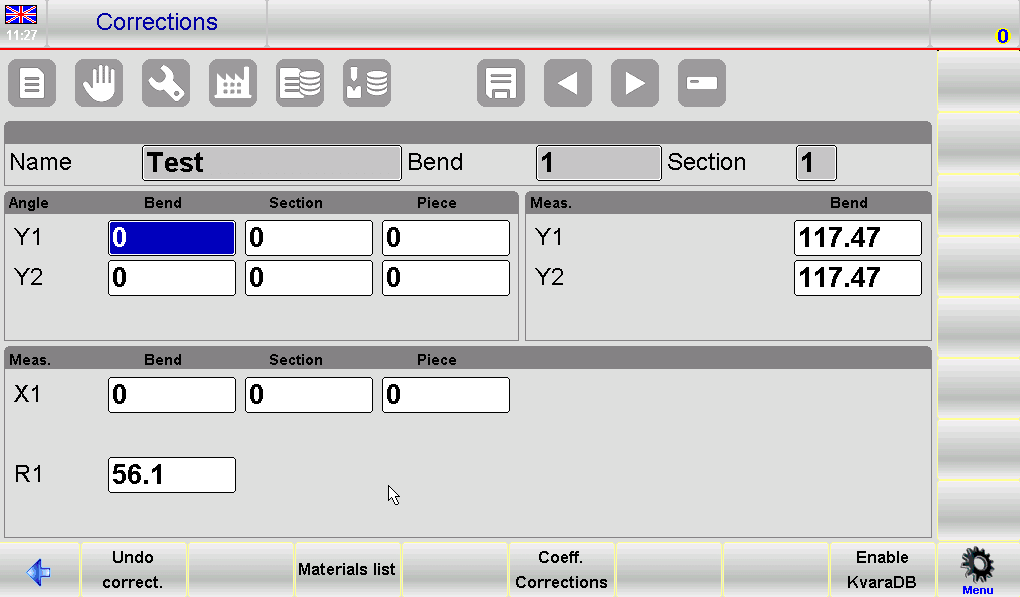
How to delete the correction data:
To delete the changes made to the corrections press the key [Undo correct.]. The values present on opening the page will be restored.
Using a Database (Optional)
General Information
The database uses linear interpolation to fill in theoretical correction values for bends without previously saved corrections. This ensures consistent performance across different bend types, continually enhancing machine learning.
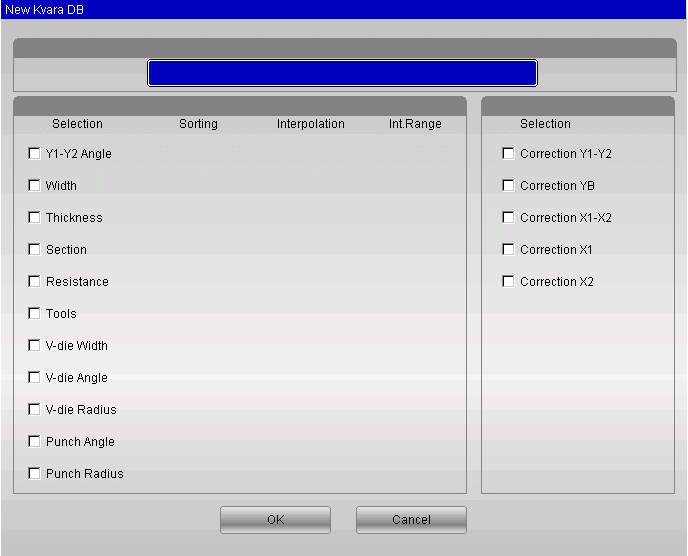
Each ESA S630 Database consists of multiple tables, each corresponding to specific materials. Customize the database by selecting various fields—like bend angle, sheet metal width, and V-die width—when configuring your database.
Fields are categorized into key fields for unique record identification and correction fields for storing associated correction values. Properties such as sorting order and interpolation settings enhance search efficiency within the database.
Example of a database
An example of a database called FERO will be illustrated in this document.
The structure of the FERO database consists of 6 fields, 4 keys, and 2 corrections values:
– (*)Angle of the bend
– (*)Width of the sheet metal
– (*)Thickness of the sheet metal
– (*)Tools
– Correction of the Y values
The asterisks (*) indicate the key fields, the remaining fields represent the corrections acquired.
The tables
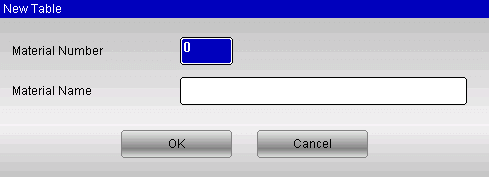
Each table is identified by the number of the corresponding material (from 1 to 99). It is also possible to associate a descriptive text with the table.
All the corrections acquired over time for that specific material are also saved in each of the tables.
Each table generated inside a database inherits its structure, that is, the same key and correction fields and relativeproperties.
How to use the Kvara Database
Enabling the Kvara Database:
- Access the CORRECTIONS Page: Start by navigating to the CORRECTIONS page to manage your corrections.
- Toggle Database Functionality: Use [Enable KvaraDB] and [Disable KvaraDB] to activate or deactivate the database. An icon will appear when it’s enabled.
- Correction Acquisition: When enabled, the ESA S630 Database allows automatic acquisition of corrections on the EDITOR, AUTOMATIC, SEMIAUTOMATIC, and CORRECTIONS pages.
Navigating the Kvara Database:
- Access the Database: Enter the Kvara Database via the Corrections page to manage settings and fields.
- Material Tables: View data in table format, showing the current material’s table or the first available table if not present.
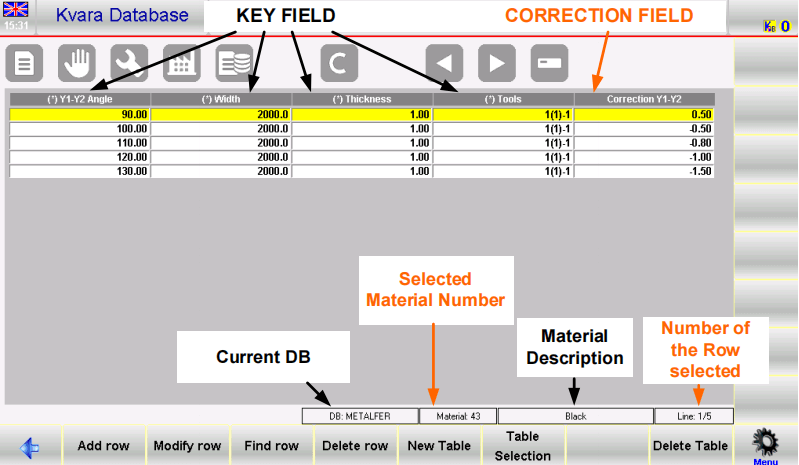
Database Structure:
- Fields Configuration:
- Key Fields (4): Angle of the bend, width, thickness of sheet metal, and tools used.
- Correction Field (1): Correction on the Y-values.
- Tools Field: Lists the die name, V-die number, and punch (e.g., “B(1)-1” means die “B“, V-die “1“, and punch “1“).
By following these steps, you can efficiently manage corrections and optimize processes using the ESA S630 Database.
Operations in the tables
Row Selection and Deletion:
- Tap directly on a table row to select it in the ESA S630 Database.
- Navigate between tables using the arrow buttons.
- Delete a table by pressing the delete button and confirming with “YES.”
Function Key Actions:
[Add Row]: Add a new row to enhance data management.
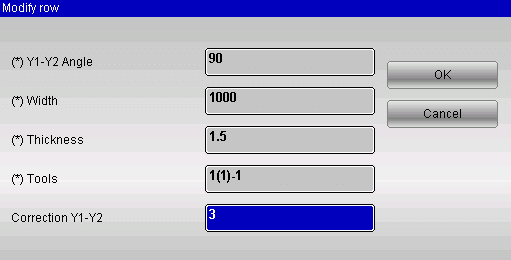
[Modify Row]: Update selected rows with new data corrections.
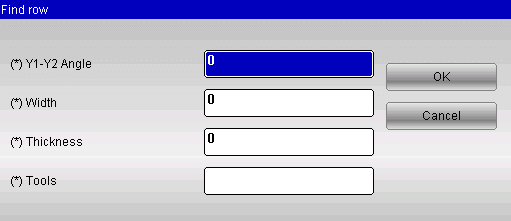
[Find Row]: Search for rows matching entered key values.
[Delete Row]: Remove the selected row from the table.
Table Selection and Properties:
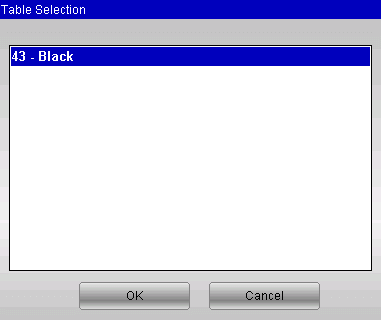
[Table Selection]: Choose a table from a list by tapping and confirming with [Ok].
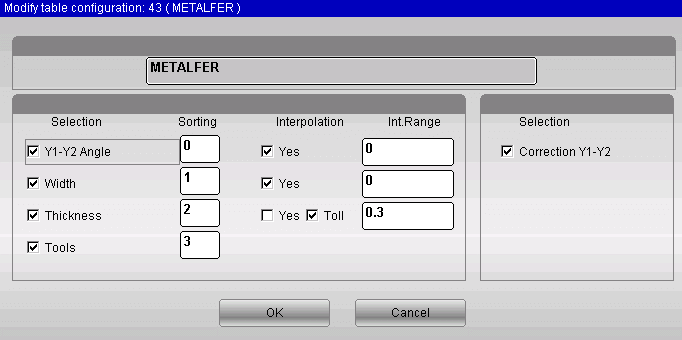
[Material Table Properties]: Adjust properties like field types without changing the table’s structure.
[Change Table Name]: Rename the material description for clarity.
[Save Table As…]: Save the table with a new code and description.
Operating on databases
Following are the descriptions of all the operations that can be performed on the databases. Access to the following functions is possible from the System Menu which opens when you press the menu button.
0>> Create New Database: Effortlessly create a new instance of the ESA S630 Database, where you can customize its structure. This involves naming the database, selecting keys, and establishing correction parameters. You can also configure properties like the sorting index and interpolation settings to improve data retrieval accuracy.
1>>Disable Corrections: Remove specific corrections from the database, focusing only on necessary adjustments.
2>>Modify Database Settings: Adjust key arrangements and interpolation settings across tables for consistent data processing.
3>>Delete Database: Remove unneeded databases from the system for streamlined data management.
4>>Database selection: Easily choose the most suitable database for your current tasks.
5>> Save current DB: Back up your current database to a USB device for security and portability.
6>> Save all DB: Save all databases to a USB device, ensuring your entire data set is protected.
7>> Load all DB: Quickly upload all saved databases back into the system, maintaining data continuity and accessibility.
Correction Management
Acquiring Correction Values
Streamlined Correction Entry:
- Enable the Kvara Database feature in the ESA S630 Database to seamlessly acquire corrections from the EDITOR, CORRECTIONS, or SEMIAUTOMATIC pages.
- Use the [Insert on KvaraDB] function key to record the corrections in the appropriate Materials Table. If the table doesn’t exist, you’ll be prompted to create it.
Avoid Duplicates: Should you re-enter an existing value, the system will ask if you wish to replace the old value to maintain accuracy.
Self-Learning Mode for Efficiency: Enable self-learning mode to automatically capture corrections without needing to use [Insert on KvaraDB] each time. This mode is perfect for new database setups.
Press the [Enable self-teach. KDB] key: the icon for enabling the KvaraDB will be displayed in the top right hand corner:

KvaraDB enabled in normal mode

KvaraDB enabled in self-learning mode
Using the correction values
Automatic Correction Integration
Once the Kvara Database is enabled, correction values are automatically found and applied in numeric and graphic programs. Any changes to key data in the Editor or Semiautomatic pages prompt the system to fetch corresponding corrections.
Interpolation of the Data
The database performs linear interpolation to fill in missing correction data. It averages values when higher and lower value records are found. You can define the interpolation range, which determines the distance between these records.
Thickness Tolerance
Use thickness tolerance to apply database corrections to bends with slightly different thicknesses. Corrections are made only when a thickness within the specified tolerance is found in the database.
Materials Table
How to enter the materials Table page:
To access the Materials Table page follow the steps below:
– enter the Corrections page by pressing this button

– press the [Materials list] key
The page appears as illustrated in the figure:
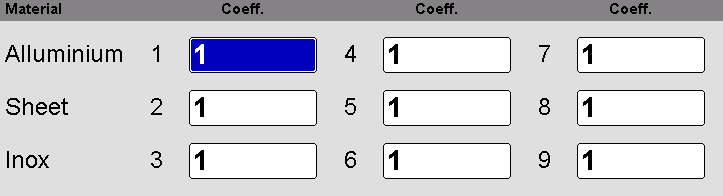
How to use the materials coefficient:
- Open the Materials Table page in the ESA S630 Database.
- Enter coefficients to correct material stretch calculations.
- Default value is 1; adjust to change stretch (e.g., 2 for double, 0.5 for half).
How to disable the calculation of the stretching:
- Set all coefficients to 0 to stop calculating stretch.
- Disabling this means no X corrections in numeric programs and exact segment sums in graphic programs.
Save and Upload Coefficients:
- Press save to store coefficients in external memory.
- Use [Load from disk] to upload from a USB device.
- Save or load all coefficients using [Save ALL] and [Load ALL] functions.
Utilize the ESA S630 Database to effortlessly manage material behavior and optimize your programming projects.
Frequently Asked Questions(FAQ)
How can I ensure data security when using the ESA S630 Database?
Implement strict access controls and regularly update your database security settings. Employ encryption for sensitive data, and use secure protocols for data transmission. Regularly review user permissions within the ESA S630 Database and conduct security audits to prevent unauthorized access.
Can the ESA S630 Database handle large-scale applications?
Yes, the ESA S630 Database is designed to support large-scale applications. Its architecture allows for scalable solutions, capable of handling a significant amount of data and high user traffic without compromising performance. Review the scalability options provided in the database documentation to properly configure your setup.
Conclusion
In summary, the ESA S630 Database is a powerful tool that can significantly enhance your programming capabilities. By leveraging its extensive features and resources, you can streamline data management, improve code efficiency, and develop more robust applications. Understanding how to effectively utilize this database will enable you to unlock its full potential and leverage its strengths to achieve better programming outcomes.
For more detailed information or specific inquiries, feel free to contact our team. We are here to assist you with any questions and to provide further guidance on optimizing your use of the ESA S630 Database. Additionally, don’t forget to explore our other documentation to gain deeper insights and knowledge on related topics.


