


If you’ve been searching for a way to master ESA S640 programming basics, you’re in the right place. The ESA S640 is renowned for its efficiency and precision in managing metalworking tasks, particularly in programming sequences for press brakes. Understanding the fundamentals of this system is crucial for optimizing performance and ensuring high-quality results in your projects. I’ll guide you through the essential aspects of ESA S640 programming basics, focusing on techniques that will enhance your ability to efficiently set up and execute programs. Whether you’re just starting or looking to refine your existing skills, this article will provide the insight needed to elevate your expertise with the ESA S640.
Understanding the List of Programs
Accessing and Navigating the List
Step 1: Enter the program list by pressing the button on your ESA S640 controller.

You will see a window with a list on the left, program data in the center, and a preview on the right.
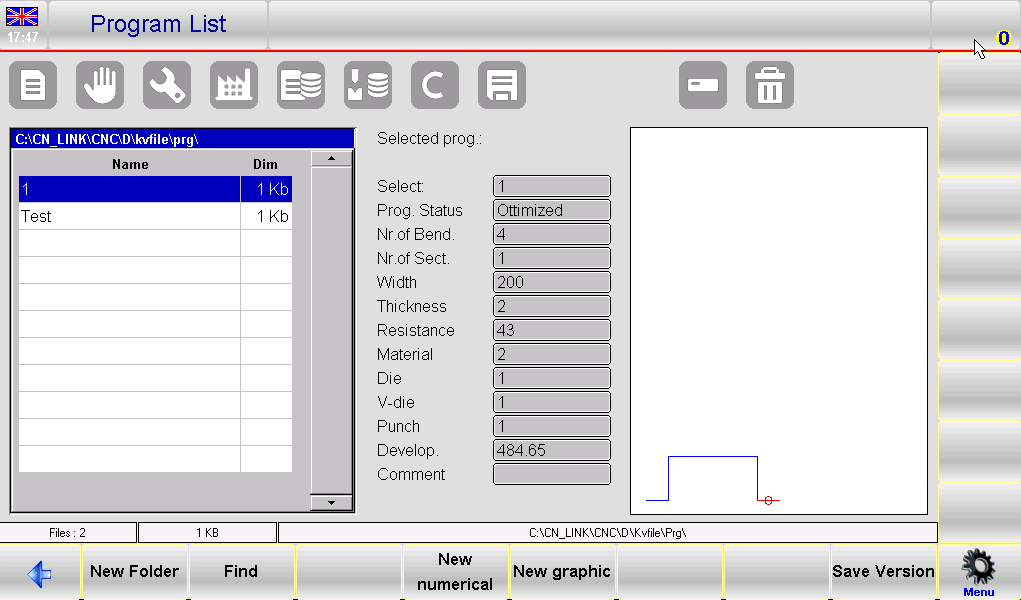
Step 2: Use the scroll bar to navigate through the available programs.
Step 3: Utilize function keys such as [New Folder] for organization, [Find] for searching, and [New Numerical] or [New Graphic] for creating new programs.
Managing Program Previews
Step 1: Enable or disable program previews by entering the menu and selecting 4>> Preview.
Step 2: Re-enable the preview by repeating these steps if it has been disabled.
Essential Program Management Skills
Copying and Renaming Programs
Step 1: To copy a program, select it with your finger, open the menu, choose 0>> Copy, and enter a new program name.
Step 2: For renaming, select the program, open the menu, choose 1>> Rename, and enter the new name.
Saving and Deleting Programs
Step 1: Save a program to a USB device by selecting it and pressing the button.

Step 2: To delete a program, select it and press the button followed by [Yes].

Saving all the programs on the USB device
This allows you to save the programs on the USB device in order to then transfer them to another control (this also allows you to create backup copies). Insert a fat32 USB formatted device with enough space for containing the programs into the USB port:
- Press the Menu button to open the menu.
- Select the item 2>> Save programs .
- All the programs will be saved on the USB device.
Deleting all the programs
This allows you to delete all the programs. Follow the steps below:
- Press the Menu button to open the menu.
- Select the item 3>> Delete programs .
- All the programs will be deleted (you will be asked the confirm).
Programs list on the USB device
This allows you to view the program list on the USB device. The possible operations are the same as for the tool list therefore it is possible to copy, rename and delete all the tools present on the USB device. Select the program list and follow the steps below:
Insert the USB device containing the programs into the USB port.
- Press the button.

- The programs list on the USB device will be displayed.
- Execute the desired operation.
Saving a program from a USB device to NC
This allows you to save a program on NC from a USB device in order to be able to download it from another control. Select the program you wish to save with a finger and follow the steps below:
- Press the button.
- The program selected will be saved from the USB device to NC.
Saving all the programs from a USB device to NC
This allows you to save the programs on NC from a USB device in order to be able to download them from another control. Follow the steps below:
- Insert a USB device containing the programs into the USB port.
- Press the button.
The programs list on the USB device will be displayed.
- Press the button to open the menu.
- Select the item 2>> Save programs .
All the programs will be saved from the USB device to NC.
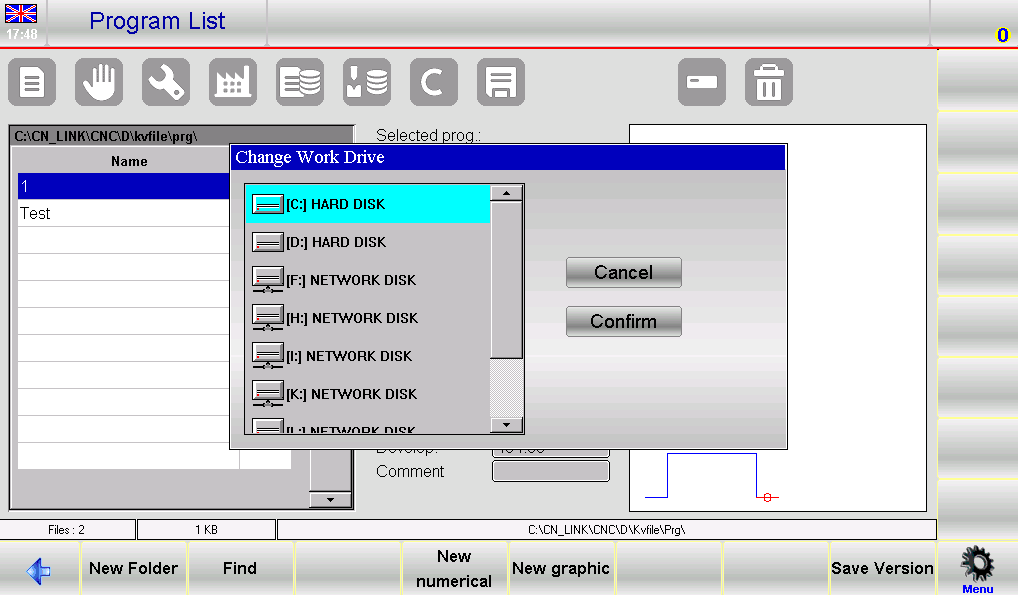
Changing the work unit
This operation can be performed in the following sequence:
- Press the button to open the Program list.
- Press the Menu button to open the menu.
- Press 5 >> Change work drive.
- Select with a finger a work drive from the list
Entering a Numeric Program for ESA S640
Step 1: Begin with the Editor
To start entering a new numeric program, navigate to the Editor page on your ESA S640 interface. Select [New Numerical] to initiate the process.
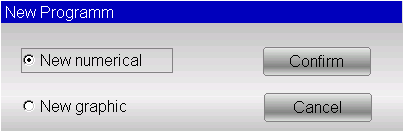
This is a fundamental step in mastering the ESA S640 Programming Basics as it allows you to define the essential parameters of your program.
Step 2: Input Sheet and Material Data
Once you have created a new program, a window will appear prompting you to enter key data:

- Sheet Width: Enter the width of the metal sheet to be bent. This is a critical factor in ESA S640 Programming Basics.
- Thickness: Input the metal sheet thickness, ensuring precise bending operations.
- Material Resistance: Set the resistance level based on the material type:
- Aluminum: 0 to 30
- Iron: 31 to 50
- Stainless Steel: Greater than 50
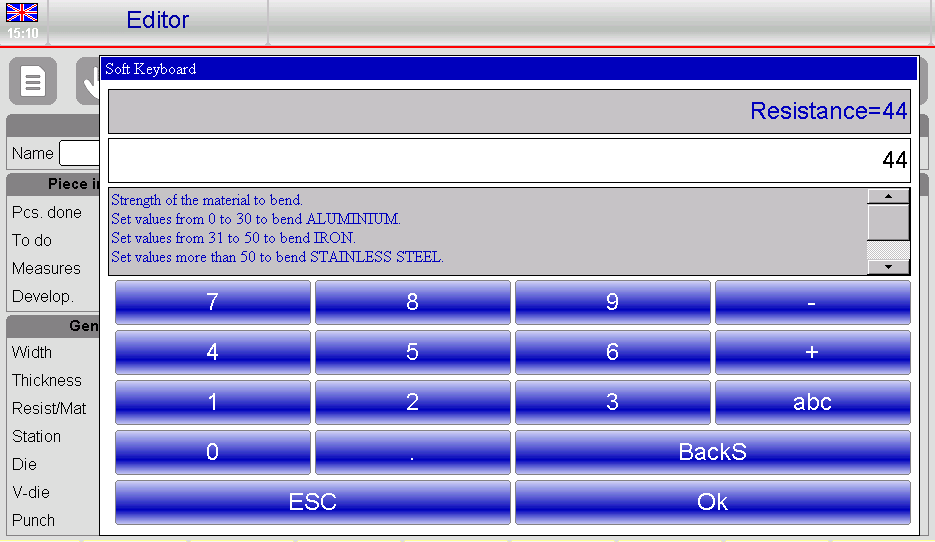
These inputs are integral to the ESA S640 Programming Basics as they influence the overall bending process.
Step 3: Select Dies and Punches
Navigating the ESA S640 system also involves selecting the correct tooling:
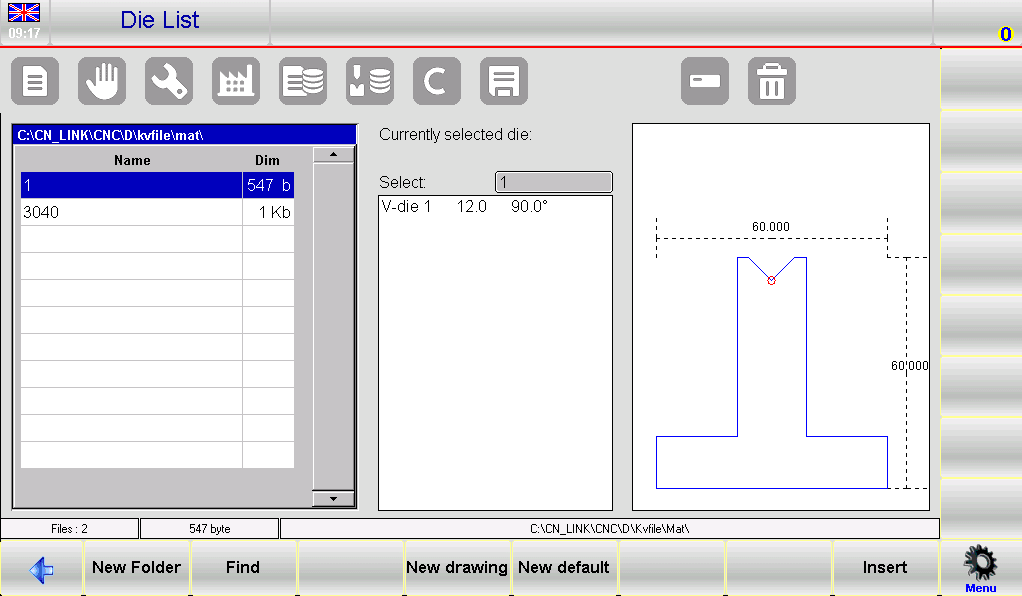
- Choose a Die: Access the list and select an appropriate die. Ensure the die is pre-drawn in the system by scrolling through the toolbar and pressing [Insert].
- Select a V-Die: Specify the V-die to be used for bending. If there is only one V-die, enter ‘1’.
- Pick a Punch: Finally, select the necessary punch from the list. Like the die, the punch must also be pre-drawn in the system.
This step reinforces your grasp of ESA S640 Programming Basics, ensuring you have the right tools for the job.
Setting the Bends
When programming on the ESA S640, setting the bends accurately is crucial. Begin by positioning the cursor in the fields designated for bend settings. Each bend requires specific inputs:
- Enter the desired bend angle in the Y1 Angle field.
- Specify the bend length in the Final X1 field.
The ESA S640 control will automatically compute additional data, but these can be adjusted according to specific needs, ensuring full flexibility and precision in your ESA S640 programming process.
Accessing Work Data
To master ESA S640 Programming Basics, understanding the work data related to each bend—like the absolute T.D.C, Mute, and Pinch Points—is vital:
- Navigate to the desired bend.
- Open the menu and select 7>> Work Information.
- A window will display the necessary work data. Exit by selecting [Ok].
Copying and Entering Bends
Enhance your ESA S640 programming by efficiently copying and entering bends:
- Copying a Bend: Select the desired bend, use the menu to choose 5>> Copy step. This creates a copy at the section’s end.
- Entering a Bend: To insert a bend, select a position after the desired entry point, then use 4>> Insert step.
For entering a copied bend on your ESA S640, follow similar steps and use the copy function to duplicate the bend precisely where needed in the section.
Defining a Radius Bend
Incorporate radius bends into your ESA S640 programming with ease:
- Activate radius bend assistance through the numeric program’s data entry window.
- Input the desired rolling angle, radius, pitch length, and initial stop position, confirming each entry.
Correct any inaccuracies by measuring angle differences, ensuring that each bend meets the specified parameters.
Optimizing Dutch Folding and Coining Operations
For ESA S640 programming basics, learning Dutch folding and executing coining operations improves work efficiency:
- Dutch Folding: Enter 0.0 in the Y1 angle field to define such bends. Corrections involve adjusting the L.D.C. of Y1 rather than altering angles directly.
- Coining Operations: Perform these manually as they aren’t available in automatic calculation modes. Adjust force applications directly on the Editor page.
For coin corrections, an alteration in the lower dead point of Y1 and Y2 might be needed to achieve the desired bend precision.
Implementing Conical and Other Specialized Bends
Leveraging the ESA S640 Programming Basics includes understanding advanced bending forms:
- Conical Bends: Set the X2 axis for conical operations. Enter your stop position in the X1 Field and the conical angle using the secondary menu.
- Specialized Bends: Create out-of V-die bends by adjusting values directly in the L.D.C Y1 and L.D.C Y2 fields, ensuring all numeric controls follow a logical, descending order.
Program Saving and Updates
To complete your mastery of ESA S640 Programming Basics, regularly save and update your programs:
- Saving Programs: After configuration, save the program by entering a name and confirming the entry.
- Updating Programs: If tools change, update your program to recalibrate all data. Use the menu to select 3>> Program update and save changes as required.
By integrating these strategies into your workflow, you will effectively master the ESA S640 Programming Basics, ensuring both peak performance and enhanced programming efficiency.
Frequently Asked Questions(FAQ)
What common mistakes should I avoid when learning ESA S640 Programming Basics?
Avoid skipping over initial setup steps and neglecting manufacturer guidelines. Ensure you are consistently applying ESA S640 Programming Basics to avoid long-term errors and operational inefficiencies.
How do ESA S640 Programming Basics improve the bending sequence accuracy?
By mastering ESA S640 Programming Basics, operators can input precise parameters and sequences, leading to improved accuracy and consistency in the bending process, thus enhancing overall product quality.
Conclusion
In mastering the ESA S640 Programming Basics, the key steps involve understanding the program list and numeric entry methods, diving into graphic program capabilities, and effectively calculating the bending sequence. By grasping these fundamental aspects, users can enhance their operational efficiency and precision in using the ESA S640 model.
For those eager to deepen their understanding or need further assistance, we encourage you to contact our support team for personalized guidance. Additionally, explore our extensive documentation to learn more about advanced programming techniques and best practices. Your journey to mastering ESA S640 programming starts with taking these proactive steps.


